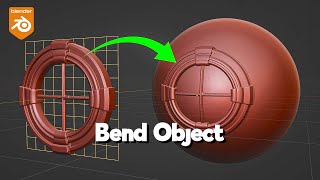
Wrap geometry on a surface in Blender.

ฝัง
- เผยแพร่เมื่อ 10 พ.ย. 2020
- In this short clip I show you how to wrap a flat mesh detail onto a curved surface.
This technique can be handy when doing hardsurface modelling when you need to project a mesh detail to a surface.
MACHIN3tools addon:
github.com/machin3io/MACHIN3t...
Not an affiliate link(Hardops):
blendermarket.com/products/ha... - วิทยาศาสตร์และเทคโนโลยี


In other words:
Set your object as a child to a plane (with enough plane geometry for deformation),
Add "SURFACE DEFORM" mod to your object, set plane as the target, and "BIND IT"
Add "SHRINKWRAP" mod to the plane, and set it's target object.
Thank you 💙
ive copy en pasted yr awsome quick to the point paragraph thankgoo
Thank you. A 6 minute video to cover a 30 second task.
I have just used your method for cheese on top of burgers meat. But I had to add Solidify modifier to the cheese plane with negative thickness in order to make it look better.
@@RealDaveWinter beginners also need to undesrtand
This would be perfect for clothing features on a character, buckles pockets and the like. Awesome tutorial thank you!
Bro this is the exact reason why I was looking for this tutorial 😂
I can't tell you how incredibly useful this was. THANKS SOOOO MUCH!
I have been searching for this answer in blender for 2 years. I've watched hundreds of videos and everyone is projecting and that never works.
My mouth fell open when you parented it to the plane. I've also never seen that loop boxy thingy lol I'll come back to it another day. Your method is so simple. This is perfect for adding logos to anything! Brilliant, absolutely fantastic, SUBBED. 💓 Looking forward to what you do next!
Really cool, and well explained!
And you know what? You could probably even take it a step further. In your example you had all the loopcuts on the plane distributed evenly, but there might be some objects you want to bend more than others EX: You want the fabric parts of the buckle to bend, but not the metal parts. You could place the loopcuts exactly where you wanted the bends to happen, and the rest would be taken care of automatically
Thanks for the suggestion man, I'll try and incorporate that into my workflow.
@Zach
Did you try this? Very cool idea.
@@Hitsujioyaji I did an experiment just now and it seems like it's causing some weird artifacts. In theory it _should_ work, but I'll have to mess with it some more
@@ZachHixsonTutorials were you able to figure out how to do it without causing weird effects?
@@flowercollector9013 a little bit. Seems like the closer the mesh is to the surface before you shrinkwrap the better the result is, though it doesn't always fix things 100%
Elegant solution to wrapping an object to a curved surface!
great tip... if anyone have a problem to follow along with a simple cube, like me, all transformations had to be applied in first place before modifiers plays their role... it works even if the plane not in the middle of the geo...
OMG OMG OMG. THIS! I couldn't for the life of me figure out what was going on until this comment made me apply everything to both my plane and my cube. Thanks so much.
Phenomenal.
Thank you so much for this 💪🏾💪🏾
Wow. I would have never thought of this! Very clever. Thanks for the tutorial.
The proper definition of good service! Thank you.
Excellent! Just what I was looking for to complete a project I'm working on. Thank you.
Joe Gay Cool !
Perfect! Just what I was looking for.
Thank you! Been looking for such a technique
This worked perfectly for me in blender 4.0 THANK YOU SO MUCH!
Really cool technique. You should do more tutorials like this.
I plan to. Thanks.
This is exactly what I was looking for! Thanks a million!!!
Excellent! Very informative and to the point!
wow, awsom, it is pointing me in the right direction to get this to work.
Thank you, thank you, thank you, infinite thank you...
I have tried so many options but none seemed to work at all but this one, thank you so much.
It worked perfectly. ♥
Dude, this was amazing.
Thanks, this was exactly what I've been struggling with !
Very nice and easy technique. I will refer to this video often. Cheers mate!!
Thanks for the video! Straight to the point and functional!
Such an awesome tutorial, what a lifesaver!
underated feature , thanks
Very useful tip, thank you for sharing.
You can actually use lattice the same way. Just remove It's height so It's flat like a plane and you can shrinkwrap it just like a regular object.
thanks
Great trick to have under the belt. Thanks!
Realy cool info, thanks a lot!
Been looking for this thank you!
Awesome! Simple and effective.
Exactly what I needed! Thanks
I was struggling so hard thanks a lot
Great tutorial! Thanks!
Nice idea. Thanks mate.
you are doing a great work
keep it with blender
Finaly, been looking for this!
Glad I could be of help.
You incredible human being I hope you have an amazing day, week, month, year, and life. THANK YOUUUUUUUUUUUUUU
Thankyou so much, I’ve been looking for a tutorial for so long
Thank you very much !!! Very efficient and easy to use
Glad I could help.
3 minutes of what is not a solution. For a video that finally starts for those who wondered : at 03:03
Very useful. Thanks.
Good tutorial, thanks for the knowledge ^^
saved my actual life thank you!
excelent. Exaclty what i was looking for. Thank you !
Super job. Makes total sense. I was searching for an answer and this provided it. I'm subscribing.
so cool . many thanks
Excellent! Thank you!!
Nice idea, thanks
it's just magic!!! Thank you !!!
Man, Thanx a LOT!!! This really helps!
Perfect! Thank you!!!!
this was really useful thanks. I was wondering how to put filigree on amor and things like that
remember to apply scale and rotation
thanks for the tips! That really deformed the geometry quite nicely! I don't think I was able to get it to work with curves but could probably do something similar with verts + skin modifier. Anywho! Thanks!
Wow man, Thanks for the tutorial.
All this time i had tried modelling while it being curved,lmao.
Hello Enigma Studios!
Did the shrink wrap change the geometry of your single parts of the model ("chain") after bending the plane? Or your original object was just bent on the connection point?
Thank you :)
AMAZING
Impressed!
Perfect, tank you very much!!!
You did a good job. Thank you. N
Very Thanks, excelente class.
Thanks!
THANK YOU!!!
Good! Thank you!
I'm glad.
Another way is select edge path on the surface, duplicate it, convert to curve and fit your object on curve
So i need to use curve modifier right?
I get stretching on the ends is that common?
Dangerously based, thanks.
Awesome really! 😍😍😍😍
thank you
I feel like this could've been summarized in 3 lines. Oh wait, someone did that in the comments.
Amazing~~~
Awesome!!!!
Love you Bro....
Perfect for those who want to digitally kitbash warhammer minis
just a question. Why didn't you shrink wrap the geometry to the sphere directly? Does it make the shrink wrap easier to work with? I am just a beginner of sorts, so asking to understand the fundamentals here. @enigmastudios
Yes that works if you have a geometry without details in the vertical direction- like a flat shape, which you can solidify later, but doing so on a regular geometry flattens the details to plane shapes. You can try it yourself.
Exactly. I have been looking for a solution where my object is not a plane.
thx a lot
I can't figure out where and how to download the machine3tools please help? All I see is some complicated listing which is the right one?
Its not crucial for this demonstration, I was just saying not to confuse anyone but you can go the github link download the code as zip file and install it like any other addon - github.com/machin3io/MACHIN3tools/archive/master.zip
Genius!
Guys, Alt + Middle mouse click to recentre your viewport on your required location. You're welcome :)
In rhino you can do this in three easy steps. Place your geometry over a surafce and use the command "flowalongsurface" and choose your desired surface even if you have complex geo or pattern. I doubt Blender can 360° wrap a pattern around a sphere or maybe a dome.
Очень круто, спасибо :)
Thanks bro
thenksss :")
Brilliant! this is exactly what I had in mind to make life easier! THANK YOU!
just wondering... (as I’m literally a newbie)
if the plane mesh isn’t centred to the intended target-object, will it act like an offset?
so instead of having the target-object being slightly sunk into the operator-object it could sit on top of the operator-object.
Best way to find out is to try it. You can customise where you want the geometry origin to be by placing the 3D cursor anywhere you like then outside of edit mode selecting your object and going into "Object > Origin > Origin to 3D cursor"
Yes it will offset the mesh and produce some distortions. If you actually want to offset the object you can change the offset value in the shrinkwrap modifier.
@@LucidCog aaaah yes of course, that’s even better... the actual offset for the shrink wrap makes perfect sense.
thanks heaps brother! 😎🤙🏼
@@MonsterJuiced awesome, thanks mate ✌🏼
Delightful ...
nice
I just realized that I don't have enough life left to learn this program... What an odd and disturbing revelation.
hey how are you doing
how can i get rid of the plane? for 3d printing
Just apply the modifier, Unparent and keep transform, delete the plane.
i have a cube, t doesnt shrink wrap with my sphere? 4.50?
Maybe you don't have enough geometry. Subdivide it a few times.
3:30 video start
works up till the shrinkwrap, then my object doesnt follw along. 😞
I can not get the shrink wrap to apply properly , my object gets completely deformed, it does not kep the shape after the wrap ( it has 37.000 tris )
:-(
I should be doing something wrong if every body gets it well.
I'm not sure I understand what happened.
Jump to 3:45 to see how to do it.
WOW!
Actual explanation starts at 3:03 for those who are interested
Thank you
Yeah
Smart
The tutorial starts at 3:02
If you don't want to fall asleep , play the video with increased speed.
very confusing! especially after applying the curve modifier it´s just fast forward... not good
Loved it! though this could have been a 15 second video
Another blender video without a cycles render. I must be asking too much.