Beginner Series: Etching - Applying a Toner Transfer Resist

ฝัง
- เผยแพร่เมื่อ 1 ส.ค. 2024
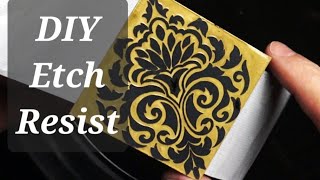
- Many of my pieces begin with a beautifully etched design. Over the years I have found what works best for me and thought I would share my process with you. This video focuses on applying a resist to sterling silver using a toner transfer method with glossy magazine paper.
The next video in the series will focus on the actual etching process I use. This toner resist can also be used for base metals, but this video series focuses on sterling silver.
See my available pieces at torchstonejewelry.com/
MATERIALS NEEDED:
Design to transfer
Glossy magazine paper
18g or 20g sterling silver sheet large enough for the design
TOOLS/PRODUCTS USED:
Image Editing Software (your choice)
Warm Ammonia Solution for cleaning (recipe below)
Ultrasonic Cleaner (optional): amzn.to/3t1Dycq
Jeweler's Soft Brass Brush: amzn.to/3tcA870
Green Scotch Brite Pad: amzn.to/2KS9E9k
Nitrile Gloves: amzn.to/3addYc3
Denatured Alcohol
Paper Towels
Laminator: amzn.to/3r0l2Qa (pricey but the closest to what I use)
Carrier Sheet for Laminator
Container for water
Vinyl (my preference is Oracal 651): amzn.to/2Md7zWj
Backing sheet for vinyl (save sheets)
Agate Burnisher: amzn.to/2YigIze
Clear Packing Tape
String
DISCLAIMER: Links included in the Tools/Products Used list are affiliate links. If you purchase a product or service with the links that I provide, I may receive a small commission. There is no additional charge to you! Thank you for supporting my channel so I can continue to provide you with free content.
RESOURCES:
www.amazon.com/
www.riogrande.com
AMMONIA CLEANING SOLUTION RECIPE:
2 cups water
2 tbsp. ammonia
1 tbsp. Dawn original dish washing liquid
Mix all ingredients together and store in a tight container. Best if used warm. - แนวปฏิบัติและการใช้ชีวิต


Such a great video: complete, clear, and at a pace that was easy to follow without being boring. You gave me everything I need to enjoy this process. Thanks.
Thanks so much for the feedback. I'm so happy you enjoyed it. Do you have plans for a specific project? Would love to see what you do with it.
Great presentation. Good tips and tricks from an experienced artist. Logical info presented at a good pace, not too much or little. Thank you so much. Looking forward o your other presentations!
Fantastic instructions! Thank you :)
Thank you so much Gillian and you are welcome!
I just happened to find your vid on FB. Really great work. Etching can be tricky business, but you sure make it look easy. Your content was true to the title, but I would have loved to see the results...maybe even the finished piece.
Thanks Lola! You are in luck. I just posted the second part of the video series that shows you how I etch the piece. The results can be seen there. You can find it at th-cam.com/video/pxUqG38jYu4/w-d-xo.html. Hope this helps!
Great tutorial. Is there a alternative paper to use beside glossy magazine page?
This is the best video I have seen by far of etching sterling silver. Thank you so much for your effort and time to make this!
May I ask, was the silver you used 925? And where can I buy sterling silver sheets because I don’t have the possibility to make my own sadly.
Thank you! The silver I use is 925 and you can purchase sterling silver sheet from Riogrande.com.
Really great tutorial. Hope you have got a good mic and muffler now?
Thank you for sharing!! Is the etching then done with an acid?
If you used vinyl on the back, and you have a cricut, then why not use that to cut out your design in vinyl a d use that? Is this way just faster than picking out all the negative space?
I’m trying to do this again, it’s been a few years… I’m struggling to get the toner from the paper to the metal (and I have everything except the alcohol is the alcohol absolutely necessary? I’m so frustrated it’s not even funny 😂😅
Hi Tammy. Thank so much for sharing your knowledge. I believe you are using an HP12W LaserJet. It is no longer available. Can you recommend a printer?
Hi Debbie. You are very welcome! I really like HP printers, so I would recommend something like the HP LaserJet Pro M118dw that uses the original HP toner cartridges.
Do you think you could use an iron on a low setting instead of a laminator? Is the only purpose of the laminator heat?
Yes, you can use an iron. The purpose of the laminator is to provide both consistent heat and pressure. Here's an article that may be helpful: www.robotroom.com/Toner-Transfer-Etching-2.html. Good Luck!
can you recommend a laminator that is currently available? thank you.
Hi Susan. The laminator I have is no longer sold, but I have heard good things about the laminator recommended here: pcbfx.com/main_site/pages/start_here/laminator_info.html?fbclid=IwAR0b0meNL7ogWeQaqVfKfkLTa0hCC58xk3CYsz_hiNDkUrsp5Y-Kofyg6Es
Which ammonia did you use?
I just used regular household ammonia you can find in your local grocery store.
Good information and good narration but you don’t need to show every single part of the process. Like, we get that it needs to go through the laminator multiple times but don’t need to see you do it, whether speeded up or not.
Thanks for the feedback. I'm still new to the video process, so I'll keep that in mind for future videos. I do appreciate you watching and taking the time to comment.
Actually I think that it is the most helpful video on this process that I've ever seen. And I think that showing everything made it better - because sometimes people cut videos a lot and don't show every part of the process, e.g. just say something like: "oh, and of course I've already cleaned the piece before with my cleaning solution" - and some people watching may miss some parts of the process (that was just an example, haha). I've never used a laminator before, of course there's nothing difficult in using it, haha, but actually before watching the video I thought it may be more complicated.
So I think that if you really care about getting everything right about (in this case) etching you can always spend like 1 minut more, watching things that may be obvious to you... But maybe for someone else it will be more helpful to see just everything :)
And @Tammy Baalman, I really don't know how to thank you for this tutorial! I had troubles with getting the results I wanted and now I see what I can improve :> I bought the laminotor and I'll be testing your technique today!
@@eloelo717, thank you for taking the time to let me know that seeing the entire process was helpful to you. I know everyone is at a different skill level and what works for some doesn't work for others. I did approach this series as if you had never done any of this before and particularly for the visual learner. I wish you lots of luck with your trials and I would love to hear how it goes for you!