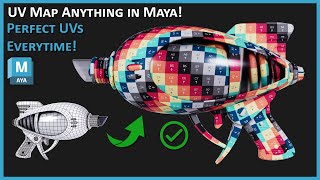
Master 3D Modeling and Topology Today! www.onmars3d.com/ Discord: discord.gg/vybvJnEeya And my Patreon: www.patreon.com/OnMars3D for all my project files, 3d models, bonus videos, Discord and more or just to support this channel 🙂 Check out my new 'UV Map Anything in Maya 2025' here: th-cam.com/video/EriiuMPx22Y/w-d-xo.htmlsi=vtsOPGKvTwvmS6mK *Make sure to Delete History and Freeze Transforms first!
Dude this is probably the most helpful Maya video I have ever seen about UV unwrapping. You explained it so simply and executed the process in what felt like mere seconds compared to all these other confusing ways.
For those not getting similar results make sure before you start unwrapping, that you "freeze transformations" and "delete history by type" for the object(s) you are going to work with.
The key is how visual he teaches all of this, deleting the default UV and then make it like the camera is such a great idea, then separating the cute like visually “uncapping” the hammer also helped, it’s like breaking down into pieces!
This video was perfect for what I was doing. I didn't realize who it was when I clicked it, but then I recognized your voice! Thanks for the great channel!
What a great way to go about it. Your method is so simple and so effective, I never thought of doing a camera based UVs first and then just slicing up pieces
I'd like to say, we really appreciate your kindness in sharing these tutorials, your videos are to the point, no waste of time, precise at the same time, clear and easy to follow. Bless your heart and take care :)
You're getting a like, a subscribe and a comment for the algorithm. These are the kind of videos I need. Simple, straight to the point, easy to understand. No faffing around. Love it. Thank you.
thank you so much for this tutorial - i had a class on this and got soo frustrated because no matter what i tried i couldn't get the results i wanted. this tutorial helped me so much in understanding how to uv map!
Thhhannnnnnnnnnk uuuuuuuuuuuuuu :O I love you! You explained it so well. My university teacher make these videos that lasts 2 hours everyweek and you just explained it all so simple in 10 minutes! I was crying all day because I have a midterm tomarrow! If only I had saw your video earlier...
Happy to help! I'm guilty of lecturing for too long, especially if I'm excited about the subject but sometimes, breaking it down into simpler concepts is the better way to go.
This is a useful advanced method simplified. I'll try it when we UV Map our Lego Models for our finals in class. Right now, we're using basic projections with "Planar" and "Unwrap" revisions as we practice with cereal boxes.
This did help me quite a bit I did not use the exact technique you are doing but I had no idea the camera based button existed and I’ve been taking 3D classes for 2 years!
Thats very easy man im Professional Modelor but i had never come with these path and coz of this i took interest from now on unwrapping...thanks man ..u deserve everything
Probably the best Maya UV video I've seen so far. So many other videos just use one of the default pre-UVed primitives. I didn't know where to start in Maya and none of my cuts/seams were being created, needed to see that you start from camera based to generate the initial UVs in the tile. I was just deleting them and wondering why seams weren't appearing and why it wasn't unwrapping anything. Thank you!
Thankyou so much.... None could teach better than this on youtube, as much as i could find out. You helped me alot for my exams as i was a little confused on uv's and couldn't understand much on 3d due to this covid. Online teaching sucks of our university, but i could see you as a helping hand. Thanks again :)
Awesome. I will give this a shot. I am doing a 3D modelling course and I didn't fully understand how this worked. They showed me taking uv using cylindrical and planar maping. Never showed this method or fully explain why we map. I thought you have to use cylindrical or planar maping to get UV's. Your tutorials explained everything clearly
Cheers dude. Had to mess around a bit with unfold option and still wasn't perfect, but i was using this for a randomly gagged low poly mountain wasn't quite as straightforward. I would say I got "good enough" results, but not the perfectly uniform UV I aspired to, but i think it will be unnoticeable. But if you have any ideas or if you covered this in a video I didn't watch, please lemme know.
This was so much help for me, the only issues I had ran into is that I had to make sure that my unfold was set to unfold3D as it had set itself to legacy at some point. If you are having a similar issue where your unfold just doesn't seem to be working correctly you can check and change it by Shift+LMB to open the settings for unfold.
Totally just had to leave a comment. You literally saved my life 😅 I couldn't figure out why some parts of my UV mapping went missing, and my model wouldn't print right on the 3D printer. Didn't even realise that was relevant to the printer until the print gave me an error halfway through. I watched like 3 other UV mapping videos that did not answer my question and your video showed me how to fix it in 3 clicks. Thank you so much for the tutorial!! 🫡 👊
I love and have been using both Blender and Maya for quite a long time now, except I never gave Maya a fair chance when it came to UV Mapping. Let's see how this goes. Eager to learn. Thanks for creating the educational content! Much appreciated.
some people might facing same problem that i faced . try this solution . Uncheck the "Create new UV set " option from create UV based on camera option before everything . (UV editor top bar > Create > Camera based setting > Uncheck the "Create new UV set " option.
Thank you. The method I've been going at it was way more tedious and slow and still more messy at times. And involved a lot of stitching at points. Hopefully this will be a bit quicker and simpler.
Thanks so much for the video, it was really helpful. One question that I'm unclear on, though: You mentioned that you need to cut an edge loop on both sides of your object, and one more edge that effectively connects the other two edge loops. However, you don't appear to cut the connecting edge in the timelapsed examples at 7:54, and 8:35, and yet it still works. Why is that?
Thankyou for actually explaining tNice tutorialngs. Other videos that I watched started talking about how to make soft and didn't ntion anytNice tutorialng
I kept making a mistake where I would alter my model and a UV would go missing, for some reason I forgot how to get it back and this video reminded me. I forgot how to recreate a UV for some reason, getting no mistakes on UV's for a few months would do that to me I guess
Good! But I usually don´t delete UV´s, just apply a camera based planar map... Is delete necessary first? Also, sometimes you need a freeze transformations first or unfold will give strange results. Suggestion: use the workspace: UV editing, the UV editor will appear docket ready to use.
Wow.. I'm in college for computer animation right now and this made more sense to me than their prerecorded lectures. Could be that I'm just stupid as well lol
amazing your video, i was doing uv with Bonus tool uv editing and some uv's i get well others mm regular, i tried this method over a group of flat and wide ribbons around a medieval weapon and the results is really better, thank you a lot, you should make tutorials about Uv map over different objects,complicated and organic geometries, it would be a really help to everyone
For more organic objects, you will need to add more seams to reduce the amount of distortion. I cover that in my more in-depth Unwrapping tutorial here: th-cam.com/video/pajVKwwUbJg/w-d-xo.html When you have things like a curvy road, the workflow is a little different. I was planning on making a video on that in the near future.
sir you are using camera based , and then there are planer and cylindercial based uv maping , which method is effective and usefull , or these methods depend on shape and size of the object ??
Waaay more easier compared to blender, 1 guide that is simple and straightforward compared to the 50 random 1 minute blender tutorials from people that can't speak english.
I heard somewhere that its a rule of thumb to always cut UV seams when they reach around 90 degree angles. But in this case on your hammer's pole, you didn't make a cut at the extruded edges along the length of the handle. Would it be better to cut more often than not and unfold them, or does it not make a huge difference during the texturing process. Thank you very much for making this video it has really cleared up a lot of questions I had about UV mapping!
Also, when laying out the hammer head and hammer handle you placed them in the same UV map. I see that you have them as separate meshes, so is it okay to UV map two meshes together or would that mess up the texturing process down the line?
It really comes down to minimizing distortion. The less distortion you need, the more seams and shells you will have. Regarding laying out UVs, If you have multiple objects on one material/texture, then all you need to do is make sure the UVs are non-overlapping.
Great video, I learned that technique a while ago and it’s been good for most objects, how would you unwrap a spiral based object ? I assume you would use one of the more automated systems included with maya
Glad it was helpful! I only straighten UVs when it's needed for very specific materials and textures. I do plan to do a video on how to straighten UVs when it comes to unique patterns, curvy objects, or roads.
It depends if you need the texture pattern to be straight. Most of the time having slightly bent UVs are fine but if you need them to be completely straight, you can use tutorial here: th-cam.com/video/ujyxtqcdiLM/w-d-xo.html
@@OnMars3D ok. When I doing uv at uveditor I accidentally press a key and mouse it shows the same texture result without dragging an texture image,but I forgot how to do it again. I am still looking for it now… but thank you for the tutorial again.
Very good tutorial indeed. I was unwrapping a coke can and because I had it set to cylinder the 'label' part flattened out nicely, but the top and bottom of the can just showed up as a line. I know this isn't what you are showing here, but is there a way of changing the orientation of the map, so it flattensnon the correct axis? Thanks again, brilliant tutorial, I'm going to try it now.
Hi There, for the top parts of the can, do the following in the UV Editor: Select the faces and do a Create>'Planar' (or UV>'Camera -based' Projection from the top view) Select the newly laid out UVs and run an 'Unfold'. After that, you should have good UVs for the top of the can. Depending on the model, it's normal to use a few different project methods to get the UVs to lay out properly. Hope that helps!


Master 3D Modeling and Topology Today! www.onmars3d.com/
Discord: discord.gg/vybvJnEeya
And my Patreon: www.patreon.com/OnMars3D for all my project files, 3d models, bonus videos, Discord and more or just to support this channel 🙂
Check out my new 'UV Map Anything in Maya 2025' here: th-cam.com/video/EriiuMPx22Y/w-d-xo.htmlsi=vtsOPGKvTwvmS6mK
*Make sure to Delete History and Freeze Transforms first!
That was the first time someone on TH-cam actually managed to explain it right and show us the most important steps. Thanks a bunch!
Happy to help!
After literally crying from not figuring this out, you made it just look so easy and so nice. Thank you so much for explaining this concisely
You're welcome, so glad this helped you figure out UV Mapping!
Dude this is probably the most helpful Maya video I have ever seen about UV unwrapping. You explained it so simply and executed the process in what felt like mere seconds compared to all these other confusing ways.
Glad it helped!
For those not getting similar results make sure before you start unwrapping, that you "freeze transformations" and "delete history by type" for the object(s) you are going to work with.
thank you so much man, i was getting frustract
@@sullimafrax i was in the same boat. spent hours stuck on that.
Where can I freeze the transformation
Top menu, go to Modify>Freeze Transformations
@@OnMars3D thanks
This is by far the easiest explanation regarding setting out your UVs, very easy to understand and simple.
The key is how visual he teaches all of this, deleting the default UV and then make it like the camera is such a great idea, then separating the cute like visually “uncapping” the hammer also helped, it’s like breaking down into pieces!
I know I'm commenting two years later, but WOW thank you for making a simple and to the point video about unwrapping! You are a huge help!
This video was perfect for what I was doing. I didn't realize who it was when I clicked it, but then I recognized your voice! Thanks for the great channel!
Thank you, glad to help!
What a great way to go about it. Your method is so simple and so effective, I never thought of doing a camera based UVs first and then just slicing up pieces
I'd like to say, we really appreciate your kindness in sharing these tutorials, your videos are to the point, no waste of time, precise at the same time, clear and easy to follow. Bless your heart and take care :)
Doing a game design course right now with a week of crunch before hand-in and UV mapping was killing me.... thank you!
Happy to help!
You're getting a like, a subscribe and a comment for the algorithm. These are the kind of videos I need. Simple, straight to the point, easy to understand. No faffing around. Love it. Thank you.
this was so much more helpful than anything my professors were showing/sending me. I was in tears before I found this video.
I appreciate how there’s no ads, thanks.
thank you so much for this tutorial - i had a class on this and got soo frustrated because no matter what i tried i couldn't get the results i wanted. this tutorial helped me so much in understanding how to uv map!
This video has taught me more about unwrapping than my college professor... thank you, going to try this out and hopefully it works for me.
Happy to help!
Thhhannnnnnnnnnk uuuuuuuuuuuuuu :O I love you! You explained it so well. My university teacher make these videos that lasts 2 hours everyweek and you just explained it all so simple in 10 minutes! I was crying all day because I have a midterm tomarrow! If only I had saw your video earlier...
Happy to help! I'm guilty of lecturing for too long, especially if I'm excited about the subject but sometimes, breaking it down into simpler concepts is the better way to go.
I owe you my life - This is the only tutorial that made me understand, thank you SO MUCH!
Really happy to hear that, glad I could help!
Took me awhile to figure this out, but after watching ur video a few times, it finally clicked and i was able to do good UV's. Thank you!
Glad I could help!
This is a useful advanced method simplified. I'll try it when we UV Map our Lego Models for our finals in class. Right now, we're using basic projections with "Planar" and "Unwrap" revisions as we practice with cereal boxes.
Also, really hope I can figure out how to do the same in Blender since you just explained how to approach a complex concept in such a quick time frame
I plan to cover Blender tutorials in the future, stay tuned!
Best tutorial on UVs that I've ever seen... you make it simple, thank you!
Glad it was helpful!
Omg this helps a ton! I need to do this for class and everyone said it’s super complicated but you broke it down so well thank you!
Glad to hear it!
I tought I understood how to cut UV's until I saw your video, outstanding explanation!
This did help me quite a bit I did not use the exact technique you are doing but I had no idea the camera based button existed and I’ve been taking 3D classes for 2 years!
Thats very easy man im Professional Modelor but i had never come with these path and coz of this i took interest from now on unwrapping...thanks man ..u deserve everything
Glad I could help!
Probably the best Maya UV video I've seen so far. So many other videos just use one of the default pre-UVed primitives. I didn't know where to start in Maya and none of my cuts/seams were being created, needed to see that you start from camera based to generate the initial UVs in the tile. I was just deleting them and wondering why seams weren't appearing and why it wasn't unwrapping anything. Thank you!
Thankyou so much.... None could teach better than this on youtube, as much as i could find out. You helped me alot for my exams as i was a little confused on uv's and couldn't understand much on 3d due to this covid. Online teaching sucks of our university, but i could see you as a helping hand.
Thanks again :)
Appreciate it, really happy I could be of some help!
Your tutorial is very clear and easy to understand. Thanks a lot! Very helpful!
Glad to hear it, always happy to help!
Wow, after trying to understand uvs for so long and failing you made it so simple . Thank you very much
Glad to hear that!
Thats what we expect from a tutorial!! Good job, pal✌
Happy to help!
Awesome. I will give this a shot. I am doing a 3D modelling course and I didn't fully understand how this worked. They showed me taking uv using cylindrical and planar maping. Never showed this method or fully explain why we map. I thought you have to use cylindrical or planar maping to get UV's. Your tutorials explained everything clearly
Recently stumbled onto your channel and I’m hooked. You have some the best and most easily absorbable content on this subject 🙌
Awesome, thank you!
This really helped! Thanks for saving my homework and explaining this in a way that feels like it stuck!
I watched a ton of videos and didn't understand much, you made it all clear.
Cheers dude. Had to mess around a bit with unfold option and still wasn't perfect, but i was using this for a randomly gagged low poly mountain wasn't quite as straightforward. I would say I got "good enough" results, but not the perfectly uniform UV I aspired to, but i think it will be unnoticeable. But if you have any ideas or if you covered this in a video I didn't watch, please lemme know.
thank you so much for this! the workflow in the end helps a lot too, figuring out which uvs to straighthen and which to separate!
Great to hear!
Thanks a lot brother ❤, my faculty was not able to teach in an easy way, but you cleared my all doubts, thanks a lot brother ❤😊
Glad to hear that
@@OnMars3D yess broo, will appreciate
This was so much help for me, the only issues I had ran into is that I had to make sure that my unfold was set to unfold3D as it had set itself to legacy at some point.
If you are having a similar issue where your unfold just doesn't seem to be working correctly you can check and change it by Shift+LMB to open the settings for unfold.
Yeah, I should've started with make sure the plugin is loaded :)
Totally just had to leave a comment. You literally saved my life 😅 I couldn't figure out why some parts of my UV mapping went missing, and my model wouldn't print right on the 3D printer. Didn't even realise that was relevant to the printer until the print gave me an error halfway through. I watched like 3 other UV mapping videos that did not answer my question and your video showed me how to fix it in 3 clicks. Thank you so much for the tutorial!! 🫡 👊
Happy to hear that, I've always taught UVs like this and never found a similar video on TH-cam. Glad it's helping so many people like you :)
Man, this explanation is saving my project, thanks
wow i was always scared to do uv unwraping till this day now u made it look alot easier for me
Glad I could help!
I love and have been using both Blender and Maya for quite a long time now, except I never gave Maya a fair chance when it came to UV Mapping. Let's see how this goes. Eager to learn. Thanks for creating the educational content! Much appreciated.
Glad I could help!
jeez this was the most simplistic thing to follow thank you!
Glad it helped!
oh god, my eyes, now I understand why I have to teach every freelancer, what is the real UV mapping looks like
some people might facing same problem that i faced . try this solution . Uncheck the "Create new UV set " option from create UV based on camera option before everything . (UV editor top bar > Create > Camera based setting > Uncheck the "Create new UV set " option.
Make it simple at its finest. Huge thanks man.
Thank you. The method I've been going at it was way more tedious and slow and still more messy at times. And involved a lot of stitching at points. Hopefully this will be a bit quicker and simpler.
Glad it helped!
Thank you, I will use this to teach my students. It simplifies it so much :)
Thanks so much!! My skill listening English is not my best point but you speak greatful and with a bit of patient. It is easy to understand you!! :D
I'm really happy to hear that, glad you found this helpful!
I'm going to show my college tutors your content! It's a art in gaming level 3 course and I think this will really help the class
Really glad to hear that, this is why I have this channel, for anyone to learn!
Loved it... A lot simpler than I thought
Thanks, I'll be referencing this video again in the future. UV mapping is taking some time to get use to 😫
Happy to help!
Good tutorial. You got a new subscriber!
Thanks for the sub!
thank you so much this tutorial is so easy to understand compared to some others, i appreciate it so much :)
So glad you found this helpful!
Thanks so much for the video, it was really helpful. One question that I'm unclear on, though:
You mentioned that you need to cut an edge loop on both sides of your object, and one more edge that effectively connects the other two edge loops. However, you don't appear to cut the connecting edge in the timelapsed examples at 7:54, and 8:35, and yet it still works. Why is that?
Perfect Tutorial for Maya Unwrapping.
Has it been this simple for the last 4 years?
It's been this simple since Maya included 'Unfold3D' by default, which was back in 2015 :)
thank you for helping me speed run my assignment
I was lost and you showed me the way TKS!
Glad you found this helpful!
thank you for making this straight forward and to the point tutorial, very easy to follow and helpful especially for a maya noob like me haha
Happy to help!
you're an absolute legend +1 subscriber
:)
This tutorial is awesome ! you saved me lots of time and headaches. appreciate it very much 🤠
Great to hear!
thanks for this awesome tutorial!
Glad it was helpful!
Thankyou for actually explaining tNice tutorialngs. Other videos that I watched started talking about how to make soft and didn't ntion anytNice tutorialng
I kept making a mistake where I would alter my model and a UV would go missing, for some reason I forgot how to get it back and this video reminded me. I forgot how to recreate a UV for some reason, getting no mistakes on UV's for a few months would do that to me I guess
Thank you for this tutorial, you just saved my ass :)
No problem, glad it helped!
Good! But I usually don´t delete UV´s, just apply a camera based planar map... Is delete necessary first? Also, sometimes you need a freeze transformations first or unfold will give strange results. Suggestion: use the workspace: UV editing, the UV editor will appear docket ready to use.
It's not necessary, but I teach with starting with a clean slate. Deleting History and Freezing transforms is part of that process too.
Best tutorial ever. Thanks!!!
You're welcome!
good work king, love you
Best UV tutorial
Wow.. I'm in college for computer animation right now and this made more sense to me than their prerecorded lectures.
Could be that I'm just stupid as well lol
UVs can be confusing when you first learn them, so I definitely get it. Glad this helped!
Thank you! So clear and straight foward!
amazing your video, i was doing uv with Bonus tool uv editing and some uv's i get well others mm regular, i tried this method over a group of flat and wide ribbons around a medieval weapon and the results is really better, thank you a lot, you should make tutorials about Uv map over different objects,complicated and organic geometries, it would be a really help to everyone
I've released a good handful of UV mapping tutorials. Glad you found them helpful!
thanks, i didnt fail thanks to this video
Glad I could help!
I wish you would explain what to do when "unfold" results in a distorted distribution of squares
For more organic objects, you will need to add more seams to reduce the amount of distortion. I cover that in my more in-depth Unwrapping tutorial here: th-cam.com/video/pajVKwwUbJg/w-d-xo.html
When you have things like a curvy road, the workflow is a little different. I was planning on making a video on that in the near future.
Cool tutorial, made perfect sense to me, thanks very much.
well you explained it easily.. but uv is still complicating for me.. i'll practice. keep doing the tutorials.. theyre so helpful. thankyou
Glad you found it helpful!
sir you are using camera based , and then there are planer and cylindercial based uv maping , which method is effective and usefull , or these methods depend on shape and size of the object ??
You can use either camera based, planar, or cylindrical. All that matters is you generate UVs so you can properly unfold them after you add the seams.
That's a really good tutorial.
you just saved my life! thanksss
Waaay more easier compared to blender, 1 guide that is simple and straightforward compared to the 50 random 1 minute blender tutorials from people that can't speak english.
great tute! cheers bro for the great help!
a very straightforward tutorial! thank you :)
Always glad to help!
I heard somewhere that its a rule of thumb to always cut UV seams when they reach around 90 degree angles. But in this case on your hammer's pole, you didn't make a cut at the extruded edges along the length of the handle. Would it be better to cut more often than not and unfold them, or does it not make a huge difference during the texturing process. Thank you very much for making this video it has really cleared up a lot of questions I had about UV mapping!
Also, when laying out the hammer head and hammer handle you placed them in the same UV map. I see that you have them as separate meshes, so is it okay to UV map two meshes together or would that mess up the texturing process down the line?
It really comes down to minimizing distortion. The less distortion you need, the more seams and shells you will have. Regarding laying out UVs, If you have multiple objects on one material/texture, then all you need to do is make sure the UVs are non-overlapping.
Thank you for the video, this was very helpful
No problem, glad you enjoyed it!
WOW!!! ❤ Pure genius simplicity ❤
Thank you!!
Great video, I learned that technique a while ago and it’s been good for most objects, how would you unwrap a spiral based object ? I assume you would use one of the more automated systems included with maya
super helpful! i have question do you never straighten Uvs?
Glad it was helpful! I only straighten UVs when it's needed for very specific materials and textures. I do plan to do a video on how to straighten UVs when it comes to unique patterns, curvy objects, or roads.
Thank you very much, i thought that maya's uv editor is just worst, but you showed me that is not so.
Yeah, it's not so bad!
Thanks so much for this ! About the hammer handle...does it matter if it's UVS are a little bent ?
It depends if you need the texture pattern to be straight. Most of the time having slightly bent UVs are fine but if you need them to be completely straight, you can use tutorial here: th-cam.com/video/ujyxtqcdiLM/w-d-xo.html
@@OnMars3D hhm ok ok , will check out the other video :) thank again !!
in uv editor, how you can change teh uv editor's background like the video cover image? like color and check box and number together..
I use a custom texture map to visualize the UV maps on the models here: uvchecker.byvalle.com/
@@OnMars3D ok. When I doing uv at uveditor I accidentally press a key and mouse it shows the same texture result without dragging an texture image,but I forgot how to do it again. I am still looking for it now… but thank you for the tutorial again.
Fantastic explanation
Glad it was helpful!
You saved my life, thank u
Happy to help
Very straight foreward and super helpful thanks man!
No problem, glad it helped!
Such a good tutorial, gj.
Glad it helped!
Very good tutorial indeed. I was unwrapping a coke can and because I had it set to cylinder the 'label' part flattened out nicely, but the top and bottom of the can just showed up as a line. I know this isn't what you are showing here, but is there a way of changing the orientation of the map, so it flattensnon the correct axis?
Thanks again, brilliant tutorial, I'm going to try it now.
Hi There, for the top parts of the can, do the following in the UV Editor:
Select the faces and do a Create>'Planar' (or UV>'Camera -based' Projection from the top view)
Select the newly laid out UVs and run an 'Unfold'.
After that, you should have good UVs for the top of the can. Depending on the model, it's normal to use a few different project methods to get the UVs to lay out properly.
Hope that helps!
@@OnMars3D very much so. Thanks very much. I tried your technique and it worked very well. It makes me very happy to find so many kind teachers here!
You're welcome! Always glad to help!
Thank you so much for kind tutorial🙏
My pleasure 😊
thank you very very much for this tutorial !
No problem, glad to help!
you are a life saver sir thank you
Thank you soo much this SAVED Me