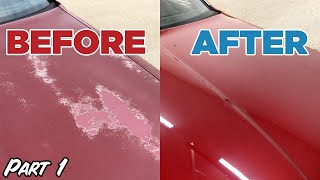
How To Remove Oxidized Paint

ฝัง
- เผยแพร่เมื่อ 30 ก.ย. 2024
- I'm not a professional detailer, but when I got this 1994 Acura Legend Coupe 6 speed, I thought it might be time to try my hand and repairing oxidized paint. It didn't require a big investment in tools and materials, but it did take quite a bit of time. In fact, I spent 2 days on the car and I could probably spend 2 more.
I hope this information will be helpful to you if your vehicle also has issues with the paint.
One final note. The paint on these cars was actually pink. The clear coat had the final pigment that created what Honda calls, Milano Red. Therefore I didn't want to go too far during the repair process for fear that I might change the color. In fact, there were a couple of areas where this started to happen.
I think in order to truly restore this cars finish, it would be best to respray the roof, hood, and deck lid after removing all the dents. This car doesn't have any rust so perhaps one day I'll make that investment. Till then, I'm going to be happy with my shiny red car that I call Scarlett Johansson.
The best place for answers to your automotive questions: www.ericthecarg...
Check out my ETCG1 channel: / etcg1
Check out the ETCG Blog for the latest info: www.ericthecar...
Thanks for watching!
Music from TH-cam: Ipanema Daydream/ Song: Bird Creek
Discussion about this video: www.ericthecar...
Links to stuff I used in the video.
Meguiars Ultimate Compound: www.amazon.com...
Polisher: www.harborfrei...
Polishing Pads: www.harborfrei...
Finishing Pads: www.harborfrei...
Related Videos
1994 Acura Legend Type II 6 Speed: • 1994 Acura Legend Coup...
ETCG Gets a 2002 Acura RL: • ETCG Gets a 2002 Acura RL
ETCG Gets a 1998 RL: • ETCG Gets a 1998 RL
How To Find a Broken Transmission Mount on a Legend or RL: • How To Find and Fix a ...
How To Wash Your Engine: • How To Wash Your Engine
Easy Rust Repair the 'Hack' Way: • Easy Rust Repair the '...
What Happens to Bondo Bodywork After a Couple of Years?: • What Happens to Bondo ...
Finding Water Leaks: • How To Find Water Leak...
What Should I Do With Dads Truck?: • What Should I Do With ...
What Should I do With the GSR?: • What Should I Do With ...
**Answers to your automotive questions found here: www.ericthecarg...
Social Network Links
Facebook: www.facebook.c...
Twitter: / ericthecarguy
Google+: plus.google.co...
Instagram: / ericthecarguy
Wanna see more stuff like this from ETCG? Information on Premium Membership: www.ericthecar...
Stay Dirty
ETCG
Due to factors beyond the control of EricTheCarGuy, it cannot guarantee against unauthorized modifications of this information, or improper use of this information. EricTheCarGuy assumes no liability for property damage or injury incurred as a result of any of the information contained in this video. EricTheCarGuy recommends safe practices when working with power tools, automotive lifts, lifting tools, jack stands, electrical equipment, blunt instruments, chemicals, lubricants, or any other tools or equipment seen or implied in this video. Due to factors beyond the control of EricTheCarGuy, no information contained in this video shall create any express or implied warranty or guarantee of any particular result. Any injury, damage or loss that may result from improper use of these tools, equipment, or the information contained in this video is the sole responsibility of the user and not EricTheCarGuy.


![[Full Episode] The Restaurant War Thailand ศึกพ่อค้าซ่าแม่ค้าแซ่บ Episode 2 | 29 ก.ย. 67](http://i.ytimg.com/vi/r3lfLNH6Ke4/mqdefault.jpg)


Hello Eric. Pro detailer here. I am watching the video and will comment as I see things. First off, for compounding, you want to use the max speed of you polisher. You are trying to remove damaged paint with a low end polishing machine (good ones run in the 300-400$ range). So crank that thing up to max speed. Second, your pad should always be spinning while you are working, if it's not, it is not correcting the paint, just buzzing on it doing pretty much nothing. The product you chose (Meguiar's Ultimate Compound) is the best consumer grade compound available. Good choice. As for wet sanding... you should definatelly use a bloc to make sure your pressure is even on the sand paper and you don't burn through your paint. 1500-2000 grit are the best papers to use for that step. After you are done with the compound, you should do a polishing step. Same pad and machine, but with Ultimate Polish. This is what restores the shine.... the compound leaves paint dull. Then you can wax or better yet, use a paint sealant (synthetic wax). Hope this helps.
Calendyr I was seeing his pad turn red... maybe to much pressure?
No, it's the type of paint on the car that does this. His car has what is called a single stage paint. It means that the color and protection products are in through the whole paint. Now we use a Basecoat/Clearcoat system where the color paint is 1 layer covered by a varnish layer of clear coat. So when you polish a Clearcoat the paint you are taking out is transparent and doesn't change the color of the pad. But on a single stage paint, as the paint is coming off from the buffing, it changes the color of the pad.
@@Calendyr Hi there, I've got a single paint stage car and I am trying to figure out the best method, polish/waxes to apply so that I am not taking out it's [red[ paint. Trying to diminish swirl marks and oxidation without damaging the paint. Let me know, thanks
@@Nicole-ju8fd Hi Nicole, you should just buffing the car with a Polishing Compound ( Extra Fine Polishing Compound ). The Pad should be a foam pad ( orange color - medium cut , blue color pad - low cut ) , it depends how damaged and dull your paint is. If it's just dull, use blue color, if damaged, scratches etx, use orange color pad. After that use waxing with a wool buffing pad.
You can use a rotary machine at 2500-3500rpm, but make sure you don't burn through paint, as you use a rotary and you also have 1 stage paint. Cheers
@@mihai0377 thank you for the reply, I'll be using the orbital one so it wouldn't be possible to damage / burn my paint. As for the necessary compound is what exactly I need to get thanks again !
The music made me feel like I was on hold while calling Eric 😁
Harrythepot or in a slow moving elevator
definitely elevator
😂😂 I love this comment
Eric from Statefarm?
Recently becoming a qualified paint spray this video reminded me of how I was as an apprentice. Which isn't a bad thing as we all gotta start some where.
A few tips you Eric!
- When you're using the mop or buffer you need to put a fair amount of pressure directly over the cutting head. I always find it better to ditch the side handle and put my hand right over the pad on the soft rubber. You'll find the mop will cut a lot better and also not push it's self around as much.
- For compound I would highly recommend Farecla G3 Premium, or 3M Fast Cut Plus. Makes compounding a breeze
- When wet sanding clear coat you don't wanna use anything less than 2000grit as you'll struggle to get the scratches out perfectly with any courser paper. Would also recommend using a wet block. Using your bare hand to flat can and will leave "tram lines" in the clear coat as you're only applying pressure to the paper at your palm and finger tips. Where as with a block you'll get even pressure and a much better finish.
- Use a hard foam pad for getting out things like deep scratches and oxidation (Real heavy stuff) then use a softer foam pad with either a diminishing compound or dedicated fine polish to get rid of the compound scratches and refine the finish even further. As for applying wax I always prefer to do this by hand with a microfiber applicator pad in small circular motions. Usually if doing a whole car then I start on the drivers door and work my whole way around the car. Then when I get back to the drivers door the wax should have hazed enough to wipe it off easily.
Thank You. I’m saving your comment. I’m studying how to remove heavy oxidation.
Didn't seem like the DA was spinning. Should do clay bar, compound, polish, then paint sealant / wax.
"increasing the resale value" as if you would ever sell that car.
Yeah, I understand you for sure. I was thinking resell is nice, but is he really saying that as it looks better, he's feeling better and better about it all the time? :D
Didnt he end up selling that car?
Id buy this car in a heartbeat
FINALLY, I found a video of a car with actual faded paint that truly needed to be compounded, and not a car that was one step away from a final polish. Thanks for showing us what ultimate compound can do for genuinely faded paint.
Wet sanding should always be done with an appropriate sanding block, start out with 1500 wet or dry and use a drop or three of Dawn dishwashing liquid in a bucket of warm water. When you hold the paper in your hand to sand the pressure of your fingertips causes striping... literally sanding finger sized grooves into the paint or clear coat. The idea is to achieve a perfectly flat surface to enhance gloss. I start out by hand washing, clay barring, then compounding or polishing and always keep a spray bottle of water handy to lube the pad and paint during polishing. Do 3 sq. ft. sections and wipe off before moving on. It is very time consuming, but you said it... You're actually rubbing value into your car for pride or resale.... Don't mean to sound like a "know it all", but I've detailed cars since about age 15 or so... I"m 57 now.... Not much elbow grease left in these old arms! lol...
The issue that you were coming across was overloading the buffing pad with product and the dead paint from oxidation. If you wet sand it with a 3000 grit trizac paper or disk, you would have removed 90% of the issue that was on the surface of the paint. If this was followed with what you just did, The finished would’ve been closer to a show room status..........
change your pads or clean it after every panel. and crank it up to speed 6. it dont cut on low speeds. low speeds for applying wax
You should put 1 or 2 pen marks/lines on the top of the pad and hold the machine square and push enough pressure that the pad spins. The lines make it easier to see.
With the music I felt like this was going to turn into some weird car porno.
Sick fuck
Thanks!
Settle down Kevin Crawford
Are you a hondasexual?
I mean, he was playin with the intake and tailpipes...
Love your videos. Definitely looks better, but if you ever do it again, follow these steps. I promise you'll be impressed with the results. Clay the car after washing to remove embedded contaminates. Once you've done that and the necessary prep, use the DA at a higher speed. Heavier oxidation needs more friction. It's very hard to burn through paint with a DA, so I wouldn't let that be a concern. Also, move much slower to allow the foam and the compound to do its job. Typically on a rough surface such as the one you are working on, I move 2 inches per second. It takes much longer, but it's worth it for the result. After you've done that, move on to a polish so that you can remove the scratches that the compound left. Wipe it down with an IPA solution and then place your protection onto the paint. Not bad for not having any experience though. Respect for anyone willing to learn on their own!
Well said
I give Eric credit that he admitted he didn’t have much experience with this. AMMO NYC is the channel for this content. To do this type of work properly, it is an all day job, especially for someone without experience. Eric only did a few steps and it took him a day. Car needs to be decontaminated with a wash and clay, wet sand if cut compound alone is not sufficient, polish, then seal/wax. Use a quality DA and the right pads for each step. Kind of surprised Eric posted this content, but I appreciate the effort he gave it. The Legend does look better.
agreed but it is cool to see him experimenting with detailing and not the usual grimy mechanics
Integra DIY It is at minimum what you would not expect on the ETCG channel. Car detailing by Mr. Stay Dirty. Although I’m sure Eric is not advising on detailing, but rather, oxidation removal. What I like most about the video is that Eric was exploring something new and was not pretending to be an expert on the subject.
Totally agree with you. Love seeing Eric starting out with learning. Maybe he will delve more into learning about detailing in the future.
robo tiger actually the products are great and not much more than any meguiars ultimate product
Secondly doing the job right is wiser than a quick job you'll have to redo shortly
A quick job is a half ass job.
Eric is learning so I'm not calling his work half ass as he clearly put in the time. However constructive criticism will only throw tips his way to hopefully save him headaches and end up with better results
robo tiger 9 out of 13 products he sells are 25 or less with many of those under 20. The absolute most expensive out of the 13 items 69 bucks and its really only for car show use
Stop pulling numbers out your ass. And holy crap it's now a bad thing to recommend a good brand like Makita? I love harbor freight and all but their polishers are absolutely mediocre at best
Do the job right or don't do it at all.
Not sure if it was your frame rate. but for a significant portion of your buffing shots the pad wasn't rotating as part of the dual action. The pad needs to spin to get the best out of the system. On a super ruff cut, you're best to dial it right up to max speed and use a little water in a spray bottle to ensure lubrication. That compound is very durable and the abrasives wont break down. jsut use water to reactivate/lubricate.
To get best effects from wet sand, you can get wet-sand pads that'll fit your buffer. makes it way easier. but it looks like there's work to be done. rest assured it can be flattened :)
Took me 15+ hours to bring my yellow 1992 Pulsar GTiR which was equally faded (single stage yellow) back to the world. it's a long and slow journey that can't be rushed.
I also found that Meguires 'wet look' seems to work excellent on oxidised paint and just done by hand.
Hey Eric! I tried my dual action polisher for the first time the other day on my heavily oxidised car... And it came out amazing! But what I did was use a clay bar with soapy water first, before using the polisher. I believe that's to prevent the existing contaminants from scratching the paint when using the polisher. Nevertheless, excellent work at the end man... 👍🏻
Smaller pads focus the power of the machine. A 6” pad limits your correction ability. I would use a 5” max on that machine at max power. Thin pads transfer more power. Need air without oil or a wet towel to clean the pad often. Need to work a small area, yet you need to push harder to correct without stalling the pad. You DO want to cover the pad lightly then put on a few dots. After you get rid of all that haze, use Ultimate Polish and a polishing pad to make it shine. Then wax it
The Steps for most people Should Follow for that would be:
----------------------------------------------------------------------------------
Step 1 - Wash & Dry
Step 2 - Fill in any rock chips & clear coat them.
Step 3 - Tape off trim
Step 4 - Use Fallout Remover to remove iron contaminants in the paint (google iron X , sonax Fallout Cleaner , you'll see)
Step 5- Clay Bar Service ( use clay bar, clay block, clay mitt, clay towel with a Detail Spray or Clay Lube ) wipe dry
Step 6- Use a Dual Action Polisher with the appropriate cutting pad & pad conditioner spray & Compound & when done then a Polish. So for what he used Meguiar's Ultimate Compound 1st, then Meguiar's Ultimate Polish. They make 1, 2 & 3 step polish/compounds also from other brands etc.
Step 7 - Apply by hand or machine with a wax pad - Glaze, Sealant, Wax
Step 8 - Optional after your final layer of protection has cured you can use a detailer spray or quick wax or something like that.
^^^That in General is what should be done and more than sufficient to detail the paintwork of a car for the average person that's new to the detailing world.
This is Chemical Guys (brand similar to Meguiar's ) Detailing Flow Chart --- that will help people understand the Steps
Safe Link >>> www.chemicalguys.com/v/vspfiles/assets/images/ChemicalGuysDetailingFlowChart.jpg
The link's dead now :/
I use the same stuff on my tired paint it looks great now👍
I did this to a 92 Mustang and made the same mistake. After the compound instead of going straight to wax go over the car with Meguires Ultimate Polish with a finer pad. I think the pad you need is blue from HF. Anyway then you will be ready for wax. The polish will remove the swirls and bring up more shine. The car will look way better. Also when wet sanding put a few drops of dish soap in the water. It will help the paper last longer, lube the surface better, and keep it cleaner. 2000 grit is pretty safe to use. Wrap the paper around a sponge or a flexible rubber block or squeegee otherwise you will leave finger marks in the paint. I have done this now several times to several older cars using these methods and the Harbor Freight buffer and pads.
wax on / wax off, Don't rub me the wrong way !!!! LOL....
I know I'm super late on this but if you woudlve put that DA up to at least 6, you wouldve had much better results. I could see the pad wasnt spinning a whole lot. Still came out good but if you wouldve ripped that with meguiers 105 and then followed with 205 and a wax it wouldve looked brand new.
Sleepy music . Relaxing!!
Michael D elevator music ☺️
Haha. I was thinking elevator music too. :)
reminds me of Bob Ross-- this video could be called The Joy of Buffing
Bossa Nova !
“It feels so smooth and I haven’t waxed it yet” -my wife said that the other day.
Dick.lol
That's what she said.
I always loved the look of those cars. I'd still love to have one.
Honda's red paint always does that. I had a red 2005 Civic and without some wax it almost looked grey more than red. Yet, the plastic bumbers were still shiny.
Eric I think you got the result with the effort (and materials) that you used. The next step up (for those out there who are in a similar boat), would be 1) get a few more of the orange and finishing pads (you need a few to 'do' an entire vehicle; 2) split up the car into chunks (unless you're really needing do the whole car at once); 3) Use Meguires professional M105 as the first step with the orange pad, then wipe; 4) Then follow with Meguires M205 as the 2nd step - using the finishing pad - to give it the spit shine. Yes it would mean 'double' the work, but I think it would give you 'double' the result. But alas Eric, with a single polish compound and a single pad...you got a good result already!
M105/205 stink. If you're going full hog, use the appropriate grade of Menzerna/Jescar compound on a microfiber pad, and polish with Sonax Perfect Finish on a yellow Rupes pad.
For quicker results, slow your arm speed down a bit, and work smaller areas at once. 2 feet x 2 feet is plenty. Make sure you take full advantage of the product's abrasive qualities by working it steadily until it is fully broken down.
wax on wax off
How do I know when to stop polishing? Do you just polish certain areas or usually the whole car when taking off scratches and such? Obsviously this car needs a full job .
Did you wet sand the whole car? If so, What grid paper did you use for sanding?
I did this for over 15 yrs and a few garages hated me for taking too long buffing cars and i told them you aint gonna get top dollar for it if it aint done right.Eric did a good job on this but buff it with polish too not with a rag/cloth.My best advice is you got to remember to use proper wax after it's all done and then wax it again a month later to let it settle which sounds strange nut it's true.Use AutoGlym Super Resin polish a month later then another coat a few months after that and you'll go WOW!! You'll never regret it,even on plastic door mirrors will restore it lovely BUT use polish with v.little compound on a cloth first.
"Better than it was" is not the criteria for a properly detailed car, it's a criteria for half-assed work.
Now that car looks LEGENDARY
I'm sorry i'll show myself out
Good one fila
Haha good one
LOL
The pad isn't spinning if it not spinning it's not correcting
You have to put mild pressure and don't leave the pad get dry out while buffering or polishing. Stop buffering once you feel your arm getting tight or needs muscle flex, that way you don't polish on dry surface.
More speed on the machine, move it slower and reduce your working areas. You will definitely get better results.
I love my 91 legend, and watching this....just made me happy haha
Hear we go
Soak the sand paper in water for a few hours, then go ahead and sand it. Also, you a sponge if you dont have a sanding block, so you put even pressure over the paint.
ReggaeDubSoundSystem when I seen him using his fingers to sand...noooooo!! Lol
Clay bar and Polish
Great job. Looks a lot better and I'm sure it runs just a little bit better now, too. I know my car always runs a little bit better right after a wash and wax. :D
amazing elevator music! Good job Eric.
+hubbleISS spot on!
Good job, i dont have the patience for that
Before you are committed to removing the oxidation, take a plastic bag (zip loc bag) and put your hand into it.
Now run your hand on the paint while wearing the bag like a glove. feel the "paint" depending on the level of oxidation, it should feel very rough almost like sandpaper. The plastic bag pretty much enhances your sense of touch. And should give you a good idea or reference on what pad you may need.
EDIT: it should tell you what the level of oxidation is present also.
Also to add, if the paint is rough from your plastic bag test. You may need to clay your paint before going to town with the orbital buffer.
Done this on my
1964 Dodge Custom 880 and the paint is showing some "bling" to it now. But the paint on the car is too far gone. So what I like to say is *can you polish a turd?*
Red is a tough colour to perfect. Good job, that Meguiar's stuff works well
looks much much better, for some reason red looking cars get that oxidising haze more than other colour coats that ive seen around here in AU, especially if not looked after eg waxing every few years etc,anyone know why that is?
Looks good. Sad to see all the hail damage though.
very closely resembling my experiences with home buffing/polishing. car is almost the same colour, no clear coat. same product, almost the same buffer, and virtually the same result as what I got with my red car. nothing that I can really be proud of, but it's always wise to know when paint is too far gone. "bringing it up a little" is good, but it'll never be perfect, short of a quality respray or a wrap.
I did this on my Skyline R33. Been busy for 2 days (whole weekend) and did all the stages. Now it's perfect. But the first few scratches have already been made, and those are the most painful ones after all the work I'd put in. But hell yeah it was worth it!
It looks tons better than when you started, but..... Doing it the right way would make it look a million tons better, and it would only take you about an hour and a half to two hours to do it
Your techniques and products are way flawed. First of all, your Technique was flawed because you moved your da polisher too fast... you're supposed do go slower passes, plus you're pushing too hard. When you use a DA polisher, you're supposed to be able to see your backing pad moving around in circles..., about one rotation every third of a second. If you're takes longer than a third of a second, you're pushing down on it too hard, if it takes less than a third second, you're not giving it enough downward pressure on your polisher. By not letting your Plus you should do a crosshatch pattern meaning going one way, and then going at a 90 degree angle for the next pass and do fortify passes doing that. If you would have done those things you would have had that thing looking almost new.
Plus you used the wrong pad to begin with. Harbor Freight pads are junk, you should have got a more well-known brand like Lake Country, or as bad as your paint was/still is, I would have started out with a microfiber pad because it is a heavier cut pad then the foam pad that you used. Then I would follow it up with an orange pad using your same compound, and then gone to a white pad with a lighter cut compound. And then follow up with your black Pad to wax it. Doing this as just suggested, would have alleviated you needing to wet sand it. Also those backing plates are changeable so that you can use different size backing plates, that way you could have bought a 3in backing plate with some 3 1/3 inch pads and got into the smaller areas along with your front bumper a lot easier and not had to polish them by hand. You should start all over and try to polish it the way I suggested. You now have about 65-70% perfection, and if you did/do as I have described here you can get between 90 and 95% Perfection and really make your paint pop. But like I say, I would throw away the Harbor Freight pads and the Harbor Freight backing plate and buy Lake country backing plates and polishing pads. I would buy a 5 inch backing plate with 5 and 1/2 inch polishing pads, and a 3-inch backing plate with three and a half inch polishing pads for the tight areas, if you have a 1/2 inch bigger polishing pad then you're backing plate your backing plate will be less likely to accidentally hit your paint and scratch it.If you wanted to retry to polish that and make it look tons better, you should be able to do the whole thing within an hour and a half doing it my way from where you are now
i agree, polishing/restoring paint us an art in itself. thx.
That is a sweet looking car Eric. It's body lines are so clean. From every angle it looks awesome. I love that front end and rear end both. Good work on the paint too. It almost looks like a different car already.
Wait that jazz music, isn't it from the sims game ?
Sure does sound like it. :)
'70's RomCom montage music
It sounds like the wrc 2011 (wrc 2) menu music
Sounds like Jethro Tull
I've seen all those cars sitting outside a shop up the street from me. I just realized that you live up the street from me... Weird.
CommandoPG creepy
CommandoPG are u a teenager
Hey Eric, glad so see such improvement on the car. I'm not a DIY specialist, but I suggest to let the electric cord pass over your shoulder so it doesnt rub against the car's body ;)
the music is like am sitting at hotel lobby
james brooke ll puhajahhaha yeah
I love the way the car turned out !...but the fact that the hood doesn't properly line up with the front bumper kinda bothers me....
You would have been better off using a rotary machine for the first passes
And the DA for final stages
Rotaries are like surgeon's scalpels - very powerful in the right hands, very dangerous in the wrong ones.
Well said!
Brad Kells remember he's inexperienced with this. That would be the case with a Pro detailer. In his case he probably would've burnt through the clear coat.
I agree computiNATEor. Using tools better suited to someone less experienced makes more sense.
I bought a legend about a month ago and i am so happy with it. they have always been in my top ten dream cars. absolutely love seeing you work on yours!
Go slower with the rotary. Reduce your arm speed, let the compound work in & breakdown. Otherwise great job!
He's using a dual action, not a rotary. But your advice still applies to that machine as well, even more so actually.
all my years of compounding, I've never used a machine. You new kids...jeez
Yep I better go over to harbor freight yep yep yep... Can't use white old T-shirts and compound to do this work might take me all day or take me two...
5:25 - 6:29 "Your call is important to us, please stay on the line. .................. Your call is important to us, please stay on the line. ................."
I love detailing. It's my hobby and I wish I had a shop to do it instead of outdoors.
That is a BIG job. Better put aside a whole day. Looks Great Eric.
What grit sandpaper ? Awesome car
What a gem and a great price, Happy to see this preserved a little repair is natural and expected on any used vehicle rare find and definitely one of my favorites, on my 5th and 6th Honda, best affordable car built period
The process is wash, clay bar, wash again, wet sand with1500-2000 grit, wash again, then buff it with the cutting compound and then buff again with polish, wash again and finish up with wax, about a day's work.
Get a soapy water spray bottle a bigger piece of sandpaper on a sponge and hose it off too, you want it pristine clean before cutting and polishing. If you don't wash well and clay bar you are just scratching it up worse with the sanding and the buffing...
Yea you are not a professional detailer you probably shouldn't have made this video lol, but that's cool and this is what the comment section is for lol...
Lol Eric love the music!
These pads from Harbor Freight work great for about an hour so buy 3 of each color and SAVE your receipts!!!! You WILL be returning them often!!!!
Great work mate, looks very good👌🏻 g3 do a great compound aswell which I’d highly recommend.
That was my dream car in the mid to late 90's! Never could find one for sale privately or on a dealer lot so I never had the joy of owning one. You're lucky to have her.
Clay bar eric CLAY BARRR
Using waaaaaaay to much product and not doing small enough concentrated areas, need to do # pattern passes and do a few feet at a time and the results will be far better 👍🏻
Okay, compound sure,but what about having a longer lasting effect? Wax,polish? Im asking, coz im doing the same thing on an old faded door for my car
It looks like you had the polisher spinning way too slow.
Best looking car Honda made? You know they made the NSX right?
The old nsx is honestly the only honda that looks better than a second gen legend in my opinion
I think his integra looks better, but I'm biased because I own one. The legend is in the top 5 though.
Beauty is in the eye of the beholder
I like ludes, like 88-91's
Queludes and preludes.... Chaaaah maahn
You were dragging that dirty power cord all across the paint bruh!! Whew come on man even a rookie knows to keep the cord up over your shoulder SMH...
Nice job for a non-detailer! Good call on the 6" HF polisher. The 7" is a rotary polisher, which should NEVER be used by anyone but experts. (... even then)
From working in a body shop, you might have been better wet sanding at 3000 trizac before buffing! Nice to see you trying something different tho!
Anyone know the differences in active ingredients between Meguiar's Ultimate Compound and Meguiars scratch X 2.0? Is Meguiar's Ultimate Compound just a diluted version of scratch X? I know one is a Polish for scratches and one is for compounding but don't compounds contain some small amounts of abrasives as well?
From 2010-2017 my daily driver was a ‘95 legend coupe. Damn i miss that thing..floodwaters consumed her.
I get my car, which was oxidized just as bad as that ….but I get it looking like a mirror almost & a nice solid thin layer of same Mcguires as youre using …… all good UNTIL I try to remove the wax, THATS when I get smudges & smears in the finish, then I have to start over again & buff the smudges out..... they come right out with the buffer,like you have, Then....as I remove the wax , I will see it smear in some areas & it wont towel off, I have to buff it AGAIN. Almost powerslammed my bufgfeer today I was so mad but I didn't. but almost. Came in to relax & see if TH-cam might help. Never seen anything like it. Almnost looks like its gonna turn out nice, Ive spent about 8 hours on just the hood alone & STILL gotta try again. Gues my next desperate move will be 2000 grit sandpaper. .trouble is...… After that I will STILL have top wax it again & proly have the same issue I have now.
Valid attempt at saving paint on your car. However, I feel like this is not a video you post on channel with 1mil subscribers. Maybe something outside of your regular postings at least. Please resume with quality videos "... it was broken, here is how I fixed it ...." that you are good at. I feel like that is your specialty and that is what is expected from you by your viewers. No more headlight kits or tire noise tests, at least not on Fridays. Thanks you and welcome back from a break. Waiting for more awesome videos from your Eric.
Man that Harbor Freight buffer is really bad. It doesn't even really rotate at all, it's just vibrating around. A decent beginner quality DA like the Porter Cable 7424 would probably yield better results.
Eric it’s very inexpensive to do vinyl wrap. They look surprisingly good. You’re the type of person that could actually pull it off. There are plenty of TH-cam videos showing how to do it. This car would be the perfect card to learn on.
ROFL you can't buff cracks but you will bring out the shine just like buffing faded head lights
totally agree with a big improvement.
well done maybe you can do a video on how to paint and fix hail etc.
I'm loving the Bossanova jazz overlay; we need more!
Happy Birthday if its ya Birthday!
i need to do this bad, my 09 has lost its deep red and i hope after a good wet sanding i can bring it back, if not then paint, but worth a try, i have seen miracles performed original 60's!! paint jobs
Pgcmoore That's his other channel lol.
I used 1300 grit, water it all down . Gently sand it off. Then use buffer. 😂👍 compound, polish, wax. When your done, it LL look like 🍭 candy.
Hey Eric, did you think to ask Chrisfix for some pointers? His technique is pretty solid and is pretty much in line with what I woulda done back when I was working in the bodyshops. An just to let you know, red is a hard color to match, lol. Yeah just from your camera I can see that this car is gonna be a tough customer if and when you want that showroom look
I scoured the TH-cams, but couldn’t find a video on how to remove and replace the master and slave cylinders for the Acura Legend. Could you do one? Please and thanks!
If anything it looks like treating the car accentuates all the dings, scratches and twirls in the paint. But at least it looks shiny now. Shiny with a lot of scratches.
Nice car of course, but in terms of sexiest cars Honda ever made? Nothing beats the 2010 Honda Civic Si coupe.
So I washed my car with meguairs wash and wax soap and then dried it with meguairs quik detailer and after only one of my fenders looked dull and everything else looked nice and shiny... why did this happen?
Appearance absolutely exactly like a fishing jig fishing lure... The car could be a piece of crap otherwise... They would opt for this ostentatious Insanity syndrome... To buy a would be fixer upper in some mad irrational craving impetus... English language I believe...
You should have clay bared the car first and you wouldn’t have to wet sand it
Looks way better! That's one of my favorite cars from that generation too. Hard to find that clean and in 6 speed!! Nice. Anyway great videos man!
This Meguiers stuff looks like the typical american "polishes-your-car, feeds-your-dog and enlarges-your-penis for 1.99$" product :) You should try something like "Sonax ExCut 05-05" or anything similar.
Decontaminate.
Wash.
Cut (in this case with an aggressive cut)
Polish.
Wax.
Usually the best sequence.
That Legend Coupe was one of the best designs from Honda. The nose & tail are slightly different when compared to the sedan version. Now, the Legends are named RLX and just about all 2018 Acura models look the same at the nose; ugly (Lincoln & Nissan seem to have taken the same path).
I am not letting go of my 2004 TL 6MT, and I used Chemical Guys' products to restore the paint job. The end result was very impressive and not many people think it is a 13-year old vehicle.
BTW, Honda in its homeland is now known as minivan & light-weight (smaller than 0.66L engine) manufacturer. The new NSX is nice, but it is simply unaffordable.
Realize that fish can actually see the hook when it goes for that jig..... At some point he just says f*** it that s*** looks good...........
For a first time job, I'd say You did really well. Detailer could do it way better, but hey, we can't all be pros in everything. For Your next job, I'd say: start with claying the whole car, and use a microfiber pad for the first few passes, it cuts much faster than a foam pad. Of course get a small backing plate (for 80mm pads), that way You could do the pillars easily with a machine. And Meguiars UC is a good compound for fixing small scratches, but not the best one for the job. Personally I'd say: get a Koch H8.02 or Menzerna 400 for cutting and and Koch Antihologram for finishing the job, You'd be amazed how fast and easy polishing the whole car is.
Go to Walmart or similar...purchase a bottle of Meguiar's Ultimate Compound and a bottle of Nu Finish Car Polish. Mix it 50/50 and use. You will be amazed. Done.
Hey Eric I know your the man when it comes to Honda's but I have got 2 accords. One is a 04 2.4 a/t sedan ex with 186k and an 03 3.0 a/t sedan lx with 185k. Have had no problems with the transmissions yet. Hopefully I'm not jinxing it right now knock,on wood. What maintenance/service would you recommend I do to keep both of the cars driving trouble free if,its possible because every forum ive read says that no one with an accord 03-07 has ever made it past 200k with the original trans. I was thinking about converting the v6 trans with a 6 speed manual but I think it will be too much work for what the car is worth.