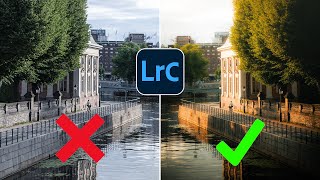
Emulating Kodak Portra 400 in Lightroom

ฝัง
- เผยแพร่เมื่อ 7 ม.ค. 2022
- i know we are all suffering from the Kodak price increase so let's emulate some Portra 400 together 💛 I hope this video provides some insight in some way ahah!
let's connect on instagram!
/ jaycielinh
Winding Road by Pyrosion / pyrosion
Creative Commons - Attribution 3.0 Unported - CC BY 3.0
Free Download / Stream: bit.ly/al-winding-road
Music promoted by Audio Library • Winding Road - Pyrosio...


Great to see a video that explains a detailed process rather than simply offers a sale of presets.
Yes! There aren’t enough videos like this one. It’s great to see an actual tutorial for those of us that want to make edit our own photos
I couldn't agree with this comment more! It's great to watch each step, which I was applying to my own raw file as a test. The results were excellent. Appreciate the observations made along way regarding the differences between the raw file and the film stock.
Never seen such a good process/video to simulate Portra. Most people want to sell there presets.
Great job! Thank you for showing your whole process, this is spot on what I was looking for
Best matching I've seen yet. I haven't got example images of Portra 400 myself so this was really helpful!
Literally watched all TH-cam videos on this topic. This is the best one. Amazing work.
this is a really great tutorial, keep doing what you're doing i love it!
Thank you for making such a detailed video about the grading. This videos hepls a lot.
Great video with simple practical tips! You realise how film gives a unique look to each photo as you can’t just simple apply one setting to all photos.
I recently stumbled on your channel and have been enjoying your content. Keep it up! - Curious to know if you've tried out some packaged film simulation profiles (e.g. RNI's All Films 5), and what your opinion might be on their performance.
Great video. Keep up the good work!
Omg you did such an amazing job! You really know what you are doing. Great help to get my editing in the right direction. Thank you so much!
So good, followed a long and it was really helpful!
this is actually helpful esp the color grading part. thank you :)
this is really helpful thank you ♥️
This is a great tutorial. Good presentation, thanks!
Mmmm pretty cool result 🤔Interesting process. Thanks for sharing it with us.
Thank you so much for your work.
Thank you. This is great job
thank you, this video is really great
This was really fun to watch.
Actually not bad, third kodak emulation I follow today, this one actually gives a real base to adapt digital photos to portra 400 look
Thank you for the video!
Great vid 🤍
This was really smart!
👌🏼 you are a wizard Jaycie
ahah thank you tats! looking forward to more of your content this year!!
Results look pretty similar indeed, that said it's much harder if you don't have the reference.
agreed! i think once you get a grasp of the film characteristics, you can apply them to your digital photos to look relatively similar!
Very good! 👍🏼
great tutorial but I had a little trouble understanding through the heavy vocal fry
The thing that stands out to me most about film is the far superior colour depth, modern digital sensors in cameras have a thinner CFA - Colour Filter Array which job is to filtrate light to the various pixels which are red, green and blue pixels on the sensor which is why you would want a thicker CFA for better colour depth and accuracy which is why people tout older cameras as superior in image rendition, CFA is thicker on older sensors, but a thicker CFA = more noise and poorer dynamic range because less light is reaching the pixels overall.
Another factor that film has over digital cameras is the fact it renders highlights in much higher dynamic range than digital sensors do, but film in turn has inferior dynamic range in the shadows.
Essentially the dynamic range of film which is around 12/13 stops on 35mm to 18 stops for a medium format ISO 25/50 film is shifted upwards, whereas on a digital sensor the dynamic range is more below a centre point.
But film does in fact emulate much closer to how we see the world in terms of lighting, our eyes have usable upwards of 20 stops dynamic range and can auto adjust accordingly, a digital camera that has superior highlight roll off and dynamic range with a thick CFA will produce the closest image to film, there only 3 camera systems that I know of that achieve this, Sigma's outstanding Foveon cameras, the Sony A850/A900, and the Fuji S5 Pro.
Really appreaciate these insights. Have been around these topics for a while yet haven't come across a lot which you speak of! Thanks for some more things to google in the depths of the night!
only problem with triyng to emulate it on digital is you can make a preset for sure but that preset wont ever work the same in different lighting situations and different colors in the photo over all
like if you shoot a red wall with film then go shoot the same wall on digital and just ad the preset from your portra that you copied before it wont look the same you will always need a side by side reference ive tried this multiple times myself its just not that possible to fully emulate the look
hey! definitely agreed, i don't think film presets are ever a true replacement of film given how dynamic it is in different situations. however, there are some film presets that can get pretty close and that may be an alternative option if someone can't shoot film! thanks for watching! 😊
try shoot more photos with the same white balance, and most of presets will transfer
Cool video
Really nice video!!! Please post more videos. We like it ♥️
gimme a preset please 😢😢
*are you Vietnamese bro?*
How do I copy and and paste in the next picture?
you can press the “previous” button on the bottom right, or you can just ctrl+c your settings of your picture and select the adjustments you want to keep and then ctrl+v (paste) onto your next photo!
can i get the present
I love u so so much
watching your eyeballs sped up while you work is so funny
wow magic 🤓