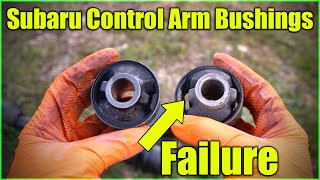
*PLEASE READ THIS AND THE VIDEO DESCRIPTION FOR HELPFUL INFORMATION* In the video, we show lubricating the inner diameter of the arm and outer diameter of the bushing. You are technically only suppose to lubricate the inner diameter of the bushing where the sleeve rides and the outer faces of the bushing that meet up with the frame. The bushing should be inserted dry, no lube, into the control arm.
Thanks for another great vid, Timmy. Question: what do you expect is the consequence (if any, really) of lubricating the bushing versus inserting it dry?
@@leifrudd8934 I honestly don't think it makes a huge difference. The idea with not lubricating the outside of the bushings is you don't want the whole bushing pivoting in the control arm. You want the pivoting to happen at the sleeve inside the bushing. Maybe the bushing will be more prone to wear prematurely if it's allowed to pivot in the arm. But, since it's lubricated, I can't see excessive wear happening.
@@TimmyTheToolman Yep, that was my thought as well, concerning wear or the lack of it. I then was wondering about side-side slippage, but the bracket prevents much of that. Anyway thanks for the vid and your willingness to answer questions on a 3+ year old vid :-)
@@leifrudd8934 You're welcome Leif. We try to answer all questions and acknowledge all comments on our channel. Some sneak by us but we believe part of running a channel like this is to respond back to people. I think really big channels have problems keeping up with the questions and comments but we're not that big yet. Happy Wrenching!
Your videos have helped me so much over the last years, have probably saved me at least $4,000 and has taught me invaluable skills. One thing I found while replacing these as well as the uppers and the panhard bar was that I was able to press the bushings out with the Ball joint/ C Clamp press that i rented from Oreillys. It came with a receiver that fit all the pieces perfectly and the rod on the C clamp pushed all the bushings out without any attachment. Removing the bushings took 1 minute each (with an impact drill)! Still had to cut off the outer layer of rubber of course. Hopes this info helps for those who don't have a press. This was on a 1997 4Runner, unsure of newer models have the metal sleeve surrounding the rubber bushing but mine did not.
@@justinrowe5579 Thanks for the continued support and for this comment! Super stoked to hear that we have saved you so much money and more importantly, taught you something new! We hope your comment and experience with the rented C-clamp helps others out there in your situation who may not want to spring for a 20-ton press. #sicmods bro! - Sean
That trick with the ratchet strap was worth its weight in gold. Thank you Timmy for saving my butt this weekend. FWIW for Lower Control arms the ratchet worked the way you describe in this video. I also watched the Upper Control Arm video where you mention that the persons runner worked opposite. When I did uppers I had to flip the ratchet the other direction from lowers for each side. For example for driver lower I pulled the axle back, but for driver upper I pulled the axle forward.
My question is can you take both the uppers and lowers off on both sides all at once along with the panhard bar? I want to take them all to my dads shop to press them out and paint all at once, thanks for the vids timmy!
@@Muskrat6969 If you did that, the axle housing has no support now other than the shocks. You would have to make sure the front of the 3rd member at the pinion flange is supported because the axle will flop downward from the weight of the 3rd member. So, two jacks under each side of the axle tube and one jack under the pinion flange. You have to be careful because that axle isn't light and if you drop it on yourself, you are going to be hurting.
Thanks for the great videos. I just did the both upper and lower arms. Anyone avoiding this job because they don't have a press should know you can do it without. I drilled out the rubber bushing material and the came out real easy. On the lowers I used a hacksaw to cut just through the sleeve. Then hammered the sleeve out with a cold chisel. Press is definitely easier. But its possible to do it without it. Also, awesone with the ratchet straps.. Thanks again for the great videos..
I just got done with mine. I used a C-clamp to push the rubber out then a reciprocating saw (be careful not to cut too deep to damage the control arm:it can be done) than a flat head with a mallet to peel off that medal bushing. Doesn’t take to much time Can be done if ur on a budget Worked for me hope it helps
Hi, Timmy! First, thanks for all these videos. I have full confidence in my ability to do the work when I follow, or at least start from your advice! I did my upper and lower bushings in the rear of my 2000 runner, and had a great go of it. Got everything prepared and went with Energy Suspension bushings. Got the runner up on the jack stands and had the floor jack under the axle, and AWESOME-O! All my bolts except one on the passenger upper slid out with no ratchet strapping! And when I whipped the ratchet strap out for the last bolts, my wrenchin' buddy was amazed! One thing that I want to present, as it was very successful on my California, no-road-salt-having runner, is the use of the threaded rods in the bushing press kit for doing the press out of the lower sleeved bushings. I did not need the 20 ton press. I set up the press sleeves and applied penetrating oil and then heat, and my Milwaukee Hi-torque Impact driver was enough to press those suckers out. I sanded the bushing surfaces of the rods with 200 grit wet/dry sand paper before installing the new bushings. I did not read your latest comment, thus I greased the things to kingdom come! I also did the sway bar bushings (Energy Suspension) and panhard bar bushings (Nolothanagainae). I can not adequately express what a phenomenal difference this made in the way my truck drives. I thought my front end was getting sloppy and was getting ready to go at that, but knew that the rears needed work so started there for a warm-up to doing the front lowers and ball joints. With the new rear bushings, it's rock solid again. I heartily recommend to all your subscribers that if you have a 3rd gen with over 200k and you don't know if the bushings have been replaced, just DO IT! Took three hours including set-up and clean up, and Wham-O, what a difference! Thanks again! Greg
Hey Greg, you're welcome. We love hearing how our videos have helped people out. I'm glad it all worked out well for you and thanks for sharing that those threaded rods that come with the press sleeve kit indeed work pretty well. Since I have the 20 ton press, i forget I have those things. Fresh bushings for these rigs definitely make quite a difference. Great job getting it done. Happy Wrenching!
Tim- I just finished this on my 3rd gen last night and put new Whiteline bushings. I got lucky and didn’t have to pull my rear end to the rear or forward when doing the rear lower/upper LCAs. Thanks for the informative video! It definitely helped me out!
I just had to get a press after watching your channel, and seeing the latest sic mods you've just done to yours. Finally got mine last week. I did rear lower control arm today and it went just like the video. Press sleeve slightly stuck exactly the same. I got to around 12 tonnes before movement of the bushing, my torch was getting low so I probably didn't heat the arm enough. Anyway Timmy, you are the best. I'm loving being able to do all this stuff. Cannot thank you enough.
Dude! that is awesome. We are STOKED you're doing your own work. I'm sure you feel a level of accomplish after your complete the job yourself, and remember most importantly, you're saving yourself money and have the piece of mind you know it got done right. We appreciate you stopping by the comments section to share your success story. Keep on wrenching! - Sean
My dad and i got my front suspension running real tight and smooth after watching your videos on the bushings and ball joints.. Now on to the rear end.. We're gonna tackle this beast starting tomorrow... hope it goes a lot easier than the front did. So much work.
Good job doing all that work. When you compare how much a new rig would run you, doing the work is worth it. Now, if you were going to pay a shop to do all this bushing work, the cost would be massive and then maybe it wouldn't be worth it. Doing your own wrenching pays off big. Also, it's pretty damn cool you get to do something like this with your dad. You'll fondly remember times like this you got to spend with your dad when you're older.
107 foot pounds on the nut, not on the bolt. The old bushing can be removed by knocking out the center sleeve and cut the outer sleeve with a hacksaw, for those who do not have a press or the proper size sleeve. Also, if the lower control arm (trailing arm) bushings are shot, so are the upper ones. Replace all, especially if switching from rubber bushings to polyurethane. Also, when installing polyurethane bushings, it won't matter if the vehicle is on the ground for final tightening, it only applys when installing OEM style formed rubber bushings.
Gotta say, your videos make owning a 3rd gen so easy ! Thanks a ton. Ended up investing in the bushing pull/press kit, Whiteline bushings, and all new upper rear arms. Gonna do the lower bushing replacement today
Hey Tim, first of all, great name. Secondly, we're glad to hear you like our videos and you're making good use of them. Good luck with all the work you have planned and thanks for taking the time to comment. Happy Wrenching!
TLDR: HARDWARE SPECS - BOLT - metric grade 10.9 high strength, M14, 2(thread)x100(length excluding head) with the same threading pattern.. $1.50/bolt at Fastenal After watching your rear axle seal/wheel bearing video, I decided to go ahead and purchase the HF 20-ton hydraulic press. Good suggestion! Turns out I didn't even have stock control arms on my truck (purchased used) so I bought some used stock arms in good condition, pressed out those bushings, installed Whiteline #W63378. Reason I'm commenting is because 2 of my bolts were so seized that I had to cut them out and the other 2 are just plain nasty. I looked up OEM hardware and the cost is insane. Found the perfect fit at Fastenal - metric grade 10.9 high strength, M14, 2(thread)x100(length) with the same threading pattern.. $1.50/bolt - all 4 cheaper than a single OEM. I've seen other people searching for hardware on forums and many end up going with OEM. Thought you might want to add the specs to description in case anyone else runs into nasty hardware. Thanks again for all the high quality videos!
@@TimmyTheToolman I recently took my control arms off to take the whole axle out for some unrelated work. I live in the Rust belt and so I was expecting that I might have trouble with the bolts being rusted into the bushings, but they came right out. The bolts that came out of my control arms seem to have a green finish on them. I wonder if this is a corrosion resistant finish. Just wondering if you ever noticed that.
Oddly-after watching your channel for the last year I have found myself looking at Craigslist for a 3rd gen 4 Runner -👍🏻 Your videos are so well done man. Have a Tacoma and FJ now why not make room for the 3rd gen.
Nice collection. I wouldn't mind owning a Tacoma and an FJ too. What do you think of the FJ? I'm in the market for a second vehicle and was considering one of these. The only problem is everyone wants stupid money for them. Same goes for Tacomas and 4runners. Everything for sale is sky high right now. I want to feel like I got a good deal and paying 4-5k over Blue Book sounds a little nutty to me. Glad you like our videos. Are there a lot of videos available for the FJs?
Timmy The Toolman. There are good handful of videos for them for nominal fixes. Not comprehensive stuff like you do. You’ll love owning one. So capable and short wheel based. The 4 link set up in the rear is exactly like the 4Runners. You’ll have no issue wrenching on them. The 4.0 motor is bullet proof. I hear you in the price. I’m here in AZ where most of these and Tacoma are still fairly reasonably priced and rust free. Just got mine in July. Armored skids. Front and rear bumper. Total Chaos UCs. Icon shocks at all 4 corners. Metal tech long travel rear control arms. 150k miles. 2007. Reinforced frame gussets. Known problem in early model years. 35” tires. 4.88 gears. All this done by prior owner. Paid $16,500. It has over 9k in aftermarket equip. First thing I did. Took it dealership to handle any recalls for free. Just one thing needed to be addressed. So check the Phoenix metro market✌🏻
Wow, that was a hell of a deal you got. Might be worth a flight over. In my area, they'd ask for over 20k for that rig. I'm going to start looking in Phoenix area.
I was looking for a nice vehicle for my girl and saw a 2006 tacoma 4x4 quad cab that was super clean with a great one owner carfax with all dealer service done every 5k miles for $11k but it had 211,000 on it but it was clean as could be. IT was at autonation Toyota in tempe.
Giving this a go this weekend. Got the upper and lower whiteline bushings. Will tackle these and then get the pan hard and sway bars done next. Hopefully that does the trick and I don't need to do front control arms, but we will see.
Hi Tim, Could you speak to the ride quality after replacing all your suspension bushings with Whitelines? I understand poly type bushings is more durable and harder so it may make the steering and suspension feel tighter with less play. Do you see any downsides? For example, have you noticed more road noise and/or jarring when going over bumps as compared to OEM rubber?
I have no complaints with the poly bushings. It seems one of the common complaints with poly bushings is they can squeak, but from my experience, the only ones that have squeaked on me are the sway bar bushings. I spray some silicone spray in them and they quiet down.
The question was not really answered and thank you of course but does the ride quality feel better? Tighter? Loose and comfortable? 99 sr5 with original bushings and wounderin if worth replacing if not broken
Why to put the 4runner on jack stand to change the rear control arms ?? Their is a guy on TH-cam that have a 2005 4runner and he changed control arms with out lifting the truck , i am just wondering because it looks more simple the way he did it . I going to try to replace my next week , thanks for posting this videos , I Learn a lot with your channel. .. 👍
You lift it off the ground so you can manipulate the rear end the way you need to in order to take pressure off the bolts. With the tires on the ground, you won't be able to pull the rearend forward or backward very easily.
Thanks and you're very welcome. I suppose you could take them off to re-grease the bushings, but I personally wouldn't. The only way I'd remove mine again is if the bushings needed replacing. My Whiteline bushings are still holding up fine with around 45k miles on them and I do a fair amount of off-roading in my rig.
I looks like the axle shift when the control arm is disconnected at least correlates to the side of the axle the shock is connected to. The driver's side shock is behind the axle for example, perhaps pushing it towards the front of the car, which you have to compensate for with the ratchet straps. The passenger side shock is in front of the axle and maybe pushes it towards the back of the car. So threrefore, I would suggest test this if and when I need to do mine or if you do this job again, by disconnecting the lower shock mount and supporting the axle with a stand before disconnecting the control arm.
Steven Bauer That is a solid theory. Maybe I'll try that if I do this job again. There was quite a bit of tension though on the rear end and I'm having a hard time thinking that's all attributed to the rear shock but it's entirely possible.
I like this idea. I'm about to do my control arms. Will let you know if I end up disconnecting the lower shock mount prior to disconnecting the control arm.
When putting in the arms with the new bushings, I had a hard time fitting the arms especially the rear into place, and using my mallet didn't do much. So I used the oem bottle jack that comes with the 4runner since its small enough to only touch the metal part of the arm without touching the new bushing. Just pump the jack and tighten the ratchet and the holes lined up perfectly. The bolts slid in without any effort.
Great video. I was ready for it, unfortunately my 4R is 4th gen, 2005. I spent more than an hour searching for bushings to fit my rear lower control arm. NO LUCK. Can somebody help?
We don't know. We've never done bushing replacements on a 4th Gen. Your question will have a better chance of being answered on a Toyota forum or Facebook group.
steve jette Hey Steve, glad you like the video. I went from a bicycle buying disease to a tool buying disease. A nice big shop with a lift would be nice. Do me a favor and put a good word in for me with Santa. I've mostly been a good boy this year. Mostly.
Thanks for the video! Yes one of my lateral arm bolt broke on me i tried getting oem bolts but its too short, anyway you can lead me to the right direction for a new bolt. Tia
Timmy Ive got a 3rd and 2nd gen 4runner. Your videos are by far the best. I wish other guys are this thorough. Do you see yourself doing and on the 2nd gen? I really want to put a 3.4 in it and toss out the 3.0!
Hey Steve, I don't anticipate doing much with 2nd Gens because we're more about the 3rd Gens but I would definitely work on one if a local person asked me for help. Yeah, the 3.0 Liter engines don't have the greatest reputation. Head gasket failures seem to be the big problem with them. A 3.4 liter swap would be a nice project. It's always nice to hear people like the videos we make. We want people to be successful when following one of our tutorials and that's why we try to be as thorough as possible. It really sucks when you're using a video to get something done only to find a crucial step was glazed over or skipped altogether. Where do you live? Maybe we could help you out with the engine swap? We're based out of San Jose, California.
So just a quick question... The press sleeve kit, does this allow you to do press work without an actual press, by slipping the threaded rod through the assembly you are working on? Thanks again Tim and crew for your superior work.
Hey Mike, yeah, those long threaded spindles in the kit are for doing press work without a press. You're welcome Mike. We're glad you like what we're doing.
Make sure it is what it is. I cannot imagine what a 17mm bolt can do to a bushing. Those metal sleeve is to protect the rubber/poly bushing from rubbing when suspension parts move, maybe I am wrong but check if someone did wrong job. My manual says same procedure for all 4runner so.
Hi Timmy, Have 2 questions : Does front low control arm bushing easy to push out than rear control arm bushing? Does this after market bushing last ? I did replace mine front low control arm bushing years ago. I want estimate how hard it is. Thank you for your time
I would say they take similar force to remove. I wouldn't say either are hard to remove. I can't comment on the longevity of the aftermarket bushings because I haven't had years of experience with them.
Hey I’m having trouble changing the upper rear trailing arm. There is about 1/4 of an inch away from everything fitting like it should. Do I need to use a racket strap for the upper control arms? I’ve changed my rear lowers thanks to you.
Yeah sometimes things get tweaked and the only way to pull the axle close enough would be with a ratchet strap - we show this technique in our rear control arm bushing replacement video
Question... 6 years later :) - any reason you cant do this with the truck on the ground or on ramps? Or the rear axle on stands? Or does the suspension need to be at full droop for some reason?
@@CallMeJackWagon You can try what you're suggesting, but it's helpful to be able to manipulate the rear axle to take load off the bolts so you can get them out and back in.
Thanks. Glad you like the video. I'm guessing you meant a Driveline Universal Joint video? No plans for the near future but we'll do one at some point. The double cardan joints are next to impossible to repair because quality replacement parts are hard to source. The single u-joints near the differentials are doable though.
Tim - do you think one could push out the old bushings with just a ball joint press tool? Or perhaps using adapters in a large (8") heavy duty vice? Thanks for all your videos, you've saved me major mula!
Hey Clay, yes to both. If you have the right size balljoint receiving and driving adapters, I think a balljoint c-press could do the job if you also use some heat. Same goes with the vise method. As long as you have the right size adapter to drive the bushing out and the right size adapter to support the arm and receive the bushing, it should work. Just remember, heat is your friend. Good luck with the job.
@@TimmyTheToolman Just to follow up on this, and so other viewers know, I would recommend to not attempt pressing these bushings with a vice or ball joint press. I tried both and couldnt gather enough mustard to get them out. Not only that, I began questioning the integrity of the tools with that much load placed on them. I broke down and bought the same HF 20 ton press you have Tim to make the job go smoothly. I was surprised how much force I had to put on the jack to get them to budge....maybe it was just my particular rig but I did not think they should have needed that much force (much more than what was depicted in your video). No rust on my rig either, and I used plenty of heat....All in all though a successful few hours of wrenching, and boy did my ride improve drastically! 242k miles on original bushings. Thanks again Tim!
4x3Lander make sure you come back to the comments of this video and let us know of your success and anything you learned that someone else could benefit from.
Hey Tim! Getting ready to do this on mine. What are your thoughts on the one of the FEW negative reviews for the Whiteline kit quoted below: "Stick with OEM on this one! Reviewed in the United States on February 27, 2020 Maybe I'm wrong but... After checking the original trailing arm configuration and the configuration their replacements, I don't think using these on the lower trailing arm would be advisable. it appears the poly bushings would severely limit the articulation of the lower trailing arm maybe even breaking a mount. Especially if you are doing some extreme 4 wheeling. The OEM configuration has the entirety of the elastic bushing material inside the arm and allows a great deal of flex. The poly's not only fill the arm the also take up all of the slack space between the arm and the mounts. Hence the very limited flex. Toyota engineered their trailing arm like they did for a reason."
Mark just reported back that he is plenty satisfied with his bushings, no noise, no issues. With that said, will they bind up under extreme articulation? Maybe so, but overall most people are very satisfied with these bushings
Yes. Once you have the bolts installed, you no longer need the ratchet strap. The ratchet strap is just to assist you in getting the alignment of the control arm with the frame and the rear axle so you can get the bolts in.
Great video, is the behavior of the rear suspension wanting to go fwd or back depending on which side, the same on all vehicles? I have to replace the rear pass rearward control arm on a 2002 AWD RX300....tons of squeaking from it. I was going to just do the bushings but I am all "bushed" out from last week's fight with rear shackles on an old rusty Dakota.
It's hard to say which way the rearend wants to shift on you. I thought I had it figured out after we made this video but when I set up the ratchet straps on my 98 3rd Gen 4runner to do the same job, it didn't work out. It's just trial and error which way you need to pull the rear end to make it easier to get the bolts free of the frame.
I think one could argue maybe it would be a good idea to get one after if the bushings in the rear control arms were really wasted. I'm not an expert in alignments but the machine an alignment tech is using shoots a beam from the front to the rear tires. If the rear end was shifted to one side or the other, would it dramatically throw off the adjustment in the front? I don't know if it would. No adjustments happen in the rear. The alignment tech adjusts the toe, camber and caster all in the front. I've replaced rear control arm bushings on 3 rigs now, which includes mine, and none of us got an alignment afterward. All our vehicles drove fine. So Sean, I think you're fine not getting an alignment.
If you do enough of your own work, it will easily pay for itself, maybe in just one use. Shops can charge quite a bit for press work. I've now used that press and sleeves for 4 rear axle seal jobs, front wheel bearings for the manual hub conversion video we made and now this video. People talk a lot of crap about Harbor Freight tools but I've been pleasantly surprised with them. The press and transmission jack I bought from them have worked flawlessly. And, that press sleeve kit I bought off Ebay has been great. Money well spent in my opinion.
Yeah, it will. But, if you're looking to buy a Harbor Freight press, I'd buy the 20 ton press because it can handle more jobs and it's not much more money.
Do you think that the polly bushings limit the articulation of the rear axle when off roading? I usually like polly bushings but I'm undecided in this case.
Hey Chase, you could melt them out but then you still have the old bushing sleeve you have to deal with. You could try to cut if with a reciprocating saw as a relief cut and then try to drive it out with a hammer and chisel. I take it you don't have a press?
Timmy The Toolman yes I don't have a press. I may rent a bushing press to drive them out from Autozone. A useful multipurpose tool. I will let you know how it goes! Thanks.
Hey Chase, if you enjoy wrenching, I highly recommend you go ahead and invest in a Harbor Freight 20 ton press, get the press sleeve kit I have and maybe a couple more press plates and have some fun. I've used my press for a ton of things. It's a very handy tool to have.
Buzz No problem. I guess you're going to attempt this with a balljoint press. With enough heat, it might work. A hydraulic press is obviously a better option. You also might be limited by the balljoint cups available to rent. You need a size that fits the outer diameter of the control arm and then one that will contact the sleeve of the bushing. Not to be pessimistic, but I'm doubtful you'll be able to rent the perfect sizes. If you're going to be doing a lot of work like this, a Harbor Freight 20 press and that press sleeve kit I have are a great investment.
I bought too much Energy suspension and not enough Whiteline. I think I only have the Whiteline front lower control arm. Hope the machine shop can get all this pressing done.
The only problem I had when I did this is for some reason my urethane bushings kept wanting to push themselves out as I was trying to do all this don't know if anyone else has experienced this but I did it exactly how he did and for some reason they just kept pushing themselves out as I was trying to get everything done. Granite I got them done and they are in but just curious if anyone else has experienced that issue
They get air trapped in between the parts because of the grease! Press them in slowly and put the steel tube in only after the urethane parts are fully seated or you'll get even more air trapped in there.
If the control arm bushings were really wasted, you would get excessive movement out of the rear end but I don't know if it would be enough for someone to spot it following you down the road. I believe vehicles that are crabbing down the road are mostly due to damaged components from an accident. The frame got bent and/or suspension components got bent and the shop that fixed it didn't realize these components were compromised.
Oh, you're looking at a vehicle that drives like this. DONT'T DO IT!!!!! If they haven't told you about an accident it was involved in, they are lying to you. Run away from this sale!
Sorry Ian, I don't know the answer to this. Maybe ask this question on a Toyota forum like IH8MUD.com because they have a land cruiser section of their forum.
If you are replacing the upper control arm bushings, lower control arm bushings & panhard (rear track arm) bushings....is there an order or sequence you recommend? I've pulled the panhard and will take it to the machine shop first/reinstall since you used tie straps to hold everything in place. Can I remove all upper/lower at once? Should I do one side at once? Lining up bolt holes is a concern.
I would do one side at a time. If you disconnect both sides, upper and lower, all at the same time, I don't think the rear axle would be very stable and it might be harder to line things up. I'm going to help a friend do all his rear control arm bushings soon and tackling one side at a time is what I'm planning on doing.
Just changed mine whole rear, everything old out and new in. I had to take all off, so I put pan head first. First attach it to differential frame, second use jack to raise differential housing so pan head align to chassis bracket. Note the vehicle should be on jack stand all the time via frame near lower control arm brackets. a 3/8"(19mm bolt) extension or 1/4" extension(17mm) will help you align hole for bolt to go in if it needs persuasion. Second goes upper. Again do one side first. If doing second side you find it's not fitting, a jack under the differential and few in and out should help you align. Last goes lower, same procedure. Grease inside and flanges, if dry they will wear like filing with sandpaper when moving. Toque via bolt not nut. Phew by myself it was hell, but got done. I welded panel to brackets to lower control arm from bottom both sides, and also a panel onto inside chassis next to muffler because of rot. Replaced even gas tank, changed fuel pump etc and all. Well I did watch timmy's video which was relief. I had manual and few similar project under my belt.
Not that I'm an expert, but I did each one completely before moving to the next. Driver lower, upper then passenger lower/upper. Got the bolts for each pne back in before removing the next one, tightened them all, then full torque once back on the ground.
Ya I don't have a press and wanna paint all 4 control arms and panhard bar before pressing new bushing in... Gotta take in to my dads shop off site... What to do?
Hi Tim, your dewalt power tool have what model number is? Please, i can’t choose when it has 2 models are DCF 899P1 and DCF 899M1. Can you help me,Tim?
Jack ' I do showcase their tools in a lot of our videos. I reckon they are getting a lot of free advertising. Maybe one day they'll thank me and send me some free swag.
Disregard...I found it (or one very similar). "8MILELAKE 26pc Universal Press and Pull Sleeve Kit" www.amazon.com/dp/B01C6UT55W/ref=sspa_dk_detail_8?psc=1&pd_rd_i=B01C6UT55W&pd_rd_w=hijq6&pf_rd_p=8a8f3917-7900-4ce8-ad90-adf0d53c0985&pd_rd_wg=rBE2B&pf_rd_r=9NCV24GPPR9K8TWMJ9TA&pd_rd_r=112d8018-be89-45c4-8ef5-a7f12d65da61
Hey Timmy please help me, I just bought a 2002 4runner 140k miles! I start hear the noise( I think from engine compartment )when I drive the car after a few minutes! ( don't here the noise when start the car). The noise noticeably at idle or at stop light . As soon as I accelerate the noise gone!. I hear the noise more when shift to drive or reverse, at park and N it's less noise. Also, when I turn the A/C even the car in Park the noise start appears! I really don't know what going !
Helping someone pinpoint the cause of a noise over the internet is very difficult. Your best bet is to buy yourself a mechanic's stethoscope and start searching for the origin of the noise with somebody's help. While you listen inside the the engine compartment at different locations, have a helper put the transmission in drive, in reverse and turn on the AC. Listen near all the pulleys (AC Pump and AC Idler, Power Steering, Alternator and Fan). There's two types of attachments for the stethoscope, one that's a small cone for listening to general noises and a metal rod you can put right on the surface of the accessory near the pulley to listen to the bearing. Here's the mechanic's stethoscope I purchased: www.amazon.com/Lisle-Drake-Off-Road-Tools/dp/B0015DLMOO/ref=sr_1_fkmr0_1?ie=UTF8&qid=1513869793&sr=8-1-fkmr0&keywords=lisle+mechanics+stethoscope Let me know when you figure out the origin of the noise.
Timmy The Toolman thank you! I did buy one on harbor freight buy still won't be able find the noise ! I touch all around the engine when the noise appear and know that that is knocking noise! It's everywhere can't tell where exactly. For your experience from 4runner 3rd I hope you can think a common symptoms of that knocking noise like I just described!
A knocking noise is a whole different story and most likely has to do with your engine and not any accessory equipment bolted to the engine. Valve lifters can cause a ticking or knocking sound. I know on my Subaru my engine knock was caused by piston slap. I did read that engine knocks could be attributed to fuel detonation issues from an improper air/fuel mixture or maybe the spark plugs are severely worn. When was the last time the spark plugs were changed? Have you ever cleaned the Mass Air Flow Sensor? Is the engine oil in good shape and at the proper level? Thai, I know some things but I'm not as experienced and knowledgeable as some people might think. Even though I hate to suggest this to a DIYer, you might want to do a Yelp search for a good auto shop in your area and pay an hour labor for them to help you diagnose this problem. Let me know what you figure out.
Timmy The Toolman thank you Timmy, i change the spark plug when I got the car and valve cover gasket cause it leak really bad! The mass senors fine and I did clean it with cleaner! I have a scanner( autel maxi elite) I check a live data. Mass air flow reading good! and long, short strim around +- 2 mean good mixture fuel ! The previous owner did the timing belt so I did some research and found a very useful information that over tight the driven belt can cause the hamornic balancing pulley pull to whatever direction have more force . 3 driven belt on 4runner if all of them over tight can cause damage the harmonics pulley, so the crankshaft stress and scratching the rod bearing. It might have a little gap on rod bearing, so when piston go up and down, it makes a knocking noise ! I think this very close to my case ! Should I take off a oil pan and check them ? How to check the rod bearing ?
To pull off the oil pan, the front differential needs to come out. I've pulled the oil pan off before but the engine was removed from the vehicle. I don't know how you check the rod bearing. I've never done something like that before. Pulling the differential out and getting the oil pan off is a fair amount of work. We have a video for the front differential removal. It's tight to get out but we learned a trick from a subscriber. He said he disconnected the driver side motor mount and jacked up the engine a bit to give the differential more clearance to be removed. Here's the differential video: th-cam.com/video/w_gPiDvh9v4/w-d-xo.html Here's our trans mount and engine mount replacement video because it's related to this job: th-cam.com/video/g_4DiywsSbk/w-d-xo.html And, here's our drive belt video: th-cam.com/video/Zi1XfFUOjKc/w-d-xo.html I wish I could be of more help with this, but like I said, I'm not a professional mechanic with experience in all aspects of automotive repair.
@jonesafro It means you won't put the bushing in a bind. The old rule is you tighten down rubber bushings at their neutral state, which would be with the wheels on the ground and fully weighted by the vehicle. If you tighten rubber bushings with the vehicle unweighted, the suspension components will be fully extended. When you drop the vehicle to the ground, the bushings will be in a bind all the time, which will dramatically lessen the bushings' life. With Poly bushings, they can not be put into a bind because they can slide infinitely so you can tighten down poly bushings with the rig unweighted. Hope that makes sense to you.
Hey Justin, Mark reported back that night after his 2 hour drive back to Napa from San Jose. He said there was a big improvement. Bumps and railroad track crossings that use to cause lots of rear end movement didn't cause it anymore. He's very happy with how it turned out.
Timmy The Toolman thanks for your response. Love the content. Have any friends that drive a Tacoma that need work maybe you can video that too. That’s what I drive, lol. Regardless, keep up the good work.
We actually did a lift video on a 1st Gen Tacoma but lost the footage when Sean had a mishap with his external hard drive. There are some local Tacoma dudes that know about us so I would definitely work on a Tacoma if the opportunity arose. 1st Gen Tacomas are very similar to 3rd Gen 4runners so many of the jobs we've done work for Tacomas as well.
Timmy The Toolman that’s why I watch your vids, because of the similarities. Gonna install new coil springs and Bilstein 5100s this Friday. Thanks again.
I've got one word for you Scott, "Haters". We literally have people subscribed to our channel just so they can give a thumbs down to everything we post. The reason why we know this is we will quite often get a thumbs down to a video we just made live and there's no way the person even had time to watch it. People will make jerk comments and then are surprised when we fire back. We've blocked over 20 people from being able to comment on our channel and that list will grow because there's no shortage of A-holes in the world. I don't think they dislike Sean, it's me they hate because I don't take shit from people on our channel or on the Toyota forums. It makes me smile every time we get a thumbs down because it let's me know I really got to someone and their continued petty actions prove to me they deserved the shit I talked back to them.
@@TimmyTheToolman It's sad that you have run your channel that way and actually weed out the pieces of shit out there. At least you know there are far more people who appreciate your time, these videos and your advice on the forums. Easily some of the best how-to's I've seen on the Tube. Just keep doing what you're doing! I appreciate the freedom of speech but I truly believe social media may have given people too much of a voice as far as attacking people, being keyboard heroes, or just pieces of shit in general. Reading comment sections of posts on various forms of social media is downright scary at times. Now I'm about to tackle my driver's side axle seal for the fifth and hopefully last time. My new Harbor Freight 20 ton press is just about assembled. I've been fighting this a few months and I'm ready to be done with it. Your video for that is a good tutorial also. 👍
@@scottk.8494 You're right Scott, it is unfortunate. If a person's comment isn't too out of line, I will respond because I view it as a teachable moment for them and anyone else reading through the comments. But, some comments are just so disrespectful or out of line they don't deserve a response, so these people just get blocked from being able to comment on our videos. Sean and I do know the high majority appreciate what we're doing so these are the people who we're putting out the effort for. Good luck with the job and thanks for taking the time to comment and support our channel. Happy Wrenching Scott!
Timmy Do you have to remove the outer shell in order to put in the new bushings? I know the white line bushings come with the bushings and inner metal sleeve but no outer metal shell. I tried checking whiteline website for the installation instructions on this but they’re not available. This article mentions the outer shell www.suspension.com/blog/how-to-burn-out-suspension-bushings-the-right-way/
Hey I like your videos and everything but I think I it will help more for you and ppl watching if you made them a little shorter like 15 ish. Bc a lot off ppl will skip through it Miss parts or just click on another one because of the time.
Hey Nick, glad you like our videos. The length of the video is dictated by the subject matter we are covering. It would be nice to have short and sweet videos because we know people's attention spans are getting shorter and shorter, but we don't care if people have short attention spans. We'd rather provide very detailed videos so people can be successful following one of our tutorials. For example, how can we make a 15 minute video for a timing belt job, transmission swap, differential replacement, wheel bearing replacement, supercharger install, etc, etc. Sean and I agreed we wouldn't make videos that would leave people lost. Worrying about the length of the videos would force us to cut out important content that might make the difference between somebody being successful with a job or failing at it. People come to us for the detailed videos that we offer. If people don't have the patience to watch a video that shows them step by step how to perform the job, I see that as their problem, not ours.
You should check out the TH-camr chrisfix. Especially his drum brake video I dont mean for my comment to be taken it in a negative way or anything. I just think it would help you guys grow as a channel.
Well of course you can do that. Tools are an investment and will pay for themselves many times over if you like to do your own work. I've used my Harbor Freight press for lots and lots of jobs that have saved me big money. This is a tool that costs around $175-200 depending if you catch it on sale or pay full price. The press sleeve kit we use has also been used for many many jobs. That kit runs around $130 online. If you're familiar with our channel, you know how many times we've used these tools to be successful with a job and save tons of money in the process. So, to each his own. You spent your money on complete control arms while others choose to purchase tools that will benefit them many times over.
I agree..I have all those tools as well and have done this professionally all my life but the older I get i find i value my time more and more..So 4 bolts and done is better for me. And I also wanted to let people who don't know that there are other options than having to press out and replace bushings and that Toyota is really good at it! Keep up the good work:)


![[MV] A leap of faith...ความเชื่อใจครั้งสุดท้าย (From "Petrichor the series")](http://i.ytimg.com/vi/U1piZH2CNXA/mqdefault.jpg)


*PLEASE READ THIS AND THE VIDEO DESCRIPTION FOR HELPFUL INFORMATION*
In the video, we show lubricating the inner diameter of the arm and outer diameter of the bushing. You are technically only suppose to lubricate the inner diameter of the bushing where the sleeve rides and the outer faces of the bushing that meet up with the frame. The bushing should be inserted dry, no lube, into the control arm.
O
Thanks for another great vid, Timmy. Question: what do you expect is the consequence (if any, really) of lubricating the bushing versus inserting it dry?
@@leifrudd8934 I honestly don't think it makes a huge difference. The idea with not lubricating the outside of the bushings is you don't want the whole bushing pivoting in the control arm. You want the pivoting to happen at the sleeve inside the bushing. Maybe the bushing will be more prone to wear prematurely if it's allowed to pivot in the arm. But, since it's lubricated, I can't see excessive wear happening.
@@TimmyTheToolman Yep, that was my thought as well, concerning wear or the lack of it. I then was wondering about side-side slippage, but the bracket prevents much of that. Anyway thanks for the vid and your willingness to answer questions on a 3+ year old vid :-)
@@leifrudd8934 You're welcome Leif. We try to answer all questions and acknowledge all comments on our channel. Some sneak by us but we believe part of running a channel like this is to respond back to people. I think really big channels have problems keeping up with the questions and comments but we're not that big yet. Happy Wrenching!
Your videos have helped me so much over the last years, have probably saved me at least $4,000 and has taught me invaluable skills. One thing I found while replacing these as well as the uppers and the panhard bar was that I was able to press the bushings out with the Ball joint/ C Clamp press that i rented from Oreillys. It came with a receiver that fit all the pieces perfectly and the rod on the C clamp pushed all the bushings out without any attachment. Removing the bushings took 1 minute each (with an impact drill)! Still had to cut off the outer layer of rubber of course. Hopes this info helps for those who don't have a press. This was on a 1997 4Runner, unsure of newer models have the metal sleeve surrounding the rubber bushing but mine did not.
@@justinrowe5579 Thanks for the continued support and for this comment! Super stoked to hear that we have saved you so much money and more importantly, taught you something new! We hope your comment and experience with the rented C-clamp helps others out there in your situation who may not want to spring for a 20-ton press. #sicmods bro!
- Sean
That trick with the ratchet strap was worth its weight in gold. Thank you Timmy for saving my butt this weekend. FWIW for Lower Control arms the ratchet worked the way you describe in this video. I also watched the Upper Control Arm video where you mention that the persons runner worked opposite. When I did uppers I had to flip the ratchet the other direction from lowers for each side. For example for driver lower I pulled the axle back, but for driver upper I pulled the axle forward.
Hey James, good to hear our tips from this video helped you out. Thanks for taking the time to comment. Happy Wrenching!
My question is can you take both the uppers and lowers off on both sides all at once along with the panhard bar? I want to take them all to my dads shop to press them out and paint all at once, thanks for the vids timmy!
@@Muskrat6969 If you did that, the axle housing has no support now other than the shocks. You would have to make sure the front of the 3rd member at the pinion flange is supported because the axle will flop downward from the weight of the 3rd member. So, two jacks under each side of the axle tube and one jack under the pinion flange. You have to be careful because that axle isn't light and if you drop it on yourself, you are going to be hurting.
Thanks for the great videos. I just did the both upper and lower arms. Anyone avoiding this job because they don't have a press should know you can do it without. I drilled out the rubber bushing material and the came out real easy. On the lowers I used a hacksaw to cut just through the sleeve. Then hammered the sleeve out with a cold chisel. Press is definitely easier. But its possible to do it without it. Also, awesone with the ratchet straps.. Thanks again for the great videos..
You're welcome Brian and thanks for sharing your tips to do the job without a press. Happy Wrenching!
I just got done with mine. I used a C-clamp to push the rubber out then a reciprocating saw (be careful not to cut too deep to damage the control arm:it can be done) than a flat head with a mallet to peel off that medal bushing.
Doesn’t take to much time
Can be done if ur on a budget
Worked for me hope it helps
Good job. Thanks for sharing your technique to get the job done.
Hi, Timmy!
First, thanks for all these videos. I have full confidence in my ability to do the work when I follow, or at least start from your advice!
I did my upper and lower bushings in the rear of my 2000 runner, and had a great go of it. Got everything prepared and went with Energy Suspension bushings. Got the runner up on the jack stands and had the floor jack under the axle, and AWESOME-O! All my bolts except one on the passenger upper slid out with no ratchet strapping! And when I whipped the ratchet strap out for the last bolts, my wrenchin' buddy was amazed!
One thing that I want to present, as it was very successful on my California, no-road-salt-having runner, is the use of the threaded rods in the bushing press kit for doing the press out of the lower sleeved bushings. I did not need the 20 ton press. I set up the press sleeves and applied penetrating oil and then heat, and my Milwaukee Hi-torque Impact driver was enough to press those suckers out. I sanded the bushing surfaces of the rods with 200 grit wet/dry sand paper before installing the new bushings. I did not read your latest comment, thus I greased the things to kingdom come!
I also did the sway bar bushings (Energy Suspension) and panhard bar bushings (Nolothanagainae). I can not adequately express what a phenomenal difference this made in the way my truck drives. I thought my front end was getting sloppy and was getting ready to go at that, but knew that the rears needed work so started there for a warm-up to doing the front lowers and ball joints. With the new rear bushings, it's rock solid again. I heartily recommend to all your subscribers that if you have a 3rd gen with over 200k and you don't know if the bushings have been replaced, just DO IT! Took three hours including set-up and clean up, and Wham-O, what a difference!
Thanks again!
Greg
Hey Greg, you're welcome. We love hearing how our videos have helped people out. I'm glad it all worked out well for you and thanks for sharing that those threaded rods that come with the press sleeve kit indeed work pretty well. Since I have the 20 ton press, i forget I have those things.
Fresh bushings for these rigs definitely make quite a difference. Great job getting it done. Happy Wrenching!
@@TimmyTheToolman Just insane how good it feels again! Totally satisfying result.
@@gpaolino And, you did it all yourself without paying shop labor rates. Win-Win!!!
Tim- I just finished this on my 3rd gen last night and put new Whiteline bushings. I got lucky and didn’t have to pull my rear end to the rear or forward when doing the rear lower/upper LCAs.
Thanks for the informative video! It definitely helped me out!
Good to hear the job went smooth for you Josh. You're very welcome.
I just had to get a press after watching your channel, and seeing the latest sic mods you've just done to yours. Finally got mine last week. I did rear lower control arm today and it went just like the video. Press sleeve slightly stuck exactly the same. I got to around 12 tonnes before movement of the bushing, my torch was getting low so I probably didn't heat the arm enough. Anyway Timmy, you are the best. I'm loving being able to do all this stuff. Cannot thank you enough.
Dude! that is awesome. We are STOKED you're doing your own work. I'm sure you feel a level of accomplish after your complete the job yourself, and remember most importantly, you're saving yourself money and have the piece of mind you know it got done right. We appreciate you stopping by the comments section to share your success story. Keep on wrenching!
- Sean
My dad and i got my front suspension running real tight and smooth after watching your videos on the bushings and ball joints.. Now on to the rear end.. We're gonna tackle this beast starting tomorrow... hope it goes a lot easier than the front did. So much work.
Good job doing all that work. When you compare how much a new rig would run you, doing the work is worth it. Now, if you were going to pay a shop to do all this bushing work, the cost would be massive and then maybe it wouldn't be worth it. Doing your own wrenching pays off big. Also, it's pretty damn cool you get to do something like this with your dad. You'll fondly remember times like this you got to spend with your dad when you're older.
107 foot pounds on the nut, not on the bolt. The old bushing can be removed by knocking out the center sleeve and cut the outer sleeve with a hacksaw, for those who do not have a press or the proper size sleeve. Also, if the lower control arm (trailing arm) bushings are shot, so are the upper ones. Replace all, especially if switching from rubber bushings to polyurethane. Also, when installing polyurethane bushings, it won't matter if the vehicle is on the ground for final tightening, it only applys when installing OEM style formed rubber bushings.
Thanks for sharing your thoughts.
Best channel on TH-cam.
Many would argue with you but THANKS for the vote.
Gotta say, your videos make owning a 3rd gen so easy ! Thanks a ton. Ended up investing in the bushing pull/press kit, Whiteline bushings, and all new upper rear arms. Gonna do the lower bushing replacement today
Hey Tim, first of all, great name. Secondly, we're glad to hear you like our videos and you're making good use of them. Good luck with all the work you have planned and thanks for taking the time to comment. Happy Wrenching!
TLDR: HARDWARE SPECS - BOLT - metric grade 10.9 high strength, M14, 2(thread)x100(length excluding head) with the same threading pattern.. $1.50/bolt at Fastenal
After watching your rear axle seal/wheel bearing video, I decided to go ahead and purchase the HF 20-ton hydraulic press. Good suggestion! Turns out I didn't even have stock control arms on my truck (purchased used) so I bought some used stock arms in good condition, pressed out those bushings, installed Whiteline #W63378. Reason I'm commenting is because 2 of my bolts were so seized that I had to cut them out and the other 2 are just plain nasty. I looked up OEM hardware and the cost is insane. Found the perfect fit at Fastenal - metric grade 10.9 high strength, M14, 2(thread)x100(length) with the same threading pattern.. $1.50/bolt - all 4 cheaper than a single OEM. I've seen other people searching for hardware on forums and many end up going with OEM. Thought you might want to add the specs to description in case anyone else runs into nasty hardware. Thanks again for all the high quality videos!
Hey Tim, thanks for the specs on the bolts for the control arms. I'll add it to the video description.
@@TimmyTheToolman I recently took my control arms off to take the whole axle out for some unrelated work. I live in the Rust belt and so I was expecting that I might have trouble with the bolts being rusted into the bushings, but they came right out. The bolts that came out of my control arms seem to have a green finish on them. I wonder if this is a corrosion resistant finish. Just wondering if you ever noticed that.
@@matts_.4494 Don't know anything about that green bolt finish. Maybe a previous owner replaced them with some special bolts.
Oddly-after watching your channel for the last year I have found myself looking at Craigslist for a 3rd gen 4 Runner -👍🏻 Your videos are so well done man. Have a Tacoma and FJ now why not make room for the 3rd gen.
Nice collection. I wouldn't mind owning a Tacoma and an FJ too. What do you think of the FJ? I'm in the market for a second vehicle and was considering one of these. The only problem is everyone wants stupid money for them. Same goes for Tacomas and 4runners. Everything for sale is sky high right now. I want to feel like I got a good deal and paying 4-5k over Blue Book sounds a little nutty to me.
Glad you like our videos. Are there a lot of videos available for the FJs?
Timmy The Toolman. There are good handful of videos for them for nominal fixes. Not comprehensive stuff like you do. You’ll love owning one. So capable and short wheel based. The 4 link set up in the rear is exactly like the 4Runners. You’ll have no issue wrenching on them. The 4.0 motor is bullet proof. I hear you in the price. I’m here in AZ where most of these and Tacoma are still fairly reasonably priced and rust free. Just got mine in July. Armored skids. Front and rear bumper. Total Chaos UCs. Icon shocks at all 4 corners. Metal tech long travel rear control arms. 150k miles. 2007. Reinforced frame gussets. Known problem in early model years. 35” tires. 4.88 gears. All this done by prior owner. Paid $16,500. It has over 9k in aftermarket equip. First thing I did. Took it dealership to handle any recalls for free. Just one thing needed to be addressed. So check the Phoenix metro market✌🏻
Wow, that was a hell of a deal you got. Might be worth a flight over. In my area, they'd ask for over 20k for that rig. I'm going to start looking in Phoenix area.
I was looking for a nice vehicle for my girl and saw a 2006 tacoma 4x4 quad cab that was super clean with a great one owner carfax with all dealer service done every 5k miles for $11k but it had 211,000 on it but it was clean as could be. IT was at autonation Toyota in tempe.
Exactly and you have room to negotiate. You know darn well they only took it in for about 5-7k.
Giving this a go this weekend. Got the upper and lower whiteline bushings. Will tackle these and then get the pan hard and sway bars done next. Hopefully that does the trick and I don't need to do front control arms, but we will see.
Hope it went well for you. I just saw your comment.
I just did this job on my 1990 HDJ81 Land Cruiser, wish I had used heat. Not a bad job, HF press worked great.
Yeah, a little heat helps. Good job getting it done.
Do you have a video for the rear upper control arms as well? Or is it pretty much the same procedure
Yes, we do. th-cam.com/video/IvBid-kIdiI/w-d-xo.htmlsi=462pT4KZTYqHdhED Happy Wrenching in 2024!
Timmy, that you sir! Once again you’ve made a great video that will help me with my 2007 FJ Cruiser. It may be an oldie but it’s a goodie!
You're welcome Chris. Glad you like the video. Good luck with the job on your FJ Cruiser. Happy Wrenching!
Hi Tim, Could you speak to the ride quality after replacing all your suspension bushings with Whitelines? I understand poly type bushings is more durable and harder so it may make the steering and suspension feel tighter with less play. Do you see any downsides? For example, have you noticed more road noise and/or jarring when going over bumps as compared to OEM rubber?
I have no complaints with the poly bushings. It seems one of the common complaints with poly bushings is they can squeak, but from my experience, the only ones that have squeaked on me are the sway bar bushings. I spray some silicone spray in them and they quiet down.
@@TimmyTheToolman Thanks so much!
The question was not really answered and thank you of course but does the ride quality feel better? Tighter? Loose and comfortable? 99 sr5 with original bushings and wounderin if worth replacing if not broken
Why to put the 4runner on jack stand to change the rear control arms ?? Their is a guy on TH-cam that have a 2005 4runner and he changed control arms with out lifting the truck , i am just wondering because it looks more simple the way he did it .
I going to try to replace my next week , thanks for posting this videos , I Learn a lot with your channel. .. 👍
I forgot his channel is call : xinnkoda
You lift it off the ground so you can manipulate the rear end the way you need to in order to take pressure off the bolts. With the tires on the ground, you won't be able to pull the rearend forward or backward very easily.
excellent video. thank you!! I have a question, after a period of use, should I grease the bushings???
Thanks and you're very welcome. I suppose you could take them off to re-grease the bushings, but I personally wouldn't. The only way I'd remove mine again is if the bushings needed replacing. My Whiteline bushings are still holding up fine with around 45k miles on them and I do a fair amount of off-roading in my rig.
@@TimmyTheToolman Thank you very much for answering. vital information. I occasionally do offroading too. thank you!!
@@esmithzapata You're welcome.
I looks like the axle shift when the control arm is disconnected at least correlates to the side of the axle the shock is connected to. The driver's side shock is behind the axle for example, perhaps pushing it towards the front of the car, which you have to compensate for with the ratchet straps. The passenger side shock is in front of the axle and maybe pushes it towards the back of the car.
So threrefore, I would suggest test this if and when I need to do mine or if you do this job again, by disconnecting the lower shock mount and supporting the axle with a stand before disconnecting the control arm.
Steven Bauer That is a solid theory. Maybe I'll try that if I do this job again. There was quite a bit of tension though on the rear end and I'm having a hard time thinking that's all attributed to the rear shock but it's entirely possible.
I like this idea. I'm about to do my control arms. Will let you know if I end up disconnecting the lower shock mount prior to disconnecting the control arm.
When putting in the arms with the new bushings, I had a hard time fitting the arms especially the rear into place, and using my mallet didn't do much. So I used the oem bottle jack that comes with the 4runner since its small enough to only touch the metal part of the arm without touching the new bushing. Just pump the jack and tighten the ratchet and the holes lined up perfectly. The bolts slid in without any effort.
And once again, THANK YOU TIM FOR YOUR WONDERFUL WELL DONE VIDEOS THAT HAS HELPED ME SO MUCH
@@bricehysmith4501 You're very welcome Brice. Good job getting it done.
Great video. I was ready for it, unfortunately my 4R is 4th gen, 2005. I spent more than an hour searching for bushings to fit my rear lower control arm. NO LUCK. Can somebody help?
We don't know. We've never done bushing replacements on a 4th Gen. Your question will have a better chance of being answered on a Toyota forum or Facebook group.
I am going to bring you a bigger garage for Christmas. Or a storage unit for bikes. Anyway, this is another super-watchable video !! Thanks again.
steve jette Hey Steve, glad you like the video. I went from a bicycle buying disease to a tool buying disease. A nice big shop with a lift would be nice. Do me a favor and put a good word in for me with Santa. I've mostly been a good boy this year. Mostly.
Hello Timmy The Toolman! Greetings!! How are those bushing holding up? I might have to do that job on my 4Runner. Thanks for the video tutorial!
They're holding up well.
Thanks for the video! Yes one of my lateral arm bolt broke on me i tried getting oem bolts but its too short, anyway you can lead me to the right direction for a new bolt. Tia
You must have got the wrong bolt. Your local dealer parts department should be able to look up that part no problem and get it ordered for you.
Timmy Ive got a 3rd and 2nd gen 4runner. Your videos are by far the best. I wish other guys are this thorough. Do you see yourself doing and on the 2nd gen? I really want to put a 3.4 in it and toss out the 3.0!
Hey Steve, I don't anticipate doing much with 2nd Gens because we're more about the 3rd Gens but I would definitely work on one if a local person asked me for help. Yeah, the 3.0 Liter engines don't have the greatest reputation. Head gasket failures seem to be the big problem with them. A 3.4 liter swap would be a nice project.
It's always nice to hear people like the videos we make. We want people to be successful when following one of our tutorials and that's why we try to be as thorough as possible. It really sucks when you're using a video to get something done only to find a crucial step was glazed over or skipped altogether.
Where do you live? Maybe we could help you out with the engine swap? We're based out of San Jose, California.
So just a quick question... The press sleeve kit, does this allow you to do press work without an actual press, by slipping the threaded rod through the assembly you are working on? Thanks again Tim and crew for your superior work.
Hey Mike, yeah, those long threaded spindles in the kit are for doing press work without a press. You're welcome Mike. We're glad you like what we're doing.
I did this job today and my control arms didn't have metal sleeves, which made the job really easy--aside from all of the rust.
Really, no metal sleeves? Sounds like you're talking about the rear uppers. The rear uppers don't have a metal sleeve but the rear lowers do.
Timmy The Toolman no sir, these were the lowers and definitely OEM bushings installed from the factory
Hmmm, that is interesting. I've done 2 rear lower control arm bushing replacements so far and they both had sleeves. What year is your rig?
Timmy The Toolman Mine is an '01. But these particular control arms are from an '00 SR5. Might be an update with the facelift '01-'02?
Make sure it is what it is. I cannot imagine what a 17mm bolt can do to a bushing.
Those metal sleeve is to protect the rubber/poly bushing from rubbing when suspension parts move, maybe I am wrong but check if someone did wrong job. My manual says same procedure for all 4runner so.
As Timmy stated Whiteline Bushing Kit #W63378 for lower and #W63379 for upper rear control arm.
Excellent video with awesome narration. I will be doing this on a 2002 Infiniti QX4 One of the best I've seen.
Thanks Ty. Great to hear you like our video. Good luck with the bushing replacements.
Hi Timmy, Have 2 questions : Does front low control arm bushing easy to push out than rear control arm bushing? Does this after market bushing last ?
I did replace mine front low control arm bushing years ago. I want estimate how hard it is. Thank you for your time
I would say they take similar force to remove. I wouldn't say either are hard to remove. I can't comment on the longevity of the aftermarket bushings because I haven't had years of experience with them.
YOU ARE A LIFESAVER!!!!!!Along with my new battery powered impact!
Our pleasure Debi. Glad our video helped you out.
Will a 12 ton press get the job done?
Yes, it would work.
That press sleeve kit is very usefull
Yep, I've used it a ton of times. It's well worth the money.
Hey I’m having trouble changing the upper rear trailing arm. There is about 1/4 of an inch away from everything fitting like it should. Do I need to use a racket strap for the upper control arms? I’ve changed my rear lowers thanks to you.
Yes, use a ratchet strap to pull the rear end the way you want to make the connection.
Yeah sometimes things get tweaked and the only way to pull the axle close enough would be with a ratchet strap - we show this technique in our rear control arm bushing replacement video
Wow thank you so much for your timely response! You are the best :) I will try it tomorrow!
@@darwing6493 You're welcome Darwin. You'll get it.
Question... 6 years later :) - any reason you cant do this with the truck on the ground or on ramps? Or the rear axle on stands? Or does the suspension need to be at full droop for some reason?
@@CallMeJackWagon You can try what you're suggesting, but it's helpful to be able to manipulate the rear axle to take load off the bolts so you can get them out and back in.
awesome video! Any plans for a driveline universal bolt video?
Thanks. Glad you like the video.
I'm guessing you meant a Driveline Universal Joint video? No plans for the near future but we'll do one at some point. The double cardan joints are next to impossible to repair because quality replacement parts are hard to source. The single u-joints near the differentials are doable though.
Greetings for you from Iraq
Greetings back at ya my Iraqi Toyota Brother.
Tim - do you think one could push out the old bushings with just a ball joint press tool? Or perhaps using adapters in a large (8") heavy duty vice? Thanks for all your videos, you've saved me major mula!
Hey Clay, yes to both. If you have the right size balljoint receiving and driving adapters, I think a balljoint c-press could do the job if you also use some heat. Same goes with the vise method. As long as you have the right size adapter to drive the bushing out and the right size adapter to support the arm and receive the bushing, it should work. Just remember, heat is your friend. Good luck with the job.
@@TimmyTheToolman Awesome, thank you. I have a torch and I rest easy knowing my 98 T4R is 99% rust free. Cheers!
@@claybowers2105 You're welcome. Let me know how it goes for you.
@@TimmyTheToolman Just to follow up on this, and so other viewers know, I would recommend to not attempt pressing these bushings with a vice or ball joint press. I tried both and couldnt gather enough mustard to get them out. Not only that, I began questioning the integrity of the tools with that much load placed on them. I broke down and bought the same HF 20 ton press you have Tim to make the job go smoothly. I was surprised how much force I had to put on the jack to get them to budge....maybe it was just my particular rig but I did not think they should have needed that much force (much more than what was depicted in your video). No rust on my rig either, and I used plenty of heat....All in all though a successful few hours of wrenching, and boy did my ride improve drastically! 242k miles on original bushings.
Thanks again Tim!
@@claybowers2105 Thanks for sharing your experience Clay and we're happy to hear our video helped you get the job done. Happy Wrenching!
Thanks for your video
You're very welcome.
thanks bud ...I got the same symptoms. Impossible to drive on highway,,,
Hopefully some new bushings will fix your issue. Let us know how it goes.
@@TimmyTheToolman 100 percent difference.80 mph
@@Mr1Schoolmaster Great to hear it fixed your problem. Thanks for getting back to us and letting us know.
4x3Lander make sure you come back to the comments of this video and let us know of your success and anything you learned that someone else could benefit from.
@@TimmyTheToolman loving this truck quiet ,smooth and powerful/torquey. Thanks fellas
Hey Tim! Getting ready to do this on mine.
What are your thoughts on the one of the FEW negative reviews for the Whiteline kit quoted below:
"Stick with OEM on this one!
Reviewed in the United States on February 27, 2020
Maybe I'm wrong but...
After checking the original trailing arm configuration and the configuration their replacements, I don't think using these on the lower trailing arm would be advisable. it appears the poly bushings would severely limit the articulation of the lower trailing arm maybe even breaking a mount. Especially if you are doing some extreme 4 wheeling. The OEM configuration has the entirety of the elastic bushing material inside the arm and allows a great deal of flex. The poly's not only fill the arm the also take up all of the slack space between the arm and the mounts. Hence the very limited flex. Toyota engineered their trailing arm like they did for a reason."
Mark just reported back that he is plenty satisfied with his bushings, no noise, no issues. With that said, will they bind up under extreme articulation? Maybe so, but overall most people are very satisfied with these bushings
@@TimmyTheToolman Cool, thanks for the feedback! Ordered.
@@danmac247 You're welcome.
Can I do each control arm one at a time without lifting the vehicle like take the lower off punch and press new bushings then reinstall?
Maybe that would work. It's easier with the wheels off the ground to manipulate the rear end with ratchet straps to get the bolts out and back in.
Do U undo the ratchet strap after u lower it to the ground to torque it
Yes. Once you have the bolts installed, you no longer need the ratchet strap. The ratchet strap is just to assist you in getting the alignment of the control arm with the frame and the rear axle so you can get the bolts in.
Great video, is the behavior of the rear suspension wanting to go fwd or back depending on which side, the same on all vehicles? I have to replace the rear pass rearward control arm on a 2002 AWD RX300....tons of squeaking from it. I was going to just do the bushings but I am all "bushed" out from last week's fight with rear shackles on an old rusty Dakota.
It's hard to say which way the rearend wants to shift on you. I thought I had it figured out after we made this video but when I set up the ratchet straps on my 98 3rd Gen 4runner to do the same job, it didn't work out. It's just trial and error which way you need to pull the rear end to make it easier to get the bolts free of the frame.
Got it, thanks will give it a shot and see how it turns out.
@@josevelasco3245 Ok, good luck with the job. Let us know how it goes for you.
Will do and will reply back if straightforward or anything people might need to know. I’ll be able to do it hopefully by Oct 5th weekend.
Hey Tim,
Is an alignment needed after replacing the lower and upper rear control arms?
I think one could argue maybe it would be a good idea to get one after if the bushings in the rear control arms were really wasted. I'm not an expert in alignments but the machine an alignment tech is using shoots a beam from the front to the rear tires. If the rear end was shifted to one side or the other, would it dramatically throw off the adjustment in the front? I don't know if it would. No adjustments happen in the rear. The alignment tech adjusts the toe, camber and caster all in the front. I've replaced rear control arm bushings on 3 rigs now, which includes mine, and none of us got an alignment afterward. All our vehicles drove fine. So Sean, I think you're fine not getting an alignment.
Love it, now I just need to get a press and sleeve kit lol!
If you do enough of your own work, it will easily pay for itself, maybe in just one use. Shops can charge quite a bit for press work. I've now used that press and sleeves for 4 rear axle seal jobs, front wheel bearings for the manual hub conversion video we made and now this video. People talk a lot of crap about Harbor Freight tools but I've been pleasantly surprised with them. The press and transmission jack I bought from them have worked flawlessly. And, that press sleeve kit I bought off Ebay has been great. Money well spent in my opinion.
Will a 12 ton press work??
Yeah, it will. But, if you're looking to buy a Harbor Freight press, I'd buy the 20 ton press because it can handle more jobs and it's not much more money.
Do you think that the polly bushings limit the articulation of the rear axle when off roading? I usually like polly bushings but I'm undecided in this case.
No, I don't think the poly bushings would limit articulation.
Could you put a zerk on the control arm?
I suppose you could drill and tap some threads in the control arm to install a zerk fitting.
Can you use the 12 ton harbor freight press instead of the 20 ton to do this? as well as the front lower control arm bushings?
Yes, it would work.
Thanks
What are other methods I could use to remove the old bushings? Melting?
Hey Chase, you could melt them out but then you still have the old bushing sleeve you have to deal with. You could try to cut if with a reciprocating saw as a relief cut and then try to drive it out with a hammer and chisel. I take it you don't have a press?
Timmy The Toolman yes I don't have a press. I may rent a bushing press to drive them out from Autozone. A useful multipurpose tool. I will let you know how it goes! Thanks.
Hey Chase, if you enjoy wrenching, I highly recommend you go ahead and invest in a Harbor Freight 20 ton press, get the press sleeve kit I have and maybe a couple more press plates and have some fun. I've used my press for a ton of things. It's a very handy tool to have.
Any idea if the same parts could work for a 4th gen?
I think that might be a stretch. I would assume the parts would be different.
thanks again ! getting prepped to tackle mine in hopes to stop wondering to the right on acceleration and left on deceleration
Good luck with the job and let me know how it goes for you.
not looking forward to it , need to rent press tools from oreillys but certainly do'able . thanks for the strap tip !
great attitude and video , much appreciated !
Buzz No problem. I guess you're going to attempt this with a balljoint press. With enough heat, it might work. A hydraulic press is obviously a better option. You also might be limited by the balljoint cups available to rent. You need a size that fits the outer diameter of the control arm and then one that will contact the sleeve of the bushing. Not to be pessimistic, but I'm doubtful you'll be able to rent the perfect sizes. If you're going to be doing a lot of work like this, a Harbor Freight 20 press and that press sleeve kit I have are a great investment.
bought nice bushings , local shop said $75.00 . have at it ! to save me time . thanks again
I bought too much Energy suspension and not enough Whiteline. I think I only have the Whiteline front lower control arm. Hope the machine shop can get all this pressing done.
Yeah, I've found I prefer Whiteline over Energy Suspension for control arm bushings.
Why is that, Timmeh?
The only problem I had when I did this is for some reason my urethane bushings kept wanting to push themselves out as I was trying to do all this don't know if anyone else has experienced this but I did it exactly how he did and for some reason they just kept pushing themselves out as I was trying to get everything done. Granite I got them done and they are in but just curious if anyone else has experienced that issue
They get air trapped in between the parts because of the grease! Press them in slowly and put the steel tube in only after the urethane parts are fully seated or you'll get even more air trapped in there.
Hi timmy, is it possible to attribute crabbing to any of these components failure?
If the control arm bushings were really wasted, you would get excessive movement out of the rear end but I don't know if it would be enough for someone to spot it following you down the road. I believe vehicles that are crabbing down the road are mostly due to damaged components from an accident. The frame got bent and/or suspension components got bent and the shop that fixed it didn't realize these components were compromised.
Timmy The Toolman thanks, I was going to but it, now I don't know.
Oh, you're looking at a vehicle that drives like this. DONT'T DO IT!!!!! If they haven't told you about an accident it was involved in, they are lying to you. Run away from this sale!
I'll keep on looking. Thanks timmy
Are the lx470/100 series bushing and hdj80 the same?
Sorry Ian, I don't know the answer to this. Maybe ask this question on a Toyota forum like IH8MUD.com because they have a land cruiser section of their forum.
If you are replacing the upper control arm bushings, lower control arm bushings & panhard (rear track arm) bushings....is there an order or sequence you recommend? I've pulled the panhard and will take it to the machine shop first/reinstall since you used tie straps to hold everything in place. Can I remove all upper/lower at once? Should I do one side at once? Lining up bolt holes is a concern.
I would do one side at a time. If you disconnect both sides, upper and lower, all at the same time, I don't think the rear axle would be very stable and it might be harder to line things up. I'm going to help a friend do all his rear control arm bushings soon and tackling one side at a time is what I'm planning on doing.
Just changed mine whole rear, everything old out and new in.
I had to take all off, so I put pan head first. First attach it to differential frame, second use jack to raise differential housing so pan head align to chassis bracket. Note the vehicle should be on jack stand all the time via frame near lower control arm brackets. a 3/8"(19mm bolt) extension or 1/4" extension(17mm) will help you align hole for bolt to go in if it needs persuasion. Second goes upper. Again do one side first. If doing second side you find it's not fitting, a jack under the differential and few in and out should help you align. Last goes lower, same procedure. Grease inside and flanges, if dry they will wear like filing with sandpaper when moving. Toque via bolt not nut. Phew by myself it was hell, but got done. I welded panel to brackets to lower control arm from bottom both sides, and also a panel onto inside chassis next to muffler because of rot. Replaced even gas tank, changed fuel pump etc and all. Well I did watch timmy's video which was relief. I had manual and few similar project under my belt.
Not that I'm an expert, but I did each one completely before moving to the next. Driver lower, upper then passenger lower/upper. Got the bolts for each pne back in before removing the next one, tightened them all, then full torque once back on the ground.
Ya I don't have a press and wanna paint all 4 control arms and panhard bar before pressing new bushing in... Gotta take in to my dads shop off site... What to do?
Perfect, thank you for the detailed response!
You're very welcome Sean.
@@TimmyTheToolman fl
llp
@@TimmyTheToolman fl
llp0
Or you can loosen the rear shocks from the bottom if you don’t have a strap
Thanks for the tip.
Hi Tim, your dewalt power tool have what model number is? Please, i can’t choose when it has 2 models are DCF 899P1 and DCF 899M1. Can you help me,Tim?
This is the one I bought a little over a year ago:
www.amazon.com/gp/product/B00WJA1J68/ref=oh_aui_detailpage_o02_s00?ie=UTF8&psc=1
Thanks you so much Tim
You're welcome Billy.
Jack ' I do showcase their tools in a lot of our videos. I reckon they are getting a lot of free advertising. Maybe one day they'll thank me and send me some free swag.
Can you post the model or part number for the press sleeve kit? The eBay link is no longer valid.
Disregard...I found it (or one very similar). "8MILELAKE 26pc Universal Press and Pull Sleeve Kit"
www.amazon.com/dp/B01C6UT55W/ref=sspa_dk_detail_8?psc=1&pd_rd_i=B01C6UT55W&pd_rd_w=hijq6&pf_rd_p=8a8f3917-7900-4ce8-ad90-adf0d53c0985&pd_rd_wg=rBE2B&pf_rd_r=9NCV24GPPR9K8TWMJ9TA&pd_rd_r=112d8018-be89-45c4-8ef5-a7f12d65da61
I put up a new link. Thanks for letting me know. I just did a search for "Universal Press Sleeve Kit" on Ebay and found a new seller.
Hey Timmy please help me, I just bought a 2002 4runner 140k miles! I start hear the noise( I think from engine compartment )when I drive the car after a few minutes! ( don't here the noise when start the car). The noise noticeably at idle or at stop light . As soon as I accelerate the noise gone!. I hear the noise more when shift to drive or reverse, at park and N it's less noise. Also, when I turn the A/C even the car in Park the noise start appears! I really don't know what going !
Helping someone pinpoint the cause of a noise over the internet is very difficult. Your best bet is to buy yourself a mechanic's stethoscope and start searching for the origin of the noise with somebody's help. While you listen inside the the engine compartment at different locations, have a helper put the transmission in drive, in reverse and turn on the AC. Listen near all the pulleys (AC Pump and AC Idler, Power Steering, Alternator and Fan). There's two types of attachments for the stethoscope, one that's a small cone for listening to general noises and a metal rod you can put right on the surface of the accessory near the pulley to listen to the bearing.
Here's the mechanic's stethoscope I purchased: www.amazon.com/Lisle-Drake-Off-Road-Tools/dp/B0015DLMOO/ref=sr_1_fkmr0_1?ie=UTF8&qid=1513869793&sr=8-1-fkmr0&keywords=lisle+mechanics+stethoscope
Let me know when you figure out the origin of the noise.
Timmy The Toolman thank you! I did buy one on harbor freight buy still won't be able find the noise ! I touch all around the engine when the noise appear and know that that is knocking noise! It's everywhere can't tell where exactly. For your experience from 4runner 3rd I hope you can think a common symptoms of that knocking noise like I just described!
A knocking noise is a whole different story and most likely has to do with your engine and not any accessory equipment bolted to the engine. Valve lifters can cause a ticking or knocking sound. I know on my Subaru my engine knock was caused by piston slap. I did read that engine knocks could be attributed to fuel detonation issues from an improper air/fuel mixture or maybe the spark plugs are severely worn.
When was the last time the spark plugs were changed? Have you ever cleaned the Mass Air Flow Sensor? Is the engine oil in good shape and at the proper level?
Thai, I know some things but I'm not as experienced and knowledgeable as some people might think. Even though I hate to suggest this to a DIYer, you might want to do a Yelp search for a good auto shop in your area and pay an hour labor for them to help you diagnose this problem. Let me know what you figure out.
Timmy The Toolman thank you Timmy, i change the spark plug when I got the car and valve cover gasket cause it leak really bad! The mass senors fine and I did clean it with cleaner! I have a scanner( autel maxi elite) I check a live data. Mass air flow reading good! and long, short strim around +- 2 mean good mixture fuel !
The previous owner did the timing belt so I did some research and found a very useful information that over tight the driven belt can cause the hamornic balancing pulley pull to whatever direction have more force . 3 driven belt on 4runner if all of them over tight can cause damage the harmonics pulley, so the crankshaft stress and scratching the rod bearing. It might have a little gap on rod bearing, so when piston go up and down, it makes a knocking noise ! I think this very close to my case ! Should I take off a oil pan and check them ? How to check the rod bearing ?
To pull off the oil pan, the front differential needs to come out. I've pulled the oil pan off before but the engine was removed from the vehicle. I don't know how you check the rod bearing. I've never done something like that before. Pulling the differential out and getting the oil pan off is a fair amount of work. We have a video for the front differential removal. It's tight to get out but we learned a trick from a subscriber. He said he disconnected the driver side motor mount and jacked up the engine a bit to give the differential more clearance to be removed. Here's the differential video: th-cam.com/video/w_gPiDvh9v4/w-d-xo.html
Here's our trans mount and engine mount replacement video because it's related to this job: th-cam.com/video/g_4DiywsSbk/w-d-xo.html
And, here's our drive belt video: th-cam.com/video/Zi1XfFUOjKc/w-d-xo.html
I wish I could be of more help with this, but like I said, I'm not a professional mechanic with experience in all aspects of automotive repair.
wowww you are Awesome!!!!!!!
jimbola77 you're pretty awesome too Jim! Thanks for the kind words.
Poly bushing doesn’t require torque at vehicle’s sitting height they are free wheeling
You are correct. This is something we learned after making this video.
What does that mean ?
@jonesafro It means you won't put the bushing in a bind. The old rule is you tighten down rubber bushings at their neutral state, which would be with the wheels on the ground and fully weighted by the vehicle. If you tighten rubber bushings with the vehicle unweighted, the suspension components will be fully extended. When you drop the vehicle to the ground, the bushings will be in a bind all the time, which will dramatically lessen the bushings' life. With Poly bushings, they can not be put into a bind because they can slide infinitely so you can tighten down poly bushings with the rig unweighted. Hope that makes sense to you.
Did he report back yet?
Hey Justin, Mark reported back that night after his 2 hour drive back to Napa from San Jose. He said there was a big improvement. Bumps and railroad track crossings that use to cause lots of rear end movement didn't cause it anymore. He's very happy with how it turned out.
Timmy The Toolman thanks for your response. Love the content. Have any friends that drive a Tacoma that need work maybe you can video that too. That’s what I drive, lol. Regardless, keep up the good work.
We actually did a lift video on a 1st Gen Tacoma but lost the footage when Sean had a mishap with his external hard drive. There are some local Tacoma dudes that know about us so I would definitely work on a Tacoma if the opportunity arose. 1st Gen Tacomas are very similar to 3rd Gen 4runners so many of the jobs we've done work for Tacomas as well.
Timmy The Toolman that’s why I watch your vids, because of the similarities. Gonna install new coil springs and Bilstein 5100s this Friday. Thanks again.
Good luck with the install. Happy Wrenching My 1st Gen Tacoma Brother.
easy peezy!
Yep, especially when you know exactly how to tackle the job.
@@TimmyTheToolman awe yeah! Thanks Tim!
@@starvinDJ You're welcome!
How do these videos get thumbs down? 😵
I've got one word for you Scott, "Haters". We literally have people subscribed to our channel just so they can give a thumbs down to everything we post. The reason why we know this is we will quite often get a thumbs down to a video we just made live and there's no way the person even had time to watch it. People will make jerk comments and then are surprised when we fire back. We've blocked over 20 people from being able to comment on our channel and that list will grow because there's no shortage of A-holes in the world. I don't think they dislike Sean, it's me they hate because I don't take shit from people on our channel or on the Toyota forums. It makes me smile every time we get a thumbs down because it let's me know I really got to someone and their continued petty actions prove to me they deserved the shit I talked back to them.
@@TimmyTheToolman It's sad that you have run your channel that way and actually weed out the pieces of shit out there. At least you know there are far more people who appreciate your time, these videos and your advice on the forums. Easily some of the best how-to's I've seen on the Tube. Just keep doing what you're doing!
I appreciate the freedom of speech but I truly believe social media may have given people too much of a voice as far as attacking people, being keyboard heroes, or just pieces of shit in general. Reading comment sections of posts on various forms of social media is downright scary at times.
Now I'm about to tackle my driver's side axle seal for the fifth and hopefully last time. My new Harbor Freight 20 ton press is just about assembled. I've been fighting this a few months and I'm ready to be done with it. Your video for that is a good tutorial also. 👍
@@scottk.8494 You're right Scott, it is unfortunate. If a person's comment isn't too out of line, I will respond because I view it as a teachable moment for them and anyone else reading through the comments. But, some comments are just so disrespectful or out of line they don't deserve a response, so these people just get blocked from being able to comment on our videos. Sean and I do know the high majority appreciate what we're doing so these are the people who we're putting out the effort for.
Good luck with the job and thanks for taking the time to comment and support our channel. Happy Wrenching Scott!
Timmy Do you have to remove the outer shell in order to put in the new bushings? I know the white line bushings come with the bushings and inner metal sleeve but no outer metal shell. I tried checking whiteline website for the installation instructions on this but they’re not available.
This article mentions the outer shell
www.suspension.com/blog/how-to-burn-out-suspension-bushings-the-right-way/
Do your rear lower control arm bushings look different than the ones we show in this video?
Hey I like your videos and everything but I think I it will help more for you and ppl watching if you made them a little shorter like 15 ish. Bc a lot off ppl will skip through it Miss parts or just click on another one because of the time.
Hey Nick, glad you like our videos. The length of the video is dictated by the subject matter we are covering. It would be nice to have short and sweet videos because we know people's attention spans are getting shorter and shorter, but we don't care if people have short attention spans. We'd rather provide very detailed videos so people can be successful following one of our tutorials. For example, how can we make a 15 minute video for a timing belt job, transmission swap, differential replacement, wheel bearing replacement, supercharger install, etc, etc. Sean and I agreed we wouldn't make videos that would leave people lost. Worrying about the length of the videos would force us to cut out important content that might make the difference between somebody being successful with a job or failing at it. People come to us for the detailed videos that we offer. If people don't have the patience to watch a video that shows them step by step how to perform the job, I see that as their problem, not ours.
You should check out the TH-camr chrisfix. Especially his drum brake video
I dont mean for my comment to be taken it in a negative way or anything. I just think it would help you guys grow as a channel.
Or you can buy them already done and save all that work and buying all those specialty tools
Genuine Toyota 48720-35051 Control Arm Assembly
Well of course you can do that. Tools are an investment and will pay for themselves many times over if you like to do your own work. I've used my Harbor Freight press for lots and lots of jobs that have saved me big money. This is a tool that costs around $175-200 depending if you catch it on sale or pay full price. The press sleeve kit we use has also been used for many many jobs. That kit runs around $130 online. If you're familiar with our channel, you know how many times we've used these tools to be successful with a job and save tons of money in the process. So, to each his own. You spent your money on complete control arms while others choose to purchase tools that will benefit them many times over.
I agree..I have all those tools as well and have done this professionally all my life but the older I get i find i value my time more and more..So 4 bolts and done is better for me. And I also wanted to let people who don't know that there are other options than having to press out and replace bushings and that Toyota is really good at it!
Keep up the good work:)
@@orpiv Roger that.
Great video! Did you remove both LCA at the same time or did you do one at a time? I'm going to work on this over the weekend.
@@IGJSarasota One side at a time. Good luck with the job.