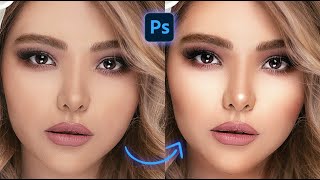
Photoshop Tutorial - Dodge and Burn with Calculations

ฝัง
- เผยแพร่เมื่อ 24 เม.ย. 2022
- In this photoshop retouch tutorial, I'll show you an amazing technique to dodge and burn using calculations.
Steps to Follow:
Apply CALCULATIONS to the Background layer.
Copy This Layer & Paste it into a New Layer.
Change Blending to Vivid Light.
Use Blend If Slider to Blend the Effect.
Add an Inverted Layer Mask & Paint White on skin and hair.
Adjust the Layer Opacity to Your Liking.
That's it.
High-End Skin Retouch with Dodge & Burn in Photoshop,
Simple Dodge & Burn in Photoshop,
Non-Destructive Dodge and Burn in Photoshop,
Mastering Dodge and Burn in Photography,
dodge and burn lightroom,
dodge and burn photoshop,
dodge and burn photography,
dodge and burn snapseed,
dodge and burn vs exposure,
dodge and burn photoshop 2021,
dodge and burn before and after,
dodge and burn photoshop 2020►Check out all tutorials here : th-cam.com/users/photoshopdesi...
Thanks for watching our free Tutorials! If you enjoyed our video be sure to subscribe to our channel to receive free new videos.
►SUBSCRIBE: goo.gl/d31fld
Don't forget to COMMENT, LIKE and SHARE, to get more :)
Follow US - LET'S BE FRIENDS!
------------------------------------------
►Official Website: www.photoshopdesire.com
►FACEBOOK : / photoshopdesire
►GOOGLE+ : plus.google.com/+photoshopdes...
►Twitter : / psdesire
►Instagram: / photoshopdesire
Softwares Used:
----------------------------
Photoshop cc 2014, 2015, 2017
Photoshop cs5, cs6,
After Effects cs5
Camtasia Studio & filmora 11
Check Out Our Playlists:
--------------------------------------
Photoshop Tutorials for Beginners, Intermediate and Advanced users
• Photoshop Tutorials fo...
Easy, Quick, and Fast Photoshop Tutorial Series (NEW)
• Fast Photoshop Tutoria...
HDR Photography Using Photoshop
• HDR Photography Using ...
Photo Editing, Photo Effects & Photo Manipulation - Special FX
• Photo Effects Manipula...
Adobe Camera Raw Filter Tutorials and Preset downloads
(same settings steps for lightroom also)
• Adobe Camera Raw Filte...
Color Grading or Coloring in Photoshop
• Color Grading in Photo...
Skin, Face & Body Retouching Techniques and Enhancing Tips
• Retouching Techniques ...
Free Photoshop Actions for Photographers and Designers
• Free Photoshop Actions...
Text and Graphics Effects in Photoshop
• Text Effects in Photoshop - แนวปฏิบัติและการใช้ชีวิต


the short and sweetest Dodge and Burn you will ever see... thanks a ton
Thank you so much for the creative trick!
short and clear 🙏 thank you BOSS
Nice. That is simple and short. You are the best. Thank you
AsXxxxxxxx
Gracias, excelente. Saludo
I said multiple times, but wanna say again, you are the best! Thanks for sharing!
Wow, thank you!
Ze
Wow this is the best technic ever
Thankyou!
nice.... simple...
Love it
Wonderful tutorial keep it up 👍👍👍👍
After a long time ....a nice short tutorial video SIR
Best one ❤️
Thanks lot lot lots
Good one ......welcome back
perfect man great tutorial
Glad you liked it!
Thanks for sharing.Iwold like to see your tutorials with your voice.good luck..
great bro
Welcome bro keep train
The best way i've seen thanks for sharing
You are very welcome
I like you Channel Name.... its good
💙💙
Thank you
Can i do it with PS Cs6 ???
yes you can
@@psdesireYT شكرا 😍😍
💖
This is awesome but boy did it not work on my photo! I wonder what I did wrong.
1:16 how did you separate it ?
Hold ALT or OPTION key then drag the slider it will separate.
great tutorial, I wanted to go to your website but it is suspended, I don't know if you are aware of that?
afilm
How do you add an inverted layer mask?
With the layer mask selected, you can press "Ctrl + I" (or "Cmd + I" on a Mac) to invert the layer mask. or Hold ALT key and click ok mask icon.
@@psdesireYT Thanks so much!
After I make the calculations I can't copy/paste.... It is gray out the options... Do you know why?
Me too!
Select all Ctrl+A and then copy paste
@@virajeg3210 thanx.... much appreciated. It worked.
If you provide sample images, it will be very helpful for us.
You can see image name in my tutorials, simply type in google search. You can download it.
Is that a CGI picture?
Following this type of video does not work for me. I am sure it is much easier to produce and From the comments they like the style keep creating as you have found an audience.
This model you don’t have to do anyshit