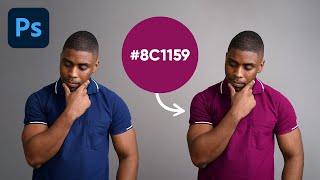
How to Change the Color of Clothing in Photoshop

ฝัง
- เผยแพร่เมื่อ 1 พ.ค. 2024
- Change clothing to any color in Photoshop-even black or white! Learn how to use Layer Masks, Curves Adjustment Layers, and Hue/Saturation Adjustment Layers to change the color of anything, all while maintaining perfect detail and realistic highlights and shadows.
Download the Sample Image & PSD:
phlearn.com/change-color-clot...
Join PHLEARN PRO (Save 10%):
phlearn.com/youtube
Join this channel to get access to perks:
/ @phlearn
―
What is PHLEARN PRO?
◦ 200+ In-Depth Courses on Photoshop, Lightroom & Photography
◦ 500+ Actions, Brushes, Presets & LUTs
◦ Master Retouching, Compositing, Special Effects & More
◦ Monthly & Annual Subscription Options
SAVE 10%: www.phlearn.com/youtube
―
Follow us on social!
Instagram: / phlearn
Facebook: / phlearn
Twitter: / phlearn


For those wondering what happened at 5:02 you can simply select the hue/saturation layer then click on the add vector mask icon below (it has a camera like icon)
Edit: Like my comment if it was helpful
thanks.
@@pratikhansa7444 👍 anytime
appreciate it
thank you so much!
appreciate it
Replacing the missing hair on the white hoody version was fantastic. Simple but very effective just using a selection from the edge of the hair as a template then cloning the detail in. Very good 👍
Literally why I came to the video. Having trouble with that part of a selection and man do I appreciate him for this 💯💪🏾 #CHEP
There are many folks graciously describing how to perform task in Photoshop, but none that has done it so clearly and patiently. I appreciate the author staying on topic and walking you step by step to complete the work. He also seems to make very few or no assumption about the experience level of the audience. He explains the keys, commands and functions easy enough for the beginner to follow along. I will definitely check out the rest of his collection.
Nice! A few little bonus tidbits, too. Great work. Professionally presented, concise, and your enthusiasm is almost contagious.
This video was so well paced! Thank you so much for making this it really helped! ❤️
That was an exceptionally clear and well structured tutorial. Without all the usual waffle. Well done 👍🏻
Aaron, you are truly wonderful for sharing your talent so generously. Big blessings to you for all that you do. You are amazing! Thank you.
This tutorial is incredibly well organized. without the typical blather. Thank you.
You are amazing! Hair sample technique was beautiful . Thank you Aaron ❤️
Thank you so much! I always refer back to this video whenever I need to do this on an image I am working on. For some reason I always forget how to do it but this video is an anchor for me-- and it's so easy to follow.
5:02 how did you put the mask?
I paused like u and looking for an Ans :(
click on the add layer mask underneath. It has a camera-like icon
@@braimahishmael1264 Thank you
You are a great teacher my friend. Thank you for this amazing content! It has been so helpful.
The way you explain things is just fantastic.
Thank you so much, I really hope you channel keeps growing!
Thank you for all the short cut keys, it helps a completely new beginner to learn the small tricks
This is one of the most organized tutorials I've ever seen!
This video just saved my day! I needed to do "quick and dirty color change" for work, and its all done in the few min. Thank you!!!
This is so helpful and easy to follow Thank you!
Perfect timing for this video! I had a shoot recently and didn't like the color of the dress the model wore and wanted to change it! SO I DID! Thanks Aaron!
Perfectly constructed tutorial, thank you
This tutorial is very helpful specially to a newbie in photoshop like me, thank you so much!
You never disappoint Phlrean!! Thank you!!
Amazing tutorial! Clear and concise!
You did such a great job explaining everything and at a pace that was easy to follow. Thank you!!!
You make learning so easy. I was able to follow and effectively changed the color of my subject's clothing..
As usual, you're tutorials are great!
Thank you very. much for this video. Step by step explanation, clear voice and neat presentation. Very very useful for Ps beginners. Thanks so much!
Your video's are AMAZING. You have helped me navigate better quality and time saving than I can tell you.
Man... my respects to your work, it is excellent.! Thank you.
Dang great tutorial! Easy & straight to the point
Another amazing tutorial, thank you so much Aaron! :D
Awesome, love how you replaced the hair with a mask and clone tool !!!
Hi sir,
This is not a photoshop related but I'm so amazed every time you did a zoom round effect on your mouse cursor while moving around the canvass. I'm kinda interested on how you do it. Great tutorial by the way. Thank you as always.
Perfect for what I needed! Thank you.
S/O to this guy for an easy to follow and not boring tutorial
Thanks you Aaron it was amazing😍
Your lessons have completely changed my Photoshop game. Thank you.
THE BEST WAY TO CHANGE THE COLOUR, GREETINS FROM COLOMBIA!!! THANKS FOR THE TUTORIAL
I love the channel!!! You are amazing. I am extremely new to photoshop. I work in an engineering office and have been tasked with learning Photoshop. We have scans of large (24x36) engineering drawings and wiring diagrams and I would love some tips for working with these types of files. Most of them were hand-drawn and it is difficult because there is hand lettering on them. I would be more than happy to provide an example or two. Could you do a video, or at least point me to some tutorials for this type of Photoshop work?
that hair trick at the end was STYLIN!!!!!
Thank you so much!!!!! I subscribed after I saw this tutorial! :)
My dude! You saved me. Huge thanks.
Great tutorial! : )
OMG you are the 🐐 of all 🐐's when it comes to these Photoshop tutorials 🙅🏾🧢❕ Everything is so easy to lean with your videos. Thanks for that!!! 👏🏽👏🏽👏🏽
Hello, you are welcome to visit my TH-cam channel, where you can discover a variety of fascinating lesson videos.
It's fantastic that you came to my channel; it's my pleasure to help you.
Thank you a lot.
Muy buen tutorialy muy bien explicado paso a paso. Gracias,
Fantastic! Thank you Aaron.
Congratulations for 2M ❤️
This is completely useful! Thanks sir!
best tutorial on the internet, thank you
Excellent tutorial!
Thank u .. that was very helpful.. like ur way of explication
Being new to Photoshop I find it all a bit daunting but this style of video and tutorial is priceless. Well presented, made clear and simple.....it is perfect. Looking forward to running through the Photoshop in 30 days playlist. Great work!
thanks for watching and phlearning with us!
wow..perfect again
Great tutorial! Thank you
Awesome, worked a treat, thank you
Hi there! This video was very helpful! However, I'm using a photo where the subject has a lot of loose, straight hair on the sweatshirt. I'm not sure how to accurately mask that hair in my layer mask selection so that the new sweatshirt color covers all areas, including those small areas between the hair. If you could make a video on this, I would be so grateful! Love your vids btw!
Exceptional method.............your video instruction is excellent
You truly are amazing.
Thanks Aaron!
Thank you!
thanks bro. You are A Pro Teacher. Love From Hindustan (INDIA) love you brother.
Salute You Sir, Super video. Make my Day & Accuracy.
Wonderful job. Expecting a tutorial on turning black hair into white.
At 5:10, you hit some key to create a mask layer. What did you hit?
Me too 😆😅
sameee
select it and click the tiny button (the one that looks like a circle drawn inside a rectangle) next to "fx" button in the bottom left. It worked for me :)
😊👌 Very good explanation. Thank you 🙏
Hi, thanks for another awesome tutorial. Is there a way to colorize the clothes to a specific color or just a similar color by vision? Thank you.
For a specific color, you can use a Gradient Map. Hope it helps.
thank you for this amazing detailed video. i wasted hours trying to change dark blue into grey
just subcribed to your website content, seriously you've made me a much better of photography. I wish you guys have a Davinci course just quality as your photography course, i think it will be loved to
You are always awesome
Hi, fantastic tutorial, just in case anyone had the same issue as me when following and when selecting black nothing happens to the mask! be sure your mode box has "normal" in it while in the fill box! 🙂
Awesome. Thanks
Very good explanation!
Great Video. Thanks.
you are he best, thank you
Thank you for this enriching instructional video. I got a question, how do I use this technique to change the dress color to another EXACT color (like from the color swatch or eyedropper instead of the Hue/Sat etc. color sliders)? Hoping to hear back.
did you ever find out how to do this?? I wonder the same thing!
everything going smooth until you make a shortcut move on your keyboard without saying which keys you combined. How did you put a mask on the "hueSaturation 1" layer?
time stamp 5:07 - 5:10
having same problem...
I have the same problem. What is it?
@@emmetjeuhh no idea
same here. how to do it?
@@gelaiandoy580 Just ckick on the bottom look like camera
Thanks you amazing
Awesome... Just awesome
Ok, ok, ok. Great! I already added you to the category of geniuses. My humble respects.
Thanks again!
thanks for the tip! the mask is a bit tricky though but I enjoy the tip!
Glad you enjoyed it!
Thanks! How about changing the color to match a specific color? I've been trying to play around with the eyedropper tool but to no avail
I'm looking ahead for this solution too. share with me if you figured it out please
Wow!
Very helpful
Do you have a video on changing the color using her codes for s specific color
What if I want to type in a hex code to make it a specific color? Where can I do that?
Fantastic Video..ThanX A Lot Sir For This Video
Hello, you are welcome to visit my TH-cam channel, where you can discover a variety of fascinating lesson videos.
It's fantastic that you came to my channel; it's my pleasure to help you.
Thank you a lot.
Very simple and easy to run! Obviously, after that beautiful video lesson demo you kindly gave us. Fantastic! Thank you very much!
Hello, you are welcome to visit my TH-cam channel, where you can discover a variety of fascinating lesson videos.
It's fantastic that you came to my channel; it's my pleasure to help you.
Thank you a lot.
Thank you for this. I just used it for a group photo where two people didn't get the color scheme message. This was a lifesaver.
That's great to hear kenneth! Thanks for phlearning with us!
how do I use this technique to change the dress color to another EXACT color (like from the color swatch or eyedropper instead of the Hue/Sat etc. color sliders)?? @@phlearn
Great tutorial. Thank you. I hesitate to ask this because it shows my ignorance but how do I connect the new mask to my final image? When I copy and past the subject into my next project the clothing color is still the original. Do I need to hit an "apply mask" button? (And you thought your tutorial was simplified to its greatest level. ha ha)
wowwwww thank you
This was great! I must have done something wrong though, when I click on the brush tool to clean up the missed parts, it brushes it back to the original color and when I click on the curves layer to change to black or white, nothing actually adjusts.
Can anyone tell me what I missed? I have a PC if that makes a difference.
nice but as a newbie i dont get it how you put the mask on hue/saturation after making a group. seems like you just press shortcut key but i dont know what key you used
red idea good
This video deserves thousands of views thanks for this amazing video
great hair tip and nice look of the black hoodie. The white version still looks kind of flat, but ok.
how did you add that second mask?
how did you put a mask on hue adjusment layer
Nice Arron bahi
Thanks for all the help. Im pretty sure I followed all the the steps given, but when I go to the hue saturation mask in the group, it changes everything outside the selected are. However, the curves mask changes everything inside the selected area. If you have any suggestions that would be great!
Hi Michelle! if you send us an email to support with a screenshot of your PSD file and layers, our team will do their best to guide you.
When I tried brush tool to paint inside ..like it was mentioned in the beginning of the video ...actually it erased the colours 😅 I can see well I choosed the paint brush! Can someone explain why?
At minute 5:08 you hit a key to put a "mask" on the Hue/Saturation layer (that's in a Group). Which key did you hit? How did you do that? Thanks. Awesome video tutorial.
I clicked on a button that looks like a white rectangle with a gray circle in it. It's located below the layers in the same area where the trash can is.
@@IT-cn8pw thank you! so helpful. Only spent 10 min trying to find an answer here, instead of 1 hour.