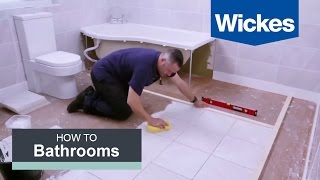
How to Install Cement or Backer Board to a Bathroom Floor

ฝัง
- เผยแพร่เมื่อ 11 พ.ค. 2023
- Before tiling onto floorboards or chipboard the floor should be strengthened and waterproof by using a cement board sometimes called backer-board. In this video I show you how to cut lay and fix backer board to a floor ready to accept tiles.
Proper DIY Patreon Page: / properdiy
🧰 The tools and equipment I use: www.amazon.co.uk/shop/properdiy
The Amazon links above are affiliate links. It doesn't cost you anything to click on them but I do earn a small commission if you do. As an Amazon Associate I earn from qualifying purchases. - แนวปฏิบัติและการใช้ชีวิต


Some comments are getting a bit trollish. I appreciate the basic instruction here. It makes such a project approachable.
Here in the US, the cement board manufacturer instructs us to use a JIGSAW for cuts. When I first read it, I thought "this can't be right". I'm glad you confirmed it when you said we should avoid anything mechanical.
I use a shear for cement board. No dust and incredible cuts. I think mine is the yellow brand. Just saw this. PacTool SS424 Backerboard Shear - Fiber Cement Cutting -Contractor Grade- Professional Power Tools
Thanks Stu - your videos have given me loads of confidence and guidance when renovating my home from top to bottom. Appreciate all your hard work that goes into these vids - thanks.
Really informative, thank you, my only concern I have is that there may be a step from the bedroom to the en suite after laying the backerboard
Stuart, you make this all look very easy! To me, that's the sign of a true craftsman!
Absolutely fantastic channel. Easy to understand instructions, and everything explained in simple terms. Thank you Stuart 👏🏻👏🏻
By far one of the top five channels on TH-cam! Thank you Stuart 👍
Thank you so much for this, your channel has taught me such a lot. I am currently working my way though a recently purchased house righting all of the DIY wrongs committed by the previous owner, thanks again.
I've used this in a shower, really good stuff. Hardie also make an expanding foam adhesive for their boards for blockwork which is what I used. It is worth mentioning though that the boards aren't impervious to water so a painted on membrane over the top is the ideal
Hi Stuart, Once again a brilliant and constructive video.I know at the moment I wont be doing a job like this, but when the time comes I know Who to watch. And I know it will be your video. Thanks for making great videos, that so I can do the job and not to pay some one else to do it for me.Take care, see you on the next one.
Nice work Stuart, and you managed to keep your clothes fairly black too ! 😉😁
I fitted some of this in our shower cubicle when the plaster board fitted by the builders failed, a fiddly job to retro-fit as a little thicker than the plasterboard so had to trim all the salvages tiles by 3-4mm ! I gather you can "waterproof" normal plaster board, but from my experience I would always choose cement board anyway.
It's a great video lots of information and help the only thing
I would add knee protectors either on your knees on the floors knees are for life, not just for DIY 😊
A master teacher, indeed!
The proper tungsten scorer is much much better than a utility knife. You can get a circular saw blade for these that only has 4 teeth on the whole blade, at the 3, 6, 9 and 12 o'clock positions, to keep the dust down. Gives a very clean cut...
👍🏿👍🏿👍🏿 Stu. I never got board watching this video
Awesome book that gives you step-by-step photos th-cam.com/users/postUgkxTNB_zFBSnTo_O1PqfVUwgi7ityw0JlKt and directions to make every day project. I can see myself making a few of these projects and giving them as housewarming and holiday gifts!
Hi Stu, great video with exactly the content I have been looking for as I am attempting to renovate my bathroom myself. And as you state "can be done by your average diyer", believe me mate, with reno work I really am average ha ha ! Cheers from Australia
Great video and guidance, and lovely background tunes lol
Brilliant, very helpful. Thanks for sharing!
Brilliant job and some great little tips.
excellent work !
Great video thnk u. Very helpful and great instructions 👍
I would use primer for existing chipboard flooring, before adhesive, as you fo before tiling, painting etc. no big cost, and better adhere...
You've taped backwards. Short ends get taped first. Followed by long edges so it overlaps the short ends.
Great Jobs Sir!
Hi Stuart , great video as always! BTW did you know some of your video clips are shown on the voltmox adverts.. you may know already, but thought I’d mention in case they had pinched your content. All the best Rob
Hi. I've left a message on another of your videos. You are being use on a SCAM video from VoltMax-UK-V7.
They are using stills from one of your videos where you upgrade the circuit breaker board.
I'd be very surprised if you are involved in this scam.
The scam is about a plug-in electric saver. Something that smoothes out the signal etc.
This is a heads up to you so your name doesn't get tarnished.
Thank you. Subscribed.
Great video !!! thanks !!!! 😊😊😊😊😊😇😇😇😇😇
this is not mental. thanks. I will be watching your videos
Ist class info thank you. A wee quickie. The previous occupier of my address built a 16 ft x8ft workshop out of this stuff. Warerproof but i put my foot through it one day that's when i found out what it was . Happy Days 😂
its a SUBSTRATE not a finished product lol. Sounds like the man started the project (right) but never finished it
When you do your short mesh segments on the perpendicular, they should go under the longer parallel pieces that will protect the ends, just like when doing drywall.
this sounds very intelligent and insightful. Wish I understood what it means🙏🏽
I've got to do my bathroom, but I've been looking at the Element boards.
Nice Job Stuart - could these boards also be used on walls, after old tiles removed and saves on re-plastering? Thanks again x
No more ply is a great product. Glue and screw it down and it’s solid and waterproof
No comments for this episode, BUT you have been used, along with Big Clive, on an advert for some scammers site selling rubbish.
The usual, some developers in the UK have cut the price of………
It makes kinda interesting watching, when I look back at other comparable adverts.
Now I’ll enjoy this episode…….
That's handy.
great tips and process. thanks for sharing :)
Can you list out/link to the tools you are using? Specifically I'm liking the look of the ruler (with the red handle) and looking for one similar.
If your original floor slopes, should you try to level it with the backer board adhesive.
Id like to use that system however i do have pipework underneath .whichever way you lay it , it would be a ball ache getting it up again . Bice job all the same
Would you lay cement board under a bathtub or would you do something else?
(Would you tile under a bathtub? Would the weight and movement of the bathtub damage the board?)
Should have put 5mm ply down before hand. You always want to leave yourself a route back to the original sub floor.
alternatively, could you simply screw the backerboard to floorboards without adhesive? or would that leave it too flexible for tiles on top?
Ply isn’t allowed to be used in bathrooms now according to British standards
@@figrollinthe adhesive is to level out any imperfections in the floor as well as help hold the boards down
@retiree not sure what you mean about access to the floor, once the tiles are down that's it, the only way to get access is breaking the tiles up.
@dogbreath Yes, no, I appreciate that. But, if you rip up the tiles and backerboard, and the backerboard is glued to the floorboards, you have to replace floorboards. if just screwed, you dont I presume. is gluing still better than not in that instance?
you could PVA or SBR the floor 1st
Decoupling matt over the wood floor and tile on that, no need to use cement board, you are just adding height to the floor that you need to lose at the threshold
Do you screw the boards down when thr adhesive is wet ?or is it done afterwards to prevent it getting low spots where you screw?
Hi, I watch your videos with interest. They are very educational and informative. I have a question please. can you tell me how much CURRENT a typical washing machine drowes from the socket? In other words how many AMP a typical washing machine drowes from the socks that is connected to? I would be very grateful.
13amp
Hi Stu, great timing for this video - im just about to tile the bathroom floor after laying cement boards down. I didn't know about the 3mm space between the boards and edges, is this a must?
I used cement boards in my bathroom 7 or 8 years ago on the floor & the walls surrounding the shower - I didn't leave the gaps between the boards. It doesn't seem to have had any effect. Nothing has moved at all and I haven't had any cracked tiles or grout. I did use a lot of fixings on the cement board and then a thick bed of flexible adhesive between cement board and tile - not sure if that helped or not but it still looks as good as new today
I think answer is NO, but will wait for the master since I can’t, for the life-of-me, figure out WHY the spacers?
I've saw them adverts with Stuart, wonder if he knows? 😮
was that a normal tile adhesive you used or does it need a special one? also, did you have to prime floor boards?
Use a single part flexible adhesive and yes, i prime the subfloor with a tile primer 1:1 ratio with water. Do not use PVA.
hi.... were you putting the backer board directly on the existing floor?
Do the boards needs to run perpendicular to the floor joists or subfloor?
Great video. Would these be suitable to fit on top of traditional floor boards? i.e. the blank style floor boards? Would the process be exactly the same? Thanks.
Hi, yes, i've fitted thousands of these boards. First, make sure your floorboards are well screwed down, you don't want squeak's after the fact. 2. Vacuum the floor boards boards clean. 3. Prime floor boards boards 1:1 ratio with a tile primer, NOT PVA. 4. Follow on from this video. Aim to get your screws halfway width wise into the floor board. Use a 25mm screw, no longer, your floorboards are 18mm plus 6mmbacker board =24mm. Don't use to long a screw as you do not want to hit pipes.
Brill video. Just wished you spent a few minutes talking about under the backer board. So explaining what wood you used, etc.
Catchy music too
is this advised to use on a wooden floor
Hi Stu, Just saw you in an advert for a very imaginative electricity saving device... did you know?
Yes, I've been told about this and it's nothing to do with me - someone using my name / video without permission.
Hi Stuart - are you actually vonnected to Voltmox? Just had an advert appear and it has clips of you - implying you're the English electrical engineer who invented it. Didn't think you were an electrical engineer, though you do have a technical construction background?
Cheers
What is the powder used for
8:09 Why is there a need for the 3mm gap between the boards to the walls and eachother?
Any idea what's the minimum recommend subfloor thickness for 6mm boards?
18mm Minimum.
Whstvis tge 3mm gap for, expansion?
seen this
Boy the next home owner who needs to pull that floor up because they don’t like the tile or just wants to make changes is going to love the bill that comes from ripping that up and the subfloor going to be demolished yummy money for the next guy coming in and a frightening headache.
From what I’m seeing there’s a million videos on how to install everyone has a way everyone has the right way .
I don’t see how just screwing down wouldn’t be Sufficient enough we use screws to hold lots of stuff together seems to me the problem is with the upper part of the install Thin -set trowel being used and not mixing correctly or putting in the correct amount of water or not buttering the back of tile seems to me that’s where most issues are don’t get me wrong subfloor has to be level thus backing board.
I’ve removed so much tile they just pop up then there’s them ones that are a nightmare to get up that’s a good thing. 1. Level floor 2. Correct trowel 3. Mix the The Thin -set right to Manufactures specs. 3 butter back of tile 4. Trowel in one direction. 5Tap air out press from the middle out ward doing on all sides 6. Check tile to see if full contact is being made with thin -set use good products in joy your work don’t say I won’t be around in 10 years take pride in what you do.
Did you know some extracts from your videos are being used in a scam advert for voltmox?
Did you realise that your video is being used by voltmox to sell a rubbish device that is supposed to save you a fortune on your electricity bill regards Jeff a subscriber
Isn’t this an old video?
Great video, but I reckon that you could lose the background music mate.
He usually picks something a bit more upbeat. Stu in a mellow mood 😂
Do you know you are being used on a advertisement for Voltmox? It has you down as the inventor of a device to save money on your electricity bill.
Good video but unnecessary music
What’s the purpose of the spacers (or screws)? Why not just cut-to-fit? This would make the adhesive step unnecessary. And enable some future removal-of-it-all (hopefully never, or 10/20/30 years down the road. Your technique is fastidious and nice, but seems too many steps? That cement board is NOT moving around under tiles, which are applied with adhesive!!! Help me make sense of this, please?
Wrong job! more wasting energy! 1) NO NEED to glue under 2) NO NEED to extra tile design cuts 3) NO NEED patching joints, it is not plasterboard sir. Silicon MUST be used instead.