How To Make A Floating Fireplace Wooden Beam Mantel Shelf | Beginner Woodworking Project

ฝัง
- เผยแพร่เมื่อ 19 พ.ย. 2020
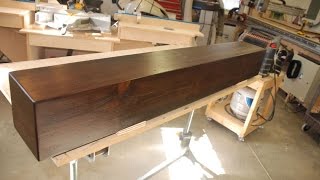
- If you want to know how to build a simple wooden beam, floating shelf or a mantel for your fireplace this is a great weekend project. It is perfect for anyone getting started in woodworking. The materials and tools needed to make this wooden beam project are listed below. It took me about 2hrs to purchase, cut and assemble the beam or shelf. I would highly recommend getting the GRR-RIP Block from @Microjig it will help you safely push your lumber though your table saw. It took me another ten to thirty min to finish and apply my stain. If you have any questions please leave a comment below I will be more than happy to help.
--------------------- PLANS ---------------------
📄 DOWNLOAD THE PLANS FOR FREE 👉 bit.ly/3R1rSU4
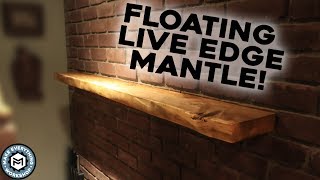
In order to make this Floating Wooden Beam Mantel Shelf you will need the following unless you simply want to skip the build process an want to have one all ready made for your specific space check out the beam here...etsy.me/3341aBR
📝 MATERIALS LIST
• 1x6x6 (4) homedepot.sjv.io/60rjq
🧰 TOOLS
• Wixey Digital Angle Gauge | amzn.to/3dBnMPC
• Miter Saw | amzn.to/2XgnJCo
• Table Saw | amzn.to/2XfJliB
• Drill Kit | amzn.to/2FKP6tG
• Drill bits | amzn.to/2UY4n1H
• Orbital Sander | amzn.to/2LFAMqn
• Nail Gun Kit | amzn.to/2LwpNzi
• Air Compressor | amzn.to/2LyID95
• Cordless Brad Nailer | amzn.to/36Rr112
• Level | amzn.to/3btuFyU
• Hammer | amzn.to/2UDYJ4c
• Square | amzn.to/3fj4v5d
• Tap Measure | amzn.to/2wGQGLU
• Kreg Pocket Hold Jig Kit | amzn.to/3kPcZ54
• Microjig GRR-RIP BLOCK Smart Hook | amzn.to/2KobAG1
🏷️ HARDWARE
• 2in screw | amzn.to/3bcXrTK
⭕ MISCELLANEOUS ITEMS
• Titeboand Quick Thick Wood Molding Glue 8oz | amzn.to/2UCipVY
• 1-1/4in brad nails | amzn.to/2ygWw7j
🎵 MUSIC
Epidemic Sound | share.epidemicsound.com/3n0q85
👣 FOLLOW
Subscribe - bit.ly/2FRGV11
Instagram - bit.ly/2FRK0y7
Facebook - bit.ly/2FVJLSU
Twitter - bit.ly/2FV5H0i
Pinterest - bit.ly/2FWv6a1
----------------- SOFTWARE ------------------
• Adobe Creative Cloud | amzn.to/2xpxKxM (Optional)
• SketchUp | www.sketchup.com (Optional)
📹 FILMING EQUIPMENT
• Main Camera | amzn.to/2QDh8y9
• Main Lens | amzn.to/2KOf3Kg
• Secondary Lens | amzn.to/2QdsgSY
• Audio Camera Mic | amzn.to/2SkY5pg
• Voice Over Mic | amzn.to/2rjjtjs
• Lights | amzn.to/2Eacl1e
• Laptop | amzn.to/2Q57cxL
• Editing Software | amzn.to/2QygbH9
#Woodworking #Fireplace #DIY
@Microjig @KregToolCompany
DISCLAIMERS | Some of these links have an affiliate code, if you purchase tools or gear with these links I will receive a small commission at no additional cost to you. This helps cover my build materials. Thank you! - แนวปฏิบัติและการใช้ชีวิต


![[Live] : ONE 167 วันนี้!! "ตะวันฉาย vs โจ"](http://i.ytimg.com/vi/D9_dvfIa6Ao/mqdefault.jpg)

Nice build Phillip! One possible improvement would be to put the pocket hole screws on the other side of your french cleat. You typically want those angled towards the middle of a board, not angled towards the outside/edge of the board for strength reasons. The wood glue you added should make sure it holds, but having the pocket screws angled in towards the middle of the board would give you more strength for a better joint.
Keep up the good work. Cheers!
Thank you really great advice and I will make that correction.
Just what I was looking for! Great video! Thanks!
Subscribed.
Glad to help and thanks for the sub
This was great. Thank you!
Glad to help
Awesome vid! Thank you.
Thanks
Thanks for this! I'm embarking on my 1st project and have watched a lot of easy diy mantel videos but they didn't show details and explain like you. Very helpful and well done ~ fingers crossed mine turns out! 😊
Glad it was helpful! you can do it 😀
Phil, this is clever as hell. Looks fantastic.
Thanks
great job, thank you
Thanks
Love your video brotha❤
Thank you
You deserve a ton of subscriber
Thank you, you are so kind
GREAT JOB
thank you.
awesome
Thanks
The end of the beam would look even better if you use the end of an actual 6x6, just cut 3/4" off and bevel it as shown. Then you see end grain, it looks more realistic.
yeah, I didn't do it in this version but in others I do that.
Great job as always!
Thank you
@@HowYouCanMakeIt You are welcome. Keep it up.
Will try my best. It is hard to find time to make content with a full time job. I appreciate the support
Wow, well done.. Very encouraging to make my own.. Ours would have to be 10inches deep..
Awesome
That's a great build i made one but with a frame on the wall sticking out and the mantel screwed to it.....French cleats is a great idea
Thanks French cleats are amazing
I really like the look of that sander you used in the video - what brand is that if you don't mind - thanks for sharing this fun and easy project
It is a festool sander. Saved up a long time to get one they are $$$
💯👍👍
Thanks
Awesome, and what’s the best way to hold it to the french clear once it’s all hung together? Thanks!
Once the French cleat is attached to the wall the weight and downward pressure locks and holds it in place
Very nice project! Big like from me👍! I also make some diy wood projects and shoot videos. Keep on!!!
Thanks for the support
Nice job, Philip. I'll be making a mantel like you did here. Question: In my case, the mantel will be attached to stacked stone, not a nice flat sheetrock wall. Do you think the French cleat method would be the right one to use with a somewhat irregular background? Thanks. Mark
It should still work you may need to shim the French cleat
@@HowYouCanMakeIt Thanks Philip!
very nice thank you for the video. what kind of wood did you use?
Thanks spruce lumber at Home Depot
Great video. Where did you find the angle finder? it's not your tool list for this video. I like the french cleat mount as well easy for customers to secure it to the wall.
Thanks on Amazon there is the link to the Wixey Digital Angle Guage amzn.to/3dBnMPC
Nice video Phillip. I thought about making smaller beams for my house. Do you have a link to where you sell your mantles? Do you sell just the mantle or screws with it? Also, how are some people selling the same thing for $300-400? That's crazy.
The link to the beam is in the description. Everything you need to install the beam comes with it.
Bud where is your riving knife? Little sketchy but great video very informative 👍
I had to remove the riving knife to get the 45 degree cut I needed.
Mantle
:)
The portion of the cleat that was attached to the wall appears thinner than the half initially cut on the saw. Was this cut shorter but not shown? I've been having issues with getting the cleat to clear the bottom board, so I assume this is why it was done, if so.
Your cleats needs to be narrow enough to clear the inside dimension of your beam. In this video the French cleat is very tall on the inside box and the wall is not as tall.
What did you use for poly? Looks whitewashed almost, thank you
The takes differently depending on the wood grain etc. I used varithane satin/matt finish
I don't have a Brad nailer. Just use 6d nails and pre drill?
👍🏻
at how many inches did you set up the table saw to cut the miters on the 1x6 ?
I used a scrap piece and made adjustments
What color stain did you use for the beam?
Early American. Varithane
My house is over a hundred years old and the timber used in its construction was from a famine ship that sank in the harbour, when we bought the house it was derelict and the roof purlins needed replacing, with the history of the wood I didnt want to just throw them out, I want to make a mantle piece out of one of them. It's a solid 4x4, any recommendations on how to mount it?
Thanks, Joey 🇮🇪
You should look at www.sheppardbrackets.com/
Thanks bud
Glad to help
How much weight do you think this would support?
that is a good question. It all depends on if you can hang the french cleate to studs vs. drywall anchors. I haven't tested anything however I know the drywall anchors I provide with the beam can hold 60lb and there are usually 4 of them.
Nice video. I tried to download your planes with link and it's not going to your download. Any suggestions?
thank you for letting me know. Here is the link bit.ly/3R1rSU4
From the rip fence to the blade on a 1x6 board. Where does the board need to be with the blade to get that beveled edge. Does the board have to be right on the edge of the blade. Do you mark the distance from the Rip fence to the blade 6 inches?
I use a scrap board to get it right up to the edge
@@HowYouCanMakeIt what about the blade for you cut. Do you use a special blade. Thank you so much
Just a regular blade
What color stain did you use?
Early American
Nice what is the name of the wood stain?
Early American by Varithane
What stain did you used???
I think it is early American
What stain color did you use
Early American
Can it be made more secure? A kid or me been me, coming up from lighting the fire, would a bang from the top of my head knock it off the french cleat?
It secures really well on the French cleat
Nothing stopping you from putting just a few little drops of glue on the cleat before you drop it in place. The little bit of glue would help prevent the instance you describe but not keep someone from removing it entirely if they wanted to do so on purpose.
The cleat is glued and screwed to the bram
@@HowYouCanMakeIt Yes! Definitely gotta do that. I was saying he could put a few dabs of glue on the 45 degree parts of the cleat if he was that concerned with bumping the mantle off the cleat.
How would we add a hidden compartment?
Not sure I understand
Can we use screws instead of nails?
You could might be a bit more challenging
I used the same wood but some of the board turned a riddish color... when i try the stain the boards dont match, is there a fix for it?
what type of stain did you use? I recommend using only Varithane Interior Stain amzn.to/3xna3Fl
@@HowYouCanMakeIt it's not so much about the stain, the wood itself changed its core color from the yellowish pine to more of an orange. Not sure if it was moisture.
But the different planks are different tones so when I tried a stain test the color of the stain doesn't come out the same
@@HowYouCanMakeIt but the stain I did try is minwax
Oh I see very interesting
went to download free plans and can not figure it out. guessing really not free
DM me and I will email them to you. The site that was hosting it is not longer.
Looks great but not really for beginners. I am just starting diy and looks like I need alot of expensive tools to make that mantel.
That is awesome you are starting. Table saw and a miter saw are all you need. You can build so many things with two tools. That is what I have done. You don’t need $$$ table saw start with a contracted version.
You can rent those tools at Home depot.
Yes
How much if you make one for me?
I would love to make you one. You can buy it on etsy here is the link www.etsy.com/listing/883228233/fireplace-mantle-wood-beam-mantel-mantel
DOWNLOAD THE PLANS FOR FREE???? it says it costs $2, i bet you made more money from people downloading the plan than that 1% of ratio sales you had. Its a good idea, thank
There is a code in the video description that you enter at check out that makes the plans totally Free to you. If you run into issues let me know. There are a few people who just visit my website and never come from TH-cam and pay but it has only been like 5 people since the video was released.