***WARNING*** NEVER EVER heat a ball joint!!!!! My father almost died from it! It exploded and went through his right eye and lodged all the way into his head....and it was still glowing hot!
Why didn't you show the clip where you put the ball joint through the control arm? Thats all I came to see in this video and you failed to add that clip.
I have been trying so hard with a tuning fork to the point of putting all my weight on it. Got a scrap 2x4 and beat the hell out of it with a hammer and the SOB popped right out! 5 hours vs 30 seconds! I NEVER would have thought of that. KUDOS! THANK YOU!
I live in the rust belt and my pinch bolt on my 2010 Impreza came out intact! Thought for sure its gonna snap. First I sprayed it with penetrating oil, then I put a socket and extension on and gave the head of the bolt some good whacks, then I used a heat shield(piece of tile) and heated around the bolt. Then I turned it slowly...it didnt budge. I turned a little harder and it moved. At this point I wasnt sure if I was snapping the bolt or it was moving inside. So then I turned it back in...then out a little...then back in...etc. Slowly working it loose. Finally it came out...lol. Now on to the rest of the job... So...3 hours later its done! BUT...I had to remove the A arm because when I tried to pound the a-arm off the threaded part of the ball joint it wouldnt budge. I used a 2x4 and a big hammer but the whole ball joint came out of the steering knuckle. So I took the A arm off (marking the alignment bolts) and then pounded the ball joint out of the A arm on the ground. What a pain in the ass...lol. Anyways...I have been working on cars as a hobby since I was 16(now 48 years old) Im no pro but have learned how to deal with rusty bolts and parts being from the north. All I can say is use penetrating oil, use a propane torch, give the bolt a few good whacks and then turn slowly with gradual pressure and see if the bolt moves. Then work it slowly back and forth. On a rusty car this isnt an easy job on a garage floor with simple hand tools but it can be done. Try your best not to snap any bolts. Good luck.
I used a break bar try to remove a nut, the bolt totally broken inside. Have to tow my outback to a garage. The other three bolts were broken too in the garage by the technican. WTF!
@@qualityinnsuiteschoicehote5509 Damn....sorry brother. I still haven't done my driver side ball joint. I just used a torch and penetrating oil and worked the bolt back and forth rather than just continuing to loosen it. Try loosening, then back in, just worked it like that applying more penetrating oil and heat until she came out.
Just did this on my 2006 Impreza Outback Sport. Not only did the pinch bolt snap but the joint was seized up super bad. So after drilling out the pinch bolt and the pickle fork not cutting it I became extremely frustrated. So in a rage I absolutely went to town on the control arm with a 2x4 and a 3lb mini sledge. After a few minutes of laying into it the damn thing finally came out 😂.
@@Mcnabb2Desean4aTD Just a Milwaukee drill. I started on one side with the smallest drill bit and just progressively worked my way up. I use a bunch of CLP I had to keep it from getting hot. Did the same thing on the other side until I got through. Took a couple hours.
@@PastorDr.MartinSsempa Just got done drilling out them on both sides. Driver side I still need to go in with larger bit but it's wanting to get caught. I couldn't get the joint isn't coming out either. I got the same "tools" that you do and I wonder if I should just keep hammering on it or what.
@@daenku32 I just keep applying more oil and more force on the drill bit to get it to go through. I legit split a 2x4 trying to get it to come out. I kept soaking the ball joint are in pb blaster and after enough force it finally came out. It took a pretty long time.
@@PastorDr.MartinSsempa Got a ball joint puller coming tomorrow, but just getting the control arms dropped *from* the ball joint is already terrible. Having to use the 2x4 method on a control without even a nut holding it in place.
If you take a small flat spaded chisel and hammer it in the slitand open up the grasp on the old ball joint ,then the ball joint will pop out of the spindle easy. And if you do break off the cotter pin dont worry as long as you can get your socket on the crown nut the crown nut will drive right over the cotter pin with a bit more torque. Just some tips.
Just did the second ball joint successfully…3 years after you helped me with the first one. The pinch bolt came out without snapping but I used a lot of heat and PB blaster and worked it out and in, adding heat and PB blaster. I avoided doing the passenger side until now because it is a PITA doing this job.😂The wheel bearing finally bit the dust so I did the ball joint AND wheel bearing/hub replacement at the same time. Double the fun! 😅 Not for a beginner home mechanic thats for sure. I had to really heat the area around the ball joint and pounded that piece of wood for a good 15 minutes, heating, pounding with my poor wife wearing ear protection and holding the wood while I pounded with a sledge hammer. Split the wood and had to cut the ends clean again. Definitely not for a noob if you are in the rust belt. Thanks again for the vid.😁👍
🤣😂 sometimes this works. But for me the pinch bolt head snapped off. Therefore had to drill the bolt out. After 2 hrs 5 bits, still not done. Resorted to remove the steering knuckle. Hammered remaining bolt out. With a slide hammer and ball joint removing cup 15 tries. No even budged i have done alot of mechanical work on vehicles and work in a shop. Not had many as bad as mine. Knuckle replacement may be in order.
Exact same thing happened to me. Went through 2 drill bits and gave up after only getting through half of the bolt. Luckily watched a video where someone welded a nut onto the end of the bolt that was sticking out a bit so I decided to give it a try. My first weld failed but the second time I welded a nut on I was actually able to back the bolt out!
Free All, heat, an impact, and patience goes a long way in the rust belt for the bolts. Also get the Astro Pneumatic ball joint puller tool. Takes ‘em out so easy.
Thanks for the very precise and compact instructions. Let us see what happens on weekend. Got failed on inspection today from this reason with my rusty old Subaru.
this was the first video i clicked, when i searched for subaru ball joint and wow that was a good one. well explained and filmed. ...and by coincidence its also about an Impreza MY 2007-2012. thanks
Thanks so much for this educational video. I was told by a few mechanics that they needed a special tool to work on the ball joint, but now I see that's not necessarily always the case.
You can use I believe a 5/8th long socket under where the pinch bolt goes after jacking up the control arm and placing the socket then lowering. If that's not enough put the tire back on place socket while car is jacked up and the lower car. And that is done while the castle nut is on and the pinch bolt removed.
What also helps is spray the living S$&37T! Out of it a few days before you decide to remove them. Spray them in the morning and the evening. This will help. So the penetrant soaks into the rust. Then if it seems super tight still loosen it a tiny bit then reverse so it loosens then tightens. This will help it from breaking. If it breaks grab a drill and angle grinder.
I'm stuck where you were at 9:34... except you just reached in and grabbed the ball joint and pulled it out with your hand easily.. mine won't come out with a press... it deformed the bolt on the bottom and did not loosen the ball joint. The wood banging you did was to remove the ball joint from the knuckle
Good video and well explained. As one of those DIY guys I found out it’s easier to wire brush the treaded ends then spray some PB Blaster on the threaded ends and it sure makes removing them easier. Cut the ends off the cotter pins then pull it out by the head.. Adding some anti seize to the threads ends and the ball joint hole helps also for the next time or next owner. Thanks again
You're either incredibly lucky, or more likely you're outside the rust belt states that use copious amounts of road salt. A subaru ball joint with 8 years and/or 100k+ miles definitely won't pop out like you demonstrated up here in New England. It's the pinch bolts that cause the most headache, as you eluded to. They seize up, round off, and/or snap when trying to be removed. I ended up having to take my 04' LL Been wagon to a pro to get my ball joints replaced. That said, a very well done video for those in milder climates.
Interestingly enough, this vehicle has been driven since day one in New England. I agree in that it's quite difficult to remove the ball joint. Using the piece of wood and heavy hammer did the trick.
You beat me to this comment; this is the 1 guy in history whose pinch bolt didn't snap off! I spend an hour today spraying it down, torching it, gently working it with the breaker bar, etc. Didn't matter - snapped RIGHT OFF! Now I've got hours of F'ING drilling ahead of me tomorrow. You can remove steering knuckle but then you need to pay for an alignment. OR you can heat it with oxyacetylene - but if you don't have a torch, you've got to buy one. I bet it's CHEAPER to pay a shop to do the ball joints than to pay for the alignment and/or buy an OA torch. Great comment!!!
Superb video! I know it is incredibly hard to film and perform the work, especially if you are by yourself. Thank you. BTW, was it tricky to get the control arm back into the ball joint stem given how stiff it is? I have seen many videos where they have the stem in the control arm and then the ball joint is aligned with the socket and hammered inside, which was quite tricky.
YOu left OUT how you got the stud back into the control arm!! How did you pry that control arm down enough to get the new joint in? Same way as you got it out??!!
I have a 97 Nissan Maxima that is leaking from the rear main seal. If I use a bottle of sealer do you think it would hurt the motor? I hate to do this because it still runs great. 278000 miles on it. I have learned a lot about this car by watching your videos. Thank you so much
You should add buy extra pinch bolts at or around the same size as oem and like you said heat it or take it very easy. I was one for two on my first r and r. Good video very to the point
It's far easier to undo stabilizer bar end link from the control arm than the bracket. It's 14mm nut and 8mm allen key (as far as I can remember). Doing my Ball joint as soon as I have some time, and weather approves...
Bulb snap on me the wood didn't work and it looks easy but isn't at the end it took me 8 hours to get it done and every brake I took I was watching your video to be onest it helps me but I think I don't have the hands for it but it was better than paying a mechanic
If you live in the rust belt I guarantee it will not be as easy. The pinch bolt will snap unless you heat it (don't burn the CV boot!). The ball joint will be darn near impossible to get out. Look up Subaru ball joint puller on Amazon. I haven't used one but it looks like it may be worth a try.
I actually just take the entire knuckle off the vehicle anymore. That way I can use the big torch on the pinch bolt. That and my ground down thinner air hammer bit that'll get into the slot and just drive that ball joint right out. Edit, I'm also doing this in a shop and sell an alignment with the job.
If you disconnect that bolt that connects the sway bar to the control rod you don't have to push down with that 2x4 when it's free as is allows the control arm to just come down all the way, leaves you not fighting the sway bar while you smack the ball joint out.
I live in the Midwest, so I use Gasoila Nickel anti-seize do to all salt and helps fight any corrosion. I also found SeaFoam Deep Creep to be better than PB blaster at penetrating, but mileage may vary.
you are so dang lucky. I just did my '05 and sprayed the shit out of that bolt about a dozen times .... tapped it and whatnot to work it in per directions, added eevn more ... bolt head snapped off instantly. SO MUCH EASIER when that doesn't happen :\
Many people tell to do so. But if you know why the sway bar is there in the first place you can support both sides of the car on the jack stands and release any tension from the sway bar all together. This way you neither need to touch the brackets nor the links. Same applies to replacing the sway bar links - jack up both sides of the car.


***WARNING*** NEVER EVER heat a ball joint!!!!! My father almost died from it! It exploded and went through his right eye and lodged all the way into his head....and it was still glowing hot!
You can you just need to poke a hole into it first.
Why didn't you show the clip where you put the ball joint through the control arm? Thats all I came to see in this video and you failed to add that clip.
I have been trying so hard with a tuning fork to the point of putting all my weight on it.
Got a scrap 2x4 and beat the hell out of it with a hammer and the SOB popped right out! 5 hours vs 30 seconds! I NEVER would have thought of that. KUDOS! THANK YOU!
I live in the rust belt and my pinch bolt on my 2010 Impreza came out intact! Thought for sure its gonna snap. First I sprayed it with penetrating oil, then I put a socket and extension on and gave the head of the bolt some good whacks, then I used a heat shield(piece of tile) and heated around the bolt. Then I turned it slowly...it didnt budge. I turned a little harder and it moved. At this point I wasnt sure if I was snapping the bolt or it was moving inside. So then I turned it back in...then out a little...then back in...etc. Slowly working it loose. Finally it came out...lol.
Now on to the rest of the job...
So...3 hours later its done! BUT...I had to remove the A arm because when I tried to pound the a-arm off the threaded part of the ball joint it wouldnt budge. I used a 2x4 and a big hammer but the whole ball joint came out of the steering knuckle. So I took the A arm off (marking the alignment bolts) and then pounded the ball joint out of the A arm on the ground. What a pain in the ass...lol.
Anyways...I have been working on cars as a hobby since I was 16(now 48 years old) Im no pro but have learned how to deal with rusty bolts and parts being from the north. All I can say is use penetrating oil, use a propane torch, give the bolt a few good whacks and then turn slowly with gradual pressure and see if the bolt moves. Then work it slowly back and forth.
On a rusty car this isnt an easy job on a garage floor with simple hand tools but it can be done. Try your best not to snap any bolts. Good luck.
Appreciate the feedback! We're all here to help each other. Thank you.
@@CarsNToys Thanks. The video definitely helped. Cheers. 😀
I used a break bar try to remove a nut, the bolt totally broken inside. Have to tow my outback to a garage. The other three bolts were broken too in the garage by the technican. WTF!
@@qualityinnsuiteschoicehote5509 Damn....sorry brother. I still haven't done my driver side ball joint. I just used a torch and penetrating oil and worked the bolt back and forth rather than just continuing to loosen it. Try loosening, then back in, just worked it like that applying more penetrating oil and heat until she came out.
Just did this on my 2006 Impreza Outback Sport. Not only did the pinch bolt snap but the joint was seized up super bad. So after drilling out the pinch bolt and the pickle fork not cutting it I became extremely frustrated. So in a rage I absolutely went to town on the control arm with a 2x4 and a 3lb mini sledge. After a few minutes of laying into it the damn thing finally came out 😂.
What did you use to drill it out ?
@@Mcnabb2Desean4aTD Just a Milwaukee drill. I started on one side with the smallest drill bit and just progressively worked my way up. I use a bunch of CLP I had to keep it from getting hot. Did the same thing on the other side until I got through. Took a couple hours.
@@PastorDr.MartinSsempa Just got done drilling out them on both sides. Driver side I still need to go in with larger bit but it's wanting to get caught. I couldn't get the joint isn't coming out either. I got the same "tools" that you do and I wonder if I should just keep hammering on it or what.
@@daenku32 I just keep applying more oil and more force on the drill bit to get it to go through. I legit split a 2x4 trying to get it to come out. I kept soaking the ball joint are in pb blaster and after enough force it finally came out. It took a pretty long time.
@@PastorDr.MartinSsempa Got a ball joint puller coming tomorrow, but just getting the control arms dropped *from* the ball joint is already terrible. Having to use the 2x4 method on a control without even a nut holding it in place.
If you take a small flat spaded chisel and hammer it in the slitand open up the grasp on the old ball joint ,then the ball joint will pop out of the spindle easy. And if you do break off the cotter pin dont worry as long as you can get your socket on the crown nut the crown nut will drive right over the cotter pin with a bit more torque. Just some tips.
a trick : you can watch movies at Kaldrostream. Me and my gf have been using them for watching a lot of movies during the lockdown.
@Aryan Kabir yea, I've been watching on kaldrostream for months myself :)
Excellent tutorial.
This is almost exactly how I removed the LCA ball joints on GD chassis Subaru's.
Just did the second ball joint successfully…3 years after you helped me with the first one. The pinch bolt came out without snapping but I used a lot of heat and PB blaster and worked it out and in, adding heat and PB blaster. I avoided doing the passenger side until now because it is a PITA doing this job.😂The wheel bearing finally bit the dust so I did the ball joint AND wheel bearing/hub replacement at the same time. Double the fun! 😅 Not for a beginner home mechanic thats for sure. I had to really heat the area around the ball joint and pounded that piece of wood for a good 15 minutes, heating, pounding with my poor wife wearing ear protection and holding the wood while I pounded with a sledge hammer. Split the wood and had to cut the ends clean again. Definitely not for a noob if you are in the rust belt. Thanks again for the vid.😁👍
🤣😂 sometimes this works. But for me the pinch bolt head snapped off. Therefore had to drill the bolt out. After 2 hrs 5 bits, still not done. Resorted to remove the steering knuckle. Hammered remaining bolt out. With a slide hammer and ball joint removing cup 15 tries. No even budged i have done alot of mechanical work on vehicles and work in a shop. Not had many as bad as mine. Knuckle replacement may be in order.
Exact same thing happened to me. Went through 2 drill bits and gave up after only getting through half of the bolt. Luckily watched a video where someone welded a nut onto the end of the bolt that was sticking out a bit so I decided to give it a try. My first weld failed but the second time I welded a nut on I was actually able to back the bolt out!
Free All, heat, an impact, and patience goes a long way in the rust belt for the bolts. Also get the Astro Pneumatic ball joint puller tool. Takes ‘em out so easy.
Thanks for the very precise and compact instructions. Let us see what happens on weekend. Got failed on inspection today from this reason with my rusty old Subaru.
Good luck!
this was the first video i clicked, when i searched for subaru ball joint and wow that was a good one. well explained and filmed. ...and by coincidence its also about an Impreza MY 2007-2012. thanks
Try this with a 13 year rust belt Subaru. 😢 it is not even close to becoming loose
Thanks so much for this educational video. I was told by a few mechanics that they needed a special tool to work on the ball joint, but now I see that's not necessarily always the case.
Great video. Removing the knuckle currently on my forester cuz of a stuck hub.
You can use I believe a 5/8th long socket under where the pinch bolt goes after jacking up the control arm and placing the socket then lowering. If that's not enough put the tire back on place socket while car is jacked up and the lower car. And that is done while the castle nut is on and the pinch bolt removed.
What also helps is spray the living S$&37T! Out of it a few days before you decide to remove them. Spray them in the morning and the evening. This will help. So the penetrant soaks into the rust. Then if it seems super tight still loosen it a tiny bit then reverse so it loosens then tightens. This will help it from breaking. If it breaks grab a drill and angle grinder.
Great walk through on this. When I do mine, I will probably use some copper anti-seize to keep it from corroding in the future.
Happy to help. Just watch that pinch bolt. They often break.
Yeah, antiseize is Karma to the gods, pay it forward. Who knows, you may be the next guy, ha ha.
Just changed the wheel bearing and axle on my girls Subaru...drove great then BAM ball joint. Going to tackle this one soon. Great video.
I'm stuck where you were at 9:34... except you just reached in and grabbed the ball joint and pulled it out with your hand easily.. mine won't come out with a press... it deformed the bolt on the bottom and did not loosen the ball joint. The wood banging you did was to remove the ball joint from the knuckle
You run a flathead to widen the gap for the ball joint where you taken the nut and bot
That removal method is kinda genious man. Great video man. I like the wood method alot
Good video and well explained. As one of those DIY guys I found out it’s easier to wire brush the treaded ends then spray some PB Blaster on the threaded ends and it sure makes removing them easier. Cut the ends off the cotter pins then pull it out by the head.. Adding some anti seize to the threads ends and the ball joint hole helps also for the next time or next owner. Thanks again
Thanks a lot man. Couldnt figure out how to pop it out of the knuckle! What would you do if the rod came out of the socket?
how do you drill out that bolt i snapped mine the pinch bolt
They literally fuse to the steering knuckle here in the rust belt. Wouldn't it be great if manufacturers used anti- seize?
You just saved me with your 3 foot wood and hammer trick. Thanks!!
Happy to help.
You're either incredibly lucky, or more likely you're outside the rust belt states that use copious amounts of road salt.
A subaru ball joint with 8 years and/or 100k+ miles definitely won't pop out like you demonstrated up here in New England. It's the pinch bolts that cause the most headache, as you eluded to. They seize up, round off, and/or snap when trying to be removed. I ended up having to take my 04' LL Been wagon to a pro to get my ball joints replaced.
That said, a very well done video for those in milder climates.
Interestingly enough, this vehicle has been driven since day one in New England. I agree in that it's quite difficult to remove the ball joint. Using the piece of wood and heavy hammer did the trick.
You beat me to this comment; this is the 1 guy in history whose pinch bolt didn't snap off! I spend an hour today spraying it down, torching it, gently working it with the breaker bar, etc. Didn't matter - snapped RIGHT OFF! Now I've got hours of F'ING drilling ahead of me tomorrow. You can remove steering knuckle but then you need to pay for an alignment. OR you can heat it with oxyacetylene - but if you don't have a torch, you've got to buy one. I bet it's CHEAPER to pay a shop to do the ball joints than to pay for the alignment and/or buy an OA torch. Great comment!!!
Wonder if there is a way to seat the new ball joint without hitting the stud of the ball joint, extra large socket?
***IMPORTANT***
If you are buying any parts from the dealership, the new parts wont come with any bolts, nuts, washers, gaskets, etc.
:O THE EXTENSION TRICK, I always use old piece of pipe man, now Im always gonna do your way. thanks!!!!!
it's easy to install a new one but it's too hard to move the old rusted bolt nuts, especially if you lived in canada.
And the uk 🙈
NY as well the rust belt is real
Lucky you with that cutter pin.
Thank you for video
Superb video! I know it is incredibly hard to film and perform the work, especially if you are by yourself. Thank you. BTW, was it tricky to get the control arm back into the ball joint stem given how stiff it is? I have seen many videos where they have the stem in the control arm and then the ball joint is aligned with the socket and hammered inside, which was quite tricky.
Should the socket for the ball joint be greased?
YOu left OUT how you got the stud back into the control arm!! How did you pry that control arm down enough to get the new joint in? Same way as you got it out??!!
Just left it up with a hydraulic jack once you have on position
Thanks man!! I’ll be working on my Moms XV. I think the procedure is the same! More power to you Brother!!
How did you get it back together after you seat the nes ball joint?
You don’t remove the end links? Thanks. Enjoy all of your videos.
I have a 97 Nissan Maxima that is leaking from the rear main seal. If I use a bottle of sealer do you think it would hurt the motor? I hate to do this because it still runs great. 278000 miles on it. I have learned a lot about this car by watching your videos. Thank you so much
Will these make a metal to metal thumping sound?
Thank you. Having a very tough time, wish I had watched this first.
Hope it helped!
Nicely done. Thanks for the knowledge. I have a 2012 Forester to do the same replacement.
My subarus only 6 years old and the pinch bolt snapped off, and the ball joint was completely seized into the knuckle
You should add buy extra pinch bolts at or around the same size as oem and like you said heat it or take it very easy. I was one for two on my first r and r. Good video very to the point
Thank you and that is a great tip!
It's far easier to undo stabilizer bar end link from the control arm than the bracket. It's 14mm nut and 8mm allen key (as far as I can remember). Doing my Ball joint as soon as I have some time, and weather approves...
@coolman92 Didn't think about this factor...
Unless the allen part rounds off, then you’re in extra trouble. Ask me how I know…
Great video and crystal clear, good lighting. Thank you
Yeah mine snapped and drilled through, the balljoint is still stuck in there… 2001 impreza wrx
Why you need to loose the brackets on both sides?
If you do not loosen both sides of anti sway bar you cannot remove ball joint. Try it and see for yourself.
Clio has similar style, the pinch bolt is seized solid usually.. 😐
You made it look harder than it really is
Any ideas when this doesn't work?
Bulb snap on me the wood didn't work and it looks easy but isn't at the end it took me 8 hours to get it done and every brake I took I was watching your video to be onest it helps me but I think I don't have the hands for it but it was better than paying a mechanic
If you live in the rust belt I guarantee it will not be as easy. The pinch bolt will snap unless you heat it (don't burn the CV boot!). The ball joint will be darn near impossible to get out.
Look up Subaru ball joint puller on Amazon. I haven't used one but it looks like it may be worth a try.
Great info my man
I actually just take the entire knuckle off the vehicle anymore. That way I can use the big torch on the pinch bolt. That and my ground down thinner air hammer bit that'll get into the slot and just drive that ball joint right out.
Edit, I'm also doing this in a shop and sell an alignment with the job.
I would grease all the mating surfaces and threads as a matter of good practice.
Great video!! Thank you for the time you took to make this. saludo y u abrazo desde las vegas
so touching for an excellent video
Explained very well. Thank you from Germany✌️
If you disconnect that bolt that connects the sway bar to the control rod you don't have to push down with that 2x4 when it's free as is allows the control arm to just come down all the way, leaves you not fighting the sway bar while you smack the ball joint out.
Thank you. Will have to try that.
really well done video. Thanks!
Great video with lots of tips to help with this project. Thanks!
Hope it helps! Thank you.
Yeah I had to pull the knuckle pinch bolt broke
Couldn't you just pull the sway bar end link instead of pulling all the sway bar bolts off?
Excellent detailed video Thank you.
I live in the Midwest, so I use Gasoila Nickel anti-seize do to all salt and helps fight any corrosion. I also found SeaFoam Deep Creep to be better than PB blaster at penetrating, but mileage may vary.
So well explained.
The lever suggestion is good, but really... taking off 8mm nuts is no big deal.
Gracias amigo tu vídeo me sirvió de mucho 👌
God knows how much I love your videos! :) You are awesome man
I got that same torch. I use it for dabs
Infortunately this tips will not work in the rust belt states. Took me days with lots of tools and patience
this will save me much time and money! thank for the instructions :-)
Thx for posting the vid bro. This will help me save some money. Happy Thanksgiving!
Excellent video 👍
Thank you very much!
My 2007 OB need more elbow grease than yours lol. Iam order the ball joint press tool(eric the car guy). good video btw
In the future, just pull the end link off; and anti seize the pinch bolt and the ball cup after cleaning it out.
Thank you sir... this is very helpful in a project (read problem :) ) I'm working on. Well done
Solid video
Thank you, Philippe!
Great Video!
Thank you. Hope it helped!
Love the pinch bolt, pressed balljoints piss me off lol
Aren't they a million times easier than drilling out a snapped off pinch bolt?
Thank bro big help
great job, thanks !
Glad you liked it!
Muy buen video y Buenos tips! 👍 GRACIAS por la info.
you are so dang lucky. I just did my '05 and sprayed the shit out of that bolt about a dozen times .... tapped it and whatnot to work it in per directions, added eevn more ... bolt head snapped off instantly. SO MUCH EASIER when that doesn't happen :\
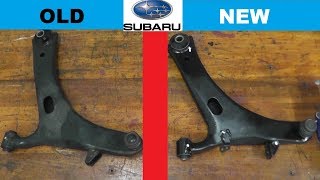
Those lower arms! Glad mine is an STi and therefore aluminium. Legacy go the same way, more shocking quality from Subaru.
Improvised long reach bar love that. Kicking myself for not seeing that
Do I technically need to remove the sway bar brackets?
Many people tell to do so. But if you know why the sway bar is there in the first place you can support both sides of the car on the jack stands and release any tension from the sway bar all together. This way you neither need to touch the brackets nor the links. Same applies to replacing the sway bar links - jack up both sides of the car.
This always LOOKS EASY but I live in the rust belt
That pinch bolt came out too easy. I bet it won't be that easy for me.
Lucky AF.
Pinch bolt snap on you?
Excelente 🇨🇱
I know it's 3 years ago bot you the bom
HE SAID A PITCH FORK
You forgot to mention safety and the best jacking points.
keta subaru
Too many adds… couldn’t watch all of it