Simple Dodge & Burn Technique in Photoshop - Sculpting the Face by Dodging & Burning [Easy & Fast]

ฝัง
- เผยแพร่เมื่อ 18 ก.ย. 2023
- Simple Dodge & Burn Technique in Photoshop - Sculpting the Face by Dodging & Burning [Easy & Fast]
Instagram.
sanam_pixel...
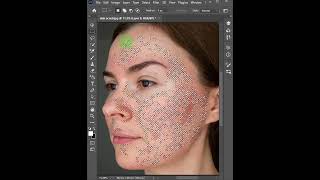
First what is dodging and burning, Dodging and Burning is an extremely powerful technique that can sculpt, contour, and enhance the details of your subject.
This is a very popular process that give prominence to the existing highlights and shadows in subject’s face, and gives the face lots of depth and dimension for a really pleasing look.
I take the extra time to do this to nearly every image I retouch, so for me, it’s almost like a “finishing step” that gives the image that extra depth.
This method requires a great deal of skill to improve a photo but i made it lot more simple and easier.
Ok let's get started.
First duplicate background image.
Rename the layer to "DODGE"
Change the layer blending to screen. This step lightens the overall image.
Now double click on the layer to open blending options.
Go to blend if section. The important slider here is Underlying Layer.
we need to minimize the lighten affect from the shadows.
and keep the affect on forehead, nose, cheek bone, chin etc.
So drag the black triangles to the right until you will see that the particular lighten areas are influenced.
see now we selected the specified highlight areas.
Now Hold Option or Alt Key clicking on the triangles splits them so you can feather the blending effect.
Keep an eye on the image and slowly drag the black handles to add depth to the highlights.
click ok to apply the changes.
Duplicate background layer again. Rename layer to BURN and move the layer to top.
Change the layer blending to MULTIPLY. This step darkens the overall image.
Now double click on the BURN layer to open blending options.
This time we need to minimize the darken affect from the highlights.
So drag the white triangles to the left until you will see that the particular influenced areas to appear.
Once we selected the specified shadow areas.
Again Hold Option or Alt Key clicking on the triangles splits them so you can feather the blending effect.
Keep an eye on the image and slowly drag the white handles to add depth to the shadows.
click ok to apply the changes.
We successfully lighten and darken particular areas and draw attention to areas of an image.
Now group the top two dodge and burn layer CTRL +G
We need to blend this group with the bottom original background layer.
So add layer mask by clicking the MASK icon.
Select the layer mask and go to image tab and choose apply image
Keep everything setting to default and click ok.
I'm keeping group opacity at 100% because i'm happy with result.
If necessary we can lower the group opacity to control the depth.
Now similarly enhance the lips and eyes
That's it. We're done.
#simpledodgeandburninphotoshop #dodgeu0026burnphotoshoptechnique
#dodgeburnportraiteffect
#sculptretouchingphotoshop - ภาพยนตร์และแอนิเมชัน


![Simple Dodge & Burn Technique in Photoshop - Sculpting the Face by Dodging & Burning [Easy & Fast]](http://i.ytimg.com/vi/XqjBO7Y6364/mqdefault.jpg)


very good lesson and your nice teaching.......go ahead bro.............always support
Thank you sir please keep supporting
Excellent 👌👌👌
Thanks a lot
Thanks this is way simpler than all that 50% grey nonsense full on youtube
♥️
nice method, thank you very much
Welcome 🤗