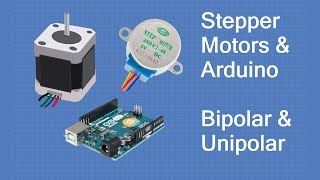
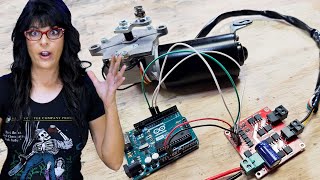
Control Position and Speed of Stepper motor with L298N module using Arduino

ฝัง
- เผยแพร่เมื่อ 14 พ.ค. 2024
- In this video we learn how to use the bipolar (4 wires) Stepper motor. We learn how to find the poles (wires) and how to connect and program it.
Purchase from Affiliated store:
All Products below have full free TH-cam Course
Arduino 3-in-1 ioT Learning Kit from SunFounder:robojax.com/L/?id=367
Purchase The best Ever ESP32 Camera Learning from SunFounder:robojax.com/L/?id=368
Raspberry PI Robot Camera Car kit from SunFounder:robojax.com/L/?id=365
Raspberry PI Pico CAr kit from SunFounder:robojax.com/L/?id=366
Control speed of stepper motor using push buttons • Control Speed of Stepp...
Watch my full ultimate video for mini stepper 28BYJ-48 with 8 projects to controls direction, speed, start/stop and more:
• Using 28BYJ-48 Stepper...
*** Free Course ***
Arduino Step by Step Course (over 100 lectures) Starts here • Lesson 00 What is Ardu...
The best thank you for me is to not to skip ads and Subscribe 🔔 to my channel, like 👍 the video It is greatly appreciated. 🔔 😊.
I will reply to all Subscriber's 🔔 questions. So make sure to Subscribe and enable the bell 🔔.😊
The potentiometer use can be anything 1kΩ or higher up to 500kΩ.
** Purchase Arduino Start Kit **
Amazon USA: amzn.to/3z88F9G or just UNO board amzn.to/3aY7KOL
Amazon Canada: amzn.to/31an88J or just UNO board amzn.to/3pYxSNN
Amazon Europe (all Europe): amzn.to/3pMCHge or Just UNO board amzn.to/2PgGItD
AliExpress: s.click.aliexpress.com/e/_9uc7Xe
Banggood: www.banggood.com/custlink/3GD... or UNO board www.banggood.com/custlink/vKm...
eBay: ebay.us/B1JWLi
***** Purchase Authentic Arduino Uno from ***
Amazon USA: amzn.to/2KApAwK
Amazon Canada: amzn.to/37LZ8sW
All Europe Amazon: amzn.to/36YDSzn
Download the code for this video: bit.ly/4-wire-stepper
***** Purchase Authentic Arduino Uno from ***
Amazon USA: amzn.to/2KApAwK
Amazon Canada: amzn.to/37LZ8sW
Purchase Stepper Motor (Affiliated) store:
NEMA17 Stepper motor
Amazon USA: amzn.to/31OIWnp
Amazon Germany: amzn.to/3ow77AP
Amazon Canada: amzn.to/3oAnDzw
Amazon UK: amzn.to/3e30H7x
Amazon Italy: amzn.to/3e30KjJ
Amazon France: amzn.to/2G4kruR
Amazon Spain: amzn.to/3jzGCH5
アマゾンジャパン:amzn.to/37KJb6P
*** Purchase L298N Motor Driver Module from ***
eBay: ebay.us/XG3dal
Amazon Canada: amzn.to/3zXFbvp
Amazon USA amzn.to/3qpyBt8
All other Amazon: amzn.to/3jfvp1C
AliExpress: s.click.aliexpress.com/e/_9xGXUr
Banggood www.banggood.com/custlink/GKG...
Jump of this video by click on the times listed below
00:00 Start
00:52 Introduction
01:51 Hardware Explained
10:06 Wiring Explained
13:27 Code Explained (1)
19:06 Code Example (One step at a time)
19:47 Code Example (motor knob: position)
26:15 Code Example (motor knob: speed)
If you found this tutorial helpful, please support me so I can continue creating content like this. You can support me via PayPal: bit.ly/rj-paypal
Related videos:
-STLPB-01 Control Speed of this motor using Push Buttons: • Control Speed of Stepp...
-What is PWM Frequency of Arduino (Video): • What is Arduino Uno PW...
-How to use a breadboard (video) : robojax.com/L/?id=121
Tutorial by Ahmad Shamshiri form Canada
****************************
Arduino Step by Step Course (over 100 lectures) Starts here • Lesson 00 What is Ardu...
Learn Arduino in 30 Minutes (video): robojax.com/L/?id=135
****************************
If you found this tutorial helpful, please support me so I can continue creating contents like this. Here is PayPal link paypal.me/robojaxTV
Follow me on Facebook robojaxTV
Follow me on Twitter: / robojaxtv
Follow me on Instagram: / robojax
Tutorial by Robojax.com
Get other projects code and learn Arduino
robojax.com/learn/arduino
#robojax #robojaxStepper #robojaxL298N - วิทยาศาสตร์และเทคโนโลยี


![🔴 [TRỰC TIẾP] Tứ Xuyên (Trung Quốc) VS U20 Thái Lan | Cúp VTV9 - Bình Điền 2024 | JET STUDIO](http://i.ytimg.com/vi/bguJ41PcW0c/mqdefault.jpg)


Excellent description & very helpful to enhance application knowledge on stepper motor & Arduino !We hope to see you with your more tutorials of steeper motor application for use in a letter engraving machine , router machine & other applications ! Thank you so much Sir for this educative post !
Thank you for the high quality, thorough explanation!
You make it so easy to connect L298, stepper motor & Arduino. Excellent job and thank you.
I know this is an old post but you have helped me more than you know. You're GREAT!
This is the best tutorial i could find. Very helpful, thanks!
you have the best presentation and detailed step by step walkthroughs on TH-cam. Thank you for all your hard work, I would sub 100 times if possible
Thank you very much.
Thanks for taking the time to share. An analog dial something like a temperature indicator using a thermistor or make an hour,minute,second hand of a clock. In an age of ultra cheap time keeping it is a Dinosaur but with so much salvaged parts laying around it might make an unusual display. I do not want anyone to do my assignment for me but it is nice to have help when encountering a bad block on the road to completion.
Thank you for making this video. It's exactly what I'm looking for.
ABSOLUTLY the best Video on the L293N. If I had the chore of explaining this, I could only wish to do it as well. Awesome!
I am glad you found my tutorial useful. Here is $200 Arduino course for free Arduino Step by Step Course (over 100 video lectures) Starts here robojax.com/L/?id=338
Just found our channel after much frusta searching and you have loved the clearest explanation of this topic !
Thanks and welcome
Found this video (again), and got the answer to the question i send you hours ago about this L298N ;) Thank you Ahmad for your videos !
You are welcome.
Very good presentation. I've had the L298, steppers, and Arduino for some time now and haven't been able to put it all together and now it's easy. Thanks again!
You are welcome!
thank you I spent hours tying to figure out why it was just jittering, and it was the ground from uno to power supply!
This is exactly where I am in my exploration. Well presented and thorough. I subscribed and liked. Thanks
Thanks for the sub!
Thank you for lesson teacher!
Great video! Thanks for teaching us.
My pleasure!
You are a great teacher!
Thank you! 😃
Jazak Allah bro good information about subject by this video i drive my stepper very easily
Excellent explained.
Keep uploading new videos... enjoyed, thanks.
Fellow Canadian :) Thanks for the video, it was very helpful, and I've seen a few which kept me looking until I found this one.
Glad I could help!
Best explanation 👍
I needed this. Thank you!.
Will watch in a few days when my project is nearing its coding phase
You are welcome.
thank you so much for detailing explaination sir (also turkish subtitlet)
Thank you so much sir!! I can now work on my DIY 3D printer!
Glad I could help!
Wonderful, did you work on it or still planning? I need to ask were you be able to connect multiple stepper with Arduino
YOU ARE THE BEST SIR.................Specially how you cover every espect...............HUGE THANKS>>>>>
You are most welcome
Nice explained. thank you 🙏
You are welcome
Creative video, thanks for sharing :)
Love your channels use multi language...thanks
So nice of you. you are welcome.
Thank you so much sir, , excellent explanation
You are most welcome
Hi, thanks so much for the video - it really is the best on TH-cam for this topic. I have a question: Whenever I take the motor above ~250 RPM, it stops moving and just squeals. It draws 12V 0.4A, and is getting the correct power. I'm using an Arduino Uno and the L298N as well as a 10K potentiometer. Any help would be greatly appreciated!
You are welcome. Thank you for your comment. If doesn't run faster, most probable reason would be limitation of the motor, unless you have Serial monitor in the loop printing something. Make sure not to print anything as serial monitor is very slow and it slows the motor.
Thank you 👍
You are welcome
Thanks sir for your efforts, excellent explanation
You are most welcome
Great sir,
Very nicely explained
Thanks for liking
This is a very good and helpful video.
My stepper motor is just jittery and not rotating how can i solve this problem # i am using a 9v battery.
Thanks sir very much ,god bless u
you are welcome. Good bless you too.
Hi thanks for this excellent series of tutorials, i have an issue however and hoping you can advise please. i have connected my arduino. my L298N (same as yours in example), and motor (i have identified the two coils with a meter) and it is a 1.8' degree step which is 200 steps for ful lrotation and a 12vdc 2amp supply. i have uploaded the example sketch from the arduino ide and the motor, the one that steps the motor clockwise then anticlockwise but my motor initially doesnt complete a fill 360 before reversing and then starts jumping and jittering before stalling, the L298N module heatsink is also becoming very hot. can you suggest anything that may be causing it to do this and what i can do to correct it please?
(ps i have also tried other code and it doesn't work as expected from there either.
cheers.
Gracias por compartir tus conocimientos, estoy empezando a experimentar con motor paso a paso y tu video me ayudo de mucho!! Saludos desde argentina! Me subcribi👍
Me complace que los haya encontrado útiles. Gracias por suscribirse. Mantenerse a salvo. Saludos desde Canadá. Puede ver este video th-cam.com/video/csf_G1pi0ps/w-d-xo.html
THANK YOU
Hi Robojax, is there anywhere I can view the full code for the speed control using the potentiometer. I see the position control code on the video but only half of the speed control. Thanks
You have great technique to teach
Thank you. I am pleased that you liked it.
Awesome video🤙🏻
Thank you.
one of the bes tut i have seen and will use it much much thanks
wow. Glad to hear that. you are welcome.
@@robojax i bouth everything but my L298N getting way to hot, 12V 10 amp power supply,
thank you so ,uch for this,. great help
you are welcome. Please subscribe. I appreciate it and helps my channel grow. Thank you
Muy buen trabajo , Very good job
Love you bro
I like your videos many important tips I learned thank you for sharing
You are so welcome
Exelente
Gracias por compartir sus conocimientos
Thanks for the informative tutorial! Does the L298N module support a 2 amp stepper motor? I am currently using an Adafriud Motor Stepper Servo Shield, but unfortunately this shield only supports a current of 1.2 amps. However, since I need a more powerful stepper motor for my project, I recently got myself a 59Ncm stepper with 2 amps. Since the Adafuit shield doesn't support the whole thing, I'm now looking for a new board. I hope the L298N module supports this stepper.
you are welcome. I've provided the datasheet for L298N and also shown it. I forgot what the current was so please refer to the datasheet. the link to code and resources page is in the description.
adamsın abi sen. eline sağlık ;)
çok teşekkür ederim. Ben Hürasanlıyım ve Türkiye insanlarını seviyorum.
@@robojax şaşırdım, sevindim ve memnun oldum 🙋🏻♂️
Looking forward to the upcoming switch for direction and speed control
I have it on my list. Let's see when the timer permits to do it.
Lovely video.
Man bless your soul
God bless your soul too. I hope you've subscribed as your subscription help my channel grow. Thanks
Its a wonderful content and you explain it so well. There is one request, if you can please consider and make tutorial that how we can control 3 stepper motors with one Arduino. Many thanks ❤️
I will try to make video of that. I will put on on my "to do" list. thanks
@@robojax ❤️
Thank you
Great work
Thank you.
Hi Robojax. Two days ago I was totally new to the Arduino, even though I've been an electronics engineer for over 30 years. Thanks entirely to you and your excellent series of videos for absolute beginners, I programmed my first Arduino today using the L298N module to move a stepper motor forward and backward a set number of degrees, each direction with a different speed. This is for a project I am working on to replace a dc motor and noisy crank system. My question is, do you have a video or any code on how to set the home position on a stepper using a micro switch on startup? thanks a million. Dan.
Hi Danny, You are very welcome. I am glad you found my tutorial useful. nice to meet you pal. same here Electrical Engineer. Actually I don't have such video yet but it is on my list at the top. Got busy with life. Here is $200 Arduino course for free Arduino Step by Step Course (over 100 video lectures) Starts here robojax.com/L/?id=338 this course has wiring diagram for each video. You have a look at my other stepper related videos th-cam.com/users/RobojaxTVsearch?query=Stepper
Hi Danny - I wish I could learn as quick as you - 78 this end - I am trying to do something simple - two buttons - forward and reverse - speed set in code - to drive a stepper motor - I have it running in one direction - but not the other - any ideas please thanks
gracias , será útil esta información para el L293D de un solo microcontrolador ,supongo que se programa igual en arduino, un saludo
thank you very much.
you are welcome.
As far as the step and direction is concerned, can I switch a 5VDC signal without the use of an external computer or aurduino? I would like to use a very simple handheld box with a switch (up/down) to move a motor cw and ccw. I have used STAC5 controllers in this way with a fixed velocity. 5VDC to the step input energizes the motor and then adding a 5VDC signal to the dir changes it's direction.
Thanks!
You can’t do it. It has be turned and off 1000s of times by microcontroller
Very beautiful explain
Thank you.
Lovely video.
Is it possible to move the rotor randomly?
Great video. Thank you!
When I use the L298N with my SY42STH47-1684MA stepper motor running at 12V, the L298N gets really hot. Do you know why this may be?
You are welcome. When you connect 12V to the module, it passes the 12V to the motor. Perhaps your motor is not rated at 12V or it is over loaded. if there is no load and still getting hot, it could also be that the signal is going to the motor to hold it in a position but the motor should tolerate that. So check the voltage of motor unless the wiring is incorrect.
The L298N is not really made to run steppers you would be better off spending a bit more on a TB6600 or an A4988. If you do still want to use the L298N you need to have a fan blow on it.
Hello Sir
Thanks for the video and very clear step by step explanation
Please let me know how to control the without Aurduino ?
Can I be able to control this same stepper motor with driver board by other means ? If yes what signals I need to feed the Driver module ?
I am planning to use a PWM signal from other module
you are welcome. PWM is not the right way but can be done. this is all about counting. You can learn it from other video here th-cam.com/video/Sl2mzXfTwCs/w-d-xo.html
Hello, Robojax! Great video, but I have a question: I replicated only the last part, speed ctrl with a pot (10k), with exactly the same configuration & sketch and I faced an issue - my lab power supply says the "device" is consuming 3A (@12v), which I believe is way too much, therefore my motor (Nema17 KS42STH48-1684A) stops after a very short while. How do you limit the current (as A4988)? or should I use a different power supply 12 v with max 1.7A?
thank you!
Octav
I will make separate video for that chip. Check the link I description or search for another video on this module where I have explained stop and hold of motor which affects the energy consumption
Thanks à lot
verry nice, regards from Romania ;)
Thank you. Ahmad from Canada.
Thankyou Prof
From Morocco
you are welcome akhi.
Thx i get it
hi, nice video by the way , i have a question, can i use driver a4988 for the motorknob example? cause i have this driver but i dont know how to control position with a4988 driver.
A4988 is different and won't work.
great video! I have a query How do I measure current drawn by the stepper in serial display wen it operates thru L298N motor driver.
I want to stop the say CW direction if the current drawn is over a particular limit and change to CCW. the use case is when using this stepper to open and close a sliding door, & an intruder interfere while door closing it should detect the intruder/load & change the direction of rotation to open the door instead of closing. please help
Here is my video on current sensing for the same chip used in Arduino Motor Shield th-cam.com/video/-uQKBDTWHPM/w-d-xo.html
Hi Robojax, I am new to all of this, but I just love your explanation. I need my stepper motor to travel 45 degrees counterclockwise when I turn on the machine, and then clockwise when I turn off the machine. That's it, just turn on, and 45 degrees counterclockwise turn off and 45 degrees clockwise. Any help will be much appreciated. Thanks.
Hi, I have another video shown how to control is with push button switch here th-cam.com/video/csf_G1pi0ps/w-d-xo.html this might help
Hi, First of all thank you for making this wonderful tutorial. I have followed the steps of your video with my Nima17 motor and L298N driver. But at slow speed (below 60) its just giving a jerk not even a complete rotation. I didn;t change any value of Example provided in Arduino but the motor was not running as your was runing at same value. However, once i increase the speed it did revolved smoothly. Can you please help in this regard as am doing this tutorial to control stepper motor at slow speed (but more torque). Many Thanks!
I just figured out through guidance in your video that i was using less power supply and low speed motor was drawing more current. Now its working with changing power source
You are welcome. I am glad you found it useful and resolved the issue. Peace. Stay safe.
@@charmingali34 what rating of power supply you are used? I am also get same problem like u..
Thank you. Im having an issue with my set up over heating. Im afraid it drawing to much current but I can seem to see the amp draw with my meter.
You are welcome. Please see this video th-cam.com/video/csf_G1pi0ps/w-d-xo.html in the "Brake" section. I have explained the difference between brake and stop. Stop wastes energy to hold the motor. I have demonstrated it in the new video.
Great video!!! Thank you for making it. Is it correct that the Arduino (I'm using a nano) can be used to turn on and off the power to the stepper motor using this as well as control the motor?
you are welcome. The act of controlling the motor includes turning it OFF. So it is up to you at what stage you want to stop the motor. Here is another video where you can turn it ON or OFF using push button th-cam.com/video/csf_G1pi0ps/w-d-xo.html
@@robojax Thank you Robojax for your quick reply. I want to set the Arduino Nano to use a sensor that when it receives a high signal it will turn on the motor and run a it and then turn it off after it completes its steps. This means I need a switch that can turn the power on and off to the motor by the Arduino as a step in the program. It will be used without a person being there to activate it. Would a L298 be able to do this or would I need another transistor that the Arduino Nano could signal to cut the power on or off the the stepper motor. I do not want the motor always being powered. It should only turn on when the correct parameters are met in the coding. I have never set a transistor as a switch to cut the power or give the power to a motor based on the Arduino S pin. Would the L298 work for this; or would you have a better guidance in what to use? I'm so new to this that I'm really unaware of what to use. Any advice is very welcome. Thank you again :-)
Stepper motor do not need to turn OFF from power. if you send 0, 0, 0, 0 to 4 wires, it is OFF. So do that. when you send speed of 0 (zero) it sends 0,0,0,0 to the motor.
@@robojax Thank you :-)
THANK YOU A LOOOOOOT
you are welcome.
Gracias maestro!
de nada.
Hello. I am really thankful for this video of yours. Anyway, I just want to ask if it would be okay to use not exactly 12V power supply? Like our power supply only outputs 11.6-11.7V. Will there be any changes if we use exact 12V or not? Hope that this will get noticed. Thank you so much! 💖
Hi, of course you can use. I believe I've shown the datasheet for l298N. I don't remember what I said, you can connect up to 18V power for 18V motor. 12V was just common voltage for this type of motor that I used.
@@robojax wow, okay thanks for that information!
thank you for this video. I have a question what kind of power supply did you choose?
you are welcome. I believe I mentioned it. The voltage and current depends on your motor. See your motor datasheet. Voltage can be from 5.5V to 25V. The current is also determined on motor. This motor needs 2A.
@@robojax thank you for responding . Reason that why i asked that i got same stepper motor but im using to give power to driver circuit 12V 1A power adapter there for ı couldnt drive nicely stepper motor stucks and vibrates
Thanks for your video it's amazing , I would like to ask I'm using l298n and stepper Nema 17-200 step 1.7 A /2.8 V, but I really have a problem with speed it's really slow, I calculate it it's about(( 10 roll in 20 seconds)) I don't know but I think its slow and it must be faster , what do you think .
same here, somehow when I set the speed to over 100 it keeps increasing all the way up to around 400, where it stops
Most of the time speed is affected by Serial monitor where you print something. As Serial monitor is very slow, remove all Sarial.print from inside the loop it should be okay. Please try it and tell us about the result as other people might have the same issue.
@@robojaxreally thank you, the point is that I'm using gpio not a serial way, should I change my way and back to serial way writing, may the problem could be cause of gpio, what do you think
what I said is that sometimes for debugging or learning there is Serialprint with speed or position. I am saying to remove it. if you don't have the Serial.print inside loop, then tha tis your motor's maximum speed.
@@robojax okay I got it, really thank you for your supporting
gracias me ya me suscribi eres genial .
De nada. Gracias por suscribirse. gracias por no omitir los anuncios y seguir viéndolo. Esto me ayudara mucho.
Thank you sir there are Indonesian subtitles 🙏
Wow. You are welcome. I am pleased that you used it. I spent so much time to fix and Write english subtitle and then create over 70 languages for the video. We just started working on the buttitles. Your comment is very important so I know people watch it in other languages. Thank you.
sketch uses 3262 bytes (10%) of program storage space. maximum is 32256 bytes. global variables use 230 bytes (11%) of dynamic memory, leaving 1818 bytes for local variables. maximum is 2048 bytes. an error occurred while uploading the sketch avrdude: ser_open(): can't open device "\\.\com5": the system cannot find the file specified.
amazing tricks
Thanks for the great video. I usually use the A4988 Stepper Motor driver and with those, you have to set the current limit so you don't burn out your stepper motor. How do you control the current limit with the L298N?
No current limit with this chip.
@@robojax thanks. How do you limit the current to the stepper then?
@@MakerDan55 L298n have Max 2a output
Thanks a lot it's really helpful, I would like to ask could we control the speed of Nema 17-200 step which takes power as 1.7 A /2.8 V, it seems slowly I don't if it's normally speed, thanks
you are welcome. most of the time people using Serial Monitor to print something. Please comment out or remove Serial.print() anywhere inside the loop so it runts faster. Also you have to set the steps per revolution properly.
@@robojax really thank you for your answer I got it, will try that 🙂
@@robojax sorry for making a noise, these could be an solution for arduino, but if I'm using raspberry pi and Gpio to control the motors, how could I do, should I use potentiometer or there is a way with codes
controlling stepper using Raspberry Pi is different. That requires a video which I don't have at the moments.
@@robojax oh I see, okay thank you for your replying
Hello teacher, first, thank you for the video.
It worked for me, connecting the pins in the sequence 8, 10, 9, 11. However, the Drive CI of the L298N Module is getting very hot. Does this have to do with the two ENA and ENB jumpers? (I left them connected). I'm using 12V (external) to power the L298N Module and the Arduino I'm powering via USB from the PC. My Step is an STP-57D101-01 (1.8 DEG/STEP 3.6V 0.8A.
If you can answer me, I would appreciate it.
Hi, please view this video th-cam.com/video/csf_G1pi0ps/w-d-xo.html I have talked about "Hold" and "stop" to reduce the energy waste. If you did not understand tehe ENA and ENB, then you should watch it gain.
Thanx!
You are welcome. The best thank you for me is to subscribe to my channel. Thank you.
@@robojax Done! I Look forward to the next Video…👍🐻
Thanks for the video series, I tried experimenting on a 17HS3001-20B stepper with a power source of 18 V. The L298N chip got burnt so did the jumper cables from the battery. I am investigating what might have happened, any suggestions?
Incorrect wiring seems to the problem. Or the motor needs very high current.
Thanks for the response. You are absolutely right, the stepper motor’s current was 1.2 per phase so it’s greater than L298N maximum limit of 2A. Thanks so much.
muy bueno, gracias
***** Free Arduino Course worth $200****
Arduino Step by Step Course (over 150 lectures) Starts here robojax.com/L/?id=338
i am facing the same problem had tried all the solutions changing wire combination, code, pins drivers but the motor is still sometime gives a beep only or rattles with beep and the strange thing is that motor is showing continuity in all four pairs, led blew up no matter what the wire combination is it show continuity on pairing 1,2 -1,3 -1,4 and so on for all. I had tried running motor directly with arduino without motor driver and it is running, but facing issue while it is connected to CNC shield with A4988 driver.
I am using Arduino uno and motors are 4 pinned. Could you please tell me what I am doing wrong?
Super bir anlatım olmuş. Tesekkurler. Yabancı Dil bilmesem dahi yaptım. Supeeeerrrr.
Bir şeyler öğrendiğine sevindim. Rica ederim
Sunay kodu atabilir misin
Sir this so usefull..so many thans for me😁... Actually sir do you have video for CNC manchine... I mean how to user L298N to be a steper motor for CNC manchine with GRBL code. This gonna be cool and cheap for $ 😂
You are welcome. I will have to look at CNC as I have no experience with that.
Very very nice sir
Thank you.
hi thank you for this video can we control the position of a actuator withe is change the stteper motor withe a actuator
Hi, you are welcome. this module can be used. here is the video to control actuator th-cam.com/video/EaoB6lfnS7g/w-d-xo.html
very video, I dont recall you showing the reverse motor knob function. can you show that please.
you mean to set knob at the middle and motor stays at on position. then rotate knob to CW or CCW to rotate motor in that direction?
@@robojax yes. I have a magnetic loop antenna where I need to be able to turn the capacitor one way or the other to tune the antenna to a different frequency forwards in the band or backwards as I use the radio for transmitting on different frequencies
New subscriber here. Thanks for this informative video. Just one quick question, I want to use a push button to execute the start and stop of the code you used. How will I do that? Thanks a lot
Ғpluses the links in description or search my channel. Thanks for subscribing
@@robojax Thank you very much.. will check that
hello, for the last section of the video regarding the speed controller. How do you make it go counter clockwise?
Hello, you made me watch the video. Perhaps you missed 100 vs -100 which changes the direction. Please watch it fully so you have no questions lest. If you want to control the speed using push buttons see this video th-cam.com/video/csf_G1pi0ps/w-d-xo.html
@@robojax i had checked , and pur -100 , my still keep going in single direction only
I changed no of steps also
200 clockwise
- 100 for counterclock wise ( half circle )
It still goes 200 clockwise only
@@robojax first of all Thanks you very much for the detailed descriptive video
शुक्रिया from India
What about sample wiring connection for 24Vpower supply to drive two 24V DCmotor, using Arduino Uno along a breadboard. Assuming Arduino Board is powered by 9V Battery, ENA and ENB enable.
this is the wrong video. if you are you look at to run DC motors, then here is the video th-cam.com/video/2JTMqURJTwg/w-d-xo.html fully explained and here are all videos where L298N is used th-cam.com/users/robojaxTVsearch?query=L298N
Ive followed your instructions & all is working well. My L298N & stepper motor are getting extremely hot am I doing something wrong?
Your motor must be powerful. either use another motor with lower power or some how increase the size of heat sink.
عالی بود ❤
www.youtube.com/@ilmofan
سلامت باشید. مجرای فارسی بنام علم و فن را راه اندازی کردم
Is there something we could do in the code for the step motor knob, that would reduce buzzing or shut off power to the motor when the mapped steps have been completed? Such as a movement threshold or standby mode?
if understood this code, it would be very easy. I've tones of other videos to control buzzer or relay. you can combine them with this code.