Amazing Wooden Fence Gate Repair on 1 Sagging gate [STEP BY STEP]

ฝัง
- เผยแพร่เมื่อ 18 เม.ย. 2020
- We found a wooden fence gate repair solution for the terribly sagging gate. Don’t rebuild your gate!
True Latch 8' Telescopic Gate Brace in this video: 🔧 amzn.to/3p5LPdO 🔨
Almost anybody can fix a gate easily and affordably.
That's why you should stop settling for saggy gates.
We hear again and again the True Latch anti sag gate kit braces are easy to install and easy to adjust.
True Latch ORIGINAL 64" (1 piece construction) 🔧 amzn.to/3c73Ao5 🔨
The Original gate brace that started it all. It will work on the gate in the video.
True Latch 6' Telescopic (Extends 40" to 74") 🔧 amzn.to/3uDPCAf 🔨
(Fits short, small, or narrow gates up to normal sized gates) It would work on the gate in the video also.
True Latch 8' Telescopic (Extends 52" to 96") 🔧 amzn.to/3p5LPdO 🔨
(For most all typical walk gates on 6' tall wood privacy fences) It would work on the gate in the video.
True Latch 9' Telescopic (Extends 64" to 108") 🔧 amzn.to/3vzSDTw 🔨
(For larger gates such as 8' tall fence gates or possibly a driveway gate) It would still work on the gate in the video, but better to choose a 8' telescopic, 6' telescopic or an Original brace.
True Latch 10' Telescopic (Extends 64" to 120") 🔧 amzn.to/3vHMWD5 🔨
(For very large gates such as wide 8' tall fence gates or a driveway gate) It would still work on the gate in the video also, but better to choose a 8' telescopic, 6' telescopic or an Original brace.
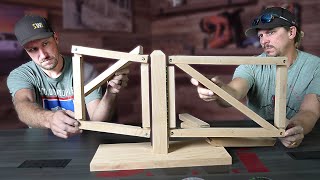
Brad Novacek, an American Fence Association Certified Fence Contractor, and an active, managing member, of a fence company for over 12 years, will show how to fix the very common problem of sagging, dragging gates.
The 3 common problems on fence gates are:
#1 The hinge post or the latch post (leaning, broken or loose).
#2 The gate hardware (ie. hinges, handles and latches).
#3 The wood fence gate itself (sagging from weak, worn or fatigued bracing).
In this video we focus on the sagging fence gate itself.
We use a new gate brace that is able to lift your fence gate into a perfect latching position, anytime. The old wood bracing is removed and the new, heavy duty brace is fastened and installed.
We show you how to fix a sagging fence gate with an affordable, wooden gate repair solution that upgrades you from a wooden cross brace to a metal gate brace that allows you to adjust the gate in the future.
The types of woods that are often used are covered, such as Western Red Cedar and pressure treated lumber and when to predrill, if needed.
All the gate hardware parts of the True Latch gate brace (8’ version: extendable to 8’ long) are identified, and demonstrated on how they are installed to make no sag gates.
Save your gate, save money! Don’t call a fence contractor, as you likely can save yourself a lot of money by a DIY wood gate repair on your sagging gate. You can do it. 💪
Ask our experienced, AFA Certified Fence Contractor, free of charge, if this solution will work on your gate. Watch thru to the end of the video for contact details and outtakes.
A quick True Latch Anti-Sag Gate Brace video demonstrated in under 3 minutes: 🔧 • True Latch Gate Brace ...
0:00 About the Gate Repair
1:05 3 Problem Sagging Areas
2:02 Remove existing Bracing
2:28 How to install the True Latch
3:21 Position of the Top "L" Bracket
3:47 Joining Extension with Self Drilling Screws
5:41 Screws
6:12 Center Bracket
7:05 Mounting Brace to Gate
8:46 Predrill if needed
10:28 Bottom Screws on Latch Side
10:50 Mounting Center Bracket
11:19 Adjusting height with Hex Nuts
14:33 How to Contact Us & Outtakes 😏


Hi guys! Please, check this solution out to see if this will work on your gate to get it latching perfectly again!
If you have questions concerning your fence gate, ask in the comments below, and we'll answer them!
Or you can see our contact details in the video for phone, with text, or email! Plus, catch some of the outtakes at the end.
Brad
My door was in such bad shape I was sure it needed replaced, but it’s near impossible to find a competent contractor. This was the perfect solution. In less than 15 minutes my door went from sagging so bad it wouldn’t close to working perfectly. It was so easy to install. Thank you . For all the naysayers who have not used this stop dissing the product. It works.
This is a great little system. I installed it in about 10 minutes and made a huge improvement on my sagging gate.
Very helpful video to explain how to install my two new braces. Thanks!
Awesome. I'll have to make more with that encouragement. Brad
11:41 Extremely easy to install following the instructions provided on the installation video. Works great.
these youtube videos always show such an easy situation. in reality 20 other things will be wrong not just one easy fix.
The solution is very specific to one situation, yes. However, the video was about using an adjustable brace not multiple solutions to lift a sagging gate. It would be nice if the video touched on other causes and solutions but for this video is appropriate according to the title and the content talked about. It’s a good video, I think.
Do I alway have to install this on the side of the gate where the horizontal beams are? Mine are on the outside and I don't prefer the brace to be on the outside if possible. Thanks!
Great video! Thank you. My gate works perfect now. 👍
Hey Steven your welcome! 💪
My door have 82 inches from one side to the oposite side, so do I need side 8 or 8 ? Or another size, Please let me know. Thanks
Hi Carlos,
It sounds like your gate is 82" inches wide. If that is the case, and supposing your gate is 6' feet tall. Your diagonal measurement would roughly be 109" inches at the longest, IF your horizontal rails are at the very top and bottom. So, in the worst case you would need an 9' foot True Latch gate brace. But, possibly you could still get by with the 8' True Latch, extended to it's max and you won't reach from corner to corner. But corner to corner is not necessary. You just need enough leverage for the brace to work, which the 8' footer and the 9' footer would provide. Just remember to PRE-LIFT the gate before attaching the True Latch, so the gate brace does do all the initial lifting. This provides the best result. Here's a link to the instruction sheet for the 9' footer. Good luck Carlos!
drive.google.com/file/d/1hnDes80DQwF_XXSWv-swlCfJrgWO7z1Y/view
I see there are different lengths to buy my gate is 6’ on each side . I only need to lift one side . Thanks, very good instruction video.
Hi Mike,
We have 5 versions currently. You'll need to check the diagonal measurement, that would be best.
The True Latch ORIGINAL 1 PIECE: is 64" inches exactly so you need to make sure your gate is not too small or a very large gate.
The True Latch 6' TELESCOPIC gate brace: is extendable from 40" up to 74".
The True Latch 8' TELESCOPIC gate brace: is extendable from 54" up to 96".
The True Latch 9' TELESCOPIC gate brace: is extendable from 64" up to 108". It is for large gates.
The True Latch 10' TELESCOPIC gate brace: is extendable from 64" up to 120". The 10' is for very large gates.
True Latch Thank you for the information I really appreciate your help. The fence company who installed the fence who have been around a while told me they have never had a sagging gate before. Which is hard to believe. Soon after it was installed the gates were rubbing together when the gate was opened or closed at the top inside. They came out and used a circular saw to slice off the top inside edge of one side of the gate so they would not touch. Of course right now they are touching again. Thanks again for your help.
Nice! where can we buy that? you mentioned Central California, by Fresno huh?
Jose, I would just go to Amazon.com for now... Brad True Latch
I assume this will not work if the gate already has a diagonal brace from the hinge side to the latch side, correct?
The True Latch anti-sag gate brace works best if you remove other diagonal bracing. The instruction sheets tell how you can try and check by a "shovel test" if you want to attempt to leave in the existing bracing: www.truelatch.com/pages/instructions
The top part of my gate door is scraping the latch side post. Will the True Latch repair this?
Mark, most likely not. It sounds like the hinge post has come out of plumb. A number of factors may have caused it. You may have to reset the hinge post. Throw a level on the fence near the hinge post and see how far out of plumb you are.
Brad
American Fance Association?
When I am making the adjustment it is twisting my gate instead of lifting it? Followed the instructions as well as watched this video. Not sure why it is not working. Any suggestions?
There could be a number of reasons:
1. Your existing diagonal bracing is hindering.
It is best to remove the existing diagonals (if possible). This includes any 45 degree wood pieces in the corners or corner metal brackets with a 45 degree steel bracing member. However, if it will damage the gate OR make it too difficult to remove the existing bracing... Then try the "shovel test" by prelifting the gate to the height you want, before attempting to install the True Latch gate brace. You carefully put a shovel under 2 or more pickets or a lever (like a board or 2x4) under the lowest horizontal gate member. Then carefully begin to work the latch side of the gate back up to the latching height you need or better, a little past the point you need. IF you are able to raise the gate sufficiently then you DON'T need to remove the existing diagonal bracing. If you need to help coax the gate you could possibly try tapping on it lightly in on the horizontal frame work to try to work it back up from where it has sagged.
Then, install the True Latch at this height. It would be good to use blocks or shims to hold the height, then install the True Latch brace. This way, you prevent gate twisting because you are doing compressive forces from under the bottom of the gate, prior to the brace attempting any tension forces later. This pre-lifting on EVERY gate, even ones with difficult existing diagonals, helps prevent twisting from the tension forces. By doing this you only will need small adjustments after installing the brace.
2. All the existing fasteners (screws or nails) are NOT allowing some "play" in the gate, or the gate is painted or glued together.
We are basically counting on the fence gate to have a little "play" in it. We are needing for all the fasteners to be able to slightly shift in the material, and the pickets on the framework to be able to shift also, in order to "rack" the gate on the latch side upward. This is why a shed door, made of 100% plywood would not be able to "rack". It is made of a solid sheet of material. Also, for example, if the gate has been painted with an exterior paint, the fence gate may act like it is all glued together at every joint, making it a solid unit. Just like if you had painted an old window while it was still in the jam, it would be impossible to open or move as if it's glued shut.
When we talk about "racking" a gate or fence panel, you're basically changing its shape from say perfectly square with 90 degree corners, to a parallelogram. Except, usually in school we always pictured a parallelogram as shifting on the horizontal axis. But, here the fence gate is shifting vertically, up and down, on the vertical axis. So, if the gate once was perfectly square, then it sagged vertically down, it took the shape of a parallelogram. Now, we may need to raise it on one end, and get it back to square, or go a little past square, because possibly there also is sag at the hinges and/or the hinge post is leaning too. So, now we are taking it past square in order to get the latch side to the right height again.
By doing a quick "shovel test" under 2 or more sturdy pickets on the latch side, you can test if the gate is able to be raised back up to the height you desire in spite of the existing diagonals.
3. You needed to PRE-LIFT the gate to the height you needed (or a little past the needed height) before installing the brace.
We are going to start emphasizing more strongly the need to raise the gate to the height you need prior to installing the True Latch gate brace. In the instructions it says to put the fence gate into the latch so that you are close to or at the proper height. But, we are starting to recommend even further to block it up at the height you need OR EVEN A LITTLE HIGHER than the height you need. This way, if you install the brace at the height you need or even holding it slightly higher than the position you need, you prevent twisting while doing the final adjustments after you release the weight of the gate again.
P.S. Removing a Twist:
Also, if there is a warp, or twist in the gate, we have taken it out by putting a slight bend in the steel brace in order to counteract the twist. You will either make the True Latch concave or convex against the gate so it will either pull or push out the twist. If the bottom latch side is pulled in, toward the back of the gate, then you would need to make the brace concave at the center, at the middle rail.
NOTE: You will need a middle rail in order to make this work. So, if you have a twisted gate deflection (bottom latch side inward in this example) of say 3/4", you would put a concave deflection of 3/4" in the True Latch anti sag brace. Do not place the brace so as to bend the threads. Rather, carefully place the brace so only the square steel tubing will be bent. In order to put the slight bend in the brace, determine which way the deflection will need to be in the brace. Then block or shim the gate up at your height so, you don't lose that position. Then remove the True Latch anti sag brace, then, carefully apply pressure with the brace on the ground, on say a 2x4 block on each end of the brace. Apply some even downward pressure so you get the deflection that is equal to the twist in the gate. Do this with caution and hold on to something to steady and brace yourself. Use only 1 foot as needed so you are fully grounded and holding onto a work bench or something solid with your hands so you don't slip. We assume no liability, so bend the brace with care.
After putting a slight bend in the brace, reattach temporarily with 1 screw in the top bracket, 1 in the bottom, and 1 screw with the center bracket. Remove the blocks or shims to check if it pushed the twist out. If so, great, you're done. Then install the remaining screws and do any final adjusting with the hex nuts. If it was not enough, reblock up or shim the gate to hold the position, remove the brace and add more bend or less in order counteract the twist as you desire.
Brad
True Latch
So how long until those hex nuts start to rust out and the whole thing is useless?
Can u install from either side?..does it make a difference?
Mike,
Ideally, you want to install on the backside like in the video. On the backside you are attaching directly to the gate framework, the 2x4's. However, if your front side allows you to attach to the framework, then there should be no issue.
Just, make sure if you install the True Latch Anti-Sag Gate Brace on the "front" where the hinges typically are, and if the gate swings FULLY open, that the brace will not pinch at the hinge post and bend the hinges and damage the gate. Not all gates have the space to swing fully 180 degrees open, but it is just something to watch for. So, if there is a pinch point, just shift the brace back from the pinch area to provide clearance.
You can install on the "front" side as in the video, although on this gate you would be fastening through the pickets first, then into the 2x4 horizontal runners. So, you would be loosing a little of holding power as you will not be attaching to the framwork directly.
So, to answer your question. Yes, you can instal on either side. Just try to ensure you will be attaching to the framework of the fence gate itself (and not have to pass the fasteners thru a picket first).
Brad
This guy really is teaching eve how to use the drill with which hand . And how to screw how about that 😎🤣
Can it be used on a small gate?
We have a 6' Telescopic True Latch anti-sag gate brace that would likely be perfect for your smaller gate. It goes all the way down to 40" and up to 74" long. So it is our ideal model for smaller walk gates such as deck gates, garden gates, or short 4' tall x 3' or 4' wide walk gates. Here's two Amazon listings where you can purchase the 6' True Latch Gate Brace (just in case one is sold out).
www.amazon.com/Latch-Telescopic-Fully-Adjustable-Brace/dp/B08B454DHF/ref=sr_1_87?dchild=1&keywords=deck+gate+brace&qid=1620413622&sr=8-87
www.amazon.com/Latch-Telescopic-Fully-Adjustable-Brace/dp/B08QH5TF1K/ref=sr_1_15?dchild=1&keywords=garden+gate+brace&qid=1620413764&sr=8-15
All these diagonal adjusters do is pull the lower corner up and toward the hinge side -- then the upper corner by the latch juts out so the gate won't close there but instead hits the post.
If you pre-lift the gate, THEN install the True Latch gate brace, you can avoid any kind of twisting of the gate. If that is what you are talking about. On the first page of the instruction sheet it gives instruction on how to install the brace properly.
@@truelatch yeah that’s what I mean. I’ll give that a try. Thank you.
do u sell in Western Canada ?
Not yet. We are working on it!
If you would like, you can Email us at Brad at Truelatch dot com. Email us your address and we can find out how much it would cost to ship one to you.
Wayne, currently the 6' version is available: www.amazon.ca/Latch-Telescopic-Fully-Adjustable-Brace/dp/B08B454DHF/ref=sr_1_3?dchild=1&keywords=true+latch&qid=1607740904&sr=8-3
That metal post is not solid. I saw the corner of the fence move when you opened the gate. Besides the gate being built totally wrong the real issue is the fence.
Thanks Nate. The metal post is a 0.095" side wall, or schedule 20 post. It's the perfect post for a 6' wooden privacy fence, as it has enough strength to resist most all strong winds right up to tornadic level winds. It is set 24" in the ground with concrete so it's super solid. Steel has the ability to flex like with the tall skyscrapers, so that's probably what you saw. The 3 back rail runners are just about as ideal as you can get with that spacing from the top of the picket (about 7" down and about 7" from the bottom of the pickets). The more 2x4 framework you add to the gate, the heavier it gets really fast. So, keeping it lighter with only 3 back rails are ideal, with a True Latch where you can stiffen the gate and remove sag when ever you need.
Sag can come into the whole gate system from a number of places. It can come from the gate itself, the hinges, the hinge post side, or even movement on the latch post side.
Could use a piece of threaded rod 4 nuts and 2 L brackets to do the same thing for much cheaper.
Hi Troy, unfortunately you loose the ability to stiffen the gate and/or counteract warp with the steel square tube that runs the length of the gate.
For example, we've been able to straighten every warped gate because we put a slight bend in the steel square tube that counter acts the warp. So, if there was a warp in the bottom latch side of the gate by 3/4" of an inch that pulls inward toward the property. I block up or shim the gate to hold the height, then remove the True Latch Anti-Sag Gate Brace, making note which way I need to make an simlilar 3/4" bend in the brace. Then carefully set it on say 2 pieces of 2x4, so it doesn't scratch the powdercoating, but not on the threads, so it does not bend the threads...only on the square steel tubing portion.
Then, apply some downward pressure on the brace, so we get a similar deflection of 3/4" when you look down the length of the True Latch gate brace. Always becareful, we are not responsible if you hurt yourself as you apply pressure to bend the brace.
Then, reinstall temporarily with 1 screw in the top bracket, 1 screw in the bottom, and 1 screw for the center bracket. And, likely the warp will be counteracted and you gate will be true to the latch side again.
If it overcorrects or you need more bend, then remove the 3 screws and apply more or less bend to completely erase the warp.
@@truelatchI understand what you're saying. You could do the same bending method with threaded rod too, albeit not as pretty as your option. thanks