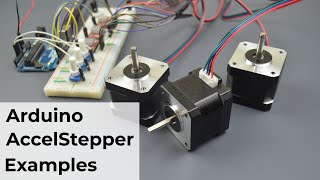
Arduino - Homing Stepper Motors using the AccelStepper Library - Tutorial

ฝัง
- เผยแพร่เมื่อ 19 มิ.ย. 2024
- Full tutorial available here: brainy-bits.com/tutorials
Facebook: / brainybits
Twitter: / brainy_bits
Follow us on Facebook and Twitter to get notified when we post new stuff!
Home stepper motor at startup using the AccelStepper Library and control movement using the Serial Monitor.
You can find more information about our tutorials on our website: brainy-bits.com/tutorials - วิทยาศาสตร์และเทคโนโลยี


Im working on an arduino based analog gauge cluster and this exactly the code architecture i was looking for, great video and explaination, keep up the good work!
Thank you for making the video and sharing the knowledge, the comments in your code are very nice!
Hi @BrainybitsCanada! Thanks for the tutorial! As a very, very new Arduino tinkerer trying to learn code, etc, this has helped me a ton! I have started a project where I am using 2 mini micro stepper motors (X axis & Y axis) which are to be moved by a user into possibly 10 different pre-determined positions each. So when a user enters number 7 into serial monitor, Stepper X moves to step position 300, stepper Y moves to step position 120. Then if the user enters number 4, stepper X moves to step position 1250 and stepper Y moves to step position 800, and so on. Eventually I would like to use a keypad for the user's input. I have been able to modify your awesome code to get headed in the right direction but so far when I input step locations individually for stepper X and stepper Y, it works well for the most part. The issue I have - when serial monitor displays Move Stepper X To What Position, after input, sometimes stepper Y moves rather than stepper X, and vice versa. Would you be able to help me with this? I could send you the modified code and my fritzing diagram if I knew where to send it. Any help you can provide would be greatly appreciated!
You are the best! Thanks! This is exactly what I needed!!
This tutorials has helped me understand a lot about the accel. library,
I was stuck how to do a proper homing with a limit switch and you saved my life !!!
Thanks for your comment, great to know that the tutorial helped, thanks for watching!
Nice explanation. Thanks! :)
Great video using AccelStepper library.
Thank you.
Thank you for watching!
Very nice explanation. I love it!
Great library and tutorial
Many thanks for this; it's very useful.
I only have one problem: after the switch has been touched, the motor doesn't return correctly to 0 position: too slow, it takes about 15 seconds for about 20 steps (microsteps) until the switch is released.
Great Video and very nice explanation. It looks like that's what I have been looking for. I have a Proaim Spark Slider, and the idea is to install a motor with a controller that can do an endless loop, and it looks to me that the arduino that you are using are capable of doing that. the problem is that I am very mechanical but have no electronic knowledge,.
Big thanks. Super useful
Nice video man!
Greetings from Brazil!
Greetings from Canada! Thanks for watching! :)
Hi Ivan great video. I have two questions. How would I use three or four button to enter preset values? Also would I be able to make the stepper motor go past the position say clockwise then always come back several steps to the proper position to take out any slack in the gears? any ideas Thanks for any suggestions.
thanks sir
this tutorial help me a lot :)
Well done
Thank you for your efforts
I'm one of your followers from Iraq
Thanks for watching! Greetings from Canada!
Clear and helpful.. Thanks.
Hello Brainy - Bits, I'm new to all of this but I wish to learn so I'll check out your tutorials. P.s, I'm trying to create a miniature Fallout vault and need parts for the gear door in order to move it inward/ outward and from side to side, do you have motors, wiring, etc. for this?
I really like your tutorial, if I wanted to add a pair of buttons to turn the motor from left to right + the speed regulator, where would I have to connect it?
Could you provide an outline? I need it to control a milling machine
Nice explanation. Thanks!!
Thanks for the comment and for watching.
alaways great explanation. thank you
I used your example end course;
could you help me with a program
I have x, y, z axis.
I need eico x and y to move diagonally from one point to another, and z axis goes down and goes up and down x, y back to 0
when you return to 0 repeat this route again
using AccelStepper Library
Omg this is fantastic work Ivan .. thank you so much .. one question ‘ how can I home more than one stepper ?
use multistepper library..
how can you show me that the code i try to control 2 stepper with 2 limits switch ? it like when swich 1 is actived then step1 will stop the same to the switch 2 and step 2
@Brainy-Bits Hello Ivan, i have a question. 1. Is it true that different stepper drivers(software) can have influence of the power and or speed of the stepper driver will have later for a project. E.g. what i read and what i got as problem too is that the acceldriver lets my nema 14 on my TB6600 move only VERY slow!!! With the stepper.h it was waaaay faster on my ESP32. Can you give a recomendation which stepperdriver for ESP32 i can use which has EN and ACCelleration? Or how to get the right settings for the acceldriver 1.58 to get it faster and stronger? Thanks in advance, also for all your videos. I am since a ver long time your subscriber, but now i have a problem and i hope you can help me :-)
Your Video is damn helpful for me to understand the accelStepper lib... But i still have open questions... Can you may explain how to do all this stuff with the AccelStepper lib by using the enable signal for the Stepper driver? I have some projects who not need to keep the StepperDriver enabled.. Just like that: enable the Driver, move & disable the driver until the next move...
Maybe You can help with that?
Kind Regards..
Is it possible to run several steppers smoothly using accelStepper while running in parallel a heavy function?
My point is that if I don't run the stepper::run function my steppers stop. Is there a function in the accelStepper library that keeps running the steppers (don't care about acceleration) while working in "parallel"?
I'm thinking of using Timer1 library to run the stepper::run but I'd rather not cause I use the pulseIn function in my code.
Thank you.
Really great tutorials.
Did you made tutorial about wiring and coding a limit switches and some actuators (like pneumatic cylinder or something similar to it)? I have this problem: I want 2 cylinders (each one with 2 limit switches) to control with typing in the desire order(sequence) of activating. Also, I want to do the readings of the states(positions) of these cylinders (see which limit switch if activated) , and to use it in code to activate it corretly (by that I mean: if I have cylinders named A and B, and I type in -A+B, I want to move cylinder A to negative (pull in) and B to positive (pull out). So if the A is for example already pulled in to stay like that.). So also it needs to read sings in typed sequence.
It's a bit complicated, any advise about making such configuration and code?
Thanks in advance, greetings from Bosnia! :]
If you have any ideas, you can contact me at: vladan20@outlook.com,
Cheers!
Hi it’s perfect. Any chance can you do it with nextion screen. Thank you
Do you need a nano instead of uno for this to work or are you just using a nano in this case?
can we use the enable pin to disable current supplying the motor?
thank you
I want to do the same, but with a number key pad. Any codes or video?
Nouvelle intro est super ! ;)
Cool! Merci pour le commentaire :)
I am using uno but needs pin 0 and 1 for setting up bluetooth.... can i skip pin 1 which is for easy driver interface... i am using TB6600... please suggest
thanks a lot
How do you set the motor Continuous speed and position
Using identical config, it has been ok for 10 inputs. However I faced no response after @10 input. The max steps larger, the break down sooner. I guess the serial buffer need to be flushed. But I don't have means. Need help! Pls.
hi Ivan, i need help. i have follow your code but there is a problem whenever the motor reach the position target, the position target is automatically change to zero. for example when the motor reaches the position 1350, it automatically change 1350 to 0. it always read at targeted position as zero after reach. i seek for solution.
Thankyou!
Thanks for watching!
I have the situation same as Jeff Para. it HOMES great, and then flunks; no further movement. I keep checking the code but cannot find any mistakes. Any help from Brainy Bits would be greatly appreciated.
this tutorial is very helpful, i tested on my fosus stacking rail, but despite i tried many times to check all the connection, only the part of homing is working, and i am not able to use the move to function. i mean i put a number in the serial monitor, he accept it and say that he reach that position but the motor is not moving at all! another question is this sistem work good when your max job is to rotate less than 360 degree. but if you are using a lead screw and you are many turns far for the home position, it is very slow to reach it. i tryed to change parameters but it remain always unacceptably slow despite i set up high max speed and acceleration in your schetch and i set the steps to full step. it takes 3-4 minutes to reach the home. what is my fault??
i have the same problem, that the motor doesn't move after homing. did you found a solution?
sensor temperature ds18b20 for control door air... step motor??
How I increase the homing speed thanks
Hi! Could you please link me the switch that you used? (or a similar)
Limit switch -> Aliexpress
Thanks for your Fantastic work! Had hepl me a lot. I tried your Code and the homing works perfect! But when i want to enter e new travel distance the motor doesn't move. But it tells me that that:
Moving stepper into position: 500
Moving stepper into position: 0
COMPLETED!
But it doesn't move. Do you have an idea what could be wrong? (Using A4988 driver & a NEMA 17)
Hi! How are you?!!
Could you solve this? the same happens to me...
Change the serial monitor to No line ending!
@@timlucas143 thank you ! it was that!
@@cesarmansilla3407 Man, you saved my day , after having a sleepless night!!!! :)
@@andreschmitt926 jajaja
this is work with A4988?
How to run 2 motors at the same time ??
I tried the code and the motor just does the Homing but it doesn't move when I add and instruction
I want to control the temperature of a door with this project, but th . please help me
slows down
Will this work on the Atmega2560 please ?
It sure will with no modifications. Thanks for watching.
This time you used right library, but Using Serial.begin(9600) will limit max speed of your steppers agin, specially when working with high microstepping... At least this time didn't blaim Ardiono speed...
if the driver used is A4988 instead of Easy Driver, the coding maybe still the same?
yes
boa noite Melvin Grabrielse ,I do not know what's wrong, but the engine is running like fullstep I'm with a jumper so, you can give an example
#include
#include
#define enablePin 8
AccelStepper stepper (AccelStepper :: FULL3WIRE, 1,2,5);
void setup ()
{
pinMode (enablePin, OUTPUT);
digitalWrite (enablePin, LOW);
stepper.setMaxSpeed (5000);
stepper.setAcceleration (500);
pinMode (12, INPUT_PULLUP);
digitalWrite (10, HIGH);
digitalWrite (6, HIGH);
stepper.setSpeed (1000);
//
How to change the direction of engine rotation in this part
//_______________________________________________________________________________
while (digitalRead (12) == 0) stepper.runSpeed ();
stepper.setCurrentPosition (0);
delay (1000);
}
loop void ()
{
stepper.runToNewPosition (-200);
delay (200);
stepper.runToNewPosition (3800);
delay (200);
}
Good night, master.
worked, thank you
I would like to know if it is possible to increase the speed for each position for example
from this position from 100 to 8000 increase or decrease speed
stepper.runToNewPosition (100);
delay (100);
stepper.runToNewPosition (8000);
delay (100);
I'll put the program here
I don't know if I'm doing something wrong, but this isn't working for me. I copied the code from your website and built the hardware just like you did. When I power up the arduino, the motor starts homing until it triggers the switch. It then asks to enter a travel distance. So far, everything is ok. When I enter a valid distance, the motor doesn't move. Instead, I get the message "Moving stepper into position: (whatever I entered)" and almost immediately after that ""Moving stepper into position: 0" followed by "COMPLETED!" It then again asks for a travel distance. I get the idea that the code is somehow not reading any serial and interpreting that as a zero?
Update: I've got it figured out. I had the serial monitor set to add a new line. That made the code repeat and, as there was no new data to be read, the code returned "0" after Serial.parseint timed out. I also added "Serial.setTimeout(50);" to the setup, to make the code more responsive.
Hi. I have the same issue but your solution doesn't work in my case. I've add your command to void setup but no effect. Do you have any other idea?
@@ltdeditions How then did you change the coding?
I'm having the same issue, I'm not sure how to see if "I had the serial monitor set to add a new line".
@@zrpickups5729 Down at the bottom of serial monitor window there are two drop downs and the clear button. Change the first drop down to [No line ending]. That worked for me. Good luck!
I connected the driver in micro step mode (1/16). In this mode, the engine runs smoother, better. Help change code. What exactly needs to be changed in the code to work correctly?www.electronoobs.com/eng_arduino_tut27_code1.php Thank.
Wheres the code so I can try it myself?
This code is in two sections. The first is the HOMING code which, imho, works brilliantly. It has saved me a lot of time and improved my understanding no end. However, the second section that makes subsequent moves (which I need for the basis for my application) does not run correctly. I have spent hours trying to debug it. I think, for some reason, the value of TravelX is not being updated by serial.parseInt, prior to being used by stepperX.moveTo(TravelX). Whatever, the stepper do not take any more steps. If I can figure it out, I'll update this. I wonder if something is Blocking the code ? The code seems to run to the end, without moving the stepper.
I got it working on my Linear Table.
@@rtalbot87hi! I have the same issue. After I provide a number of steps - it does not move. What did you do to fix this issue?
Oh I found your other comment, I'll try it out. I spent this entire evening trying to figure it out, thanks a lot!
I can't remember what I did. But, if you need me to, I'll check my code and try to remember !
Is there an update to this code? It homes, but doesnt move after. The serial monitor shows:
Enter Travel distance (Positive for CW / Negative for CCW and Zero for back to Home):
Moving stepper into position: 500
Moving stepper into position: 0
COMPLETED!
why is it resetting to zero before the move?
Did you resolve this. I have the same problem. Must be a code error, but I cannot find it ! Any help appreciated. Thanks
I have eventually figured this. The short explanation is : The parsing function is adding a zero to the loop. In the test routine we test for 0 to 1350 as a valid input. Unfortunately, this sets the moveTo destination to 0. hence no movement after the stepper has homed (since it is at zero). The fix ? Set your Serial Monitor to "No Line Ending". So, parsing will not add the spurious zero, and will travel to zero when a zero is input. Remember that moveTo uses an absolute step count (from zero); you cannot have less than zero steps. Hope this helps someone, I spent hours on it.
e possivel ligar este mesmo esquema com a cnc shild v3 por favor
thre is no code for this totorial
I did try this code, but it looks, like it doesn't work. Here is the output of my Serial monitor. The stepper homes correctly, but the loop-function doesn't work. The stepper doesn't move, when I put a number in. Did copy the code from your site! Does anybody have an idea?
08:59:38.818 -> Stepper is Homing . . . . . . . . . . . Homing Completed
08:59:42.371 ->
08:59:42.371 -> Enter Travel distance (Positive for CW / Negative for CCW and Zero for back to Home):
08:59:46.221 -> Moving stepper into position: 100
08:59:48.211 -> Moving stepper into position: 0
08:59:49.224 -> COMPLETED!
08:59:49.224 ->
08:59:49.224 -> Enter Travel distance (Positive for CW / Negative for CCW and Zero for back to Home):
yes, i have the same problem. If you found something please let me know
Thanks a lot for this tutorial. It helped me understand a lot of things a lot better! Unfortunately I do still have one complication. I am unsure what I am doing wrong. I have got the homing working, but it does not seem to accelerate to my limit switch. I have adapted the code to fit my cnc shield v3, so now my code looks like this:
/* Motor Homing code using AccelStepper and the Serial Monitor
Created by Yvan / Brainy-Bits.com
This code is in the public domain...
You can: copy it, use it, modify it, share it or just plain ignore it!
Thx!
*/
#include "AccelStepper.h"
// Library created by Mike McCauley at www.airspayce.com/mikem/arduino/AccelStepper/
// AccelStepper Setup
AccelStepper stepperX(1, 2, 5); // 1 = Easy Driver interface
// NANO Pin 2 connected to STEP pin of Easy Driver
// NANO Pin 3 connected to DIR pin of Easy Driver
// Define the Pins used
#define home_switch 9 // Pin 9 connected to Home Switch (MicroSwitch)
// Stepper Travel Variables
long TravelX; // Used to store the X value entered in the Serial Monitor
int move_finished=1; // Used to check if move is completed
long initial_homing=-1; // Used to Home Stepper at startup
const byte enablePin = 8;
void setup() {
Serial.begin(9600); // Start the Serial monitor with speed of 9600 Bauds
pinMode(enablePin, OUTPUT);
digitalWrite(enablePin, LOW);
pinMode(home_switch, INPUT_PULLUP);
delay(5); // Wait for EasyDriver wake up
// Set Max Speed and Acceleration of each Steppers at startup for homing
stepperX.setMaxSpeed(5000.0); // Set Max Speed of Stepper (Slower to get better accuracy)
stepperX.setAcceleration(9000.0); // Set Acceleration of Stepper
// Start Homing procedure of Stepper Motor at startup
Serial.print("Stepper is Homing . . . . . . . . . . . ");
while (digitalRead(home_switch)) { // Make the Stepper move CCW until the switch is activated
stepperX.moveTo(initial_homing); // Set the position to move to
initial_homing--; // Decrease by 1 for next move if needed
stepperX.run(); // Start moving the stepper
delay(5);
}
stepperX.setCurrentPosition(0); // Set the current position as zero for now
stepperX.setMaxSpeed(5000.0); // Set Max Speed of Stepper (Slower to get better accuracy)
stepperX.setAcceleration(9000.0); // Set Acceleration of Stepper
initial_homing=1;
while (!digitalRead(home_switch)) { // Make the Stepper move CW until the switch is deactivated
stepperX.moveTo(initial_homing);
stepperX.run();
initial_homing++;
delay(5);
}
stepperX.setCurrentPosition(0);
Serial.println("Homing Completed");
Serial.println("");
stepperX.setMaxSpeed(5000.0); // Set Max Speed of Stepper (Faster for regular movements)
stepperX.setAcceleration(9000.0); // Set Acceleration of Stepper
// Print out Instructions on the Serial Monitor at Start
Serial.println("Enter Travel distance (Positive for CW / Negative for CCW and Zero for back to Home): ");
}
void loop() {
while (Serial.available()>0) { // Check if values are available in the Serial Buffer
move_finished=0; // Set variable for checking move of the Stepper
TravelX= Serial.parseInt(); // Put numeric value from buffer in TravelX variable
if (TravelX < 0 || TravelX > 25000) { // Make sure the position entered is not beyond the HOME or MAX position
Serial.println("");
Serial.println("Please enter a value greater than zero and smaller or equal to 1350.....");
Serial.println("");
} else {
Serial.print("Moving stepper into position: ");
Serial.println(TravelX);
stepperX.moveTo(TravelX); // Set new moveto position of Stepper
delay(1000); // Wait 1 seconds before moving the Stepper
}
}
if (TravelX >= 0 && TravelX
Try to change the Arduino pins for the Stepper...
You type: AccelStepper stepperX(1, 2, 5);
but for the CNC Shield you need to define:
AccelStepper stepperX(1, 5, 2);
You "Step" the DIR pin & you "DIR" the Step pin... ;)
This info is for you if you buying the Nano CNC Board from aliexpress & the Board is marked with "Keyes_CNC 2014/07/01" BTW: the micro step jumper are useless if you have this board... Check this out first...
@@dastiieto7651 I found the problem. In the code where the homing is defined, the programmer added a delay(5); That comment prevents any form of accelleration since it defines a constant delay between each pulse.
Melvin Gabrielse Ok...
But this delay is for sloooooow motion against the home-switch... & release the home-switch while homing..
In the normal movement after homing this delay will take no effect to the acceleration...
@@dastiieto7651 That is true. I was only curious why the accelleration did not work WHILE homing. It turns out that the setMaxSpeed and setAccelleration function in the homing state have no function.
Melvin Gabrielse that’s true... while homing there’s no need for acceleration, because the Stepper drives damn slow... 😉
Hi Yvan have made a short video slider with stepper. how do you add that code to this code? I want the motor to always move at CCW full speed to hit the home switch whenever powering on state. the steps is already calibrated to the length of my rail. thank you very much Yvan.
CODE:
#include
AccelStepper stepper(1, 3, 2);
long int driveSteps = 25000; //this is number of steps to my rail at 1/8 steps
int pin1 = 8; //drive foreward button
int pin2 = 9; // return reverse button
int atFront =7; // at home position limit switch
int speedResistor = A0; // center pin 10k pot, 5v and grd
boolean calibrated = false; // says false until camera carriage at limit switch at rear
void setup()
{
stepper.setAcceleration(3000); //set acceleration
stepper.setCurrentPosition(1);
pinMode (pin1, INPUT);
pinMode (pin2, INPUT);
pinMode (atFront, INPUT);
digitalWrite (pin1,HIGH);
digitalWrite (pin2, HIGH);
digitalWrite (atFront, HIGH);
stepper.setMaxSpeed(1000);
Serial.begin (9600);
}
void loop()
{
int readSpeed = analogRead(speedResistor); //read 10k pot
readSpeed = map (readSpeed, 0, 1023, 100, 5000); //map to max stepper speed
stepper.setMaxSpeed(readSpeed); // set stepper speed
if (digitalRead(pin1) == LOW && calibrated == true) //foreward move pressed and unit calibrated
{
stepper.moveTo(driveSteps); //set target at max steps foreward
stepper.run();
}
if (digitalRead(pin2) == LOW) // reverse button pressed
{
stepper.moveTo(0); // set target to 0
stepper.run();
}
if (stepper.distanceToGo() != 0) // keep running until motor at target steps
{
stepper.run();
}
if (digitalRead(atFront)== LOW) // limit swtich at rear
{
stepper.setCurrentPosition(0); // set current position at 0
calibrated = true; // set unit calibrated
}
}
If you want to just home the stepper at the beginning then basically you just need to add this piece of code somewhere in the setup() portion of your code:
*just need to change the name of stepperX to yours, also change home_switch to the name of your switch. Also declare the initial_homing variable that's used. And maybe change the last setMaxSpeed and setAcceleration to something you would like. Hope that helps! Thanks for watching!
// Start Homing procedure of Stepper Motor at startup
while (digitalRead(home_switch)) { // Make the Stepper move CCW until the switch is activated
stepperX.moveTo(initial_homing); // Set the position to move to
initial_homing--; // Decrease by 1 for next move if needed
stepperX.run(); // Start moving the stepper
delay(5);
}
stepperX.setCurrentPosition(0); // Set the current position as zero for now
stepperX.setMaxSpeed(100.0); // Set Max Speed of Stepper (Slower to get better accuracy)
stepperX.setAcceleration(100.0); // Set Acceleration of Stepper
initial_homing=1;
while (!digitalRead(home_switch)) { // Make the Stepper move CW until the switch is deactivated
stepperX.moveTo(initial_homing);
stepperX.run();
initial_homing++;
delay(5);
}
stepperX.setCurrentPosition(0);
Serial.println("Homing Completed");
Serial.println("");
stepperX.setMaxSpeed(1000.0); // Set Max Speed of Stepper (Faster for regular movements)
stepperX.setAcceleration(1000.0); // Set Acceleration of Stepper
it worked! thank you so much Yvan.
Cool! Great to hear that it worked. Thanks for the comment.
MASTER, I TRACE A LINE IN THE CODE, THE ENGINE STARTS ROUTING RIGHT, I NEED IT TO LEFT LEFT AT PROGRAM START, WHERE I MARKED ONE WITH A LINE
I think you need to change this: initial_homing_stepperX++. If it is '--' make it '++' or if it is '++' make it "--"
@@Goedgedaanman,I'll do it, Master. Thank you for your attention.
it is possible to connect this schema in cnc shild v3
It is possible. All you have to do is to redefine the motor and the limit switch to the correct pin. For the X-axis use AccelStepper stepperX(1, 2, 5). For Y-axis use AccelStepper stepperX(1, 3, 6). Note that you have to enable your motor with a 'const byte enablePin = 8;' and in void setup use: 'pinMode(enablePin, OUTPUT);' and digitalWrite(enablePin, LOW);'. Furthermore you can leave code untouched for the limit switch. Pin 9 used in this tutorial is connected on your CNC shield to the X+ End stop. The black pin is for the GROUND of your switch and the white pin is for INPUT.
@@Goedgedaanman ,here in Brazil, there is not much material for this link, I will because here and I will return, thank you master
Glad to help@@livinmarcenariaartistica8212
Making a barbot
I've seen those, there are pretty cool at a party! Good luck with your project and thanks for watching!