You can use this heater to warm up your engine during winter! I added valves to be able to have only hot water in summer without heating up the floor. And having my heating system connected to the vans engine,it works even the other way around. Meaning that without the heater i can warm up my floor while driving. You doing a great job! Bon appetit and more cheese please!🔥🤘🧡
i wish factory oem passenger cars did that and cooling as in the winter/fall im not into dry fan uneven air, or have a option on the chex sheet for radiant thermals
@@dogcatmanvan you can use 24v zone valves and some switches to change between floor, or air and also turning engine heat exchanger off and on. You cn use simulir electic valves to control water on the camper. Just reserch how the big fancy mobile homes function and get built for ideas. like a prevost
If you want straighter boards at the home store, find the largest length available and cut them down to size in the parking lot with a circ saw. So instead of getting a 8ft 2x4, get a 16 footer. These longer sections come from the lower trunk of the tree, which tends to be stronger and straighter than the 8 foot sections which are more likely to be from the taller sections of the tree and prone to warp.
You guys did a marvellous job of planning and executing this heating of your van. Your choice of homes (van) will result in certain losses of heating system efficiency compared to a traditional dwelling. In a traditional home employing radiant heating with floor joists, etc. the radiant tubes are in contact with the underside of the subfloor so the metal plates conduct heat from the tubes into the subfloor, then the finish floor material and finally radiates the heat into the conditioned space. Insulation is typically placed about 4-6" below the radiant tubes in the joist space creating an air gap. You have an air gap between the insulation and the flooring. This is imposed on you by the van's construction. Air gaps are not a good convector, so some inefficiencies are introduced into your system.The net result is that your supply water temp will need to be slightly warmer than in a convential system . Due to the small volume in the space you likely won't notice any difference, and your feet will be warm in the morning.You came up with an excellent solution to implementing radiant heating into this space. I'm a retired Mechanical Engineer and have designed several radiant systems in more traditional buildings. Bravo once again.
I'm here watching wondering why your channel doesn't have a million subscribers mainly because the kind of content you upload deserves million views.Just bumped into your channel thats how I'm staying for life.All the best man
Excellent job you two! I love how thorough you are being with this build. I think radiant heat flooring is a great idea. The insulation is terrific and so worth it it. I am a little concerned the floor joists are only glued down. The marine adhesive is very good but there are many stresses on those joists. When you take the floor up again, think about securing the joists with a few screws, Simpson strong ties or even galvanized pipe strap. In my SUV, I have the butyl/closed cell all over and havelock wool stuffed into the small or oddly-shaped spaces. I use a butane stove heater for heat. Because of the insulation, thick flannel blackout curtain (headliner to floor) and my insulated window shades, it stays comfortable without much heat.
We'll be creating all of our framing with aluminum extrusion which will be connected to the floor and directly to the van body. Hopefully that will solidify our entire layout to the van itself.
@@dogcatmanvan If you said that about the aluminum, I missed it but that is an excellent choice. I expect the radiant heat with all the insulation will make all the difference in comfort. It’s not hard to stay warm at night I’m bed; the real challenge is ambient “room” temp. Excited to hear/see the IRL test of all the improvements. ❄️
I was searching for info on this awhile back... youtube suggested it today! Thanks for making a great video!! You have some of, if not the best, van build content on the platform. Keep crushing!
Hey, very nice upgrade to the channel. Last I looked you were traveling with 4 legged companions. That Julie rocks. Excellent work on your heated floor guys.
Glad you managed to get it working - you are 100% right about these heating kits, the companies that sell them don't actually tell you how to install them for this usage (mostly because this is not entirely what they were designed for...) It's mostly just a guessing game on our end to try and figure something out that works, but it's doable and in our completely unbiased opinion...worth it! 😉 Enjoy the heated floor 👍
We appreciate you two taking the time to show all the trials and errors you went through in installing your system. It was all super helpful during our install!
I can’t believe I’ve never come across your channel before! I’ve been watching a ton of van life and Schoolie videos for a few months now while doing research on it. I’m so glad I came across this video. You personality is so fun, I binged a bunch of your videos and subbed
Great build, very tidy... with your furring.. joists.. you could have laid them out used a marker to mark your cuts.. construction adhesived them down(leaving your gaps for pex without adhesive) let it dry, then use a multi tool to plunge cut out your gaps..saving all the time of laying out, cutting laying out again etc.. you just waterproof, glue, lay out rows and cut gaps.. you did great though! Also flashing tape from zip systems is 26$ a roll but is awesome to tape down almost anything! Your diffusers would never move.. that stuff sticks to everything!.. it stretches if you like.. it's 6 inches wide and is perfect to use instead of duct tape or any tape really.. plus it's super useful just to have in your tool kit...most rigid insulation can be scored and snapped, and if you heat the pex a little it will be way more compliant making your corners against its will lol. A heat gun..or hair dryer in a pinch will work . Good job guys! These are just good hearted opinions for what they're worth.
You are so fun to watch and I’ve gotten many ideas from you. I do believe that ideally the PEX goes everywhere, including under solid things like cabinets, etc., because solids retain heat and emit it. Open the door and heated air goes poof but solid items are like temperature batteries. They store the heat and gradually let the heat into your van.
Hey Jim, thanks for watching! The main reason we didn't throw any heat on the right side is because our fridge was going to land there taking up the majority of that space and we didn't want the heated floors to compete with the fridge staying cool.
Hey Ben and others, did you ever find a smaller expansion tank? I have done a floor similar to this. It works great but finding a space for that expansion tank is problematic. Thanks in advance.
Congratulations on 30 thousand subs! There’s new comment people too! I’ve been watching this channel too long haha. This floor is an amazing idea and so much detailed work. Yet you and the fuckin delightful Julie seem to work together seamlessly. And you both speak naturally and not like the process of drilling 300 tiny pieces of wood in very particular degrees according to the stars alignment for only 2 days of that year with the excitement of winning a powerball lottery and with the smiles like the Black Hole Sun video for Sound Garden.
Love the way you doing this. I always had the idea of flor heating in my van. Thank you for this inspiring video. PS: Only this isnane inches and feet mess confuses me every time. 😶
Great video, and amazing to have heated floors with air, to avoid leaks, so awesome, 4sure i will copy your system, let us know if it works in low Temperatures
Dude! I've never even thought of a heated floor in a van, that's freakin awesome 👍😎 As and edit, 7:05 on a related note, as a kid I drank some paint thinking it was orange juice 🤦
That really helps as well as a comment, no matter if it’s one word. If more people did that the allusive algorithm will recommend his videos to others!
I saw a guy do heated floors in a Skoolie - he used the 1.5 inch foam and then used a router to create a channel for the pex tubing and heat emission plate to sit in. He had the wooden joists like you. He put the foam (like the purple foam) in between the joists, then routed a channel into the foam, then he installed the metal heat emission/transfer plates into the channel then he put the pex pipe into the channel in the emission plates. I think he did it this way to save on cost, as he had one type foam insulation and it is actually how the layers should be installed. For house floor heating all diagrams show insulation with a channel for laying the heat emission plate into - then into the heat emission/transfer plate channel you put the heated pex lines. But I think your way might also work, but not as well as his method.
Finally got my version of the heated floors installed. It’s a mix yours, humbles and Darens. Lol. It works really well. Almost to good? I think I need a mixing valve so the floors don’t get to hot. Maybe a thermostat? I just have the heater piped directly to the floor and the easy start timer set to 30 min. Floors get to hot if on for much longer. I’m interested in some type of thermostat vs a timer.
Have another comment for the Algo! Great video! First one I have personally seen of an installation of radiant floor heating. Would have loved to see how you hooked all the other parts together too! Keep up the good work!
This was a very good video. Ben you have done well with the upgrades. I was thinking about finishing the wood and you used waterproofing. That seals the wood. Didn't know aluminum cost that much. Looking forward to your next video.
I'm not installing under floor heating but I am using a diesel Webasto water heater for hot water via a heat exchanger, for showers and washing up. I do have a few extra ideas but they are in the planning stage.
Awesome video, thanks so much. I have a pre-instlled heater in my van that works off the engine coolant. I was thinking about using it for my hot water. I did know these kind of diesel heaters existed, but I have never seen a video about someone using it in a van for a camper van build. I'm really curious how it works and also how you connect it together. You didn't show the process in this video. Read something in these comments about using valves to cut off one part of the system. Anyway, I would love to see how the rest of the system comes together. Love your style in video's btw!
My van heats from hydronic floor, boosted by air coil near side door. Same circulation goes through DHW tank and through valve setup to engine & cabin heater. From spring to fall 9000 BTU heat pump provides both heat & AC, run from 7.2kWh LFP battery & 900Wp solar and 3kW inverter
Great video, only just started binge watching van builds again due to being off work injured and stuck on the sofa all day…. I never leave comments on people blogs but I Came across your channel this week and binged shit loads of your videos… very entertaining and also a little more true van life rather than the usual instagram false shit you see. Happy to see your you now have a partner in crime to enjoy your van life and also another dog to keep Roc entertained. Gutted to watch your video on Archie, you can clearly feel how much he meant to you and at least you had a great 10 years together exploring the states. I Will look forward to watching more of your videos over the next few months as I will be off work for a while and these will keep me entertained. Also I checked your Anmly business online and actually went to buy a T-Shirt but everything was sold out ( which is a good thing I hope as that means it’s doing well?). I will keep an eye out for when they return in stock and I didn’t check but do you post out to the UK?
Hey Dave, I'm glad you came across the channel and liked it enough to check out more of our videos. I'm sad to say we're in the process of dissolving ANMLY which is why all the products on the site are no longer available. My business partner and I weren't seeing eye to eye and I can't afford to move forward on my own, so we're winding things down. Maybe one day I'll be able to take another crack at it, but for now my focus is going to be on the TH-cam channel
@@dogcatmanvan sorry to hear that, business with family or friends can be tough… let’s hope the years of friendship hasn’t gone down the drain… well you always seem a glass half full guy and just take the rough with the smooth and get on with things… good luck with your future adventures and the channel, I will keep tuned in and if you come across any of your r-shirts you wanna sell me let me know so I can at least get your company t-shirt here in the uk, you can then say you went international 👍👍…. Good luck with the van build
Thanks for sharing guys :) it's not the blade which causes tear out in wood unless extremely blunt. It's normal, the way blades work being jagged one side and conforms more the other way. So use tape on both sides of the cut or use a reverse blade direction (vertically in a jigsaw) if cba/rough and ready. Or cut from the other side but that'd only help marginally :) also best use a scribing blade for curves, it's just narrow to change direction-depth and razors are the same except for being finer probably-finer and thinner the teeth/blades means they're safer but cost more or replaced more and don't work effectively on thick mass like hardwoods. The thickness is only valid for circular saws and and the like, as they're longer into the wood at higher continuous speeds causing friction, making the device jump back usually onto the person irreparably or if fixed like a table saw, the wood is then catapulted from between blade and fence enough to make the same damage as a bullet albeit more brutal/blunt. For drawing templates, make something with thin ends and a writing utensil on the other-find the thickest part of the cut (wheelwell depth in this case) and folkow it parallel scribing onto the cardboard :) sorry if I missed you doing that :)
14:20 If you put tape (like 2 inch blue) over the area you're going to cut. I'll keep the surface from chipping as much when you do. Love the layout and design part. Did you guys spray the bed with some sort of mold resistant chemical? (The parts below the foam board).
Good work, two small observations. First, if you draw the pattern on the underside of the plywood, there will be no chippimo on the upper side when you use the jig saw. Or, use downcut saw blades. That works, too. Second, do not use red chalk when snapping lines on finished wood. Just don't. Red chalk is for framers that work out in the rain. Red chalk is forever. You are doing finish work, so use white chalk. White chalk is the choice of champions. It will go away with far less effort.
Yeah I told her my red chalk line was a dangerous call haha. Luckily we've managed not to stain our clothes or anything from it. White chalk is the way go.
Great attention to detail. Will be interested to see how it works for ya. Have to ask though,,,,, why the top half of a naked mannequin on the shelf in the background????
@@dogcatmanvan that’s right I remember her. Quiet kinda gal. Nice that you have moved on and the new GF adds lots to your channel. New cat coming soon?
Compared to the approach of insulated sheets with routed channels for PEX, is there a reason why you went the joist route instead? Great video! I get my new Transit in about a month :)
Yeah, the most efficient method of radiant heat is using an air gap or a vacuum. When you route a channel within insulation and lay pex in it, the heat stays trapped in that channel keeping it from heating a larger surface area. At least that’s the conclusion we came to after doing our research.
Great content and thanks for putting this out there. I’m like a year late watching this video but I wanted to know how did it perform since creating the video? Does it use a lot of gas, electricity to run the exchanger/blowers?
No the blower doesnt pull much at all. The heater I think averages around 10 amps with the blower kicking on and off (it's wired to our thermostat so it auto kicks on if the temp drops below whatever we set it to). We only turn the heater on for hot water when we need it though, so just like two minutes before a shower well kick it on and then shut it off when were done. I think if youre conscious of when and how you use it youll never have a consumption issue with electric
You know if you had done long runs there would be less bends and work right? You'll always wonder if you were to run the floor heating from the engine, and you could but it's annoying to turn it on and heat things up, at 3 am isn't good. While you have floor heating, what will you do with the walls and gully's. With vans air temp is fairly simple, it's heat loss that's more or an issue and too hot in the summer.
That's the hope. We also have an air matrix that utilizes the same hydronic heat to give us hot air, but we're hoping the floors as well as the air matrix work together to keep the van nice and toasty.
I'm thinking about the transfer plates.... should they really look down? Shouldn't they look up to the backside of the floor???? You taped them to the ground???? Not to the floors back?
You could have bought treated 2x4s then ripped them to the desired width. They are made for not rotting in humid conditions. But very wet until they are dried out....you'd need to cut it with a table saw.....or even a circular saw.
So the reflectics actually requires an air pocket to work correctly which it didn’t get and for the weight, cost and effort you should’ve just gone with the tried and tested diesel heater. They even make some that double as hydronic heaters for your water or to preheat the Diesel engine for cold weather starts
We are using a diesel heater for this that heats our water and air matrix as well. It's covered in the following video. We also ran a test on the floor without the heat transfer plates allowing the lines to free float, but I can see added space between the lines and the reflectix being beneficial.


![[LIVE] : ONE ลุมพินี : คู่มวยแห่งยุค (11 ตุลาคม 2567)](http://i.ytimg.com/vi/aTc7-tPYuJM/mqdefault.jpg)


You can use this heater to warm up your engine during winter! I added valves to be able to have only hot water in summer without heating up the floor. And having my heating system connected to the vans engine,it works even the other way around. Meaning that without the heater i can warm up my floor while driving. You doing a great job! Bon appetit and more cheese please!🔥🤘🧡
We through some shut off valves in our system as well. I like the idea of hooking it up to the engine though. I'll have to look into that!
i wish factory oem passenger cars did that and cooling as in the winter/fall im not into dry fan uneven air, or have a option on the chex sheet for radiant thermals
@@dogcatmanvan you can use 24v zone valves and some switches to change between floor, or air and also turning engine heat exchanger off and on. You cn use simulir electic valves to control water on the camper.
Just reserch how the big fancy mobile homes function and get built for ideas. like a prevost
@@swaterman08 Is there anything special about these zone valves compared to a regular solenoid valve?
@@Seqhael depends on what the body is made of and if its heat or drinking water, but if its 24v either open or closed, all the same.
You two work so well together. Of course all of your cheesy jokes and little added pop-ups make it even more fun to watch. Lots of great information 👍
I'm glad you talked to George of Humble Road. I've been watching and re watching his videos for years.
So glad you mentioned Humble Road George... he is cool... I mean warm
He's got a lot of good info!
If you want straighter boards at the home store, find the largest length available and cut them down to size in the parking lot with a circ saw. So instead of getting a 8ft 2x4, get a 16 footer. These longer sections come from the lower trunk of the tree, which tends to be stronger and straighter than the 8 foot sections which are more likely to be from the taller sections of the tree and prone to warp.
Thanks for the tip!
You guys did a marvellous job of planning and executing this heating of your van. Your choice of homes (van) will result in certain losses of heating system efficiency compared to a traditional dwelling. In a traditional home employing radiant heating with floor joists, etc. the radiant tubes are in contact with the underside of the subfloor so the metal plates conduct heat from the tubes into the subfloor, then the finish floor material and finally radiates the heat into the conditioned space. Insulation is typically placed about 4-6" below the radiant tubes in the joist space creating an air gap. You have an air gap between the insulation and the flooring. This is imposed on you by the van's construction. Air gaps are not a good convector, so some inefficiencies are introduced into your system.The net result is that your supply water temp will need to be slightly warmer than in a convential system . Due to the small volume in the space you likely won't notice any difference, and your feet will be warm in the morning.You came up with an excellent solution to implementing radiant heating into this space. I'm a retired Mechanical Engineer and have designed several radiant systems in more traditional buildings. Bravo once again.
Thanks for sharing your knowledge and watching our video!
Finally, something good to watch on Sunday. I have 4 chihuahuas that cuddle under the blanket and keep me warm ☺
Ps I ❤ George !
Lol, I appreciate the 'alu-MIN-I-um'
I'm here watching wondering why your channel doesn't have a million subscribers mainly because the kind of content you upload deserves million views.Just bumped into your channel thats how I'm staying for life.All the best man
Thanks Eric! Maybe one day we'll get there
Just wow! You’ve taken it to another level. DBVB.
information utuber is always welcome
You guys are awesome! I was feeling sympathetic for you working in the cold too.
So good…love the chemistry you two (four?) have…so entertaining! Don’t have a van. Don’t want a van, but we watch you anyway…fun!
Thanks for watching anyway haha
When you trace your pattern on to the flooring you can trace with a razor at the same time to pre score and it helps w chips!
Great work Team!
We'll keep that in mind moving forward. Thanks!
Van Floors are COLD!!!!! You will be so happy for this time and expense.
Thank you for sharing!
Of course, thanks for watching!
Beautiful, you are the only ones to do this kind of heating. well done
bye
Just stumbled through your room here. Super cute dynamic and great content. Best to you both!
Excellent job you two! I love how thorough you are being with this build. I think radiant heat flooring is a great idea. The insulation is terrific and so worth it it. I am a little concerned the floor joists are only glued down. The marine adhesive is very good but there are many stresses on those joists. When you take the floor up again, think about securing the joists with a few screws, Simpson strong ties or even galvanized pipe strap.
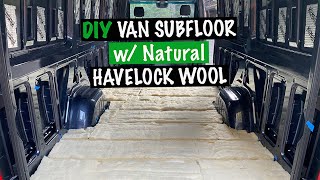
In my SUV, I have the butyl/closed cell all over and havelock wool stuffed into the small or oddly-shaped spaces. I use a butane stove heater for heat. Because of the insulation, thick flannel blackout curtain (headliner to floor) and my insulated window shades, it stays comfortable without much heat.
We'll be creating all of our framing with aluminum extrusion which will be connected to the floor and directly to the van body. Hopefully that will solidify our entire layout to the van itself.
@@dogcatmanvan If you said that about the aluminum, I missed it but that is an excellent choice. I expect the radiant heat with all the insulation will make all the difference in comfort.
It’s not hard to stay warm at night I’m bed; the real challenge is ambient “room” temp. Excited to hear/see the IRL test of all the improvements. ❄️
Yesss! Adorable couple intro for the win! ❤️👌
Congrats on 30k homie! Been here from the start, next stop 100k!
Thanks Alex. I hope we can keep this going haha!
I was searching for info on this awhile back... youtube suggested it today! Thanks for making a great video!! You have some of, if not the best, van build content on the platform. Keep crushing!
Thanks Adin! I'm glad to hear youtube is actually suggesting some of my videos for a change haha
You guys are so cute ! Definitely cuddles for warmth, + the dogos
Hey, very nice upgrade to the channel. Last I looked you were traveling with 4 legged companions. That Julie rocks. Excellent work on your heated floor guys.
Glad you managed to get it working - you are 100% right about these heating kits, the companies that sell them don't actually tell you how to install them for this usage (mostly because this is not entirely what they were designed for...) It's mostly just a guessing game on our end to try and figure something out that works, but it's doable and in our completely unbiased opinion...worth it! 😉
Enjoy the heated floor 👍
We appreciate you two taking the time to show all the trials and errors you went through in installing your system. It was all super helpful during our install!
Excellent video! Thank you! The sound and video effects add a lot of fun! The build is looking fantastic!
Not joists, "sleepers"...love you guys.
This is a great idea and you two did a fine job on it. For me there is nothing worse than cold feet.
I can’t believe I’ve never come across your channel before! I’ve been watching a ton of van life and Schoolie videos for a few months now while doing research on it. I’m so glad I came across this video. You personality is so fun, I binged a bunch of your videos and subbed
I'm glad TH-cam suggested our channel on your feed! Thanks for subscribing and following along
Very cool I’m wanting to use electric subfloor heat elements. I will add it to my horse puppies kennel area. Since they haven’t stopped chewing yet.
Good video. That's going to feel great in socks or bare feet.
Great build, very tidy... with your furring.. joists.. you could have laid them out used a marker to mark your cuts.. construction adhesived them down(leaving your gaps for pex without adhesive) let it dry, then use a multi tool to plunge cut out your gaps..saving all the time of laying out, cutting laying out again etc.. you just waterproof, glue, lay out rows and cut gaps.. you did great though! Also flashing tape from zip systems is 26$ a roll but is awesome to tape down almost anything! Your diffusers would never move.. that stuff sticks to everything!.. it stretches if you like.. it's 6 inches wide and is perfect to use instead of duct tape or any tape really.. plus it's super useful just to have in your tool kit...most rigid insulation can be scored and snapped, and if you heat the pex a little it will be way more compliant making your corners against its will lol. A heat gun..or hair dryer in a pinch will work . Good job guys! These are just good hearted opinions for what they're worth.
Thanks for sharing all your thoughts and giving sound advice Gregoria! We'll keep them in mind on the next build
@@dogcatmanvan if nothing else.. grab some zip systems tape for the road.. that stuff works for everything
Great video. Really well explained. Loved the pop ups. Do more of those.
Just a thought for future reference. The insulated panels cut very well on a tablesaw. Very nice build so far!
I was worried it would rip it apart haha. I should've just given it a test run. Oh well, next time!
Can also use a fine toothed hand saw - a Japanese Dozuki would work perfectly and no chip out. Fairly inexpensive @ +/- $25
Wow great video. A lot of these van builders try not to show this. Thank you.
You two are badass! You did a damn nice job!
Great video, nice to watch you work so well as a team.
This was very informative!
thank you folks for communicating clearly I appreciated your share
Thanks for taking the time to watch!
You guys are awesome. You both have great ideas and thoughts. I love it
You guys are going to have one sweet ride!
Al loo min nee yum !!!
YES! YES! YES!
The Aussification of the USA proceeds apace!
Best way to stay warm: be endothermic.
You are so fun to watch and I’ve gotten many ideas from you. I do believe that ideally the PEX goes everywhere, including under solid things like cabinets, etc., because solids retain heat and emit it. Open the door and heated air goes poof but solid items are like temperature batteries. They store the heat and gradually let the heat into your van.
Hey Jim, thanks for watching! The main reason we didn't throw any heat on the right side is because our fridge was going to land there taking up the majority of that space and we didn't want the heated floors to compete with the fridge staying cool.
Hey Ben and others, did you ever find a smaller expansion tank? I have done a floor similar to this. It works great but finding a space for that expansion tank is problematic. Thanks in advance.
Loving watching the progress. Great work guys!
Love you guys!
Good team work guys , seems this van will be much warmer than the last , well worth all of your efforts , ba bye
Video content with such a great vibe. DBVB
Congratulations on 30 thousand subs! There’s new comment people too! I’ve been watching this channel too long haha. This floor is an amazing idea and so much detailed work. Yet you and the fuckin delightful Julie seem to work together seamlessly. And you both speak naturally and not like the process of drilling 300 tiny pieces of wood in very particular degrees according to the stars alignment for only 2 days of that year with the excitement of winning a powerball lottery and with the smiles like the Black Hole Sun video for Sound Garden.
Thanks Cassandra! It's been a long time coming. TH-cam must be sharing this video with folks for some reason haha
Love the way you doing this. I always had the idea of flor heating in my van. Thank you for this inspiring video.
PS: Only this isnane inches and feet mess confuses me every time.
😶
Great video, and amazing to have heated floors with air, to avoid leaks, so awesome, 4sure i will copy your system, let us know if it works in low Temperatures
We will definitely be doing a review of our heating system on some colder trips we have coming up!
Dude! I've never even thought of a heated floor in a van, that's freakin awesome 👍😎 As and edit, 7:05 on a related note, as a kid I drank some paint thinking it was orange juice 🤦
Man , the things we do as kids. What did it taste like 🤔
@@suedefringe 😂
The Car Wizard would approve.
We've all had a little paint I think haha
Love it! Super practical for any cold(er) climate! Love to see how it’ll work for you when the build is complete!
You're geniuses. Thank you.
Good work!! Love your content, DCMV. Not sure why youre still only at 30k subs. i gave you a thumbs-up.
That really helps as well as a comment, no matter if it’s one word. If more people did that the allusive algorithm will recommend his videos to others!
I saw a guy do heated floors in a Skoolie - he used the 1.5 inch foam and then used a router to create a channel for the pex tubing and heat emission plate to sit in. He had the wooden joists like you. He put the foam (like the purple foam) in between the joists, then routed a channel into the foam, then he installed the metal heat emission/transfer plates into the channel then he put the pex pipe into the channel in the emission plates. I think he did it this way to save on cost, as he had one type foam insulation and it is actually how the layers should be installed. For house floor heating all diagrams show insulation with a channel for laying the heat emission plate into - then into the heat emission/transfer plate channel you put the heated pex lines. But I think your way might also work, but not as well as his method.
Can you share a link to that video? Curios to see how that floor system worked out
Finally got my version of the heated floors installed. It’s a mix yours, humbles and Darens. Lol. It works really well. Almost to good? I think I need a mixing valve so the floors don’t get to hot. Maybe a thermostat? I just have the heater piped directly to the floor and the easy start timer set to 30 min. Floors get to hot if on for much longer. I’m interested in some type of thermostat vs a timer.
I'm curious to see how you whipped your heated floors together. What did you end up doing between the three methods you watched?
Great job 😎👍
Wow! Great job!
Hell yeah dudes! Ganna keep them toes nice and toasty
Have another comment for the Algo! Great video! First one I have personally seen of an installation of radiant floor heating. Would have loved to see how you hooked all the other parts together too! Keep up the good work!
That'll be the next video so stay tuned
Since I work at Lowe's, I know you shopped there since we sell all of those items 😂😂
This was a great video!
Wow. Alot of work. Well done. Hope it works out great for ye 👍
This was a very good video. Ben you have done well with the upgrades.
I was thinking about finishing the wood and you used waterproofing. That seals the wood.
Didn't know aluminum cost that much. Looking forward to your next video.
In a van there is no such thing as overkill when it comes to insulation 👌
Super informative, thank you! (Also, legit amazing editing, like wow if there's an award I'd submit this vid)
I appreciate you saying that!
You could have used a bathroom shower waterproofing product?❤️✨Well done for working out that heated floor👏🏻👏🏻
Excellent. Thank You
Such a helpful video! Any update on how this worked out for you now that it's been 2 years? Anything you'd do differently?
Anxiety and trappin farts is my favorite way to stay warm for sure ;)
Us too!
I'm not installing under floor heating but I am using a diesel Webasto water heater for hot water via a heat exchanger, for showers and washing up. I do have a few extra ideas but they are in the planning stage.
We've got the heat exchanger set up as well. Interested in seeing how it works
Awesome video, thanks so much. I have a pre-instlled heater in my van that works off the engine coolant. I was thinking about using it for my hot water. I did know these kind of diesel heaters existed, but I have never seen a video about someone using it in a van for a camper van build. I'm really curious how it works and also how you connect it together. You didn't show the process in this video. Read something in these comments about using valves to cut off one part of the system. Anyway, I would love to see how the rest of the system comes together. Love your style in video's btw!
Thanks Chiara! Our next video will cover how we installed the entire system so keep your eyes peeled
Thompson is a good water 🌊 resistance product
I've always preferred the term "Shoilet" over "Wetbath", it has a certain hilarious ring to it.
I'm liking Shoilet a lot. I'll have to start referring to it as that haha
Thompson's Water Seal. Look it up, good stuff and dries clean.
My van heats from hydronic floor, boosted by air coil near side door. Same circulation goes through DHW tank and through valve setup to engine & cabin heater.
From spring to fall 9000 BTU heat pump provides both heat & AC, run from 7.2kWh LFP battery & 900Wp solar and 3kW inverter
Great video, only just started binge watching van builds again due to being off work injured and stuck on the sofa all day…. I never leave comments on people blogs but I Came across your channel this week and binged shit loads of your videos… very entertaining and also a little more true van life rather than the usual instagram false shit you see. Happy to see your you now have a partner in crime to enjoy your van life and also another dog to keep Roc entertained. Gutted to watch your video on Archie, you can clearly feel how much he meant to you and at least you had a great 10 years together exploring the states. I Will look forward to watching more of your videos over the next few months as I will be off work for a while and these will keep me entertained. Also I checked your Anmly business online and actually went to buy a T-Shirt but everything was sold out ( which is a good thing I hope as that means it’s doing well?). I will keep an eye out for when they return in stock and I didn’t check but do you post out to the UK?
Hey Dave, I'm glad you came across the channel and liked it enough to check out more of our videos. I'm sad to say we're in the process of dissolving ANMLY which is why all the products on the site are no longer available. My business partner and I weren't seeing eye to eye and I can't afford to move forward on my own, so we're winding things down. Maybe one day I'll be able to take another crack at it, but for now my focus is going to be on the TH-cam channel
@@dogcatmanvan sorry to hear that, business with family or friends can be tough… let’s hope the years of friendship hasn’t gone down the drain… well you always seem a glass half full guy and just take the rough with the smooth and get on with things… good luck with your future adventures and the channel, I will keep tuned in and if you come across any of your r-shirts you wanna sell me let me know so I can at least get your company t-shirt here in the uk, you can then say you went international 👍👍…. Good luck with the van build
keep the faith
Super cool!
Thanks for sharing guys :) it's not the blade which causes tear out in wood unless extremely blunt. It's normal, the way blades work being jagged one side and conforms more the other way. So use tape on both sides of the cut or use a reverse blade direction (vertically in a jigsaw) if cba/rough and ready. Or cut from the other side but that'd only help marginally :) also best use a scribing blade for curves, it's just narrow to change direction-depth and razors are the same except for being finer probably-finer and thinner the teeth/blades means they're safer but cost more or replaced more and don't work effectively on thick mass like hardwoods. The thickness is only valid for circular saws and and the like, as they're longer into the wood at higher continuous speeds causing friction, making the device jump back usually onto the person irreparably or if fixed like a table saw, the wood is then catapulted from between blade and fence enough to make the same damage as a bullet albeit more brutal/blunt. For drawing templates, make something with thin ends and a writing utensil on the other-find the thickest part of the cut (wheelwell depth in this case) and folkow it parallel scribing onto the cardboard :) sorry if I missed you doing that :)
14:20
If you put tape (like 2 inch blue) over the area you're going to cut. I'll keep the surface from chipping as much when you do.
Love the layout and design part.
Did you guys spray the bed with some sort of mold resistant chemical? (The parts below the foam board).
We just coated the entire floor with a rust reformer and then covered that with a white enamel.
Good work, two small observations. First, if you draw the pattern on the underside of the plywood, there will be no chippimo on the upper side when you use the jig saw. Or, use downcut saw blades. That works, too. Second, do not use red chalk when snapping lines on finished wood. Just don't. Red chalk is for framers that work out in the rain. Red chalk is forever. You are doing finish work, so use white chalk. White chalk is the choice of champions. It will go away with far less effort.
Yeah I told her my red chalk line was a dangerous call haha. Luckily we've managed not to stain our clothes or anything from it. White chalk is the way go.
Awesome
Fun video!
Boiled Linseed oil is very good for water proofing wood leather or vinyl
14.20 to stop the wood chipping, run some masking tape on the wood first, then draw your line and cut
Thanks for the tip!
Great. Hope to see teal world review a year from now.
Great attention to detail. Will be interested to see how it works for ya. Have to ask though,,,,, why the top half of a naked mannequin on the shelf in the background????
That's my ex girlfriend. th-cam.com/video/XCTwbSl6NNg/w-d-xo.html
@@dogcatmanvan that’s right I remember her. Quiet kinda gal. Nice that you have moved on and the new GF adds lots to your channel. New cat coming soon?
Compared to the approach of insulated sheets with routed channels for PEX, is there a reason why you went the joist route instead? Great video! I get my new Transit in about a month :)
Yeah, the most efficient method of radiant heat is using an air gap or a vacuum. When you route a channel within insulation and lay pex in it, the heat stays trapped in that channel keeping it from heating a larger surface area. At least that’s the conclusion we came to after doing our research.
I love it!
Very interesting guys. How can I donate to support the channel ?
COOL! Thanks!
you need a second heat exchanger for the engine. you can use engine to heat the van, OR! you can use the van heater to keep the van engine warm.
Great content and thanks for putting this out there. I’m like a year late watching this video but I wanted to know how did it perform since creating the video? Does it use a lot of gas, electricity to run the exchanger/blowers?
No the blower doesnt pull much at all. The heater I think averages around 10 amps with the blower kicking on and off (it's wired to our thermostat so it auto kicks on if the temp drops below whatever we set it to). We only turn the heater on for hot water when we need it though, so just like two minutes before a shower well kick it on and then shut it off when were done. I think if youre conscious of when and how you use it youll never have a consumption issue with electric
Polyiso has a poorer R value than XPS at lower temperatures. So good choice using the XPS board.
You know if you had done long runs there would be less bends and work right?
You'll always wonder if you were to run the floor heating from the engine, and you could but it's annoying to turn it on and heat things up, at 3 am isn't good.
While you have floor heating, what will you do with the walls and gully's. With vans air temp is fairly simple, it's heat loss that's more or an issue and too hot in the summer.
Great work! Does it help warm the interior air temperature of the van as well?
That's the hope. We also have an air matrix that utilizes the same hydronic heat to give us hot air, but we're hoping the floors as well as the air matrix work together to keep the van nice and toasty.
I'm thinking about the transfer plates.... should they really look down? Shouldn't they look up to the backside of the floor???? You taped them to the ground???? Not to the floors back?
We did a test on this at the end of the recent video we uploaded covering our entire heating system install. We didn't see a whole lot of difference.
Interesting.
You could have bought treated 2x4s then ripped them to the desired width. They are made for not rotting in humid conditions. But very wet until they are dried out....you'd need to cut it with a table saw.....or even a circular saw.
Rad!
So the reflectics actually requires an air pocket to work correctly which it didn’t get and for the weight, cost and effort you should’ve just gone with the tried and tested diesel heater. They even make some that double as hydronic heaters for your water or to preheat the Diesel engine for cold weather starts
We are using a diesel heater for this that heats our water and air matrix as well. It's covered in the following video. We also ran a test on the floor without the heat transfer plates allowing the lines to free float, but I can see added space between the lines and the reflectix being beneficial.