Making perfect PCB at home

ฝัง
- เผยแพร่เมื่อ 25 มิ.ย. 2024
- Finished products • Video
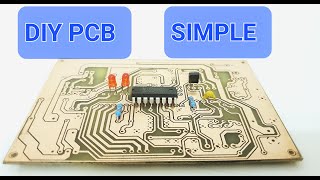
I rarely use multi-purpose PCB. I usually make PCB from copper plate. It is beautiful, and works stably. Many team members often ask me how to make perfect PCB at home, so Today's video I will show you how to create perfect PCB from copper plate.
It consists of 8 basic steps.
Step 1: Cut the Copper Plate
Step 2: Clean the Copper Plate
Step 3: Transfer the PCB Print onto the Copper Plate
Step 4: Etch the Plate with FeCl3
Step 5: Remove ink with gasoline.
Step 6: Protect the PCB with turpentine solution
Step 7: Drill the PCB.
Step 8: Print the value of components (layer TOP)
All my projects are free, I design them on EAGLE 6.0. I uploaded it to Google drive. You need to use a web browser to download the file and open the file with winrar software (extract) on the PC. Open schematic file (.SCH) and PCB file (.BRD) with EAGLE software.
Hope you enjoy my videos and projects. Like, share and don't forget to subscribe to my channel. one more thing, thanks to everyone
Facebook group : bit.ly/CreativeElectronic
#Inverter
#12Vto220V
#PCB - แนวปฏิบัติและการใช้ชีวิต


Make PCB 2 layer perfect at home
th-cam.com/video/4TQP8G41Yow/w-d-xo.html
What is the model of your printer?
Are you Vietnamese?
@@trankhacquyet23: Homemade "102" => có 1 không 2 => chỉ có người VN mới chơi chữ kiểu số này :D
Deleted... Bro
Your tools and stuff make me feel like I'm watching an apocalyptic movie.
:D
Well in some places that would not be to far off..
Very clever drill press design!
thanks
Finished products th-cam.com/video/ksk0an3RUfQ/w-d-xo.html
I rarely use multi-purpose PCB. I usually make PCB from copper plate. It is beautiful, and works stably. Many team members often ask me how to make perfect PCB at home, so Today's video I will show you how to create perfect PCB from copper plate.
Facebook group : bit.ly/CreativeElectronic
#Inverter
#12Vto220V
#PCB
Thank you very much.....
thanks
I have always used the glossy paper (not the same as you) but everytime failed to transfer the toner ink fully on the copper plate. Any suggestions? Does it have to do with the paper or the time and amount of heat applied during pressing it with iron. Please help
@@PhdHung I liked the video what was the rock you shaved off and mixed with the gasoline to make the terpentine ? Thanks
Finished products th-cam.com/video/ksk0an3RUfQ/w-d-xo.html
1500W inverter
Great, the PCB, the drill, the simplicity, every things :)
thanks bro
Wonderful creation. Great lesson on pcb manufacturing.
He made this in a cave, with a box of scraps!
Iron man references on point
It make me smiles
Very detailed and well captured. Thanks mate and well done!
Everybody is gangsta till this guy shows up with his drill press
Get rid of the constant bell rings ... once is enough ... esp. when there is not much other audio
Yes, I will lower the volume
Thanks for the step by step PCB making. Your designs were great!
thanks bro
You ae the champ buddy, great job👍🏻👍🏻👍🏻👍🏻👍🏻👏🏻
All Good ...Thanks For Everything
So wonderful, in my company has many claim PCB to supplier. Your PCB very beautiful. Thank you for share.
thanks
Amazing job, great quality
Excellent workmanship
well thanks for sharing!!!
really appreciated!!!
:D
you are by far the most talented man doing this PCB, I'm amazed with the final result, and your tools are from another world, I never would imagine to use a old PC fan to do a vibrator. 👏👏👏👏
That's really cool
Awesome 👏
i love you brother and your al of work. you are really king.
Thanks, hope you enjoy it
Very impressed by the Drill press 😍
thanks for your guide
Man, I am impressed with the work you can do with the tools you've made :3 Really leaves me with no excuse to start doing cool stuff too - if I don't have the tools, I should just make them. =) Great work!
Thank you, this is mini PCB drilling machine th-cam.com/video/-jVms_y1N7I/w-d-xo.html
Everyone agrees that your work is incredible! I'm at a similar place with my diy work in terms of tool availability, inspired by your ingenuity in making your own tools.
wow...im impressed man...good job
Thanks
wow... best tutorial ever watch....!!!
Thanks
That's perfect!!!
Thank you very much
This is really best, awesome...!!
thanks bro
good job.
Incredible!
thanks
this fan was thougt so wisely, nice vibration mahine.
Thanks
Very good show.
EXCELLENT VIDEO THANKS
Thanks for watching
thank you very much.
cpu fan idea looks good.
This is art
thanks bro
Page from Borland C++ 3.x manual ... brings back old memories.
Yes, about 20 years ago :)
Nice job !
thanks bro
Verry good
thanks
Thank you very much
Finally, a use for all my old, broken computer fans! - McGyver would be proud :-)
wow very nice..thank you so much...for tutorial
thanks
👍👍👍 MOLODEC! SPASIBO!
very nice..... your work approved that you are a real master.
Thanks, hope you enjoy it
@@PhdHung yes, of course.....
great pcb! :)
Thanks, I'll try it with atmega🤖
good luck
lovin it , one new subscriber
thanks
Excellent work ... You're smart boy 👌👌🌹🌹🌹👍 thanks...✅
Best regards from România !!!
thanks
Nice Video, that fan though. 7:53
Very nice PCB
Thanks
Мега-чувак!
эклектика эпох и технологий.
ЛУТ)
Thank you very much....♥
@@PhdHung gnjhffffyggghggggggggggg
im a CNC engineer yeah its amazing that you can make holes manually but i wonder what will you do if this is a double sided PCB
Nice work buddy keep it up
amazing!!!!!
thanks bro
very creative, if someone gave you $1000 you could turn it into a million
lol
I can’t understand nothing here but I still found this very satisfying
good work
thanks
others : "upload your gerber files"
Homemade 102 : "print your gerber files"
I uploaded it to the group
Nice work
Thanks bro.
good work. i did some of them in the past, sun insolation, transparent printed sheet... and of course with permanent ink pen.
i use cheap sulfuric acid (salfumant) + h2O2 mix... 👍👌👍
best regards from,philippines
thanks bro.
Great work man. Can you please add the links for the drill bits and the dc motor chuck?
kỹ năng làm PCB của bạn rất tuyêt. 1 like
Very nice work... excellent result. You might consider spraying the component side with a coat of white paint just before you transfer the component layout (step 8). This would allow the print to show up more clearly. But the result is excellent regardless. >Charlie
You are so cool, keep doing ;)
thanks
Until today, I thought that the circuits were filaments carefully printed into the plaque, now I know they print everything but the circuits, thank you
Awesome work!! , will this board require solder mask layer ... Please let us know..
que belleza de placa..
I'm more impressed by your tools than the PCB.
Yes, thank you very much
respect
a DIY man!
The Best! Like from Brazil
já q vc é brasileiro, oq vc usou no lugar de turpentine solution, n sei qq é isso
Eu quis dizer que este foi o melhor vídeo de PCB que já vi no TH-cam e que eu sou do Brasil
Mas tu pertinentes significa terebintina se não me engano e isso se encontra aqui no Brasil, deve vender em alguma casa de produtos químicos
@@PauloSergioDiasCarmo Ah, não tinha entedido kkk, mas muito obrigado eu joguei no tradutor e vi q existe no Brasil em farmácia mesmo, e n é caro, só a gasolina que é ksjsksj
Awesome, interesting technique! That drill press is just amazing. It is so sad to see people who cry that they need to buy all these tools to be productive, when I should have been thinking of ingenious was to improvise my whole life.
#ono
I do the same tricks for pcbs awesome awesome
rocky runner great. It’s nice to keep making your own tools if you don’t have any. keep up good work.
Yeah. Do you know what it costs to buy a little drill press for this purpose? It's unjustified. So I got a ~$20 drill press stand (for hand drills) and a ~$10 hobby motor that came with a chuck and bits, and I was rolling with a $30 PCB drill press, give or take a bit. The things that I already had though were pieces of rubber to make a spacer because the clamp on the drill press stand was too big, and a 12V DC power supply to power it.
Beautifully
thanks
Dialog would be nice.. For DIY homemade though it looks better than most I have seen on here which look like PCBs from the 1960's
:D
You’re the best
Thanks
Man pcb was amazing. What is that Turpentine solution ?
I don't say this very often but the use of all of your tools borders on the creepy and I can't put my finger on why.. altogether, this was a very informative and intersting watch.
Or you can order it...
Great video!
Thanks
In your opinion can you obtain finer smaller tracks from photo sensitive or just the ink style ? or do both style of etching give the same result ?
Usefull
Great job. Wait for double side PCB.
ok, wait me
@@PhdHung Great. Thank you.
*Je veux bien tester cette méthode...*
Very nice. I have also taken inspiration from you (you have very good skill to make PCBs only single side which is very difficult) and designing single side PCB and will make in home. Thanks for video which is very timely for me. By the way what is your job? You always busy in making projects one after another without gap. Very inspiring. Thanks.
Hi,What kind of paper is used for printing, and what is the name of the application used to draw the electrical circuit? Thank you
beautifull
show muito bom!!!
obrigada
Pls can you upload a tutorial on how to print component values on pcb (top layer)
Super 👍
Good job! I enjoy seeing nice results using the tools and materials that happen to be available. c(_)
What programs do you use for make the circuits and turned in to pcb ??
Paper used ? BTW awesome tutorial
Hay đấy! Rất rất hay!
thanks
can you make a pcb making kit? I think I really love to buy it.
Which cartridge are you using, new or refilled? What print settings do you set for your printer?
Awesome itching machine dude
:D
@@PhdHung 💗💗
I wonder about the turpentine solution, is it really effective like a varnish ? No issues with soldering after ? Is it not flamable ?