Love it! I've been shopping online for a table and even the one rated best (for my price range and skill level) gets a lot of poor reviews for pieces not fitting correctly. I decided to find videos to build my own. You sure made it look easy. Thanks!
Hi Susan, it's good to see another woodworking woman on you tube, lets have some more to brighten woodwork up.As far as the bandsaw, I bought one of those and also have a similar problem with the fence. God luck Susan, look forward to more of your you tube projects. Peter
Thanks for some great ideas for a router table. I purchased a triton router on the suggestion of Mr Ben Crowe and how glad am I that I did. They have so many useful and well thought out features. I have the JOF001, with the adjustment handle for table mounted use, much the same as yours. I especially like the cut off feature for the on/off switch, when you are changing the router bit. I'm looking forward to having a go at a similar build to yours for use with some luthiery projects. Keep on with the great videos, very instructional and entertaining.
I love my triton router...... So useful and easy to switch between the table and freehand use. Also you may want to widen the centre hole so you can change the bit above the table without having to faf about underneath but you need the centre hole wide enough for the collet to pop thru.
I made one just like this last week, but I attached two blocks of wood to the bottom of the table on opposite sides of the router so I could clamp it into my Workmate.
Very nice job. I always notice people using or making circle cutting jigs for the router recess. Just mark the center of your board where you want the router placed and drive a nail in the mark. Place the router against the nail, turn on ad lower the bit to desired depth. go in a counter clockwise movement.Use a 1/4 inch bit and your recess will be 1/2 inch larger than thee base.You did a wonderful job and I think you look very nice, love the smile and thumbs up back to you.
This is exactly the video I needed to find, other people make them so complicated, I have seen one who made a 'bolted one end, clamp the other' fence that I would add to this set up.
I have the Triton JOF001 router and a hose from a Henry vacuum cleaner (bought on Amazon) fits nicely into the base plate. You have to remove the fitting of course. The hose also has a LH thread which had me going for a while! I also turned up some shouldered pegs that fit through my table into the workmate holes so the surface can be kept flush and free of clamps. I enjoyed the video and keep up the good work!
I'm in the middle of planning for the making of my own router table to sit atop my workbench. I was thinking of building a box like table to sit on the workbench, to raise it up. I still might do this but your way (just the top) is much simpler. One tip - mount a board under the top of the router table to fit between the two boards of the workbench. Then use the workbench's handles to close the two boards together to act as a clamp to hold the router top. No additional clamps needed!
+bymitten1 the workbench has to be opened to its maximum to accept the router so I'm not sure that would work, although there might be a couple of mm play. What I've done since is screwed some plates under the spacer feet so that I can clamp it down but without the clamps standing proud of the surface. You can probably see this in a later video - maybe the guitar neck vice or the guitar mould.
Great video, well produced. Good, clear sound and no annoying background music. I hope the negative commenters don't discourage you. Well done, Thanks.
Nice video Susan and a good low cost router table. Nice to have an off switch where you can get to it easily though. One of those red button ones you can just push with your hand or whatever to quickly switch the router off.
You seem to be sort of a newbie at wood working. Just for the record though, That Triton router you have that you had never used before, is an extremely high end router. I just know that when I was working I could not have afforded one. You are very cute and I like the way you work.
Susan I have the same terrible bandsaw as you have although it improved massively with Dakin-Flather (British made) blades and a lot of fettling... the fence that you refer to is beyond hopeless but the two bolts on top of the fence can be adjusted to make it a bit better. I ended up adding an taller and longer auxiliary fence made out of a strip of 18mm ply (just drill through the alu metal on the fence with a metal bit run some M6 or M8 bolts through it countersink the heads into the face of the fence and it makes a big difference and won't flex as much. Also the locking handle twists counterclock wise to get more tension also helps to stop the flexing. The Just Bandsaw blades website is a good place for the funny sized blades.
+Robert Devenney thanks Robert. It is a lot better now that I've got a new blade and adjusted it properly. I gave up using the fence - I'll try your suggestion. It was the apparent inability of the fence to lock that bugged me most - I think inserting some sandpaper in the clamps might help.
To overcome the problem of screwing out of the center piece is just rotate the router clockwise. It would then tighten or hold fast instead of screwing out.
I have a Tra001 Triton half inch collet router but when I try to cut a base circle as you showed on your video , my cut is half inch bigger than the router base , could anybody please tell me what I am doing wrong , thanks
+Tony harrison you just need to get the pivot closer to the router bit. I had to turn the middle tab around to achieve this. Not sure if you have the same base. I also had to use a small router bit
Thank you for your reply , now sused it I was putting the plastic guide piece on top of the metal guide plate instead of underneath and the nail for the pivot was catching on the side of the router base .Have now cut a successful hole for router to fit. Many thanks you help , please keep up you interesting videos and I appreciate the lack of music , so I can hear what you are saying
I just bought the Bosch POF 1200 ae and it does not have this feature either. Disappointed as a neat way of table mounted adjustment. Thanks for the vid Susan. Researching how to mount my router to a home-made table.
great video and liked the smiling :). i need to get an adjuster...also i noticed the hole for the router bit was quite small, to small for other larger bits other than the flush cutting bit in the video.
I don't have any larger bits so I wanted to keep it small. If you have a large variety it might be better to have some drop in plates so the hole is never too large. Here's a smiley :-)
+doodle daddle it would be easy to change this problem. Many woodworkers use this on their table saws (which I believe is called a zero clearance insert). You'd want to cut an area out, around where the bit would be, small enough that it doesn't interfere with the mounting screws and large enough that it will be wider than an router bits you will use. Route a recessed lip along the edge of the hole. Then you would cut a piece of wood, mdf, acrylic, etc that can fit in that recess and cut out a hole in the middle matching the size of the bit to be used.
What I want to know is does that crank which you used to raise and lower the router collet come with the triton? You should have showed us first, what holds the table surface onto the workmate? then, what was it you removed from the router? The spring mechanism that controls depth of plunge? And is the location where you removed the spring where you insert the business end of the crank? What holds the table top onto the workmate? Are you clamping the two sides directly onto the router? Did you put some wooden bits on the bottom side of the table that get squeezed in the jaws? My workmate is old a although it is solid, the jaws can be a bit rickety. I am thinking of using a nice router insert and a melamine coated piece of particle board for the work surface. I also want to make a split fence instead of just using a peg. do you think it is going to be stable enough? And does the work surface HAVE to be the exact size of the top jaws? I have subscribed. Love to support another female woodworker!
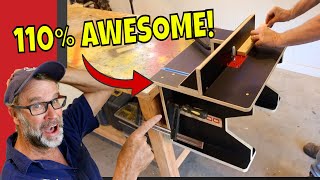
The crank comes with the router. The spring is a counterbalance spring that’s not needed when the router is upside down. Originally I just clamped the router table directly to the workmate, so it needed to be roughly the same size. However I’ve since glued and screwed 4 small square blocks to the corners of the underside of the table and then 4 larger blocks glued and screwed to these blocks which means I can clamp the corners to the workmate without the clamps obstructing the top of the table. I hope that makes sense
good on you susan. however you should have made a larger hole about 2 1/2" so that you can use any size router bit you want. You can buy or make inserts that make up the space between the bit and that large hole. this is Important as you don't want the wood to get dragged into the gap. The bit you are using is called an auger bit. Don't waste money on Flat bits, you can buy a set of really good Forstner Bits from Axminster Power Tools website. You can also buy the router cutters and inserts from them. You can also buy a stepped rubber connector to fit your vac to the router
Greg Dobson Greg I am currently ordering this unit and figured this was an affordable way to make my own router table once the unit arrives. But what do you mean "you don't want the wood to get dragged into the gap"? Am I going to need one those router plates then? I can't just do exactly how she did, with a wider 2.5 inch hole and maybe attach my shop vac underneath the table to the clear hose guard that comes on it? I know you left this comment a few months ago but hopefully you will receive a notification or something and can respond. Thanks in advance.
I just clamped a piece of planed timber across it - instant fence. I did this in part 16 of my guitar restoration series to create the bridge saddle slot
this is one of most simple but useful constructions of a router table i have seen in youtube , but for sure is the cheapest ! I like very much the all idea , to make a necessary woodworking tool by a small piece of the cheapest wood(almost wood) ! I have only an observation , i think the height of the table is too low and it is not the appropriate height for you to work ... maybe i am wrong
+Susan Gardener the truth is you made it for you , so you wouldn't had an issue to work with it and for sure you could make this higher , the wood blocks is a good solution ... well done
Thanks for the video. Can you give the router model number? I bought what looked like a good thing some years ago when much less experienced. So i now have a router table with very difficult height adjustment. A router with the turning handle looks ideal.
what is the model of the touter? I have been looking for a router with an on switch (rather than a switch you need to keep pressed down) so I can make a table like this, but I've not yet found one. Also like the fact that this model lets you adjust the bit height while it is mounted. Cheers for the video
Great video. Could I suggest you add the name and model of the router into the title, as before I bought mine (same model) I wanted to watch as much real world footage on this model as possible, and I didnt get anything that really helped as I am new to this skill, and a lot of the segments I saw were professional, or a bit promotional. I like to watch someone deliver the way you have done, where you have thought through what you wanted to demonstrate, but not had a director as it were pushing the product. Thanks for this. I enjoyed it and I am going to make the same for my router. Be safe
+n124lp I do. I've now added some extra plates on each spacer block so that I can clamp it without the clamps being on top of the table. You can see this at 19:30 in my DIY plate joining jig th-cam.com/video/TR7S5vdM60w/w-d-xo.html
Nice simple router table solution thank you. Did you use the screws that fix the baseplate to the router to fix it to the table/MDF or did you purchase longer machine screws? Thanks
Hi Susan, I've been looking at getting that router, how is it working for you? I'll be making mostly hardwood boxes, so hardwood, but shouldn't be huge cuts. In the paste I have had the 850w 1/4" trend router that wasn't up to the job, and the DeWalt 2000w, that was a beast, but it cut anything I threw at it. I was wondering whether 1400w is enough for what I want to do. Thanks.
+Richard Hawkins I've been very pleased with it. I've not hit any issues. It blew the 6amp fuse in my extension lead due to its high power, but that was my fault - I didn't realise the lead was meant for low power devices. People have pointed out it's not cheap, but it is quality.
Thank you Susan, I would rather pay for quality! Screwfix and others sell budget routers but their reviews show they can die halfway through a job! My concern really was is this router powerful enough for some of the denser hardwoods, if so it is saving me money in not buying a 2000w+ Makita, Dewalt or Triton! It seems fine for the job. I guess is the 850w was only just coping then 1400w should be enough! Thank you again, I enjoy your videos!! I noticed someone said don't worry about keep looking into the camera. I don't know why they would even worry about that. You be you!
+Richard Hawkins I've used it on oak and mahogany using the green Trend router bits without problem. You can get better quality bits, from Trend and from others, but the green range seem pretty good
Interesting video Susan, keep looking at the camera I like to get to know the personality of the presenter. The New Brit Workshop is one of the best woodworking channels on TH-cam and Peter spends a lot of time speaking to the camera. George
thanks for the all of your video lessons,just a quick question, To glue wood veneer to guitar body without vacuum press,what kind of glue you will reccommend.thanx


You, dear lady, are AMAZING!!! I was thinking of doing the same thing and you made it look easier than I imagined. THANK YOU SO MUCH!!!
4 minutes in and I have learned two new things about my router! Thank you ladies for reading instruction manuals!
Love it! I've been shopping online for a table and even the one rated best (for my price range and skill level) gets a lot of poor reviews for pieces not fitting correctly. I decided to find videos to build my own. You sure made it look easy. Thanks!
Hi Susan, it's good to see another woodworking woman on you tube, lets have some more to brighten woodwork up.As far as the bandsaw, I bought one of those and also have a similar problem with the fence. God luck Susan, look forward to more of your you tube projects. Peter
Thanks for some great ideas for a router table. I purchased a triton router on the suggestion of Mr Ben Crowe and how glad am I that I did. They have so many useful and well thought out features. I have the JOF001, with the adjustment handle for table mounted use, much the same as yours. I especially like the cut off feature for the on/off switch, when you are changing the router bit.
I'm looking forward to having a go at a similar build to yours for use with some luthiery projects.
Keep on with the great videos, very instructional and entertaining.
I love my triton router...... So useful and easy to switch between the table and freehand use. Also you may want to widen the centre hole so you can change the bit above the table without having to faf about underneath but you need the centre hole wide enough for the collet to pop thru.
I made one just like this last week, but I attached two blocks of wood to the bottom of the table on opposite sides of the router so I could clamp it into my Workmate.
Very nice job. I always notice people using or making circle cutting jigs for the router recess. Just mark the center of your board where you want the router placed and drive a nail in the mark. Place the router against the nail, turn on ad lower the bit to desired depth. go in a counter clockwise movement.Use a 1/4 inch bit and your recess will be 1/2 inch larger than thee base.You did a wonderful job and I think you look very nice, love the smile and thumbs up back to you.
This is exactly the video I needed to find, other people make them so complicated, I have seen one who made a 'bolted one end, clamp the other' fence that I would add to this set up.
That was fun to watch, you have an engaging personality, would have liked to have seen more at the end, well done and keep them coming.
I have the Triton JOF001 router and a hose from a Henry vacuum cleaner (bought on Amazon) fits nicely into the base plate. You have to remove the fitting of course. The hose also has a LH thread which had me going for a while! I also turned up some shouldered pegs that fit through my table into the workmate holes so the surface can be kept flush and free of clamps.
I enjoyed the video and keep up the good work!
I'm in the middle of planning for the making of my own router table to sit atop my workbench. I was thinking of building a box like table to sit on the workbench, to raise it up. I still might do this but your way (just the top) is much simpler.
One tip - mount a board under the top of the router table to fit between the two boards of the workbench. Then use the workbench's handles to close the two boards together to act as a clamp to hold the router top. No additional clamps needed!
+bymitten1 the workbench has to be opened to its maximum to accept the router so I'm not sure that would work, although there might be a couple of mm play. What I've done since is screwed some plates under the spacer feet so that I can clamp it down but without the clamps standing proud of the surface. You can probably see this in a later video - maybe the guitar neck vice or the guitar mould.
Susan Gardener Ahh, I didn't think of that regarding the size of the router. I guess it all depends on the base diameter. Good thinking! ☺️
You made me buy the Triton router after I saw this vedio LOL .... Thank you dear for the easiest way to make touter table .
Such a nice person you are. Your videos apart from being inspirational are so pleasing to watch, you are such a lovely person, bless you!
Great video, well produced. Good, clear sound and no annoying background music. I hope the negative commenters don't discourage you. Well done, Thanks.
First video I have seen showing how to set and use the starter pin,,,,Thumbs up from me,,,,,
I am a bit scared of routers, due to no experience. I am inspired by Susan's enthusiasm and practical tips
Just bought a MOF001 as my first router, nice to see that it is easy to build a table for it, thanks for the video. :)
I love the way you grin at the camera!
Your videos are always interesting, helpful and fun. Thanks
Nice video Susan and a good low cost router table. Nice to have an off switch where you can get to it easily though. One of those red button ones you can just push with your hand or whatever to quickly switch the router off.
Very nice and interesting video. Congratulations Suzan.
Nice workmanship!
Thanks, Susan. You are a joy to learn from!😄
Good idea for the table and a great video. Wish I had bought a Triton router!
Refreshing approach - keep on smiling.
Your doing a good job . Keep up the good work. I’m proud of you.
Lol the first router deserves a thumbs up alone!
You seem to be sort of a newbie at wood working. Just for the record though, That Triton router you have that you had never used before, is an extremely high end router. I just know that when I was working I could not have afforded one. You are very cute and I like the way you work.
I like that orange colour of the Triton !
Excellent stuff...sort of not related but I liked hearing the rain on the roof of your conservatory!
Nice vid, found this helpful and fun to watch. Thanks for sharing.
I'm impressed by the Crimson Guitar T-shirt too. :-)
che brava Susie! complimenti !!
Very impressed. Well done. Thanks for sharing.
Nicely done and very charming.
Holy moly! I think that table saw is larger than my shop!
Susan I have the same terrible bandsaw as you have although it improved massively with Dakin-Flather (British made) blades and a lot of fettling... the fence that you refer to is beyond hopeless but the two bolts on top of the fence can be adjusted to make it a bit better. I ended up adding an taller and longer auxiliary fence made out of a strip of 18mm ply (just drill through the alu metal on the fence with a metal bit run some M6 or M8 bolts through it countersink the heads into the face of the fence and it makes a big difference and won't flex as much. Also the locking handle twists counterclock wise to get more tension also helps to stop the flexing. The Just Bandsaw blades website is a good place for the funny sized blades.
+Robert Devenney thanks Robert. It is a lot better now that I've got a new blade and adjusted it properly. I gave up using the fence - I'll try your suggestion. It was the apparent inability of the fence to lock that bugged me most - I think inserting some sandpaper in the clamps might help.
Love your work. Thanks for keeping it real! 👏🌹🇦🇺✌️
To overcome the problem of screwing out of the center piece is just rotate the router clockwise. It would then tighten or hold fast instead of screwing out.
Great stuff. I need to do exactly the same thing for exactly the same router.
I have a Tra001 Triton half inch collet router but when I try to cut a base circle as you showed on your video , my cut is half inch bigger than the router base , could anybody please tell me what I am doing wrong , thanks
+Tony harrison you just need to get the pivot closer to the router bit. I had to turn the middle tab around to achieve this. Not sure if you have the same base. I also had to use a small router bit
Thank you for your reply , now sused it I was putting the plastic guide piece on top of the metal guide plate instead of underneath and the nail for the pivot was catching on the side of the router base .Have now cut a successful hole for router to fit. Many thanks you help , please keep up you interesting videos and I appreciate the lack of music , so I can hear what you are saying
Great build Susan, 👊👊👊👊
"It will probably be OK" **** famous last words I've used often.
A bit shocked at the negativity, I thought the video was great. You were great. Keep up the great work.
I like the idea, well done! Could you explain how the adjuster works/connects to the router.
+Scudo Smyth it comes with the router - it docks onto a connector that's part of the winder system
Thanks, Just that mine doesn't have that part so I couldn't understand. Clear now.
I just bought the Bosch POF 1200 ae and it does not have this feature either. Disappointed as a neat way of table mounted adjustment.
Thanks for the vid Susan. Researching how to mount my router to a home-made table.
As far as I know only the Triton routers have this feature built into the router.
Thanks for the reply Dave XB.
💡!!!! Dear Santa ,this Christmas ... A woman who wants to work wood and go power tool shopping!
You read my mind!
Yay for gaffa tape - my own go to hose adaptor!
nice work Susie,,u rock
lol only beginning this video - I say rooter too !!!! My neighbour always correcting me and I still don't fix it lolllllllllll
If I could subscribe twice I certainly would. Great work.
Excelente.....congratulations ...
great video and liked the smiling :). i need to get an adjuster...also i noticed the hole for the router bit was quite small, to small for other larger bits other than the flush cutting bit in the video.
I don't have any larger bits so I wanted to keep it small. If you have a large variety it might be better to have some drop in plates so the hole is never too large. Here's a smiley :-)
+doodle daddle it would be easy to change this problem. Many woodworkers use this on their table saws (which I believe is called a zero clearance insert). You'd want to cut an area out, around where the bit would be, small enough that it doesn't interfere with the mounting screws and large enough that it will be wider than an router bits you will use. Route a recessed lip along the edge of the hole. Then you would cut a piece of wood, mdf, acrylic, etc that can fit in that recess and cut out a hole in the middle matching the size of the bit to be used.
thanks I didn't think of that!
What I want to know is does that crank which you used to raise and lower the router collet come with the triton? You should have showed us first, what holds the table surface onto the workmate? then, what was it you removed from the router? The spring mechanism that controls depth of plunge? And is the location where you removed the spring where you insert the business end of the crank? What holds the table top onto the workmate? Are you clamping the two sides directly onto the router? Did you put some wooden bits on the bottom side of the table that get squeezed in the jaws? My workmate is old a although it is solid, the jaws can be a bit rickety. I am thinking of using a nice router insert and a melamine coated piece of particle board for the work surface. I also want to make a split fence instead of just using a peg. do you think it is going to be stable enough? And does the work surface HAVE to be the exact size of the top jaws? I have subscribed. Love to support another female woodworker!
The crank comes with the router. The spring is a counterbalance spring that’s not needed when the router is upside down. Originally I just clamped the router table directly to the workmate, so it needed to be roughly the same size. However I’ve since glued and screwed 4 small square blocks to the corners of the underside of the table and then 4 larger blocks glued and screwed to these blocks which means I can clamp the corners to the workmate without the clamps obstructing the top of the table. I hope that makes sense
I should add that with the concealed clamping blocks, the table can any size you like really
good on you susan. however you should have made a larger hole about 2 1/2" so that you can use any size router bit you want. You can buy or make inserts that make up the space between the bit and that large hole. this is Important as you don't want the wood to get dragged into the gap. The bit you are using is called an auger bit. Don't waste money on Flat bits, you can buy a set of really good Forstner Bits from Axminster Power Tools website. You can also buy the router cutters and inserts from them. You can also buy a stepped rubber connector to fit your vac to the router
Greg Dobson Greg I am currently ordering this unit and figured this was an affordable way to make my own router table once the unit arrives. But what do you mean "you don't want the wood to get dragged into the gap"? Am I going to need one those router plates then? I can't just do exactly how she did, with a wider 2.5 inch hole and maybe attach my shop vac underneath the table to the clear hose guard that comes on it? I know you left this comment a few months ago but hopefully you will receive a notification or something and can respond. Thanks in advance.
Late to the party. Sorry. Great idea. Did you find the Workmate adequately sturdy in the long run? Thank you.
Nice job!!! I'll try to build something like that.
Fantastic job thank you so much for sharing it with us.
Very nicely done
Hallo Susan - great job :)) Greeting from Germany :)
Great job! Simple and easy. You just need to build a router table fence and you got a proper router table ! :)
I just clamped a piece of planed timber across it - instant fence. I did this in part 16 of my guitar restoration series to create the bridge saddle slot
Love how u look at us 😂👍👌 thx for the video 😍
Great job Susan:)!
Miss your posting! Are you ever planning on resuming or have you moved on?
haha, just noticed your t-shirt. hmmm yes it's watching crimson guitar vids that led me to this video also lol.
I love the wifi gag at the beginning :D
Hope your 'back' didn't suffer with all that 'bending'! Cheers! Good vid.
Wow what was that little tool you used at 1:41? it had a clear yellow handle. It did the job of an electric screwdriver but it wasn't pulgged in. :)
I've just zoomed in on that point and it looks like a screw driver Ian. Fairly boring piece of equipment really lol
great and easy i like it :) just wondering i havent seen the with an adjustable handle for the height i wonder if i can get one for my Makita
Good video....GREAT smile. Many thanks :)
Good Good I Lake the Idea Thanks you for sharing.
Bravo great video, ignore the negative people.
Awesome!! Very inspiring!
Don't you need the hole in the middle to be bigger to accommodate different bits or are u just using the same bit all the time.
Thanks
this is one of most simple but useful constructions of a router table i have seen in youtube , but for sure is the cheapest ! I like very much the all idea , to make a necessary woodworking tool by a small piece of the cheapest wood(almost wood) ! I have only an observation , i think the height of the table is too low and it is not the appropriate height for you to work ... maybe i am wrong
I guess you could put blocks at each corner of the MDF instead of the 18mm pieces I used, but the height hasn't been an issue for me
+Susan Gardener the truth is you made it for you , so you wouldn't had an issue to work with it and for sure you could make this higher , the wood blocks is a good solution ... well done
it shifted to night time real quick in your country it was daylight when the video started it was night time when the video finished
Thanks for the video. Can you give the router model number? I bought what looked like a good thing some years ago when much less experienced. So i now have a router table with very difficult height adjustment. A router with the turning handle looks ideal.
It's a Triton MOF001.
Susan when you put a larger drill bit in you hand drill it looks a bit odd
Awesome mate! Thanks!
Hi Susie
What model router was it and where do you get the adjuster mechanism from I doesn’t look like that comes with the router. Nice vid xx
+James Mackman it’s a Triton MOF001. It does come with the adjuster
Nice job, thumbs up!
Susan your my type of woman woodwork and guitar
Metric adjustable wrench?
what is the model of the touter? I have been looking for a router with an on switch (rather than a switch you need to keep pressed down) so I can make a table like this, but I've not yet found one. Also like the fact that this model lets you adjust the bit height while it is mounted. Cheers for the video
Triton MOF001
What make is your bandsaw and what is the price please
It’s a Scheppach HBS20. It’s currently around GBP110 in the UK
great video and very funny too thank you
Great video. Could I suggest you add the name and model of the router into the title, as before I bought mine (same model) I wanted to watch as much real world footage on this model as possible, and I didnt get anything that really helped as I am new to this skill, and a lot of the segments I saw were professional, or a bit promotional. I like to watch someone deliver the way you have done, where you have thought through what you wanted to demonstrate, but not had a director as it were pushing the product. Thanks for this. I enjoyed it and I am going to make the same for my router.
Be safe
Great video!
I like your way to make video :-)
And nice work. How does the dust collection work from underneath?
thank you for sharing a very useful idea.
Do you clamp the router into the workmate top?
+n124lp I do. I've now added some extra plates on each spacer block so that I can clamp it without the clamps being on top of the table. You can see this at 19:30 in my DIY plate joining jig th-cam.com/video/TR7S5vdM60w/w-d-xo.html
Good demo ... thanks.
Love it, just what I needed, however, "...going to do it as cheap as possible..." great, then you produce a DYSON vac!!!!!!! lol
I am interested in doing something similar but I am not quite getting how you made the adjuster. Could you elaborate on it?
The adjuster comes with the router. It's a Triton MOF001
Nice simple router table solution thank you. Did you use the screws that fix the baseplate to the router to fix it to the table/MDF or did you purchase longer machine screws? Thanks
Why not just plunge the router to drill the center hole?
brava !! ottimo lavoro
Hi Susan, I've been looking at getting that router, how is it working for you? I'll be making mostly hardwood boxes, so hardwood, but shouldn't be huge cuts. In the paste I have had the 850w 1/4" trend router that wasn't up to the job, and the DeWalt 2000w, that was a beast, but it cut anything I threw at it. I was wondering whether 1400w is enough for what I want to do. Thanks.
+Richard Hawkins I've been very pleased with it. I've not hit any issues. It blew the 6amp fuse in my extension lead due to its high power, but that was my fault - I didn't realise the lead was meant for low power devices. People have pointed out it's not cheap, but it is quality.
Thank you Susan, I would rather pay for quality! Screwfix and others sell budget routers but their reviews show they can die halfway through a job! My concern really was is this router powerful enough for some of the denser hardwoods, if so it is saving me money in not buying a 2000w+ Makita, Dewalt or Triton! It seems fine for the job. I guess is the 850w was only just coping then 1400w should be enough! Thank you again, I enjoy your videos!! I noticed someone said don't worry about keep looking into the camera. I don't know why they would even worry about that. You be you!
+Richard Hawkins I've used it on oak and mahogany using the green Trend router bits without problem. You can get better quality bits, from Trend and from others, but the green range seem pretty good
What model router did you use and did the adjuster bit come with it? It seems like a nice alternative to the high priced router lifts.
It's a Triton MOF001 and the height adjuster did come with it
Interesting video Susan, keep looking at the camera I like to get to know the personality of the presenter. The New Brit Workshop is one of the best woodworking channels on TH-cam and Peter spends a lot of time speaking to the camera.
George
Gotta get me a Triton. My Metabo is good but Triton look much more versatile.
thanks for the all of your video lessons,just a quick question, To glue wood veneer to guitar body without vacuum press,what kind of glue you will reccommend.thanx
Titebond original is the glue that most luthiers use.