Make a 3D model from an AI image with FREE tools!

ฝัง
- เผยแพร่เมื่อ 18 ก.ค. 2022
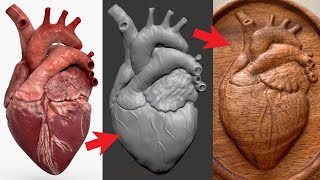
- This video is by request, creating a 3D model from an AI generated image using FREE tools, including BLENDER. This will work with Midjourney, DALL-E 2, Disco Diffusion or any AI image generator. The supporting assets are on Gumroad, including all texture maps, Blender file and STL for 3D printing here:
mcpoly.gumroad.com/l/xhzldp
Part of the right hand side of the video was cropped, but it shouldn't be an issue.
Programs used -
Photopea: www.photopea.com/
ShaderMap 4: shadermap.com/home/
Or, try cpetry.github.io/NormalMap-On...
Blender: www.blender.org/download/
The end result can be exported as an STL for 3D printing in your favourite slicer
Artstation: www.artstation.com/PeteMc - ภาพยนตร์และแอนิเมชัน


Cool to see the people are starting to understand that AI is a collaborative tool.
For sure
Well this is a very mild example of AI usage
@@Settiis Now you have the tools you need to go WILD
Its the honeymoon period for AI creativity.
Seen as collaborative tool right now. Soon it will take over completely. Its inevitable
@@hrzn202 There's definitely a love affair with it right now. Work with enough though and the current limitations become obvious. I hope to use it as a tool for generating ideas and mutations
It's amazing to see how someone with minimal knowledge of Blender, is able easily create something so beautiful. Especially with no equipment beyond a mouse and keyboard. The combination of AI, and the power of Nodes has drastically increased the accessibility everyday people have for expressing themselves. Truly a wonderful development for art.
Thanks
This will be fun and inspiring.
Wow! You got to this free sortware version so fast! I'm super grateful and impressed at your quick turn around. Thanks mate! I'm traveling and can't wait to go thru this video in depth and try this out for myself, I feel like I'm gonna learn a lot.
You're welcome
You are a man sir. You will never be seen as a woman lmao. At least you'll make it to the 41% you sussy baka
Backface selection is enabled by the little icon next to the wireframe selection on the top right corner of the viewport or you can alt left click the selection to get all in that edge.
Great tip Chris, thank you.
Nice! great to see this evolving!
More to come, thank you!
It may be not perfect, but you just opened a lot of possibilities! this is so amazing . Thank You !
Nice one Ash!
You are a hero man, for making this tutorial again but with free tools!
Thanks!
Blimey, I'm really impressed - if you're not really a Blender user you certainly did a cracking job of looking like you were.
I've used it plenty and I still struggle to remember how to find my way around some parts of it.
It helped that i made it in 3DSMax first, so I knew the steps, i just had to locate the Blender equivalents and muddle through :D
Your videos are very comprehensive. Thank you so much for sharing ^^
You're very welcome Lucas, thanks for the kind words.
Fascinated at every step. What a great set of tools and information to use them wisely. Thank you very much!
Glad you enjoyed it!
This is an awesome video with so much information included. Really cool. Thank you!
Glad you liked it!
Great video, im definately going to try this! A little tip is that you can press "U" while in edit mode to see all the unwrap options without having to go all the way up to to top. Another tip is using proportional editing to make the egg a bit easier, and the last tip is that you can press tab to switch between edit mode and object mode. I know this advice is a bit unsolicited, but I just think it could help your viewers, and yourself. :) keep up the amazing work, i learned so much from this video!
I love the tips, I'm a Blender noob, so thank you!
+1 remindme
Great video! Very instructive. This has so many possibilities.
Thanks Patrick
This is an incredible resource. Thanks mate
Glad you think so, thanks!
great stuff, really excited to go try this! Thank you for sharing!
Have fun, thank you!
Thank you so much for this video. I mean it. You've broadened my horizons so much with this. I appreciate the time you spent on explaining everything. Big ups mate 👍👍
Glad it was helpful!
Fantastic content, GAE. I'm new to the channel but this is right up my alley. Now if I can only find all the time to get to this stuff outside my normal 14 hour trucking day, that would be even better. 😂
Welcome aboard! Finding time is the hard part!
Fantastic!!! I can't wait to try this out.
Hope you enjoy it!
Thanks again for this great tutorial. Simple and effective I can't wait to try this!
No worries, hope you enjoy it!
It's astonishing what you can do with free tools. Great video, you explain very well.
Glad you liked it, thanks
For Midjourney atleast, it is not free, as everybody seems to be pretending. You only get your first 25 images for free. Afterwards you have to pay a subscription fee of 10 or 30$ a month for 200 images and unlimited respectively.
I see a lot of video's have this in common, giving the impression that Midjourney is a free tool. And the weird mindset that you shouldn't take other peoples words, because that is "stealing someones creativity skills", but stealing someones actual work (be it drawing, photosgraph, 3D model, ... ) apparently is not.
@@JustAnotherGamer1005 Just use Stable diffusion...
@@JustAnotherGamer1005 25 tries (with a grid of 4 images in each, so 100 images in total assuming you didn't get what you want 25 times) are more than enough to come up with an alien Faberge egg. As mentioned in the info under the video, this will work with any AI image generator such as Disco Diffusion, Stable Diffusion, Wombo etc. Agreed that there is a level of idiocy around the whole "prompt engineering" thing, I guess people want to hold on to some sort of create input when so much is done for you by the AI.
@@gameartexp Indeed, the Faberge egg was a cool idea. And looking at the result, a surrealistic one also 😄. And for experimentation, those 25 are enough.
But there are people who seem to assume or portray this as a free tool in your workflow. If it's something you need recurring, it's not free anymore.
I've seen a bit of that Stable Diffusion, I think. That one is free, i think?
It's nice too see what AI comes up with. And for indie-devs, this is a great tool that can burden a bit of the load.
Before AI generators, I was already creating images with fractal image generators.
Now I'm very eager to take these and newer images up another level, and maybe even
3D print them! Looking forward to what other creative people will produce!
Big thanks for sharing your insights and methodes for making AI-images come to life.
You're welcome Mark
Fractal noise was huge playground in the 2D and 3D abstract art a lot of techno trance or cyber stuff artwork where made this way in the 90s with a lot of Blue and fluorescent purpose color, but that works for anything that look organic.
Thank you for this tutorial! You have a great talent! Hope to see more
Thank you! Cheers!
one of the best tutorials I have come across
Thanks for the kind words
Great tutorial on tge basics of texturing!
Glad it was helpful!
This was amazing‼️❤️
Thanks
Nice to see a fellow Irish man stuck into Blender 👍 In the middle of converting an AI image into a game character myself, hopefully finish it tomorrow 🤞
Nice one Ian!
What you do is incredible and really interesting, thanks for sharing it !
Thanks for the kind words, appreciate it👍
@@gameartexp You’re welcome !
Brilliant. I was wondering if this was possible. Thanks for the lesson.
Glad it was helpful!
This is a great tutorial. Thank you. My results were not as good but I see this as the start of a journey. Partly my generated egg had a lot of shine and not as much bone. I have now maxed out my mid-journey beta generating a decent egg... so that's another hurdle I'll have to jump.
The input image is key to the detail in the end result, keep refining your prompts, maybe try another AI?
My source assets are here BTW mcpoly.gumroad.com/l/xhzldp
Soo useful tips, thanks man!
No problem!
Loved this video. I design mechanical parts for 3d printing in Fusion 360. What you just showed blew my mind and seems fairly easy to replicate without much experience with blender. I'm definitely checking out your other videos.
Glad you enjoyed it! Thank you for the kind comments, I hope the tutorial sparks some cool ideas
Ray Length 10.0 and Ray Spread 0.0002 in Occlusion settings per Shader Map. Should give you a very nice occlusion map to work with!
I will try those settings, thanks for this!
nice job looks amazing thanks for sharing
Thanks for watching!
Literally can’t wait to try this. This video is gonna change lives, good sir!
SO MUCH AWESOME! 🔥🔥🔥
Nice one, hope it opens some doors!
Imagine if this whole process was automated, wrapped up as a separate software, further developed and improved and monetized. Would be a game changer for multiple industries.
It's getting there, quickly. Would be especially relevant to engines where polycounts are less of an issue, eg. Nanite in UE5
Yeah I want to make a mini for dnd out of an image but man… I’m just not quite up to this level of computer wizardry.
Wow, couldn't ask for a clearer explanation of the process. I'm gonna scroll the comments if someone found a way to get Ambiant Occlusion infos for free. Thank you so very much! Great stuff!
Shadermap 4 can bake geometry too, so you could export the egg model back into Shadermap and bake AO. Or, use Blender's baking tools
Free tools are the best, thank you sir !
You're welcome
I learned so much from this video!
Glad it was helpful!
Thanks mate, hella helpful!
No problem 👍
great tutorial, thanks!
You're welcome!
Very nice! Good job.
Thank you very much!
Amazing! this is gold content!
Glad you think so Daniel, thanks for the comment
Mate, thank you so much for teaching me this, my alien egg is rendering and I am so happy :)
Glad I could help!
blend indeed awesome
Thanks
My g, i sure hope you keep doing these easy to do tutorials! With all AI possible objects! i wouldn't be able to think if whats possible since idk 3D and I see you just uploaded an AI gun model in 3D so u hope you keep finding these objects that are possible to turn into 3D and please do a tutorial for the gun and others 😩😍🙏
Thanks John! The sci-fi pistol was for modelling practice really, I made that the old fashioned way using the AI image as reference. I have some ideas on some easier conversions though, subscribe if you'd like to be kept informed
Really well presented mate, I'm using the free software called Materialize to generate the maps. Not sure if its any better but seems to have a good range of parameters to get the most out it. Looking forward to see more videos. Subbed!!
Thank you, yep Materialize will also get you over the line!
thank u shar ur hard work
It's my pleasure
Great video, nicely explained. A better way to select vertices on both sides is to switch on x-ray mode (the two squares icon next to the shader view icons - top right of the 3d viewport) or Alt-Z. Wth that on boxing around will select all vertices on both sides of the mesh.
Great tip! Thanks Darren
Great video. You can also add displacement in texture editor, there is a socket in material output. Its a bit easier that way. And if you want to have more realistic look use Cycles render engine instead of Evee.
Great tips, I'm a 3dsmax user so still a Blender noob
can you try this using a video game character face?
I've tried this www.artstation.com/blogs/petemc/468w/midjourney-to-3d
If enough people like your comment I could do a video on it.
@@gameartexp I would love a video on it :)
@@chrisgreenwell3404 keep an eye on here or subscribe ;)
That would be amazing my! I’d love to see that tutorial.
@@thegeekclub8810 Ok I think I know what my next video will be
AI is going to make the more tedious parts of 3d modelling much easier, this is very cool stuff
Glad you liked this
Super useful! Liked & subscribed :)
Awesome, thank you!
This is exactly what I was looking for. I've been searching for something like this for weeks. Thank you so much for sharing this knowledge...... Subbed. Is it possible to do this on a plane or side of cube? Im trying to prepare STL's for laser engraving.
Absolutely, you can apply the image/displacement to any geometry that has UVs and enough polygon density to support it. Follow this tutorial with the geometry of your choice! Thanks for the kind words
i like to feed the texture color into the color for the subsurface scattering.
Absolutely, I used that method in some earlier work, just not in Blender. www.artstation.com/artwork/5B2gmz
I wish I could upvote it more than once.
Thank you
you really can't use common shortcunts or blender fields for convenient workflow but, man, you're so good still. the result is amazing. thank you so much for this. get some Grant Abbit tutorials for easy workflow and you are just unstoppable!
Thanks for that!
@@gameartexp Hey, could you advice please, how did you come by with displacement, normal map and othe jpegs?
I Swear... this is absolutely incredible..
Glad you liked it
@@gameartexp "Liked" isn't even the word for it. LOVED, is a better word.
i got a question though, say i wanted to use Zbrush or Zbrush Core "For some people who can't afford normal Zbrush" is there a way to use it for the sculpting part? like could i keep the Normal Map and Texture and stuff on it while in Zbrush? do you know anything about any of that? cause if you could make a Tutorial for how to use Zbrush to help enhance the sculpting part, i think it'd help people as well. i know the widest net has already been thrown out, cause you did a blender Tutorial here, but blender just can't offer as good of sculpting as Zbrush can currently.
@@Glitch-Gremlin Absolutely Zbrush/Mudbox could be used instead. I'd forgotten about Zbrush Core actually, the tools and high poly model management would be better over there. The benefit of Blender is that it has everything under roof and there's less hopping between applications but I'll look into including Zbrush Core next time around. Thanks.
@@gameartexp If you'd like a full version of Zbrush, i can get you a "Maxon One" Zbrush, Cinema 4D, Red Giant and others Sub for ya, it can only be used for Educational but for TH-cam videos im sure that'd work. ArtHeroes gives them out, you just buy one of their tutorials "One of them is only $50" and then ask them to set you up an Educational License sub, and then pay the $10 per 6 months, they say you only need to re-up it every 6 months, so basically $20 a YEAR for all those? great deal for learning them. but i got a sub im not using for it, so i could just give it to you and you can use it if you want, take over the account and stuff. or you could make one with them, too. let me know though if you'd like that.
@@Glitch-Gremlin Thank you so much, i appreciate the offer. I actually have a full Zbrush license so including it in a video should be no problem. Thanks again.
you're very good at copy paste, hope they can invent a AI add on to do the rest of the little work.
Can you explain a bit more please?
impressive,, subbed.. Love this..
Thanks for the sub!
Came for the tips, stayed for the soothing accent
:D:D:D
Loved your first video and this one is even more accessible but I have an issue I hope you can help with, I use mac! so is there a replacement/alternative for Shadermap that I can use you'd know of? Thank you in advance.
Ah I didn't mean to exclude Mac users, I don't use one myself! You could try Quixel Mixer - Mac downloads here quixel.com/products/mixer
wooow i very like your video
Cool, thank you!
This video is great! Even i could understand it without experience. The right side of the video was cut off so some things i want able to see what you clicked.
Sorry about that, an issue with the OBS capture settings - I watched it back before posting and it should be possible to work through with the dialog. Thanks.
You can use controlnet/stable diffusion to make normal/height maps for an image that might make this easier!
It might do! Tech is moving so quick this is outdated already
You probably know this already but you can easily select vertices/faces/whatever in the back when you go into wireframe mode.
The AI is amazing when it comes to creating textures and concept art. I use it to make my own textures so I don't have to buy them or use the free ones while my friend uses the generated output as concept art for a video game he is making.
Cool tip, thanks
What AI is it?
This is amazing, and genius tutorial. Don't know how you figured this out, but kudos to you.Taking a stab at this today. See if I can get one of my ai female cyborgs to complete 3d model. Two years about ,on Blender and again, don't know how you figured this out. Wish me luck. I'm old and I'm slow.
Glad it helped! Go for it, I'm about to upload a character tutorial that may help!
@@gameartexp Excellent. Watched and did the tutorial on the egg, substituted a character generated in Nightcafe. Took 100 credits to figure out how to get a model sheet created. You can use "model sheet" Unreal character metahuman render" as potentially useful prompts. Have Unreal 5.1 installed and it looks similar to Unity thankfully. Resolution is amazing. It will be some time to figure. Unity is hard. Have little coding skill. Use chatgpt to help create code, but it makes mistakes. No way around having to learn some coding. Back to the tutorial.I see the workflow, photopea to shadermap to blender. Put the character texture on the ball. Learned how to move and adjust the uv map and thank you for explaining that so well. I've done tutorials on it, that didn't click, but now see how that works. So far haven't gotten Nightcafe to do back of character. Model sheet shows front view and side views. Tried "model sheet, t-pose, three views, front,back,side " and it's night generating back. Best I've gotten is front which isn't always a straight frontal view, and two side views. Fingers on hand are deformed. Nightcafe has new algo, which is called SDXL. Uses 3 credits, so have been using 5.1 to test results. Have a couple low poly 3d character modesl to see if the texture will map to those. It's going to be hard to figure fingers. Looking forward to seeing your character tutorial.
@@joelstolarski2244 Great progress! As explained in the character video (live now!) coaxing out the right prompt can be really tricky
Amazing! How hard is it to make an object to be animated or to interact with it? Like running or shooting
Adding physics collisions is pretty easy in a game engine for a static object. I had a displacement map gradient scrolling along it in early tests that made it pulse slightly. Further work needed to animate it though, like rigging with bones or making blendshapes/morph targets.
Question: If you had the money, would you use something like Substance Alchemist for your bitmap to material conversions, or any other program for that matter? Or does Photopea meet all your needs? Thanks!
Yes is the short answer. In this video I used Photoshop, 3DSMax, Knald (for the normals, height etc.) and Toolbag for rendering th-cam.com/video/8uh-qFOi7lQ/w-d-xo.html
Substance would definitely be of use here and Photoshop is useful for the neural filters.
great video ! Does it work also for character model?
I guess you checked my other vids!
Thank you for this amazing tutorial! It's a very interesting workflow 👍🏻
No worries, thank you for watching
you have about the software. I personally enjoy learning so it was a little bit easier to do it over ti. But you’ll get there brother
Good to know!
Imagine the pain of the hen that laid that egg
oof
great video, how are you getting rendering inside blender so fast like this 09:11 while moving through the scene at the same time ?
Thanks. It's just shaded mode using Eevee, with a direct light for shadows and bloom enabled in the render properties
Awesome, is there any shadermap alternative for mac ?
Yes, check the video info for a browser based alternative
Is it possible to utilize these techniques and make a, lets say, a fantasy tree?
Or would the geometry be to difficult?
Anything with tendrils (branches in this case) that extrude outwards in different directions would be tricky. You could ceratinly do the trunk like this and then add branches yourself and deform it afterwards
Great video!!! I would like to try it. Where can i find the image?
In the description, there is a link to the scene files on Gumroad
Does this "tricky" only works with spheres? I have tried using a cube and couldn't make it work at all :( Great video thank you very much for taking the efforts for making it.
The hemisphere works well I've found, I've created heads etc. in this way. As long as your displacement works reasonably well on a plane, adding to a hemisphere will help pull it into 3D a little better. Some subjects don't translate well with this method.
For videogames it would be heavy to import to a game engine for a lot of subdivisions right?
It depends, UE5 could handle a high detail model with ease with Nanite. It should also be possible to user a medium detailed model in Unity, by using the normal/height maps with some real-time tessellation and displacement based on distance to camera.
Is this efficient for detailed CHARACTER MODELING? Especially when creating complex characters with MidJourney (e.g. aliens)? It would be cool to see a video on that
To some degree, have you seen this? shunsukesaito.github.io/PIFuHD/
th-cam.com/video/r6hoY0C-O7o/w-d-xo.html
Coolest. Santa. Ever.
🔥
What other type of objects are good for this method? like what shape do they need to be? I know basic shaped would be better
Objects that look similar from the back or front work well with this method. Complex organics or foggy scenes could be problematic, but in theory, if you can map the image onto some representative geometry, the process should be the same. For characters, you don't get side or rear views with AI, so you could either map the front image on to the back and be careful how it is seen in 3D or hand paint the texture for the back.
Amazing , do you think you could make another tutorial for those who would like to 3d print the file later? Would be amazing to resin print this one 😮 you made
All you need to do art the end is export the file from Blender as STL, then import into your slicer and use whatever your favorites settings are to print in resin or extrusion
@@gameartexp I’ll keep rewatching your video till I get how to make 3d and shape it like you did , amazing amazing work ! Is there also a place where one could understand the key words to use to get something as amazingly complex as yours?
@@gameartexp thank you , is there a way to transfer the shape from original images to skip creating a shape in blender? while it might be not as complex with an egg shape it would near impossible with a miniature lets say due to shape complexity? Thnx
@@MaksAMD TH-cam is as good a place as any to find tutorials on 3D modelling etc. Start with the basics ;)
@@MaksAMD If I understand you correctly, and you want to skip the Blender part, you could achieve something by displacing a plane primitive with the original images, but I doubt you could get much with it. Take a look at this: www.artstation.com/blogs/petemc/468w/midjourney-to-3d
🔥🔥🔥
Nice one
is there a way to 3d ai generated structures/assets (like houses) ? that would be crazy
I'm sure you could make a floor plan using AI that could be extruded, it would give you ground floor at least. There are also options for image to image and depth to image in Stable Diffusion which would be worth looking at
i have zbrush, but am having a really hard time getting this to work the same as you did in that program. do you have zbrush to do another tutorial in that program?
Hi there, I use Zbrush and may include it in a future video
you said spanner - good lad :)
Well, that's what it is!
How's the job market for 3d up in Ireland?. Haven't been on the island since 2020.
Pretty good, not sure it's much improved on 2020 though
Thank you so much! I have one question, you said that it won't work for every image, what's the main issue?
Thanks Fred. The issue is complexity. To make this feasible we need to be able to use the same AI image front and rear on the 3D model.
@@gameartexp Got it, thanks!
@@fredferkel9604 th-cam.com/video/r6hoY0C-O7o/w-d-xo.html
Sky is the Limit!!!
Please try it out!
@@gameartexp I will as soon as I can!!!
I remember I used to tell people about ai image generation but no one listened (because ai image generation used to be kinda trash but still impressive) and now people are starting to use them to make 3d models
I think everyone is sitting up and noticing now
Hi there! Do you think it could be with a shoe?
It would certainly be more difficult
based
Appreciate it!
Please make a video of making an anime character with this method and title blender in it or something would get massive views and nice video!!
I have a video in the works like this th-cam.com/channels/2MSBDFAjMjlUnnY_jn8gnw.htmlcommunity
travail de goré ca.
?
I'm still looking for an AI tool that will create 3D OBJ shapes from images without modeling. I've found free sites that will do humans, but nothing abstract yet. What if you generate the egg images in a series of rotations through prompts, then generate a 3D object with Instant-nurf or photogrammetry?
NeRFs could work, I've been testing them lately. LumaLabs AI, OpenAI and Nvidia are all testing text to textured 3D model right now
th-cam.com/video/r6hoY0C-O7o/w-d-xo.html
I wanna make Vi from arcane, does this work for it?
👍👍👍
👍
If i do that kind of egg im probably using substance sampler or designer to extract the normal Map and depth Map and color from the original design, first you model the egg in blender you UV unwrap you made a front projection of the original jpeg artwork add symmetry and let substance extract the volume , maybe some tweek in zbrush Can do that too, it's easy to do stuff liké that with an egg shape and zsketch for the RIB cage and spinal things.
Absolutely, that's the way to go if you are a subscriber to ZBrush and the Substance Suite. This video is primarily aimed at people who don't have access to paid tools
@@gameartexpthe good Thing is it work with freenstuff krita Can extract a lot of normal Map.
Holy shit, I just know how to model, then uv, then texturing, how many more ways of doing things are there?
There are many ways to model, or you could use alpha textures on cards, each AI scene calls for different approaches!
oh poor guy alt shift to select edge looop alt z to get xray to select backsides and o for proportional editing.
I hope you push control 6 for subdivide non color for displacement map ^^ awesome egg tho
Thanks for the tips!