The FIRST - Ultimate Spool Holder(s) for QIDI Q1 Pro - Stop Monkeying around and use this!

ฝัง
- เผยแพร่เมื่อ 22 มี.ค. 2024
- We'll address one of the two issues with this printer!
Help support this channel! / needitmakeit
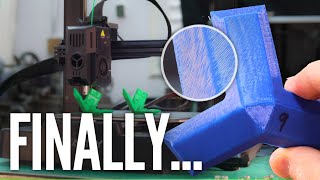
This is a solid printer, and the more I use it, the more I like using it. That said, there is a problem with the spool holder, it's too flexible and acts like a spring. When the printer vibrates just right, the spool holder bounces around and the spool will come off. So our mission for this video is to fix that and we're going to do even better than fixing.
I hope this video helped you and I hope that if you're in the market for a printer that you can get the best price. I don't know how many early-bird priced printers there are... hopefully enough for everyone that wants to buy a printer right away!
**Q1 PRO** (Supports the channel)
qidi3d.com/products/q1-pro?sc...
Monkey Bar(s) & Slim
makerworld.com/en/models/3904...
Another way to support this channel indirectly is through my affiliate links (where I receive a small commission). It helps me to continue to provide high-quality content videos. Thank you for your support!
NEW MIC (I bought this)
amzn.to/3vcMKAr - Rode Wireless ME mic (Saved me about 4+ hours/vid)
amzn.to/3NBFvZe - Mag clip (Super handy, but a little pricy)
BAMBU PRINTERS
shrsl.com/4aghz
CREALITY PRINTERS
shrsl.com/4aghy
CREALITY HYPER PLA
shrsl.com/4aghn
#QIDI Q1 Pro
#QIDI Q1
#QIDI 3D Printer - แนวปฏิบัติและการใช้ชีวิต


I had an idea this morning. A spool holder with built in scale (setable, zeroable) so you know how much filament you have left
Creality does make a product like that, I'm not sure of its performance, but it exists.
@@hetisbbq Thanks. and here I thought I have my million dollar idea
@@justaguy4788 yup.. pretty easy to have a load cell at the bottom.. if you have a standardised spool to know the actual weight of an empty pool.
Have a gander at these two projects.
Both GitHubs available in the video descriptions.
th-cam.com/video/w4BVC18xrVI/w-d-xo.htmlsi=j2Qy79YXif77sz1_
th-cam.com/video/h_89rF7SB6s/w-d-xo.htmlsi=bcDRMT9lpBdgyzfD
Quick clean work! I gotta up my 3D scanning game.
It was a bugger to clean all of that off, but it sure helped a lot to get something useable. Of course... I didn't show it being used to it's potential in this video, but I have big plans... I just hope what's in my brain can make it into reality.
@@NeedItMakeIt I just unboxed mine, and I'm realizing already, that a top cover height riser would be great.
I'll be staying tuned to see what else you make.
@@diedtrying Yeah, even a few extra mms would have been a good idea there, I've only had it rub when printing with PC filament, I suppose because of how rigid it is. another option could be to print another tube guide and then position it slightly closer to the extruder.
I think I'd like to do the filter setup next because it would benefit the most people.
How much higher do you think it needs to be?
@@NeedItMakeIt Makes sense on your PC filament. I've mostly been printing ABS, and I think that might also be rigid enough as I notice some scuffing on mine. Being that the primary filament that gets printed is PLA, this may be more of a niche problem, so from your perspective I think having it down the list makes sense. However, this printer, due to price and the heated chamber may buck the trend on what filament it prints the most.
My plan was to move it up just about 3-4 mm, likely with a lip that would catch the interior lip of the lid. My thinking, was if you break the top into the 4 corners, and design a piece that you just print 4 times and attached to each corner, you'd be able to ensure that the solution would be printed within the build volume (let me know if that doesn't make sense). If I come up with a solve I'll let you know. I think the difficulty will be in keeping a decent seal for heat retention, hence my thought on an interior lip.
Side thought - I've been considering adding some adhesive backed insulation to atleast the sides, and considering the top as well (I'm okay losing the transparency for better heat retention, given that it's easily removable). My shop stays pretty cold (even in the summer), and electricity is pricy, so I figure every bit helps; plus I'm sure it would add to temperature stability/lower wear on heating components (not that this is a driving portion of the idea). Have you considered this at all?
@@NeedItMakeIt Figured out a hilariously simple fix to the feed tube rubbing.
Added in a zipt tie 3-4 links closer to the print head from the closest clip (roughly bisecting the distance between the clip and the print head).
Left the ziptie reasonably loose, and now the feed tube has 4-5mm of clearance from the lid.
A cleaner fix, would be to print additional feed tube clips that would attach to the chain. Didn't seem worth modeling when a ziptie works fine though.
Like I said after the review of this printer, when I get back from traveling in a few weeks I'll get one of those printers and use your link. You make it look so easy!! Thank you for your videos.
Thanks Andy!
So far so good, I'm still going strong with this printer, even the micro-fuzzy skin didn't give it any trouble, that's not something I'd try with my other printers, I've only tried as low as .08 on my Bambu and it seemed to produce nice results there. I went down with this printer to 0.05 on the final ABS part and it looked, well perfect.
I wanted to work on a slightly better carbon filter next; the one they have is pretty good, but I think I'd like one that holds more pellets and also maybe we can add a Hepa-filter on there somewhere that easy to access. I'll have to think about it a little bit.
What types of parts do you normally print?
Top work Mike. I just got done printing my own side spool holders for my Max 3. As a side note, that little locking screw thing is for when you're using the Qidi dry box thing, which doesn't come with the Q1 Pro. That knob locks the stock drybox onto the stock spool holder.
It might be interesting to print one with a larger flange so that it stops spools from falling off when the drybox isnt being used
Thanks Stew, I had a look at that dry box and I wasn't really getting what it was putting down, it looks very strange, but I guess I need to see it in action before I get too judgy.
Update: I just had another look and it makes far more sense now. That's cool I was picturing that dry box being placed on a table. So I suppose if you have that attached, regardless of how much it flexes, it'll keep the filament in place, too bad they didn't send one with the printer. I will subjectively say that the monkey bars are superior. Very good to know for future projects though!
Thanks as always for your wisdom Stew!
That fuzzy skin on the abs is smart came out really good
The side mounted spool holders are definitely better than the awkward rear mounted ones
I have never tried a what I will call Micro-fuzz at that level, Orca was having a hard time generating that many movements and it took about 10X longer to send to the printer. The printer was able to handle 0.05 so far, I don't really see a reason to go anything less than that, but I might try it just to see if anything explodes!
The side mount is nice, it's working well, looks good, maybe just having it fold in would be a nice extra feature to have. I like my models to be as simple as possible so they're strong, but I think it's doable to do swing away, or even sliding tapered dovetails for the connections.
@@NeedItMakeIt ooohh dovetails on 3d prints, they would be very interesting to strength test.
Im gonna sell my ender 3 and ender 3 v3 se and buy me a qidi because your videos have convinced me its definitely a top grade printer
@@peaceorpieces8343 I don't know many joints that are both better looking and more functional than a dovetail joint, it deserves some attention for sure!
That's a good call, those printers were good for their time, but we can get a lot more out of these CoreXY printers, and with this one having active heating, it opens up even more possibilities.
The Q1 is at the level of print quality of the X1C, I've been printing with it non-stop, I just hope that they come out with an option to print multi-color or multi-material would be better, I can't say I know how that might work, but I'm interested to see what they come up with, I think there's enough demand for it.
I'd imagine that they'll expand their lineup with larger versions of this printer as well, so we'll see what comes down the pipeline. I'm happy that we're seeing competition ramping up so we can see new features and better printers at a good price.
Let me know how it goes when the time comes.
@@NeedItMakeIt there definitely gonna add a MMU of some kind
Bambu lab need to lower there prices if they think they can match the qidi?
You could buy almost 3 to the x1c
Please do keep making videos like these. Your technical expertise is really needed around here. I'm here since your Ender 3 mods, and your videos really helped me out with my projects.
Thank you, Mike, I really appreciated the process. subbed.
I love how you solve problems and you share your results and what you made. That is pretty cool Mike!
Thank you! Problem solving and inventing is fun stuff, and I would hope that on occasion someone gets an idea from the work I've done and they can build on it.
Wow that Carbon fibre spool holder is perfect and so clean and strong
You definitely deserve more followers!
That's the second video I have watched and now you have caught me!
Absolutely a cool video, and I agree the brick red is fabulous as well.
Great post again! Thank you, as someone said before, you make things look so easy... and pretty! Positive upon positive approach. Thank you very much.
nice work. first thing i'll print for mine when it comes
Nice clean design.
Very cool! Mine should be here by Monday and I will definitely be printing this out! Need to see where your filter mood is located!
Top notch! Thx for the video and your time making it! =)
The best 3D prep spray I found is "Dry Shampoo" in a spray can. Dirt cheap, covers the surface with a thin, matte, white powder. Easy to remove and doesn't leave sticky residue
Have you done a video on the fuzzy skin to add a finished texture to parts and prints while hiding layer lines?
I have done I think 2 videos on Fuzzy skin now, I was feeling as though it wasn't getting the attention it deserved and a fellow by the name of Willofthemaker suggested that we could use a finer fuzz to get a nicer print. Well I took it to the finest that the slicer could handle without crashing. That fuzz makes for a massive amount of moves and subsequently the gcode needed for the printer.
Looks great! I definitely want to print with more engineering oriented materials like ABS and PC. I live in a high humidity area and always used a homemade sealed filament spool feed on my X-Plus when printing with PC. Made a huge difference. For this unit I could see the benefit of making a support bracket that holds the Qidi filament dryer box at a suitable location
Unfortunately this Q1 printer didn't come with one. I wonder if a filament dryer off to the side might be the best solution? Filament dryers should also have a mechanism to seal them off so they can double as storage. I have some ideas and a storage place for filament would be ideal to include in the final solution; I will definitely keep your point in mind.
Thanks. I forgot to mention I subscribed to your channel and ordered a Q1 Pro based on your review. It was by far the best Q1 Pro review I’ve seen,…..and I’ve watched a bunch of them! I forgot to use the affiliate link when I ordered, so to make up for it I signed up for your Patreon channel. Looking forward to your upcoming content, especially anything you’re making with this printer😊
Looks great.
what brand is that red CF-PETG? i really love the shade of red that it is and was curious about if i could get my hands on any
Another great video. While the printer seems great so far I am puzzled how that spool holder made it through the testing phase. Lol. That seems like a huge oversight and would not have been too hard or expensive to provide a sturdier spool arm. Oh well, luckily people like you will provide some options.
ooo la la. I like your fuzzy spool holder!
Thank you for this
You're more than welcome, thanks for taking the time to leave a comment!
Amazing job as usual.
Can I please ask you what software you using to design your parts?
Great work, Thanks.
I don't have this printer yet, but I will order one very soon.
Now, what I don't get. Why design a spool holder on the side of the printer in a way that you still need all that space behind the printer because of the thickness of the spools?
I could imagine a spool holder more to the front of the printer.
Anyhow, great designs, and thanks for your effort.
While the original holder can be used directly on the back, your "double one" could be modified to allow two spools to stay there at the same time,so that filament swaps in prints with dual materials are easier
I should have taken a bit more time to allow 2 spools to be mounted at the same time, it would have been a bit more difficult, but it would have been pretty handy like you suggest to have 2 spools on there at the same time.
@@NeedItMakeIt I think this video was nice and focused on improving the poor holder provided.
Building on top of this video another one could be prepared where you shift the two holders by 2 cm towards front or to the right to have two spools. It would take little time so you can include a guide how to introduce a change filament macro. I think I saw a repository in GitHub called zippy or something about it.
A third video could be made where the enclosure is modified with a second hole to have a second Bowden get to the print head, for even faster swaps (the second Bowden would not have the tangle protection, obviously).
It would be a GREAT three video series.
I had an idea on a similar wavelength as what you're talking about, I 3D scanned the side of the printer and I wanted to have 4 spools mounted and enclosed on the side, it's a bit bigger project and the 3D scan was pretty hard to work with, I have a model that's pretty close. We're starting to get into humid weather here in Ontario Canada so having a solution is a good idea and prevent the need to constantly dry our filaments. Too bad they weren't wax coated or coated in some manner to prevent so much absorption.
@@NeedItMakeIt it's humid the whole year here in NL so I put spools in a SAMLA box sealed and with a lot of silica. It never gets above 15%.
About the model: have you asked QIDI? if they sent you a free printer they may be more willing to give you a model
Anyway, I still hope a video about filament swap in the Q1 will come :) In the meantime, may I suggest to load the filament from the side spool not from the top but from the rear? it will require less bending of the filament.
Nice work, I will be printing this when mine comes too. I have no idea how they let it ship with the design they have now.
Thanks! My best guess is that they had something else in mind, maybe a completely rear mounted spool but then decided last-minute to change it. I'm just guessing, but in any case, I've reported it back to them and they're looking into it, and we have a stop-gap solution, back, side, or back-side ;) that should all do the job well.
I think if they had made the arm just a bit more stiff, it would have worked fine, but I have had a spool work its way off, but I was lucky that I was sitting near it and I just happed to check before leaving it for the rest of the night.
Still, overall a nice printer for a good price that's hard to beat. Focus on what's important and this is the result, nice work on their part.
Next time, you should try scanning spray; it's easier to use, less messy, and disappears after a few hours.
What brand filaments did you use?
according to my experience it is not a problem to ask Qidi for a 3d model of the printer. I got this for my X Max 3 motion system as well. No problem.
I haven't had any success so far, but that's great to know, I'll have to follow up with them. Thanks.
The problem with the spool in that first orientation is the filament exits the spool at an angle, across the edge of the spool, and a new roll of filament will get tangled as the filament falls off the spool..ask me how i know.....i too did not want to use the arm that the printer came with, so I just slid the spool holder into the back of the printer, without using the arm. The benefit of the arm is that it puts the PTFE tube that the filament goes through exactly in line with the spool as the filament exits the school. So it feeds perfectly. I can only imagine that the second orientation you have for the spool holder, will be even worse having to come off the spool and changing direction around the corner of the printer.... No thanks, I'll keep the arm that it came with. It works perfect.
That's cool, I appreciate your thoughts, since this is something that has been done for many printers already, I'm quite confident that it will work out fine, it has been working with no issues since the video, but there is always a better way. I think someone came up with one that comes off of the top, that seems alright for a different option as well.
So I just purchased the q1 pro. How do I get a profile for orca slicer for this printer? Also your videos helped me make my choice from the k1c and p1s. As I dont really have a need to peint multiple colors. Thank you for the informative video. Also have you ever thought about printing a handle for the door?
It looks like someone has already submitted the Q1 Pro profiles for Orca. They should be there in the upcoming v2.0 release of Orca. If you want them sooner you can use the nightly build version of Orca until the v2.0 release is finalized.
@stew675 thank you really appreciate this.
@@kaostheary232Actually, I just checked. The v2.0.0RC image of Orca is already live and has the Q1 Pro profiles included. You don't even need to use one of the nightly builds :)
@stew675 ok thank you will install it.
It looks like you could flip the spool 180 degrees when side mounted so the filament feeds from the back which looks easier for the printer to pull in. Any reason not to do this?
Can you go add the step files to your makerworld download?
I wonder, why print from a roll that is not stored in a filament dryer? I've had so many issues with wet filament, the first thing I'd design is a simple platform to place a filament dryer.
That's best for sure, if you can store it in a dry box or a dryer. Most companies should be coming out with something for storage and for multi-color so we'll see what they do. I have separate dryers myself which I keep off to the side and have to prep before I print, it's a bit annoying but I find that they're a bit too large for my bench, having them above or attached to the printer is a good idea though.
The path of the filament when the spool is on the side seems far from ideal. A longer PTFE tube could help, but would likely benefit from having some kind of guide to get the entry-point pointing in the right direction approximately centered over the spool ...
Sure you could add a guide system and improve it. From the printing to-date so a little more than 10 prints with this system in place the guiding seems to be fine, there are no severe change in direction and extrusion is quite good.
Feel free to remix and adjust as you see fit or add come guides, I'd be interested to see what you come up with. My usual approach is to make everything as simple as possible, but that's not always the best either.
For the original holder, you can actually slot in the original bracket into the back without the floppy arm!
Got it for a day now and been awesome so far
Yea, but then you have a giant dingus sticking out the back. I have my Q1 pro on a 24" workbench, there's not enough room behind it for that.
my solution is to mount my spool above the printer though, as I'm in the process of building a multiboard grid wall, so I can just put a spool holder up.
I'm new to 3D printing but I just can't grasp why anyone would want to keep the spool in contact with any smaller machine? My V3KE prints improved noticeably once I took that unwanted mass/vibration away.
On a bigger printer it's not likely to cause much of a problem, on the KE having it mounted above the top rail wasn't the best choice, those posts are not well enough supported and there is too much weight up high. In addition, there is no active resonance compensation. That top spool holder was acting like a spring and causing the spool to move far more than it should and I'd have to agree that it should be off to the side, not attached to the printer is better.
The Q1 is pretty massive in comparison and it has active compensation, that stock spool holder still wasn't a great idea , the arm came out way too far and wasn't stiff enough, giving that same spring-like effect.
An ultimate spool holder would be that one which constantly provides *zero filament tension* while printing.
Sure, and you'd then need to remove resistance from the tube as well. The way to do as you suggest is to have an extruder motor setup to run simultaneously with the hot end extruder, essentially a Bowden and DD setup combined. I think it's possible, though I don't believe it would yield any improved results, there simply isn't enough resistance to cause anything near a problem for this extruder.
I am working on some other ideas which might meet your criteria a little better though, I'm struggling a bit because there are so many different sizes and materials of spools and each of them have a different method of construction.
Sadly the discord link in ur profile is broken - can we get somehow a new one
3:00 TRAY sa may? Bruh 😂😂😂
Finally someone commented on it!
@@NeedItMakeIt Fr? ANW I was the first one SuperVinlin
@@TS_Mind_Swept Yup, I thought it would be a real hit seeing as how I have almost no hair... I need to work on my humor I guess. Nice work!
@@NeedItMakeIt I mean there's a number of other reasons you might have it, I was mainly laughing at the pronunciation SuperVinlin
Unboxing my qidi1pro today. Just subbed and really appreciate you making content for a new printer, both the video and the monkey bar. I'm planning on printing the monkey bar slim first.
Thanks!
I'm not sure why you chose to print it upside down. If you printed it right-side up, you could have put a proper flange on it. I don't trust those little tabs to hold the spool on. Maybe if they were a little wider I'd have more faith in them, but they are just barely holding the spool. The spool being an inch lower would not cause any problems, so I'm just wondering to myself why you imposed the limitation of printing it upside down. You could have also designed it to fit in the original bracket, but I feel like that was an intentional decision to have it solidly fastened to the printer. Either way, I don't like your design, but I like your videos.