Raptor II: Test Block & 3D Printed Axles

ฝัง
- เผยแพร่เมื่อ 27 เม.ย. 2024
- ▶My Fusion 360 Course: www.thehardwareguy.co.uk/fusi...
▶▶Become a Member, get EXTRA content: www.thehardwareguy.co.uk/memb...
▶▶▶3D Model Files: www.thehardwareguy.co.uk/down...
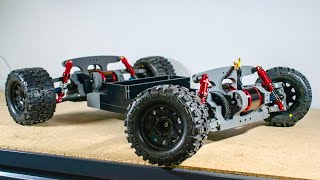
In this video I show you my current progress on Raptor 2, the 3D printed RC car. I have managed to successfully print and assemble a test block that can be used to identify design problems. The main purpose of this test block is to determine the feasibility of 3D printed gearing and 3D printed axles/driveshafts. I have decided to 3D print the parts in PETG.
Timestamps:
00:00 Intro
00:48 Design
01:43 Printed Test Block
02:56 Test 1: No Wheel
03:14 Test 1: With Wheel
04:11 New Coupler Design
04:19 Test 2: No Wheel
05:00 Test 2: With Wheel
06:12 Final Thoughts
Parts:
- 4 x ProLine 2.8" Trenchers
- 22.2V 5000mAh 65C/130C LiPO RC Battery Giant Power
- FlySky FS-R6B: www.banggood.com/custlink/GvG...
- Matek FCHUB-6S: www.banggood.com/custlink/GDG...
- iMAX B6 80W 6A Lipo Battery Balance Charger: www.banggood.com/custlink/Gmv...
- Racerstar 120A ESC: www.banggood.com/custlink/mm3...
#fusion360 #RCcars #3dprinting
Sign up for my newsletter: www.thehardwareguy.co.uk/subs...
Where I get my Music (Awesome for Creators): www.epidemicsound.com/referra...
----------------------------------------------------------------------------------------
▶My Links:
Website: www.thehardwareguy.co.uk
Instagram: / hardwareguy_
---------------------------------------------------------------------------------------- - วิทยาศาสตร์และเทคโนโลยี


Watch Raptor II in action: th-cam.com/video/cYPMdj0pcXA/w-d-xo.html
That's awesome project, I already designed a chassis for my 3d printed ford, I will print it soon
Nylon isn’t that difficult, one of the secrets is print it dry, as dry as you can (I’ll put in the oven at 70-80’C for a couple of hours first), slow, and with NO fan or draft of air at all (will cause delamination issues, especially with CF based nylon!)
Taulman Bridge is pretty easy, as is their PCTPE...
In any case I’d recommend learning to print with it, it is on another level in terms of strength!
Cool project mate!
You need to have the 2 pins on the axel 90 degrees appart to cancel out some dynamics, which will reduce a lot of vibration
Amazing
Very cool!!!!
hi, awesome project, it would be intersesting to test if a stell cable like bike shift cable would be able to be use as an axle for a one mechanical part instead of 3
Printing in Nylon will definitely give you better results, the material is self lubricating so would reduce heat build up between the rotating parts, have you tried creating a print in place part with the shaft and the couplers. The one thing that makes nylon difficult is moisture, it needs to be stored in an airtight container like a cereal box along with desiccant in the bottom, I use a food dehydrator to dry the filament before use. Also to improve the mechanical strength of the part you could anneal the parts by heating them up and allow them to cool slowly reducing the residual stresses in the part. Good video by the way
Hey great video man, i have tought about printing with Nylonx to replace weaker parts and am getting a metal hot end for my printer for that. I think printing nylon is really just about the melting temperature that needs to be higher.
Apologies if this is mentioned in another video but what do you print the parts at regarding infill? Solid or a high % infill? I am new to the game but wanting to make my own car from scratch after making a few kits. I was planning on 3mm base plates in PLA so was rather shocked when you said you were going 10-15mm haha.
Try Taulman 910, it’s as tough as old boots. Not to difficult to print on your MK3S
That is fantastic, keep it up bro 👏
As an idea try and rotate the print so its printing horizontally, this will put the print in its strongest orientation and stop it from delaminating
can confirm this helped a lot! I printed the couplers in two halves and glued them together, no breakages at all! check out my most recent update👍🏻
Why does the open coupler in the universal joint work better? Like theoretically from a physics standpoint.
You migth want to try out Spectrum 275 ASA , I find it quite different to normal ASA (also settings) but in the end nice prints and stronger layer than PETG but a bit more flexible and does not shatter like the part in your video
Also, having a steering linkage holding the knuckle in place would probably stop a lot of the vibrations your seeing with a closed coupler..
It's also good to have it run as smooth as possible before you add a steering linkage, otherwise, that force is just being endured by the steering coupler instead which is not exactly a great idea.
Try to increase the thickness of the coupler ,by removing the steel nuts and use Threading on the part itself.
Anyway your I like your design and I believe you can make it work ....
Thanks for sharing your experience and trial.
like the tarmo4... that part is not getting much force in that joint, at least not in the direction where the nuts are holding the screw on...
Plastic thread wears away easily under heavy vibration so it a a bad idea... it’ll become loose in seconds! I tried it
Just wondering what is the foam you have on your desk for noise reduction I'm looking to get some for my printers
A concrete block actually works much better as long as your printer has rubber feet.
You mentioned not knowing whether you can print nylon on your printer. I also have a Prusa mk3s and I print in Nylon all the time. With normal Nylon, you can sometimes get a bit of warping but with one of the fibre filled ones from Matterhackers there really is no longer a problem with warping, just make sure one change you make to the printer is a hardened nozzle, personally, I use the Olsun Ruby, even though it is really expensive it is worth it as it doesn't wear down as much AND there is a lot better conductivity due to the brass still surrounding the inner Ruby. I have a highly 3d print modified tt02b car which uses a waterproof (504 can) 1406 motor and Mamba X from HobbyKing and I'd love to make an altered version of your car in the future to replace my TT02b using 4 of these motor and ESC setups. They have highly optimised hall sensors already on them and the Mamba X takes the information and updates the motor live as your hall sensor will. I think I'd have to make some custom firmware for the ESCs but I might be able to use these in a similar setup you are working on. I'm starting Mechanical Engineering at the University of Birmingham next week (UK) and I would love to collaborate on this project with you, especially as I could do some aerodynamic and stress analysis simulations as I have Solidworks training and certification so I can actually do that. Can't wait to hear back. Many thanks, Elliott Dyson. :D (I know it's a big comment, sorry about that). 🤣
Just one more thing, those premade metal dogbones, and axles are a lot weaker than they look. I had some really thick hardened steel ones in my TT02B before I printed them out of Nylon X and they ended up twisting and then snapping under the immense torque and weight of the body, the tiny part that screws into the wheel hub was always the worst, too much weight on such a thin threaded piece of metal, won't stand a chance in that beast of a car. The Nylon X is still holding up great. :D
Grym
Dude, can you invert your Knuckle pivot bolt and nut assemblies , that way the nut is not in the way of your shaft hub and use a taper M3 bolt head so you get more clearence.
Hi man thanks for the comment! I did think about that... but if I invert them, the knuckle will have to pivot on the outside of the suspension arms. This causes clearance issues when mounting the wheels.... the nut would make contact with the inner wheel and reduce steering angle! I have a better solution now, update coming soon👍🏻
Does anyone know a Tutorial on how to design those gears?
processed plastic in the acetone for a couple
How did you add that motors in fusion 360? Did you draw them by yourself?
Designed them from scratch! Files are available to subscribers of my website👍
Drive shafts are a weak point. Therefore, in my 3D printed Hammer H1 project I use metal shafts from traxas slash.
Wait, you bought those overpriced AF 100$ Traxxas metal shafts?? 😂
you may want to use 3mm nails instead of the cut off M3 screws as the thread will wear away the plastic over time
Or use a hex head bolt and locknut, like the tarmo4 project, smoother on the plastic... also, are you greasing up all contact points..?
Also, if you “balled”/ rounded the ends, you could probably get the same effect with a closed coupler, which in turn would be stronger than an open one
Or use nylon with its self lubricating properties, then there will be less wear. Also, there is one that is enthused with Kevlar fibres that has great friction/wear resistance.
You may want to consider a lighter tire. Those belted trenchers are very heavy and are going to be a lot more prone to breaking things in the drivetrain. Also polymax polycarbonate is fairly straightforward to print and extremely strong and tough.
I weighed them against my cheap Chinese wheels, the trenchers are only 10g heavier... I was surprised!
@@thehardwareguy then the Chinese tires are heavy as well. The belted trenches are notorious for being heavy. There are definitely much lighter options out there.
@@thehardwareguy try the dboots backflip LP tires. Pretty light but still fairly large.
I ruled out 3D printing axles and I’m now using hardened steel racing axles! Check out my most recent update! I’m confident that the gearing will be fine, especially printed in PolyMax Polycarbonate👍🏻
I would recommend Polymaker CoPA in case you do try nylon
I have tried CoPA it doesn't stand up quite as well as the Matterhackers stuff.
Really? Thanks for the info. Is it easy to print too?
@@santiagoblandon3022 Easier than CoPA, especially the ones filled with Kevlar/glass/carbon fibres but you should only use the fibre filled ones if you have some sort of hardened nozzle
You should try overture nylon or polymaker nylon copa. They are both crazy strong nylon 6 and nylon 6.6 copolymers.overture is cheaper though and my personal favorite.
Ps:Follow printing instructions on the packacking, particularly bed temp, its very important. They are NOT a normal nylon. If you print them like other Nylon itll be a catastrophe lol. Just use a little hairspray if you have small details that you need to stick.
Did you consider using PC Blend by Prusament?
more recently I've been using PolyMax Polycarbonate for the parts under most stress (couplers, knuckles etc.), much stronger! I wouldn't print the main chassis in PC because it's very expensive and a pain to print, even on the Prusa!
har du set hur trexxas löst det
try baking the shafts in salt :)
What 3D printer do you use for this RC Car?
Prusa i3 MK3
What is the name of the stuff like roller at 2.12?
Roller / Needle bearings
@@thehardwareguy thanks
if you make the drive cups thicker then it might work better
Tried it! Problem is that it limits steering angle too much
PETG has very low impact resistance, try to use Nylon or ABS
You are too humble for the work you've presented. Must engineers would struggle to achieve your results
ASA, ABS or Nylon for you
Make it bigger for real 🚗😁
5:10 Hope your behind a polycarbonate screen
I was hiding for sure
Bout time
Im making my own RC car project. I wanted to print as much as I can, but now I can tell you that some parts have to be made from metal. I ended with making CNC for aluminum.
Rustler axle wheel's
ABS AND PLA+ work best
Polycarb or Nylon will work the best by far. Bit trickier to print though
😍👌👍
CarbonX, NylonX
Your u joints are out of phase and the output shaft is not rotating at the same speed, it's oscillating in contrast to the constant speed of input side. There's a good you tube video that explains how that works (an old guy with a credit card, some tape marks, 3 gears, an axle, 2 uni-joints & motor somewhere...)