Woodturning | Emeralds and Rubies

แชร์
ฝัง
  • เผยแพร่เมื่อ 28 ก.ย. 2024
  • This bowl is available for purchase at: formanwoodwork...
    _____________________________________
    Today's video: Hello, friends! After proving that I could indeed pull off a board/economy bowl two weeks ago, I decided to really test my limits and make something much more complex. And, oh boy, did this one take a lot of work! I lost track of how many separate steps there were in making this bowl, but I think it took the better part of two weeks to complete from start to finish. For this project, I used 3/4-inch redheart and 1/4-inch red oak wood. I first made 3 separate planks of redheart and oak glued together. Once dry, these were cut down to size using my miter saw (I really need a band saw for this sort of stuff), and additional red oak pieces were glued onto the inside surfaces of the planks. After another day of letting the glue-ups dry, I chiselled down the excess oak to flatten the planks, and then I hot glued all the planks down onto a mould for the resin pour. For the resin, I went with an opaque emerald mica that I felt complemented the redheart very nicely. This was again left to cure for 24 hours, and once hardened, I sanded the whole board flat, mounted it on my lathe, and began turning the rings off. The angle I used was somewhere between 45-50 degrees for each ring (couldn’t get a perfectly precise measure), and for the majority of this process, I used the same jig I built in the last uploaded video. My parting tool, however, snapped in half while turning off the second ring (this scared me half to death when it happened), and although I’m still trying to figure out how that occurred, I resorted to using my 1/8-inch parting tool for the final ring (which worked surprisingly well!). Once all the rings were cut, I connected them all together with epoxy resin between the seams and again left the piece to cure for 24 hours. After this, the rest of the process was quite easy. I trimmed down the rough edges on the lathe, sanded the piece up to 2000 grit, and finished the bowl with several coats of Waterlox.
    This might be one of my favourite bowls I’ve ever worked on. Despite the many, may hours I sank into this, the whole process went extremely well (minus the broken parting tool), and I absolutely love the final result! For a while, I had considered using a blue mica pigment (light or dark, I couldn’t decide), but I’m very happy I went with green in the end. I just love how it looks with the redheart.
    I’d love to hear what you think down below! Should I have used some different colours?
    _____________________________________
    Want to use the same pigments shown in this video? Check out the following affiliate code for a discount on SquidPoxy products! squidpoxy.ca/?... _____________________________________
    Check out our Instagram! www.instagram....
    _____________________________________
    Key equipment/products I used:
    Rikon 70-220 VSR Midi Lathe: www.leevalley....
    Woodstock 1/2 inch bowl gouge: www.amazon.ca/...
    Hamlet 1/8 inch parting tool: www.elitetools...
    CA Technologies Resin Casting Pressure Pot: www.finishsyst...
    Alumilite clear cast: www.alumilite....
    Waterlox Original Varnish: waterlox.com/o...
    Mould Material
    Foam Core Poster: canada.michael...
    Plastic Poster Sheet: www.michaels.c...

ความคิดเห็น • 52

  • @ThePapa1947
    @ThePapa1947 ปีที่แล้ว +2

    Looks great with a dandy finish. I have never used Waterlux and think I should give it a try.

    • @formanwoodworking
      @formanwoodworking  ปีที่แล้ว +1

      Thank you, Gary! Unfortunately, it's a bit time intensive (it typically takes 2-5 coats, depending on how much finish the wood soaks up), and the fumes leave something to be desired, but I've been largely pleased with the final results.

    • @ThePapa1947
      @ThePapa1947 ปีที่แล้ว +1

      Thank you I guess it is still worth a try. I am really liking the Minwax Polycrylic as a nice deep clear look.

  • @FranWhitten
    @FranWhitten ปีที่แล้ว +2

    Absolutely no other color would do but the emerald! Such an exquisite bowl. Wish I could afford to purchase it! Thanks for sharing.

  • @barry.w.christie
    @barry.w.christie ปีที่แล้ว +3

    I could hardly see your pencil lines for parting off the rings 🤣
    What an absolutely stunning creation, the colours are just fantastic and compliment each other perfectly 👍

    • @formanwoodworking
      @formanwoodworking  ปีที่แล้ว

      LOL! Yeah, I should put some more pressure next time ;)
      And thank you, Barry! Glad you like it!

  • @mjrulez100
    @mjrulez100 ปีที่แล้ว +1

    Just simply a very beautiful bowl. Great work.

  • @MASI_forging
    @MASI_forging ปีที่แล้ว +2

    Outstanding work 👍👍

  • @AllenOxendine
    @AllenOxendine ปีที่แล้ว +1

    Beautiful Piece and interesting process. Full View and Like 👍

  • @giacintomantovani2993
    @giacintomantovani2993 5 หลายเดือนก่อน

    These men are artists!

  • @TheNonoca
    @TheNonoca 5 หลายเดือนก่อน

    This is stunning, congratulations!

  • @wellingtonvasconcelos5491
    @wellingtonvasconcelos5491 ปีที่แล้ว +1

    Wonder! Great work of art 🇧🇷👍👋👋👋👋👋👋👋

  • @jamnjef1
    @jamnjef1 ปีที่แล้ว +2

    real nice bowl Davis PS. just bought stock in glue sticks LOL😊😊😊😊😊

    • @formanwoodworking
      @formanwoodworking  ปีที่แล้ว

      LOL! Yes, I think I saw their price is way up today!
      And thanks, Jeff!

  • @shawncrane7448
    @shawncrane7448 ปีที่แล้ว +2

    I don't normally like green, but that is beautiful!

  • @theUcane
    @theUcane ปีที่แล้ว +3

    WOW! I couldn't figure out how this was going to come together. It's beautiful!

  • @kennypool
    @kennypool ปีที่แล้ว +3

    Another masterpiece 😮

  • @alanlucas4964
    @alanlucas4964 ปีที่แล้ว

    This is gorgeous! Stunning. I love your work with resin. But where did the central red wood come from? Because as you were assembling the rings at 8 minutes and 11 seconds in, the wood used as the centre was a lighter colour. Curious, as I might have a go at this myself. Which should be a giggle, as I'm just starting out in woodturning!

  • @timbutler3733
    @timbutler3733 ปีที่แล้ว +2

    Wow ... nice, good job

  • @CraigMackey222
    @CraigMackey222 ปีที่แล้ว +2

    very nice 😊

  • @timponder7487
    @timponder7487 ปีที่แล้ว +2

    Gorgeous bowl great job

  • @valeriefuqua4641
    @valeriefuqua4641 ปีที่แล้ว +1

    Absolutely beautiful! I Love it. I also love the name. So beautiful.

  • @jay-in-az
    @jay-in-az ปีที่แล้ว +2

    Well done! Like the design.

    • @formanwoodworking
      @formanwoodworking  ปีที่แล้ว

      Thank you, Jay!

    • @jay-in-az
      @jay-in-az ปีที่แล้ว +1

      @@formanwoodworking do you have a set angle you use for cutting the layers?

  • @marycatherinelebouef-op4hf
    @marycatherinelebouef-op4hf ปีที่แล้ว +1

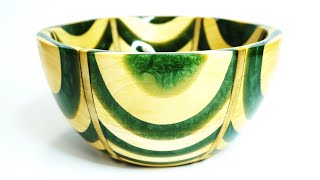
    Another absolutely gorgeous piece! I love, love the woods and the resin colors you chose! These bowls look Italian, 🇮🇹 so beautiful and full of color and shine! Marvelous work sir!!

    • @formanwoodworking
      @formanwoodworking  ปีที่แล้ว

      I did not see Italy until right now! And now I can't unsee it, lol!!

  • @rustienielsen6803
    @rustienielsen6803 หลายเดือนก่อน

    wow

  • @pennymartin3821
    @pennymartin3821 ปีที่แล้ว +1

    Very beautiful and engenious. I say 10 stars 🌟 🤩. Love ❤️ it thank you.

  • @teresaferia4047
    @teresaferia4047 6 หลายเดือนก่อน

    ❤❤❤❤❤❤❤

  • @lyndaowen2154
    @lyndaowen2154 ปีที่แล้ว +1

    Absolutely beautiful work! Thank you for sharing your talent

  • @frann.8879
    @frann.8879 ปีที่แล้ว +1

    Magnificent work-these colors are gorgeous!👌👌😁😁

  • @angelalewis3645
    @angelalewis3645 ปีที่แล้ว

    Those camera angles of the bowl with you and the chisel on the other side were unexpected and really cool!

  • @josebezerra9579
    @josebezerra9579 ปีที่แล้ว +1

    Perfeito

  • @SylphBeliver
    @SylphBeliver 3 หลายเดือนก่อน

    Now, THAT is ART!