DIY live edge table top - how to glue two slabs together the right way

ฝัง
- เผยแพร่เมื่อ 31 ต.ค. 2018
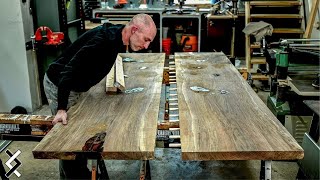
- A step by step process showing how to glue together two live-edge slabs of wood into a table top.
In this video I'm going to show you how to properly glue two large slabs together to make a table top, sharing with you the knowledge I've gained over many years of woodworking experience. Thank you so much for watching!


How was no one else stressed out about his glue up time!?! Titebond 3 or not, I would have been loosing my mind! Thanks for the video!
I see the comments about sound quality or the video being sub par or you talk to much BUT I think this is perfect and I like seeing a video of a good carpenter making a great project and forgetting a couple minor things or not having a polished script so just talking away and explain things as they pop up. I didn't come here to see an expert youtuber show how perfectly things are done with a million edits I came here to learn and I've seen good tips not one off the bigger youtubers give. I feel like my grade 9 shop teacher is showing me to a live edge table glue up and a lot of you don't get that either because most schools cut all industrial arts and home economics programs out. Good job man hot to see more.
Love the video. I see some things I might do in a different order, but I like the way you presented the information. I particularly like the method used with the sandpaper on the blocks to protect the edge. That is exactly what I was looking to learn.
Loved this! Great instruction. Thanks for including the rationale for the many steps. I'm also a Puget Sounder. Everett area.
Wonderfully informative and explained!!
Thanks so much for this video. doing my first slab glue up and this video gave me so much information i needed. Thanks a million times over.
You saved my ass with the L shaped blocks with the sticky back sandpaper to save my live edge during my glue up!!! I seriously can’t tank you enough!!!! Great video very appreciated
This is some GOOD info....thanks for the vid.
Thanks for the helpfull information!
You have a killer workshop.
wonderful information. You take your time in explaining and that really helps.
Great video! Doing my first slab and great info that you shared! Thx
this was great! I did learn a lot from this and you. Thanks for sharing!
Great video! The sandpaper edge protectors for live edge glue ups are a great idea! Just made 12 of them. Don’t even let the rude comments get you down. This is the best video I could find for live edge protection!
Thanks!
I thought the same thing, I’ve glued workbenches but I’m trying a live edge for the first time and I was puzzled about clamping without damaging the edges. What material/wood did you use for these corners? Don’t they bend/flex when you start clamping hard?
Thank you for sharing.
hello sir. That was extremely helpful. Thank you for this video.
Very very interesting and well explained
Great explanation of diy man. I’m about to do my first one for my boss this helped me tremendously thank you.. subscribed !!
Great job!
You’re in the NW, I’m subbing no questions!! Good to see another woodworker nearby! 👍🏾
Thanks so much for putting this video out! What do you typically use to make your cauls?
Great video! At the end you commented that you forgot a few things. One that I noticed is that you carefully put wax paper between the bottom cauls and the table top to avoid gluing the cauls to the table top, but you didn't do the same for the top cauls (oops). How did you separate the top cauls from the table top after the glue dried? And it would be interesting to see how you flattened a piece this big after the glue-up. Unless you have a stationary planer big enough to run this through, the options seem to be hand planning or sanding. Which did you choose, and why?
At the begging, you ran that board across the jointer! That jointer is bigger than my shop 🤣🤣🤣🤣🤣
Good info
Bravo fine job young man👍👍
I’m a first time watcher and now subscriber. You are a great teacher. You deserve a ton more subscribers. Wish you luck with your channel. I enjoyed this video. Thanks
Very helpful quick question I see you did not use biscuits for the glue up..?
great video, i'm much more confident after watching this to start my glue edge slab projects. I really like the idea of the contoured sticks to clamp it down across the table width. Is there a certain radius you used on the contour? it surely didn't seem like much and I would believe you used a hardwood vs a softer wood like Pine for these. Thanks for your content!
thank you so much for your videos. people like you help people like me learn. just a request, improve the audio to make us hear your directions better. I'm waiting for new videos, best regards
Do you have a video on making the cauls so they are consistent?
Great video and information! Thanks! Question: first time gluing two large slabs (each 24x110x2). Each need a few bow ties. Do that first, then glue slabs together? Or glue slabs first...? Thanks!!
This is THE WAY.
Step one. Buy 78 clamps. Step two: Use all of them LOL. Videos like these really go to show the levels of mastery with woodworkers and why you pay as much as you do for good furniture.
I am new to this but I thought you had to also apply clamping pressure from the underside as well. Also, the reason he is using the blocks was to protect the live edge. Do you not have to worry about the clamps damaging the underside face? Thanks.
Awesome Video. Nothing like it . You cover it very well. I would love to ask you questions., are you on Instagram? So this live edge is not overly thick, wondering how it does after you release the clamps.. you made it straight and that’s impressive, does it bounce and become wavy, like a rebound effect? Do you have to sled plain the heck outa it !? This video ensures me that I can accomplish my joints . Your teaching is respected 👍🏼👍🏼
I see from the comments you don’t answer questions, I wish you did. Trying to teach and show. Sound quality was very poor. I appreciate all the detail, but missed far to much detail because of the sound quality, but thank you as it’s great information.
Great video, The camera guy has to get in there a little closer and show the things you are talking about One Question how did you get the crown on your calls , ... Nice job ...Just Subscribed
What radius did you have on the horizontal slats?
Does the torsional strain on the wood or glue joint resulting from this approach ever later lead to cracks?
This was just the info I was looking for, I'll be making a table out of a tree from my yard eventually...the wood is drying now. Thank you!
How did you cut the crown in your ribs to get then exact or near so?
Man I wish I had that many clamps!
I just use 2x4 material from the local supplier. I look for the material that is as knot-free as I can find and preferably plain-sawn on the wide face. Thx.
How much of a radius do you put on the boards you use
One of the best vids on glue ups I've seen. You're good! Blow hammer and bowed culls, next time for me. Well done for your fist vid!
Hello how are dey tree. And haw big its your shop? Good lock
And old friend of mine lives on Puget Sound and is a woodworker. Maybe you know him. His name is Larry Marin.
I shall never again worry about the time it's taking me for a glue-up. I was having a heart attack at 15 min. I notice you haven't yet made the caul video. Is that coming soon - I hope?
He should stop talking and proceed with the damned job.
Almost forgot - I mill all of them four-square to 1 3/16" thickness. The uniformity makes everything easier/flatter during the larger glue-ups.
Nice video. You should consider a mic for the narrative as it is pretty low and difficult to grasp every step
What is the radius on the cauls and how do you make them consistent ?
This only works if you have 1,974 clamps. I do not. 😂 I tried cross board like that on a 1"countertop and they just bowed then cupped the counter piece once the glue dried. Couple mins (like 1 hr) on a router sled I built and I was able to get the cupping flattened.
What’s kind of glue you use?
Titebond III
Great video the only thing is the AUDIO very weak at times can't follow
I looked on Amazon for the sticky back sand paper and couldn’t find it. Does anyone have an idea or place that I can purchase them?
i make it my self, sandpaper 2 sided tape =sticky back sand paper
Glue it up....
Grizzly sells it in rolls. I’ve been using it for years and haven’t found paper that matches the quality of cut. I use it even when I don’t need sticky back.
I used craftsman 5" round cut to size sticky back Lowes
At 21:27 you may have put some dents in that soft wood😢
you're killing me guy, just get some four way clamps.
work faster, ur glue is skimming over 🤣🤣🤣
I did it with Stodoys.
Fix your sound quality
Such a long video for " ya know , just glue 'em and clap 'em toge'er "
Any expectations about those slabs warping in the not the far future? In fact, they are warping (and cracking) right now. That wood is not worth the effort.
get a microphone
painful to watch
Constructive crit. Comment Guys gotta edit the silent movie moments. Like after hes talking and its just awkward and especially edit him out saying fu- under his breath lol. Na its a great video though plus im like 15mins away and i do alot of fiddleback maple tables. Ive actually been flooded with the stuff and people say how rare it is
Hurry up and save your stories for later...Nice job otherwise
Wouldn't want that table top, glue joint is dry before it's clamped. Talking and saying nothing.
when you were younger you had hair you needed a comb now you don't, a bottle of shampoo now last a couple of years
Too much talking, man.