Thank you for going over the parameters and explaining what the different adjustments actually did. I've seen a lot of people who just said, "I put this at this number," but not explain why. The "why" has been my hang-up. Can't wait to try my hand at more engravings now that I have the tools I need!
Man I want to thank you from the bottom of my heart. You help me find the correct settings for my photo engraving. I own a couple of xtool d1 pro's and my settings were up and down with my photo engraving. After watching this video I am confident that I will not have an issue again with my photos. Thank you J&J!!
I paused this video for around 30 minutes while messing around with the settings to get it to look somewhat functional in the preview, only to unpause 2 seconds before he says that you shouldnt rely too much on the preview
I usually default to Laser Everything for instructions, but sometimes he dives REEEAALLLY deep. You have almost the same fiber laser as I do so I've caught myself more and more choosing the shorter J&J videos.... good work, love the channel
Too many people do demos without explaining why. It was very good to hear why he did certain things and he moved the cursor at a rate I could follow. Thanks,
Thank you for taking the time to share your knowledge. I am 83, new to laser engraving at Rochester Makerspace on a CO2 80 watt Rudia laser (I think I have this right). I really appreciate your detailed instructions, especially the box trick.
I just ran across your video. I also use Lightburn however, I have an x-tool laser so I hope it works. I appreciate your detail and explanations. I did have to pause a lot to write stuff down but that is probably better for me. I'm off to experiment.
Thank you so much for taking your time to explain using photos with Lightburn. If I may ask, where do you find the photos to use and what type do you download such as jpeg, vector?
Your video helped me so much. Is there a why I can highlight a square of a photo and do a test burn on just that section before deciding to do the whole image?
This is a great video, I am also new to engraving, can’t wait to try it and report it back. Can you share what sand paper grade you use for the photos, please? Do you use an electrical sander or just hand sanding? Thank you.
I have a thunder 100w. I have failed at photos a bunch of times trying to get images ready in photoshop and illustrator. Tried a lightburn way once and disaster. I’ll try your way on a piece is scrap later and hope for the best. I’ve run a laser for 7 years have a hd photo lens as well, but just gave up.
Do you use pass thru to go to send to the laser? and for my 35/80 watt laser, should I decrease the speed or raise the power to start? Thanks for the great videos you do.
Lightburn automatically converts the image into a dither pattern for you! If you're using an outside source to dither your photo, like imag-r, you would need to use pass through. It tells Lightburn not to dither the photo and leave it as it is. If you're testing your laser, there are some tools in Lightburn that can help. At the top look for laser tools, click there, find material test and click there. Get some scrap material and set up the parameters and run that test. It will give you an idea of how dark/light your laser is at each speed and power setting. Nifty feature if you haven't tried it yet!
So, I am running an 80w and followed your set up. did the conversion on the power and the picture I am trying to burn is showing to take and hour and 45 minutes for a 9x7 pic! What am I doing wrong?
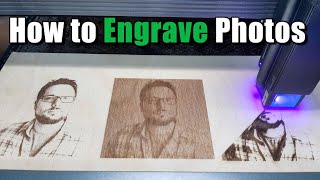
We usually use Baltic Birch plywood for picture engravings. It doesn't have a very noticeable grain pattern so your image doesn't get lost in the wood grain.
Have you ever used borax and water solution on your wood i have a Full Spectrum Titan 75 watt laser that i have just gotten converted to a Ruida controller i have done the borax and water solution was this only done with the laser or did you add anything to the wood what type of wood did you use
Hi that was a great help to me. Am I able to engrave a photo image (of a house) onto a colored powder coated tumbler? I would love to know how to get a great result for that project! New Subscriber! Thanks :)
Thanks for the great video! Have a question on the settings - I thought for engraving air is typically set to off, but I see you have yours on, is it different for photo engraving?
Why does the finished engraving have him facing the opposite way of the original photo? Would I have to flip the image backwards so it engraves exactly like the original?
We designed those in Lightburn actually! They are shaped like an upper case T. Use 6mm (1/4 inch) plywood and measure your honeycomb board's holes with calipers. Make two rectangles that are the same width as your honeycomb holes and arrange them in the shape of T then weld them together. Cut them out and see if they work. Edit and change them as you need after you test them out to make them work best for you but that's the general idea.
Thanks Jacob. I think this helped me at least try to get started. I do have a question for you hopefully you can help me better understand. As far as your settings for feeds/speeds. How did you go about selecting that setting. I presume a test card, but trying to understand or key in more on the details of the tests. Are you looking for a nice dark setting, but as mentioned not to dark that loses some detail etc. Thanks for any feedback.
Honestly it's just a lot of practice. Test cards can get you in the right direction but it just takes time and practice to understand your machine and what works best. If it looks too light slow it down power up a little, too dark speed it up lower power a little. Your Dots per inch settings will matter a lot too. If it's too high it will over burn and you'll lose a lot of details, too low and it will be really light and not have a lot of life to it. 225-325 DPI is usually a pretty good area to keep it. It's kind of a dance between all of those things and finding what combination works best.
You have to use Photoshop or some other photo editor to remove the background. I use Photoshop elements, it has a few guided features, background removal being one of them. It's kind of a headache but you get better at it with some time.
Thanks for going over this I am just learning how to laser engrave and this is awesome. my only real question is do you prep you pics in other software before lightburn (ect... GIMP, PS )?
This image was all processed in lightburn. You definitely can up your photo game by learning Photoshop or GIMP and I do use them often. You can do amazing pictures without the need of those programs though if your original photo is a good quality photo.
Hi, I have a question, Just bough Dx1 and I have Ligthburn. the laser does not have a camera so how do I know where it is going to cut or engrave on the item? How do I know where to position the item to be engraved? I'm new....thank you.
@@jjengraves227 thank you for your response. I currently went ahead and got lightburm but I have to learn this software. Will LB have this button? I truly appreciate your assistance. Thx Amira
Why did you mirror the video? I don't understand why so many People do this- I do guess if it were me I prefer my look one way rather than the other and I'd probably just do it depending on my preference but I've always kinda wonder about this- what is it that made you feel that mirroring the vid was the right choice? (I'm not saying it's the wrong choice, I just wonder about a whole lot of stuff in life that doesn't matter at all).
Hi!! Could someone help me please. I am newbie.😅 Last week I got my first laser machine-falcon 2 22w- But I am confused about engraving small objects, example: Stainless tag pets. I don't know how to place the object in the laser machine.. bigger objects are simplier, but this is still very dificult for me (I'm using lightburn) Ps sorry for my english 😅
Great tutorial. I noticed you used a grayscale image. Do you use the same procedure on colored photos or do you convert them to grayscale first. Also if the original is at 300 dpi do you downscale it to 96 dpi and then increase it in lightburn or just use the 300 dpi photo direct? Thanks for your guidance.
For this example I just took the photo without any Photoshop edits and imported it to Lightburn. Lightburn automatically converts it to black and white and it produces a dither pattern that you can change in the settings. With DPI the best method is to rescale the photos resolution in a program like gimp or Photoshop. Then change your DPI in Lightburn to match the resolution you used.
@@jjengraves227 Thank you for the response. I wasn't scaling prior but was letting Lightburn do the scaling. Once I scaled it to the size I needed in Paintshop and then imported into Lightburn and set the DPI it looked Great. Have a Great day.
Sure that's normal! The preview window is giving you a preview of how the laser moves. I typically use it to check time and to make sure everything is good before I start the job. If you zoom close enough it will come into focus and look better. I prefer the image adjustment menu to check my edits over the preview button.
It shouldn't be inverted if you're engraving on wood. If you're trying to do a negative photo you need to click the "negative image" button under layer or image settings. In the preview menu there is a button called "invert" check that if you're trying to preview a negative image. It won't show as a negative on the workspace. Only in the image adjustment menu.
Yeah if you are in Lightburn you can right click the image and save it as a bitmap. Imag-r is a site you can use if you don't have lightburn that has some decent dither patterns as well.
Thanks for some great information on the engraving process using lightburn. I do have a comment though. I would be nice if you could maybe not be so nervous with the mouse and scroll wheel. You don't really allow us to see what you are talking about and what functions you are selecting as you never seem to stop playing with the mouse for more than 1 second at a time. Makes it a little difficult to actually see what it is that you are trying to show us. Then there is the slight sea-sickness effect also. :-( Really like what you have to say and have used the info to get a kickstart on engraving with the laser that I use. Thanks for the information. Looking forward to more videos!


Thank you for going over the parameters and explaining what the different adjustments actually did. I've seen a lot of people who just said, "I put this at this number," but not explain why. The "why" has been my hang-up. Can't wait to try my hand at more engravings now that I have the tools I need!
Man I want to thank you from the bottom of my heart. You help me find the correct settings for my photo engraving. I own a couple of xtool d1 pro's and my settings were up and down with my photo engraving. After watching this video I am confident that I will not have an issue again with my photos. Thank you J&J!!
That's so great to hear! Keep practicing and learning!
Can you share me the setting? I am using a d1 pro 20w
Still giving me hope in making things work the way we do not know much in doing...Thanks so much for showing me!!! Clermont, Florida.
I paused this video for around 30 minutes while messing around with the settings to get it to look somewhat functional in the preview, only to unpause 2 seconds before he says that you shouldnt rely too much on the preview
Did my first one this morning. This was the most helpful tutorial I watched to get my settings right.
Thank you, sir!
Thanks!
I usually default to Laser Everything for instructions, but sometimes he dives REEEAALLLY deep. You have almost the same fiber laser as I do so I've caught myself more and more choosing the shorter J&J videos.... good work, love the channel
Thanks for your video. You taught me an easy way to bring in photo's to edit. I have a lot to learn in lightburn.
So glad I found this tutorial. Thanks man. You helped a lot
Just followed your instructions step by step on my 2nd try and was successful. Thanks a bunch!
Thank you for this video! I'm new to the laser engraving world and this was just great to follow along with!
I kinda find tutorials like this that really do help you but not very often. ty
Thanks. I enjoyed this and learned something’s and I’ve been using a laser for about 12 years. Seem like a good guy. Subscribed
thank you for this Jacob, I am new to laser engraving using a diode and this is a brill tutorial thank you so much x
Too many people do demos without explaining why. It was very good to hear why he did certain things and he moved the cursor at a rate I could follow. Thanks,
Thanks. Your process is more as to my laser capabilities. Most others use laser diode engravers.
Thank you for the clear instructions. I previously had very poor pictures. Great tutorial
This is a dope tutorial. Thank you so much
Thank you for taking the time to share your knowledge. I am 83, new to laser engraving at Rochester Makerspace on a CO2 80 watt Rudia laser (I think I have this right). I really appreciate your detailed instructions, especially the box trick.
Thank you, nice video tutorial. Simple and to the point! I'm just getting started and this is agreat starting point.
Awesome quick line trick. Thanks!
You sir just made my life a little easier!!
I just ran across your video. I also use Lightburn however, I have an x-tool laser so I hope it works. I appreciate your detail and explanations. I did have to pause a lot to write stuff down but that is probably better for me. I'm off to experiment.
Cool, thanks! Excited to give it a shot
Great video thanks for taking your time to share
yeah big thank you this is what youtube is for (learning)
Love the video, it was clear and easy to follow and the photo really turned out great!
I like the way you explain from the first ,great.🙏.really detail what u are using and everything,good luck sir from malaysia,new subscriber
Very good, I have an Atomstack x20 and with your video I managed to make my first impression...Congratulations for the class.
Are you willing to share your settings?
I have the x20 too and i've done so many tests but can make it right
Great video. Perfect for what I needed.
Thank you for making this video, it was very helpful. Keep up the great work!
So happy I found this! Thank you!
Thanks for the video. Keep up the good work.
great stuff bud, learnt a lot from your video today. Keep it up.
Thank you so much for taking your time to explain using photos with Lightburn. If I may ask, where do you find the photos to use and what type do you download such as jpeg, vector?
Your video helped me so much. Is there a why I can highlight a square of a photo and do a test burn on just that section before deciding to do the whole image?
This is a great video, I am also new to engraving, can’t wait to try it and report it back. Can you share what sand paper grade you use for the photos, please? Do you use an electrical sander or just hand sanding? Thank you.
This was very helpful. Thank you.
Awesome! Thank you for the guide!
I have a thunder 100w. I have failed at photos a bunch of times trying to get images ready in photoshop and illustrator. Tried a lightburn way once and disaster. I’ll try your way on a piece is scrap later and hope for the best. I’ve run a laser for 7 years have a hd photo lens as well, but just gave up.
Thank you very much very informative! Cheers
good job, explained it well. Ever fool around with leather?
Great info, the scan angle makes a difference?
Thank you. I have just one question. Can I also use a diode laser to engrave pictures like this?
Thank you for a very informative vid. just one question, which type of wood you used?
I use Baltic Birch mostly for images. The grain pattern doesn't interfere with the details as much with it. Kind of hard to get lately.
Basswood and Holly wood are also both very clear and grain free. Holly can be difficult to find, though…
That's fantastic have you tried this on glass?
Do you use pass thru to go to send to the laser? and for my 35/80 watt laser, should I decrease the speed or raise the power to start? Thanks for the great videos you do.
Lightburn automatically converts the image into a dither pattern for you! If you're using an outside source to dither your photo, like imag-r, you would need to use pass through. It tells Lightburn not to dither the photo and leave it as it is.
If you're testing your laser, there are some tools in Lightburn that can help. At the top look for laser tools, click there, find material test and click there. Get some scrap material and set up the parameters and run that test. It will give you an idea of how dark/light your laser is at each speed and power setting. Nifty feature if you haven't tried it yet!
Nice Job on the photo. Cheers
So, I am running an 80w and followed your set up. did the conversion on the power and the picture I am trying to burn is showing to take and hour and 45 minutes for a 9x7 pic! What am I doing wrong?
Great video well explained.
What I would also be interested in is which wood you use?
Hello Andreas
We usually use Baltic Birch plywood for picture engravings. It doesn't have a very noticeable grain pattern so your image doesn't get lost in the wood grain.
Have you ever used borax and water solution on your wood i have a Full Spectrum Titan 75 watt laser that i have just gotten converted to a Ruida controller
i have done the borax and water solution was this only done with the laser or did you add anything to the wood what type of wood did you use
Nice video !, Can you obtain the same result with a Creality laser falcon 22w
For us beginners, is it enough to upload a photo and wait for the engraving?
WOW! that come out great! I Saved this video for future engravings to reference. What grit sandpaper do you use? Thanks
Hi good tutorial my question is how by sanding did the engraving flip around, I’ll have to get myself one of these sanders
Hi that was a great help to me. Am I able to engrave a photo image (of a house) onto a colored powder coated tumbler? I would love to know how to get a great result for that project! New Subscriber! Thanks :)
Great video. Thanks!
Thanks so much
Thanks for the great video! Have a question on the settings - I thought for engraving air is typically set to off, but I see you have yours on, is it different for photo engraving?
Why does the finished engraving have him facing the opposite way of the original photo? Would I have to flip the image backwards so it engraves exactly like the original?
Nice tutorial! What are those clips you are using to hold down the plywood? I struggle with warped panels.
We designed those in Lightburn actually!
They are shaped like an upper case T.
Use 6mm (1/4 inch) plywood and measure your honeycomb board's holes with calipers. Make two rectangles that are the same width as your honeycomb holes and arrange them in the shape of T then weld them together. Cut them out and see if they work.
Edit and change them as you need after you test them out to make them work best for you but that's the general idea.
Nice work. How did you actually sand it after engraving? Thanks
@@allanbell2396 220 grit sand paper and blow the dust off with compressed air or a brush.
Is there some reason you keep LaserGrbl installed? Doesn't Light Burn do everything for you?
Do I use the same settings if I want to engrave on glass?
did you convert the jpg to vector file using the trace function?
Awesome.. thanks for the tutorial
Thanks Jacob. I think this helped me at least try to get started. I do have a question for you hopefully you can help me better understand. As far as your settings for feeds/speeds. How did you go about selecting that setting. I presume a test card, but trying to understand or key in more on the details of the tests. Are you looking for a nice dark setting, but as mentioned not to dark that loses some detail etc.
Thanks for any feedback.
Honestly it's just a lot of practice. Test cards can get you in the right direction but it just takes time and practice to understand your machine and what works best.
If it looks too light slow it down power up a little, too dark speed it up lower power a little. Your Dots per inch settings will matter a lot too. If it's too high it will over burn and you'll lose a lot of details, too low and it will be really light and not have a lot of life to it. 225-325 DPI is usually a pretty good area to keep it.
It's kind of a dance between all of those things and finding what combination works best.
Very informative. I am just starting, I have an arturo printer. How do you get rid of the background shading?
You have to use Photoshop or some other photo editor to remove the background. I use Photoshop elements, it has a few guided features, background removal being one of them. It's kind of a headache but you get better at it with some time.
Great Video, Thanks For The Info!!
What do you sand the engraved photo with?
Thanks! I use 220 grit sand paper.
Thanks for going over this I am just learning how to laser engrave and this is awesome. my only real question is do you prep you pics in other software before lightburn (ect... GIMP, PS )?
This image was all processed in lightburn. You definitely can up your photo game by learning Photoshop or GIMP and I do use them often. You can do amazing pictures without the need of those programs though if your original photo is a good quality photo.
Hi, I have a question, Just bough Dx1 and I have Ligthburn. the laser does not have a camera so how do I know where it is going to cut or engrave on the item? How do I know where to position the item to be engraved? I'm new....thank you.
There is a button in most laser softwares called frame. It should move your laser head around the area you're going to burn to give you an idea.
@@jjengraves227 thank you for your response. I currently went ahead and got lightburm but I have to learn this software. Will LB have this button? I truly appreciate your assistance. Thx Amira
What were all ur setting on the image adjustments
If the preview is showing the face of a photo completely darkened with no details does that mean it will engrave that way?
How can I get my project to engrave first and then cut?
could u send me a link on what materiel your using.
Why did you mirror the video? I don't understand why so many People do this- I do guess if it were me I prefer my look one way rather than the other and I'd probably just do it depending on my preference but I've always kinda wonder about this- what is it that made you feel that mirroring the vid was the right choice? (I'm not saying it's the wrong choice, I just wonder about a whole lot of stuff in life that doesn't matter at all).
Whats the best wood for laser engraving portraits of real people i keep buying wood but it comes out bad from the wood grain
Does Lightburn work with Glowforge?
Hi!!
Could someone help me please. I am newbie.😅
Last week I got my first laser machine-falcon 2 22w-
But I am confused about engraving small objects, example: Stainless tag pets.
I don't know how to place the object in the laser machine.. bigger objects are simplier, but this is still very dificult for me (I'm using lightburn)
Ps sorry for my english 😅
Wielkie Dzieki ! Help me with my 15w BL diode. Thanks!
Have you done images like this on glass?
Can someone help out? All of a sudden now when I change the passes in lightburn it will indicate the change, but will still do only one pass.
Buen video, muchas gracias
Did you sand the picture down just using normal sandpaper by hand?
Yes. I usually use 220 grit sand paper. Just be careful not to go too crazy or you could damage the engraved areas.
Great tutorial. I noticed you used a grayscale image. Do you use the same procedure on colored photos or do you convert them to grayscale first. Also if the original is at 300 dpi do you downscale it to 96 dpi and then increase it in lightburn or just use the 300 dpi photo direct? Thanks for your guidance.
For this example I just took the photo without any Photoshop edits and imported it to Lightburn. Lightburn automatically converts it to black and white and it produces a dither pattern that you can change in the settings.
With DPI the best method is to rescale the photos resolution in a program like gimp or Photoshop. Then change your DPI in Lightburn to match the resolution you used.
@@jjengraves227 Thank you for the response. I wasn't scaling prior but was letting Lightburn do the scaling. Once I scaled it to the size I needed in Paintshop and then imported into Lightburn and set the DPI it looked Great. Have a Great day.
Thank you for this video. It is so helpful!! Do you have any videos explaining how to rescale the photos in gimp?
Thank this helps a lot 👍
Hi, I just followed your video and my photo looks good until I click preview. When I preview it, the whole photo is black. Any ideas why?
Sure that's normal! The preview window is giving you a preview of how the laser moves. I typically use it to check time and to make sure everything is good before I start the job. If you zoom close enough it will come into focus and look better. I prefer the image adjustment menu to check my edits over the preview button.
@J&J Engraves thank you sir!
👍👍
I don't seem to have the align both vertical and horizontal centres button on my tool bar. how to I bring that up?
Check to make sure you're not in beginner mode in Lightburn.
@@jjengraves227 that fixed it thanks!
hi
have you laser engrave photo on acrylic
First of all, congratulations on the great recording and the great video. Just a curiosity. Which grit did you use to sand the engraved photo?
220 grit. Thank you, we appreciate the nice words!
My image won't up load as the burnt image or inverted image it goes back to the original photo
It shouldn't be inverted if you're engraving on wood.
If you're trying to do a negative photo you need to click the "negative image" button under layer or image settings. In the preview menu there is a button called "invert" check that if you're trying to preview a negative image.
It won't show as a negative on the workspace. Only in the image adjustment menu.
Hi J&J Engraves what type of plywood use for engrave photo
Baltic birch is my favorite to use for photos. The grain patterns don't interrupt the image as bad as some other woods do.
What do you mean by 1.5 lens? Not understanding this term for laser engraving. I am a noob. LOL
can i export the dots image to another program like RDworks? i want to engrave with rotatory
Yeah if you are in Lightburn you can right click the image and save it as a bitmap. Imag-r is a site you can use if you don't have lightburn that has some decent dither patterns as well.
Thanks for some great information on the engraving process using lightburn. I do have a comment though. I would be nice if you could maybe not be so nervous with the mouse and scroll wheel. You don't really allow us to see what you are talking about and what functions you are selecting as you never seem to stop playing with the mouse for more than 1 second at a time. Makes it a little difficult to actually see what it is that you are trying to show us. Then there is the slight sea-sickness effect also. :-(
Really like what you have to say and have used the info to get a kickstart on engraving with the laser that I use. Thanks for the information. Looking forward to more videos!
I'll try to keep that in mind. I have busy hands lol! Thank you for the input!
This can be done on a diode laser too, right?
Yes, the engraving part you can, not sure about cutting. Your speed and power settings will be a lot different than mine though.
How come the one you burned he’s looking to my left the one you show as the final piece he’s looking to the right.
Can you read any photo and burn?
As long as they are in the right format. I haven't ran into a photo I couldn't work with yet.
Jika foto berwarna bisa atau tidak
pola snimke pričaš a onda