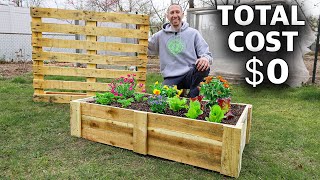
How to Build a Trellis Planter

ฝัง
- เผยแพร่เมื่อ 27 พ.ย. 2024
- Want to see more planter projects? • How to Make a Planter ...
Today we made a trellis planter!! I love the way it turned out! We do all sorts of home/garden projects. Let us know what you thought of this one and leave a comment for suggestions for future videos!
FOLLOW US HERE:
gardenanswer
pinterest.com/gardenanswer
Twitter @gardenanswer
HELPFUL LINKS:
Plans for this project: drive.google.c...


Oh my goodness, just came across this video you made 9 years ago, I can't believe how time flies!❤🤗❤️ great job Laura and Aaron!
Laura, it's 2023 and I'm just seeing this -- you, nine years ago!! You are a natural, woman!
I started watching you on Facebook about a month ago. Now I'm here, so I can watch you from the beginning!! I love this project!!
I love that you are so much more formal when you started, and I came in at 5 years it looks like, and you can tell how much more comfortable you've gotten at doing your videos! It's great to see the wonderful transformation, and you are such an inspiration for me to try new plants in my small garden! Thank you!
Hi Laura! I have been watching you now for years and am so impressed at how relaxed and professional you have gotten! That said, this is STILL one of my favorite videos! I’m actually going to be trying to build this in the next month. If you see this comment, wish me luck! Also, if you ever do an update on this design, I’m sure it will go viral! :)
Laura, with this video I found you 3 years ago and you amazed me with your talent👏 I didn't have a clue of youtube and since then I look forward every single day for your videos🙂 I just love everything you do, thank you for sharing your talent with us❤🙋🏻♀️Greetings from southern California
Wooooooooooowwwww...huge difference in your demeanor from the year you started up until now (2019). You definitely made a change for the better 👍🏼
I think she just feels natural now!!!
I just wanted to let you know that my son and I just built this today. It took us 4.5 hours to build. It looks awesome! We made it 6 feet wide instead of 4 feet Thank you very much for the inspiration. Peter
Peter Tait Hi Peter! That's great-I'm go glad to hear it! I like the idea of making it wider- that would make an even better screen. I'll say one thing...it took me for than 4.5 hours to build mine! Ha! Well done! ~Laura
Garden Answer amazing work
Hi, do you happen to still have a copy of the plans? The link above doesn't work any longer.
Glad to see someone getting the mitresaw running with full speed then cutting. Too many pro carpenters just do the cut as long as they pull the trigger, which damages the saw belt or motor due to the blade biting.
Omg. The shakey camera reminded me it's not just Laura who improved and became more confident with garden answers!!!! You guys are amazing. Best youtube couple!!! ...😍
I found this video tonight from your Highlights channel - and love it. Not only do I want to build this project, but I love seeing how much you've grown in the last 6 years. You are truly wonderful and I pray God's richest blessings upon your family and household. I also loved the metal containers you placed out in the new area near the tomatoes for Benjamin to find his strawberries in today's video. I am so grateful I found your channel ... maybe 2 1/2 years ago, thereabouts. /wave
Dear . I am in new in gardening. Just intiated gardening by planting mint , penzi, salad leaves & tomatoes. Then I searched that if there is any good guidance or expert around.
I take you as my mentor now, you are away , I don't know where you are from or from which country, but I can feel that you are around.
I am under your coaching so thank you for making us good Gardner.
I loved your love to nature & soil.
Great inspiration for me.
Thank you & love, ❤
+Uzma Riaz Gardening is my favorite thing to do, so I'm happy to hear that you are doing it, too!
Beautiful! Can you upload the plans again or post a new link to them?
You seriously post the best videos! I love how straight to the point you are
I know I've already watched this video but it's so good! The planter is so beautiful. I really admire how you didn't see what you wanted out there so you built it! Great work!
Wow, I have been scouring the web to purchase one of these but I am betting building one would save me a ton of money. Thanks for creating this tutorial. Gorgeous design!
+Melissa Kern Thanks for the comment! This video was actually the product of searching and searching for something like this and not really finding anything close, so I gave it a shot myself! Let me know how it goes if you decide to go for it! :) ~Laura
+Melissa Kern its really true
I haven’t seen a wood buy list posted, so I thought I’d share. I just built this today, though made some very minor adjustments to the top and feet. Absolutely love it!
8 - 1” x 6” x 6’ cedar pickets
6 - 2” x 4” x 8’ pressure treated
2 - 4” x 4” x 8' pressure treated
2 - 1” x 4” x 8’ pressure treated
1 - 4’ x 8’ lattice
Hope this helps! Please keep in mind that if you use the directions from the link, the 2x1 is incorrect. She uses 2x4’s for the sides.
Thanks so much for this!!
Love it.. it can be modified as a potting center and the trellis a tool holder! Keep the projects coming 8)
I like that your assembly idea didn't use pocket holes (at which point, you must mention that you made the pocket holes using a Kreg jig, of course).
Thanks for the video!
i am from India and today just go through your garden answer and found it very nice and innovative, keep this good work continue .
Just finished this project. A couple tips: if you use the link provided for your plans, as I did, it has the sides listed as 2x1's. Do NOT use 2x1's! They will not match up correctly. Not sure why the plans say that, as she is using 2x4's in the video, and that is what you should use.
Also, there is simply no way she attached the sides, then the back, then the front. Do the back first, laid down, then the sides, then the front. Again, in the video, she is clearly doing the back first.
If you're getting your wood at Home Depot or lowes, there usually isn't an oak screen trim, so I wouldn't bother looking for it. Pine or cedar are usually the only options in that size. I used pine and it works great.
Also! I didn't buy dimensional lumber for the plankings like she did. I used pallet wood. Instead of it being a solid plank all the way across the front, it was two rows of planks, butted up against each other and screwed down at the sides and the center post. This way may take a bit more creativity to get things (mostly) flush, but since you're lining it anyways, it'll work fine. I think I used four or five pallets.
Tre' Littrell
@ Darbin Orvar Here are a ton of great woodworking plans if you're interested: LukeWood.xyz
Hi, do you happen to still have a copy of the plans? The link above doesn't work any longer.
It came out great!! Maybe you should try to put the lining inside the box first and the screw down the top bezel of the planter, I think it might hold it down better and give you a more flush install.
Laura you’re so beautiful, strong and knowledgeable..I get so inspired watching your videos! Just found you on YT recently and I’ve been enjoying starting from the beginning. Congrats on the baby!!!! 🎊
It's fun watching old videos 🤣🤣❤️❤️
your my hero, your helping me get started with my garden.
Wow! its almost 6 years and still watching your videos.
You are so artistic and creative I salute you friend....God bless your Chanel...
I feel like a stalker watching you so much, but you are so very helpful with awesome ideas to help my Brown thumb and coordination of color combinations! you keep rockn'
I didn't know Laura did this type of thing. I was already impressed with her abilities, but woodwork too?! Amazing and looks very professional. Has she been trained in this?
I love it! It looks great. I'm binge watching your videos right now. So much stuff I want to try and make myself. :D
+Isabel Carrillo Thank you so much! I have a long list of projects I want to tackle, too!
The box looks fantastic and your videos rock! Just wanted to give your subscribers a heads up... If you plan on planting fruits and veggies in this box be careful not to use the chemically treated wood. They say the newer treatments are safer, but stay skeptical of any processes like that, where chemicals can leach into your garden. Look for the small slits and unnatural color on the wood. If it has that then it's chemically treated. Great work on the box, though!
Thanks Jon! Absolutely, thanks for the reminder! It's always good to remember to stay away from chemically treated wood! -Laura
how about putting pond foil as a barrier.
Jose Dias I wondered about that too!
What a great idea! I just bought my first house and have a great breezeway so was looking for ideas, and found your video. I love it so much! New subscriber! Thanks for sharing!
+always creating Thank you!!! :)
I cannot find the plans. Anyway the plans may be re-uploaded mam? Thank You ! Love how this turned out !!
You look like a model, Laura! So beautiful.
Aaron can you restore the plans for this project please? Thank You
It's been seven months...guess it's not happening :/
The link works. It’s a google doc, you need to sign in with your account and then click the link again.
@@Theclassics21 how do you do that to get the plans? Thanks in advance.
@@swissmiss221 you need to create a google account then when the account is open, click on the link in the description of this video.
Hey there. The link for the plans seems to be broken. Could you add it back please??? Thanks! This is beautiful!!
wow i loved it. as a wood artist it shows me how to build it and become better. also make one of my house.
Wow. Great planter and fantastic videography. I need to build on against the fence , but it is a little sloped for runoff. I guess just adjust the feet to account for the slope? Back feet higher than front feet.
You give great ideas for your viewer's. Thank you 😊 😊
Beautiful planter! Great job! I especially like seeing the finished project IN THE BEGINNING OF THE VIDEO!! So often I lose patience with DIY projects that go through cutting and assembly and only show the finished project at the end of the video. I want to see if it's worth it before possibly wasting my time. This one works for me. :) Thank you
Dang I’m wondering how I can find the plans for this the link is no longer available for it
Looks awesome. Going to try this for my patio.
I love this! When I follow the link to the plans for this project, every time I click on them they disappear.... is there another way to see/get the plans?
Looks great! I’m going to try it. Thanks.
wow, looks awesome~if using composite materials it will be more easier and saving time, such as without painting at all
Yeah it would last but be super expensive
Im going to use this but add thinner 1x3 moldings for front to add a little depth and visual appeal. And prob make the top boards overhang a bit as well. may use vinyl lattice too(if cheaper) as im going to paint whole thing white.And Im going to make two.On each side of and existing archwayOtherwise I love the design.Thx for the inspiration
+meckleboy Love your ideas! I think yours will turn out beautiful! :)
Всё нравится. Молодцы . Россия . Санкт-Петербург. Сергей.
Nice job! thank you for sharing, very beautiful.
"sweet autumn clematis up the lattice " HAHA I LOVE that line .
great work... I like and will attempt to build one for my wife.
Thank you so much for this beautiful design
Beautiful work and the beauty of the work is to you Miss
creative girl i love all your videos..always giving me an idea..
So beautiful i from Indonesian
Nice. I wish you would have had one shot back away from the planter so we could see how it blends in or stands out, etc... :-( but I like the planter.
Really impressive stuff, inspired me to give something like this a try!
I’ve been watching your guidance for about 3 years now and I just found this old one. You have come a long way! How has the planter held up? I haven’t seen it in any recent videos?
Very Impressive design & work.
That turned out beautiful.
Beautiful work
Just love your wood projects!
Nice project. I may have to purchase a saw. And get busy.
Wonderful to see a woman builder! I will follow your lead. :)
if u put ivy boston that would be great رائع استمري اختي 👍👍👍
incredible work
Really liked the video. Thank you! My next project.
I like all you vidous and I wacheing all one by one thank you soo mach
Beautiful!🪴
Brilliant work
looks great
I love it. ❤️ Thx for all the grrrrrr8 ideas.
BEAUTIFUL!!
no comment juste ammmaazing wow
I would love it if you would restore the plans for this project. I just found you guys!
Great build! Would you please be so kind as to post the plans if they are still available? I really want to try my hands at making! Thanks so much. All the Best!
nice job!!! wish i had a place for one
Beautiful
What an extension of amazing talents you have there young lady. This is just stunning
Nice project thank you for the information.
please can you suggest nice plants for a wooden planter, not too expensive but very colourful and unusual by the way I am in England..
Manuel Mendoza fiddlehead flowers and hyssop for purple. if you're an early riser, flax for a blue. The flax has an added bonus in that you can cut it up in the fall and mulch the bed or engage in old fashioned textile work.
Zinnias are easy as pie and were used by the aztecs for dye, even better they come in giant or dwarf sizes. Alliums, specifically garlic, are very useful in fact not just the bulbs but the greens and scapes can also be used in cooking. they also repel bugs.
Thank you for the information, the climate here is very wet at the moment..rain and more rain. I will visit my local nursery and have a look when the weather gets better, I need plants that will look after themselves and keep appearing without the need to be replaced every year.
Hi Laura. Do you still have the plans for this trellis planter? the link in the description doesn't seem to work any more. Is it possible to add a new link for it? Love all your videos. Thanks for all you do!
Hi Laura, I tried clicking on your link for the plans but the link is no longer active. Says Aaron has put them in his trash! LOL Wondering if you have them still and could update the link.
What a beautiful planter. I would NOT use plastics to fill in the bottom, especially for growing veggies, as some plastics leach out chemicals. Use natural elements.
We are thinking of building this. Tried clicking on the link for plans of the project, unfortunately, its saying they are trashed. If you dont mind, can you please reupload them?
I love it! Beautiful!
C'mon Aaron, please as Bryan Rehmert says, restore the plans. Lockdown down AGAIN in the UK and would love to build this.
Need to make one as a privacy fence
Stunning!!!
You've come a LONG way, baby girl! How do you feel about Miracle Grow, now? That's what is available here in SE Texas.
Gorgeous
This is the direct link for the project plans: docs.google.com/document/d/1Xqc8Vj0mDXn3D50UuqTMLaIj2V7pRFmG-x4u--pQXzo/edit?usp=sharing
Thank you so much!!!
Love this!!! Thank you for the plans and visual on how to make this. How much approximately was this project to make minus plants?
Thanks, Kristen! I wish I would have kept track of exactly what we spent... darn it! I believe it came in around $100 (maybe a tad less)!
Would love to plans for this project please! Can you upload them again??
Really nice planter, good tutorial and great video shooting. Nice work! You could perhaps have saved on a bit of compost by filling the bottom 8" or so with old plant pots, plastic bottles etc. It also helps with drainage and makes it a little lighter if you ever need to move it
Love the work
If the plans were still available that would be great.
Love it, great ideals as always
The 4x4’s create a gap at the bottom that you notice when laying the floor boards. You forget to mention this but you can see that you attached some scrap (4x4?) when attaching the feet.
Great job girl 👏🏻👏🏻🍃
Love it.
so beautiful...
Great Planter!
+Nellie Tolentino Thank you!