How To Use The Displace Filter In Photoshop - Displacement Maps

ฝัง
- เผยแพร่เมื่อ 8 ก.ค. 2016
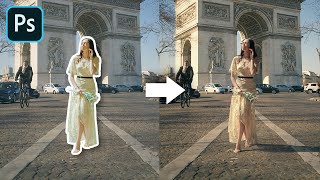
- Photoshop CC tutorial showing how to use the displace filter in Photoshop.
If you have any questions please leave them below
or head over to this tutorial's page on our website:
photoshoptrainingchannel.com/...
Subscribe + Like + Share + Comment = More Video Tutorials!
Thank you for watching!
===================================
If you enjoyed this video be sure to subscribe to our newsletter to receive free weekly photoshop tips and more!
Subscribe: ptcvids.com/subscribe
For more in-depth Photoshop Tutorials be sure to check out our Premium tutorials.
ptcvids.com/shop/
===================================
LINKS
Website:
photoshoptrainingchannel.com
Facebook:
/ photoshoptrainingchannel
Instagram:
/ jrfromptc
LinkedIn:
/ photoshop-training-cha...
Pinterest:
/ ptcpins
TH-cam Channel:
/ photoshoptrainingch
Google +:
google.com/+Photoshoptraining...
This Video's TH-cam Link:
• How To Use The Displac...
Photoshop video tutorials by Jesus Ramirez


Thank Jesus for these tutorials.
You're welcome, tallaganda83!
Finally some1 who explains whats actually going on. Thank you!
You're welcome!
great tutorial. No one ever explains the science behind the displacement, so thank you!
You're welcome, Sami!
Fantastic video as always.Love how you explain what is actually going on behind the scenes. I always look to your videos first when needing to do anything in Photoshop.
Thank you, Louise!
Stunning. I tried again and now it works. Don't know what I did differently..... Again, thanks for your fantastic tutorials.
You're welcome, Ron!
Easily one of the best tutorials online....Simply amazing. Thank you!!!
Thank you, Hermes!
I love how you always explain why things work the way that they do. Thank you!!!
You're welcome, Cassidy!
Awesome! As usual, clearly explained and you made it looks so simple. Thanks!
You're welcome!
Loved it! And waiting for the whole course
Thank you, Cristina!
Jesus thank-you making this type of lesson straight forward and reasonably easy to understand and use. You make learning photoshop fun. Would be cool if you showed how to make NFTs.
Always the best info out there! Thanks.
Thank you! :)
oh man this channel is the best....i have learned a lot from you since the estd of your channel......love you ....
I'm glad you found it useful, FILM HEAVEN! Thanks for Watching!
Great explanation, Jesús. I appreciate how thoroughly you presented the process using the XY graph and sample image with the grid to illustrate how the filter works. The use for creating a water reflection was cool. It would be interesting to have more detail on best uses and practices for two-channel maps...perhaps a bonus, bonus video? ;-) Keep up the great work!
Thank you for you comment, Philip!
Yeah, not a bad idea :)
Loved it J.R. I love the way you explain things very easily to understand it. Thank you so much.
You're welcome! :)
I have been wanting Photoshop for a while, but I don't if actually wanted it, but you have sealed the deal! Its a great future tutorial as well as a convincer to buy! Thank you!
You're welcome!
Loved it! So easily explained :D
Thank you!
holy shit. Really amazing, keep it up!
Thanks!
Although my English is not very good,but your method in explaining is amazing
Thank you, كيكي كيكي!
Well explained on Displace Filter!!! Great job!!
Thank you!
Great job with your explanations and everything else. Thank you very much.
You're welcome!
Thanks so much for such a great training class.
You're welcome, Long!
seriously man you are great... just love the way u teach things
Thank you!
love all your videos great teacher
Thank you, SCREEN PRINTING & DESIGN!
Very useful tutorial. Thanks to show us JR.
And by the way your video with Glyn Dawis is funny :)
lol Thank you!
Excellent! You are very knowledgeable and explain things well.
Thank you!
You are my new Paragon!
Thank you, STAGfm!
well explained ealy understandable thank you master
You're welcome!
Great video. Thanks.
Thank you, JJ Cm!
This is super informative
Thank you!
Okay, that was life-changing!
I'm glad you found it useful, Proletina! Thanks for Watching!
oh man, i was finding about this a while, daaamn jesus, thanks
You're welcome!
Maravilloso video.Muy bien explicado
Gracias!
Very nice job
Thank you, Craig!
Great video
Thank you, OzBassPlayer!
JR I don't know if you'll read a comment on a 4 years old video or not. But if you do then please let us know if there's any changes with this filter in the recent updates of photoshop. Maybe a new tutorial cus in the beginning it was little difficult for me to understand that graph, stretch, horizontal and vertical values etc.
Anyway it was a great tutorial cus nobody else explained the concept of displacement maps 🍺
Thank you, Pradeep! Unfortunately no changes yet. Even in Photoshop 2022
Best evaa...
Thank you!
Great stuff
Thank you!
Salut, du très bon et beau travail ! Merci pour ce cadeaux.
Thank you.
You're welcome!
很喜欢,很棒,谢谢!
You're welcome!
Como no se me ocurrio antes, usar la parte del agua como mapa de desplazamiento para hacer el reflejo, siempre usaba el FILTRO DE LA GALERIA "ondas", pero de esta manera la imagen a reflejar queda mucho mas integrada.
Si! pero nota que los canales son differentes! No solo es una imagen de agua.
thank you for the tutorial. about 11:05 - is there a reason you don't just check the "don't show again"?
I reset my photoshop all the time to do tutorials, so I don't bother anymore.
Now that you can get a depth map from any image in photoshop, thanks to the neural filter depth blur. it is perhaps a good time to revisit displacement maps?
In particular, I wonder if you could cover how to create a 3D version of any 2D by first creating a depth map with the neural filer, and then a left and right eye view using the displacement map? And perhaps finish off by turning the two views into an anaglyph, using the channel mixer, or layer styles..
While the depth maps that PS can now make give good left and right eye views and anaglyphs, if I make the latter in StereoPhoto Maker, I have not been able to get good results with the displacement filter in PS..
wow!
Thank you, zv more!
Was trying to work along with this tutorial, but probably need reference images... (like the psd's you open ?).
This is a free preview of my compositing course. The files are included in the course.
photoshoptrainingchannel.com/product/photoshop-compositing/
Okay. I understand. Thanks JR!
Okay -- Sold! I want to purchase the course ... but I cannot find it ...? BTW: When you went to remove noise from the image to be mapped, why did you use Gaussian Blur, rather than the Reduce Noise filter?
It's here Lorien.
photoshoptrainingchannel.com/product/photoshop-compositing/
I added blur because I wanted to soften up the image more than what Reduce Noise would do for me.
Hey thanks for the tutorial. But I'm having an issue with my displacement filter not exporting. It doesn't even show up on the export. And when I try and group the layers it disappears. Any help? Thank you
Hi Jesus, I used this technique before after watching this crystal-clear tutorial, but I have an image where i can't seem to get it to work. Its a fairly small image of a WD external harddrive with a wavepattern on in (I assume you know that kind of drive) and I want the first letter of my name to follow the waveform, but it just doesn't work. I've tried again and again but seem to miss something.
I don't know anywhere to go but write to you to solve this 'problem'. Kind regards, Ron (Netherlands)
I was a bit late to read this message! 😂 But I'm glad you figured it out!!!
I'm wowing
I'm glad you found it useful, jack! Thanks for Watching!
This is awesome stuff, man.
Is there a place where I can find that water displacement mask file? Or did you make that one yourself?
I made it myself, and it comes with the course that this video belongs to.
photoshoptrainingchannel.com/product/photoshop-compositing/
GOOD STUFF. ONLY QUESTION IS WHY DIDN'T YOU DESATURATE THE WATER LAYER FOR THE DISPLACEMENT MAP? ALL DISPLACEMENT MAPS SHOULD BE IN BLACK AND WHITE CORRECT?
They don't have to be. The displace filter looks at the channels to do the displacement. Sometimes I do saturate the images to see with more ease the amount of displace that may happen.
Does your course have subtitles?
Im unable to "cmd + option + g" to make it effect only the layer below it, described in 20:09. What I am doing wrong?
Try selecting the layer on top, then go to Layer > Create Clipping Mask
When I follow your directions to look at the wave displacement map in the channels, I don't get the different views in the respective color channels. They all look the same and are in B&W. What am I doing wrong?
Cathy, did you purchase my course? If so then the file provided should have different channels. Message me through my website if you need any more help with that. Thank you!
Cathy, if you purchased the course and are using the files provided it should all work. Message me through my website if you need further assistance.
Hello Jesus,
I've one question , Earlier In a composite video ( little boy lying on a big bear in jungle) you've teach us an advanced technique to match up/adjust the saturation & brightness to make a composite look real with the background, so that we can make the newly added subject to look like it is a part of the background and I love that technique.
The problem comes here, I forget that technique/method and I can't find the video in your channel. have you removed it? If this the case, please share with us again if there was not any problem doing so, Please Sir.
Thank You,
Surajit Das
I might of showed that on a live presentation that you might have watched. I don't think I have a video on that. If you bought my course, then it was on there. I just don't think I have it on TH-cam.
Where to find the displacement map for the water effect?
This is a free preview of my compositing course. The files are included in the course.
photoshoptrainingchannel.com/product/photoshop-compositing/
09:15 - 29-Dec-2022
27:49 - Done
Great work with explaining this coordinate system but there are still misteries of displacement maps which I can't solve. You mantiond that you have to target displacement source every single time, however there are existing particle effects actions which ask about the texture only once, and than just repeat displacement several times with same source in different directions, so there must be some way to select source file with texture only once for few displacements in different directions but how? I've managed to make simple action, but I have to selecting source every single time, with 5 displacements it's getting anoying, and I'd like to make action with even more to cover 360 radious. It bugs me as hell couse this would be so easier and faster to test different textures like foamed waves or marble, or fractals or sth like here:
th-cam.com/video/GstfhQEHkds/w-d-xo.html&t=25&fbclid=IwAR0R20aHaY2DgoHJnQINyU8BOTLM5KoJq5XX8O1Z0kr6A-q5fIfz6-6F7LA
th-cam.com/video/prjjZKl6ucI/w-d-xo.html
In Spanish linguage please!
very complicated filter insane complicate with minor resultates or insignificant efect. Whoom need such filter and why waste time to make extra psd all minor efect procedures to obtain this heavy use unusable slow and complicated FILTER.