Loved this. As always, Corinne, your tutorial is informative and easy to follow. Yes for the Explore Air 2, and some ways to use embossing with too, please. 💕💕
This is amazing! I was telling my hubs last night that I needed to find a tutorial about this because I wanted to a card like this. Thank you soooo much!! You’re amazing! It came out beautiful 😍 stay blessed love 🥰
I love this, and it is so informative. I am still a little confused about the dots. I would love to see more, I have a Maker, and I would like to do greeting cards. Thank you so much for this video.
The dots are just to keep everything lined up. When the cricut cuts vs scores it moves slightly and the dots are registration marks telling the cricut where to hold the design
WOW!! You are a genius Corinne!! This is fantastic!! I love how this turned out and would love to see how you would use it in different projects. I'm not much of a paper crafter but I might be now!! Thank you so much for all of the amazing ideas you share with us. This one really blew my mind!! I LOVE the image you used too. Anything beachy or nautical is totally my jam!! 🤯🩷💯🫶🏽
Wow, awesome!! Please share more about how the “registration” circles work - I understand why you had to unload the first mat, but now I don’t quite understand how the circles help. A video with more examples would be great! I’d also really like to understand the layers panel more - how Design Space places layers where it does, how to find specific layers & move them, etc. Thanks so much, Corrine!!
Because the offset is slightly larger so the machine will have it moved slightly over than the cut making the debossing tool roll over the cardstock underneath rather than next to it
yes for the explore tutorial! Thank you for offering! I just got a cricut maker 3 at work and a debossing tool, but at home I only have the explore air 2
Thank you for posting this! It explained things to me at a more understanding level! I would love to see a more advanced or intricate design made knowing I’m afraid 😅 of trying out embossing but will give it a try after seeing your tutorial! I would say your video and explanation is really beginner friendly and will share it to other crafters in the future!😊
Yes please, I would love to see how you do this for the Explorer. I loved your explanation for this. Nice and easy to understand. I went and bought a manual die cut machine just so that I could do embossing but if there is an easy way to do it on my Explorer, I would love to know. thanks
Just tried this and it turned out very well! So helpful to know it can be done! Does this method only work for embossing something on the large and plain side, or will it also work on much smaller designs? Thank you so much!!
This is helpful, except of the dots. I have a Maker 3. I was not able to attach the dots to the basic cut and the deboss. Design wouldn't let me....is there a difference in machines or a reason that I can't do the same as you did?
Nope just tried it and it attaches just fine. It’s likely something you did on your design. Make sure all items are set to basic cut and then make sure everything is selected to attach. All machines use the same software
Ok do I need both as I only want to emboss ..ie I always make 3d houses and my big shot the folders aren't bigger enough to add the card in I have turn once I emboss one part so I'm thinking if I can emboss a whole 12x12 card (brick image)it would save me so much time
@@paisleylis6181 the tool is the debossing tool. There is only one and yes you need it to do this. You need the head and the quick swap housing. Everything is linked in the video description
Hi! I'm very new to the Cricut world. I tried to do this step by step but when I clicked Make, it only gave me one mat and there's two sets of the text 😩 Would appreciate your advice, thank you!
Followed everything precisely up to "Make" but I don't get two mats, just one mat with Deboss and Basic Cut on that mat. I started over again several times, even restarting Cricut Design Space , and I still don't get two mats at the "Make" step.....what in the world am I doing wrong???
@@CorinneBlackstone I'm just trying to emboss a simple circle to test, I have followed every tiny step in the video exactly but never get two mats upon clicking "Make". I've rewatched the video and followed every step multiple times from the beginning of the design space segment but still just get a single mat.
@ well if you’re not getting two mats you have absolutely missed a step. For just a circle you would create the original circle the. The offset for the embossing part. Make both different colors. Then to ensure they line up create your shape (call it a square) and you make two squares line them up on top of each other and place them next to (near the circle) then select just one square and one circle and attach. Then select the other square and the other circle and attach. Make sure the smaller circle is set to cut and the larger offset is set to deboss. From them you should have two attached layers in different colors on your layers panel. Then when you click make it if you have done exactly what I have said there will be two mats. Now also mind you I have not done this since these videos were released and it could be design space being stupid or cricut realizing that yet again I have figured out a way to do something they didn’t want the machine to do and they have rigged it so design space doesn’t do this. But I doubt that. I will try to test this out tomorrow
@@CorinneBlackstone I really appreciate your input! However, I've had my Cricut for 2 years so I am used to cutting and scoring with design space. I just noticed that if I do NOT attach the elements I DO get 2 mats upon making with deboss on layer 1 and basic cut on layer 2. Attaching elements just throws them on the same layer. I am stumped.
It’s so they line up correctly as I mention in the video design space will move the embossing over just a little bit so by adding the circle it will keep it lined up


Yes please for the explore series
Same!
me too please
Me too.
Yes explore 2
Yes please for the explore tutorial. Love all your videos. 😊
Thank you! Another yes vote for a tutorial for the Explorer.
Yes, please, for the Explore Air 2 tutorial. Thank you.
I’ve watched several of these and this is the first one I actually understood! Yes please on projects using this technique.
I was afraid to try also. I learned quite a bit and I'm ready to get started. Thanks Corinne
Loved this. As always, Corinne, your tutorial is informative and easy to follow. Yes for the Explore Air 2, and some ways to use embossing with too, please. 💕💕
Hi! Yes, please show us how to emboss with Explore Air 2.
I love your teaching method.
Thank you so much!
@@CorinneBlackstone cricut explore, 2
@@virginiatrent8404 th-cam.com/video/zaNJG8gE9VU/w-d-xo.htmlsi=FApjYNEzZQyhDs1I
Yes for Explore Air video!
Explorer please. Love your videos!
Yes for sure the explore 3
@@liliancollins3627 its the same as this th-cam.com/video/zaNJG8gE9VU/w-d-xo.htmlsi=FApjYNEzZQyhDs1I
This is amazing! I was telling my hubs last night that I needed to find a tutorial about this because I wanted to a card like this. Thank you soooo much!! You’re amazing! It came out beautiful 😍 stay blessed love 🥰
I love this, and it is so informative. I am still a little confused about the dots. I would love to see more, I have a Maker, and I would like to do greeting cards. Thank you so much for this video.
The dots are just to keep everything lined up. When the cricut cuts vs scores it moves slightly and the dots are registration marks telling the cricut where to hold the design
Thank you so much for your videos.
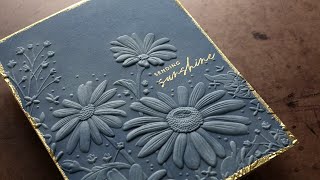
WOW!! You are a genius Corinne!! This is fantastic!! I love how this turned out and would love to see how you would use it in different projects. I'm not much of a paper crafter but I might be now!! Thank you so much for all of the amazing ideas you share with us. This one really blew my mind!! I LOVE the image you used too. Anything beachy or nautical is totally my jam!!
🤯🩷💯🫶🏽
oh Corinne this is really "awesome" and I am planning on trying out as soon as I can. Thank you for sharing 🤗
I would love to see different ways to use the embossing method.
Pretty cool embossing tutorial ! Thank you ! 😊
Yes, explore tutorial please!😊
Yes, please show us how to do it with an Explore air 2.😁
I did :) th-cam.com/video/zaNJG8gE9VU/w-d-xo.htmlsi=FApjYNEzZQyhDs1I
I finally believe that I can do this!❤
Wow, awesome!! Please share more about how the “registration” circles work - I understand why you had to unload the first mat, but now I don’t quite understand how the circles help. A video with more examples would be great! I’d also really like to understand the layers panel more - how Design Space places layers where it does, how to find specific layers & move them, etc. Thanks so much, Corrine!!
Because the offset is slightly larger so the machine will have it moved slightly over than the cut making the debossing tool roll over the cardstock underneath rather than next to it
@@CorinneBlackstone ah! Thanks!
I still don't get it
yes for the explore tutorial! Thank you for offering! I just got a cricut maker 3 at work and a debossing tool, but at home I only have the explore air 2
This was so easy to follow. Thank you so much. Can hardly wait to give it a try.
Thank you for posting this! It explained things to me at a more understanding level! I would love to see a more advanced or intricate design made knowing I’m afraid 😅 of trying out embossing but will give it a try after seeing your tutorial! I would say your video and explanation is really beginner friendly and will share it to other crafters in the future!😊
Definitely would love to see it using it with explorer series. Thank you.
Love this ❤ New to the cricut world so this was very handy. Real easy to understand!
Thank you so much! I really appreciate your sweet comment! ❤️
Yes please explore air 2. Thank you🙏🏻
@@yeseniafuerte2579 th-cam.com/video/zaNJG8gE9VU/w-d-xo.htmlsi=FApjYNEzZQyhDs1I
Definitely interested in how to for the explore Air 2!
th-cam.com/video/zaNJG8gE9VU/w-d-xo.htmlsi=FApjYNEzZQyhDs1I
Yes please for the explorer air 2.
Thank you 😊
@@KimMerdian th-cam.com/video/zaNJG8gE9VU/w-d-xo.htmlsi=FApjYNEzZQyhDs1I
Brilliant Corrine, thank you
Awesome video and great instructions.TFS🌴💕
Thank you! ❤️
Yes some projects please. I’ve had my makers for about four years now I never knew they did that. lol 😂
Yes, this looks great but I’d like to see what more I can do with it once designed. Thank you for sharing your experience
Yes please have otherembossing projects like card background embossing . 😊
Yes please, I would love to see how you do this for the Explorer. I loved your explanation for this. Nice and easy to understand. I went and bought a manual die cut machine just so that I could do embossing but if there is an easy way to do it on my Explorer, I would love to know. thanks
Thanks so much for sharing.
Excellent tutorial! Thank you so much!
Love that ♥️
❤ thank you for sharing!
Would love to see with the Explore also.
Yes, with the Explore Air 2 and 3
Great Tutorial!
Just tried this and it turned out very well! So helpful to know it can be done! Does this method only work for embossing something on the large and plain side, or will it also work on much smaller designs? Thank you so much!!
Absolutely works with smaller designs
Would love how to do this on my Explore Air 2!!! Thank you!
I love this video!!!! Would you do the same method on acetate? I would like to make some designs for fondant
Yes you may need to use a bit higher pressure though
Could you do the one with the cricut explte machine? I would love to learn that
Https://th-cam.com/video/zaNJG8gE9VU/w-d-xo.htmlsi=FApjYNEzZQyhDs1I
Yes explorer 3 and 2 i have both
Great video!
Hi, yes Cricut Explore 3 please 🙏
@@BibleBulletsBarbells it’s done the same as the explore air 2 th-cam.com/video/zaNJG8gE9VU/w-d-xo.htmlsi=FApjYNEzZQyhDs1I
That is so freaking cool! So you can only emboss with another paper underneath it?
Yep otherwise it’s debossing which is like a concave
@CorinneBlackstone you're video is so informative thank you. I assume you have emboss videos too?
@ this is embossing. Debossing videos not yet. I have some plans coming though!
@@CorinneBlackstone looking forward to them
Great video!
I see you have a Juliet, I just got one for Christmas. Do you think you’ll do any videos for that?
Probably not anytime soon.
Plus I’d like to know what do you do with it once embossed. Ideas please.
Thank you for this! Do you think it would work with a thick vellum? This is what I am hoping to do.
@@burninghandart it should
@@CorinneBlackstone thank you for this video! I am so excited to try!
I would love to learn how to do it on a explorer
@@cjthom1991 th-cam.com/video/zaNJG8gE9VU/w-d-xo.htmlsi=FApjYNEzZQyhDs1I
yes please explore and projects
I do have an explore version now :) Its so FUN!!! th-cam.com/video/zaNJG8gE9VU/w-d-xo.htmlsi=91h_hFqvkPS2hSYB
Yes please can you make a video of how to emboss with the explore air 2
@@kaycansing th-cam.com/video/zaNJG8gE9VU/w-d-xo.htmlsi=FApjYNEzZQyhDs1I
Yes, please send instructions on how to debose on the Explorer machine.
th-cam.com/video/zaNJG8gE9VU/w-d-xo.htmlsi=FApjYNEzZQyhDs1I
Would love to see it in the Explore cricut please
It’s coming! :) just finished editing today!
What kind of project would you use something like this for? I’ve never heard of this before! Thanks 😊
Cards, bookmarks, I’ve done it with fun theater tickets for events. Wedding invitations, envelopes. There are so many things
I would like to know how to do it on explorer series pleaseand thanks
I would like to do embossing on parchment paper to use for cookie decorating. What type of parchment paper would work?
I’m not sure I would think any kind would work you would need to adjust the settings so it doesn’t rip the paper but I don’t see why it wouldn’t work
This is helpful, except of the dots. I have a Maker 3. I was not able to attach the dots to the basic cut and the deboss. Design wouldn't let me....is there a difference in machines or a reason that I can't do the same as you did?
Nope just tried it and it attaches just fine. It’s likely something you did on your design. Make sure all items are set to basic cut and then make sure everything is selected to attach. All machines use the same software
Would love to know how to to on explore 3
Did you create the stay salty? If so what font? or did you purchase the SVG and if so, from where?
It’s from creative fabrica www.creativefabrica.com/product/stay-salty-beach-svg-file/ref/236877/
Yes please
Directions for an explore please 😊
th-cam.com/video/zaNJG8gE9VU/w-d-xo.htmlsi=FApjYNEzZQyhDs1I
I want to do it with my Explore Air 2, please? ❤
Ok do I need both as I only want to emboss ..ie I always make 3d houses and my big shot the folders aren't bigger enough to add the card in I have turn once I emboss one part so I'm thinking if I can emboss a whole 12x12 card (brick image)it would save me so much time
@@paisleylis6181 do you need both what?
@CorinneBlackstone the tool. or is it just one attachment that can do both embossing and embossing
@@paisleylis6181 the tool is the debossing tool. There is only one and yes you need it to do this. You need the head and the quick swap housing. Everything is linked in the video description
@CorinneBlackstone OK thank you
I have the maker however I do not have the embossing tool, is there a work-a-round with maybe using the scoring tool?
There will be a tutorial coming for the explore which will explain how to work around not having the debossing tool
Looking forward for this tutorial.
@@CorinneBlackstoneso excited for this video!!
Yes I have explore air2. Please.
I was wondering if I don’t have heavy card stock can I use cereal box material?
Sure can!
@@CorinneBlackstone great! i’m going to try that tomorrow.
Hello, there.....what cut setting will cut cereal box cardboard?@shaunebartoo
there is a setting called cereal box in the material settings. don’t forget to use deep point blade!
Can you do a full page pattern tutorial
Did one th-cam.com/video/zaNJG8gE9VU/w-d-xo.htmlsi=FApjYNEzZQyhDs1I
Explore 3, please
Explorer series please
Hi! I'm very new to the Cricut world. I tried to do this step by step but when I clicked Make, it only gave me one mat and there's two sets of the text 😩 Would appreciate your advice, thank you!
@@cecilsbandi4516 3:15 add an offset
And make sure it’s a different color do not attach them
For Explore 3 PLEASE
Can I do it on explore
th-cam.com/video/zaNJG8gE9VU/w-d-xo.htmlsi=FApjYNEzZQyhDs1I
Did anyone try embossing on a napkin? Would love to know if that’s a possibility
@@craftadoocrafts I think it would be possible. I don’t know how stable it would be or how long it would last since it’s such a soft thin material
@@CorinneBlackstonewould you want to try it out for us?😊
This would be nice to cut the same phrase out of vinyl and layer over top
The only issue would be pressing the vinyl down might flatten the embossing. But maybe if you did it on the mat before you take off the design
Cricut Explore Air 2 please
@@admcquillen th-cam.com/video/zaNJG8gE9VU/w-d-xo.htmlsi=FApjYNEzZQyhDs1I
Explore 2 please.
Followed everything precisely up to "Make" but I don't get two mats, just one mat with Deboss and Basic Cut on that mat. I started over again several times, even restarting Cricut Design Space , and I still don't get two mats at the "Make" step.....what in the world am I doing wrong???
@@user-ke5md1ho8h make sure you are not attaching the two different designs and be sure they are two different colors
@@CorinneBlackstone I'm just trying to emboss a simple circle to test, I have followed every tiny step in the video exactly but never get two mats upon clicking "Make". I've rewatched the video and followed every step multiple times from the beginning of the design space segment but still just get a single mat.
@ well if you’re not getting two mats you have absolutely missed a step.
For just a circle you would create the original circle the. The offset for the embossing part. Make both different colors. Then to ensure they line up create your shape (call it a square) and you make two squares line them up on top of each other and place them next to (near the circle) then select just one square and one circle and attach. Then select the other square and the other circle and attach. Make sure the smaller circle is set to cut and the larger offset is set to deboss. From them you should have two attached layers in different colors on your layers panel. Then when you click make it if you have done exactly what I have said there will be two mats.
Now also mind you I have not done this since these videos were released and it could be design space being stupid or cricut realizing that yet again I have figured out a way to do something they didn’t want the machine to do and they have rigged it so design space doesn’t do this. But I doubt that. I will try to test this out tomorrow
@@CorinneBlackstone I really appreciate your input! However, I've had my Cricut for 2 years so I am used to cutting and scoring with design space. I just noticed that if I do NOT attach the elements I DO get 2 mats upon making with deboss on layer 1 and basic cut on layer 2. Attaching elements just throws them on the same layer. I am stumped.
@ I’ll have to try it tomorrow and see if it’s design space screwing up or not.
🔥
Explorer please
th-cam.com/video/zaNJG8gE9VU/w-d-xo.htmlsi=FApjYNEzZQyhDs1I
Air 2
th-cam.com/video/zaNJG8gE9VU/w-d-xo.htmlsi=FApjYNEzZQyhDs1I
@CorinneBlackstone almost half ways through watching it. Thank you
I don’t understand the whole concept of having to put the tiny circle on it!
It’s so they line up correctly as I mention in the video design space will move the embossing over just a little bit so by adding the circle it will keep it lined up
What is the name of your pick tool?
@@bernadettetibbo1174 it’s a pin pen I got it here amzn.to/49yrPqJ
Love the debross
Explore 2, please
th-cam.com/video/zaNJG8gE9VU/w-d-xo.htmlsi=FApjYNEzZQyhDs1I