Until properly tested this remains an interesting theory. Just increasing the perimeters might be enough to achieve nearly the same result. Hope you follow up with an actual test. :)
Some very good points. I've got an interesting test to see the impact of this method compared to just increasing perimeters, and compared to increasing the infil up to the same material usage or print time. Watch this space!
I can see this being more useful for making large prints with zero or very very little infill. As you could design an internal structure exactly how you want/need in the prints hollow body. Which should in theory add lots of strength while removing potentially 90% of the weight, time and material usage. Very exciting! 😊
Better than some slicer trickery would be to properly design the part for FDM printing, which this part is clearly not. e.g. the tabs on top which could break easily, ruining the whole massive print. The foot uses way to much material which is not really needed and the thin middle part is just a sub-optimal engineering choice. From an engineering point a simple tube without even infill would do there. Just increase the diameter of the tube a bit and the strength goes up massively. Or at least use a different infill. Gyroid is not the best when it comes to adhesion as the layers are not stacked perfectly on top of each other. More simple infills like grid would be better. Or just increase the wall count - as those take bending forces, not infill...
This is a drone stand I designed, have printed dozens if not hundreds over several years, and have also shipped them around the world and I think only once the tabs at the top have broken off, and that was due to poor handling in shipping. I also freely share this design on Printables and MakerWorld and people don't have an issue printing and using the design. Regarding the foot, the infil etc in this video was used as an example to better show what I was talking about, but if you're reffering to the size and shape of the foot, that's an aesthetic choice, not a practical one. If you don't like it, that's fine with me but it's nothing to do with engineering. There are advantages and disadantages to all infill designs but I personally find gyroid to be the most effective (using slightly lower percentage infil) for a great number of my models. If by adhesion you are referring to the joining of the infil to the inner perimeters, I'd suggest you look into adjusting your infill anchor size and infill/wall overlap as that has never been an issue for me in 10 years. As for increasing wall count, that's pretty much what this trick does, but it extends the scope of the walls so it adds internal structural strenght as well as just on the perimeter.
Great reply! I was thinking the same thing as I watched the video. I've been using solidworks for 30 yrs now & I always look for ways of strengthening parts while reducing material. 😃👍🏻
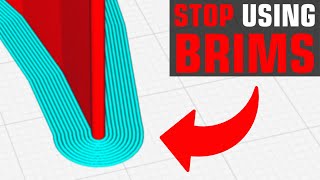
While its a cool idea, It does leave visible marks on the outside of the print, you can even see it in the slicer in this example. If you are fussy about look when printed then you would need to not have it so close to the outer edge wall. It would have been more helpful if you had printed two off, one without and one with to see the differences, both visually and for strength.
You are right, in this example it does leave an external mark (albeit very small). However, you can get around that by moving it further in from the outer perimeter by another 0.4-0.6mm and increasing the perimeter walls. I appreciate your wanting a printed example of one with and one without, and this is something I'll consider if I cover this again in the future, however, the priority for this video was to increase strength, and perfect aesthetics hadn't been the main focus point. But absolutely, it is something I should have mentioned.
It really depends on your budget and OS preference. Also if you have any other primary uses for the device other than 3D modeling (such as video editing, animation etc)
@@robertohernandez4063 Again, it really depends on your budge. I could recommend you laptops worth £5000-6000, or ones worth £500. The more expensive ones are obviously going to be more powerful and more capable, but it comes down to what you're able to spend. If you give me a rough price bracket I can make some recommendations. Also as I mentioned, it's good to know if you'll have any other use cases for the laptop other than 3D modelling as they may require things which are less important to 3D design


Just came across this video - so much potential for this idea - thanks for posting.
Glad it was helpful! Happy printing!
Same here. I’ve been struggling with certain parts of a gambody print. Keeps snapping, im going to do this
Hi. Thanks a lot for the info!
My pleasure!
Until properly tested this remains an interesting theory. Just increasing the perimeters might be enough to achieve nearly the same result. Hope you follow up with an actual test. :)
Some very good points. I've got an interesting test to see the impact of this method compared to just increasing perimeters, and compared to increasing the infil up to the same material usage or print time. Watch this space!
I can see this being more useful for making large prints with zero or very very little infill. As you could design an internal structure exactly how you want/need in the prints hollow body. Which should in theory add lots of strength while removing potentially 90% of the weight, time and material usage. Very exciting! 😊
Better than some slicer trickery would be to properly design the part for FDM printing, which this part is clearly not. e.g. the tabs on top which could break easily, ruining the whole massive print. The foot uses way to much material which is not really needed and the thin middle part is just a sub-optimal engineering choice. From an engineering point a simple tube without even infill would do there. Just increase the diameter of the tube a bit and the strength goes up massively. Or at least use a different infill. Gyroid is not the best when it comes to adhesion as the layers are not stacked perfectly on top of each other. More simple infills like grid would be better. Or just increase the wall count - as those take bending forces, not infill...
This is a drone stand I designed, have printed dozens if not hundreds over several years, and have also shipped them around the world and I think only once the tabs at the top have broken off, and that was due to poor handling in shipping.
I also freely share this design on Printables and MakerWorld and people don't have an issue printing and using the design.
Regarding the foot, the infil etc in this video was used as an example to better show what I was talking about, but if you're reffering to the size and shape of the foot, that's an aesthetic choice, not a practical one. If you don't like it, that's fine with me but it's nothing to do with engineering.
There are advantages and disadantages to all infill designs but I personally find gyroid to be the most effective (using slightly lower percentage infil) for a great number of my models. If by adhesion you are referring to the joining of the infil to the inner perimeters, I'd suggest you look into adjusting your infill anchor size and infill/wall overlap as that has never been an issue for me in 10 years.
As for increasing wall count, that's pretty much what this trick does, but it extends the scope of the walls so it adds internal structural strenght as well as just on the perimeter.
Great reply! I was thinking the same thing as I watched the video. I've been using solidworks for 30 yrs now & I always look for ways of strengthening parts while reducing material. 😃👍🏻
How to set up for .8 Nozzle
In general or specifically regarding the feature in this video? This feature should work the same for any nozzle size
While its a cool idea, It does leave visible marks on the outside of the print, you can even see it in the slicer in this example. If you are fussy about look when printed then you would need to not have it so close to the outer edge wall. It would have been more helpful if you had printed two off, one without and one with to see the differences, both visually and for strength.
You are right, in this example it does leave an external mark (albeit very small).
However, you can get around that by moving it further in from the outer perimeter by another 0.4-0.6mm and increasing the perimeter walls. I appreciate your wanting a printed example of one with and one without, and this is something I'll consider if I cover this again in the future, however, the priority for this video was to increase strength, and perfect aesthetics hadn't been the main focus point. But absolutely, it is something I should have mentioned.
Is there an equivalent function in Cura?
I'm not 100% sure but I don't believe so.
@@3DRevolutionI can't seem to find it so maybe not.
Would you know of a good laptop or tablet for 3D modeling?
It really depends on your budget and OS preference.
Also if you have any other primary uses for the device other than 3D modeling (such as video editing, animation etc)
@@3DRevolution what's a good start?
@@robertohernandez4063 Again, it really depends on your budge. I could recommend you laptops worth £5000-6000, or ones worth £500. The more expensive ones are obviously going to be more powerful and more capable, but it comes down to what you're able to spend. If you give me a rough price bracket I can make some recommendations.
Also as I mentioned, it's good to know if you'll have any other use cases for the laptop other than 3D modelling as they may require things which are less important to 3D design
I can't breathe
Are you ok?