How to oversew piping on foamed panels - Car upholstery basics

ฝัง
- เผยแพร่เมื่อ 6 ส.ค. 2022
- ✅Get our courses at: www.cechaflo.com
------------------------------------------------------------------------------------------------------------
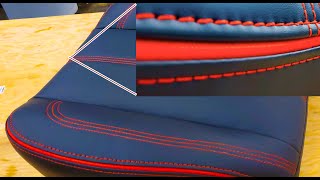
This is another video demonstration on how to sew down piping to a lateral surrounding panel which is then attached to a 1 cm thick foamed vinyl panel.
This panel has foamed 5 cm wide channels made by blind stitching on the reverse side of vinyl material.
As shown in previous videos to ease the sewing over and along the edges it is advisable to flatten the foamed edges. It helps a lot with the attaching of vinyl layers including the piping strip.
Perhaps, the most important tip in the video is the making of the piping strip gluing the reverse sides of the vinyl strip.
The piping strip looks more perfect and easier to make. After having it ready it is attached to the lateral panel the same way we did on previous videos.
The secret to get a nice piping is that our piping foot hollow part that houses the cord is slightly wider. Consequently, the first sewing is not close to the enclosed piping cord. It leaves 2 mm approx. for the final closing sewing.
The hollow part of the piping foot is the measure for the final closing sewing which is bulky due to the several layers of vinyl including the plastic cord.
At the end the cover was oversewn with decorative orange stitches. The spring loaded guide presser foot is useful to get a straight and easier sewing. As seated in front of the sewing machine we realize the presser foot spring loaded guide is on the right side. It makes our cover remain under the sewing machine head. As we can see there is not much room for our cover. As mentioned before in a former video the best would be to use a left spring loaded guide presser foot. This way if we are sewing a big cover it would remain on the left side of the sewing machine table.
I hope you find this video useful!
Cesar - ยานยนต์และพาหนะ


Absolute legend who's mastered his craft as well as teaching I'm astonished how fast I pick stuff up after watching this man and his teachings. Huge thank you from a new person to sewing and upholstery
your good upholstery work I like 👍 because I am also sofamaker upholsterer
Thank you for all your videos. The one of many things that I have learned from you is take it slow and patience.
Дуже сподобалась відстрочка, вогонь!!! І зацікавив мене упор... Дуже класний!
PERFECTION ... 💞💞 Joy to watch the "MASTER" ... Couture quality !!!
Take your time is what i learned and stretch the turns
The finish is perfect. I really liked how it turned out and I would like to learn...thank you for giving us those very good videos
He seems slow to me but the work is top notch. I would love to see if you had any vids, I have an old singer too and didn't think I could do this type of work with it
It's not my trade I am a Joiner but I love watching you do this stuff. I even get a bit tense on those tricky bits on the curves. :-) I'm so impressed I was wondering of you would have time to make me up a Vinyl suite for a wedding. :-)
Many thanks for all video, you motivate us on the way to do proper job.
So beautiful!! You mesmerize me every time!! Lol. 😍
Bravo bravo 👏👏👏 my friend you sharing your technic for upholstery making
bravo 👏👏👏👏👍👍👍👍👍👍👍
Can you hear the Doves singing as the master makes magic happen.. that old, if you could talk to anyone on this bench who'd it be question..☝️
Como siempre, admirable trabajo, Maestro !
Excelente!!! Saludos desde Argentina ! 🇦🇷
Thank you for all video
руки этого мастера, это визитная карточка мастерства! )
Your attention to detail is amazing. I never thought of using glue on welt cord.
It is faster and more precise way of preparing welting. Pipings strips look like factory made. It also works out for leather material. A line of pricking holes is saved avoiding weakening of the material.
@@Cechaflo Many years ago I took an upholstery class. They taught to first sew the welt to the first piece further away from the cord. Then sew the second piece to those tightening up the welt by sewing closer to the cord.
I like your method.
@@DannyB-cs9vx This previous video shows traditional ways of attaching piping/welting
th-cam.com/video/XjAcX1BGhi8/w-d-xo.html
Thanks so much for watching these videos!
Excelente trabajo maestro Gracias por compartirlo con nosotros saludos
Muchas gracias cada día se aprende algo mas 👍
Muito bonito seu trabalho como sempre você é muito caprichoso valeu
That machine must be very well tuned and maintained, its ticking as softly and gently asa Swiss watch
Very nice. You need to do the seats on my dad's Jimmy. We are looking at green plaid and white vinyl (its a green convertible).
Одно плохо, в России в ближайшее время, заблокируют ютуб и не смогу больше видеть Ваши шедевры. Всегда очень внимательно слежу за Вашими пальцами, они о МНОГОМ могут рассказать.
Браво!!!
Hopefully, those bad events will never happen.
Благодарю Вас, что Вы есть у нас!!!
Будем надеяться😁
Руслан, ну может и не закроют
Thank You !
Merci maître toujours c est intéressant tes vidéos
Merci beaucoup scotch 🙏🥰
3mm (diameter) piping, 2πR = 2*3.14*1.5 = 9.42mm (piping perimeter), 3.2cm - 0.942cm = 2.258cm / 2 = 1.129 = 1cm left after the gluing process which is good
Gluing the piping on such hard corners is the recommended technique, the way to go to avoid wrinkles. I would take advantage of that 8mm thread guideline, sewing the first 2 pieces upside down than you did, i would use the seam guide and the thread guideline, both, to make sure the needle is sewing at 2 mm to the inside of that guideline, but experience rules here. For the second part of the sewing process, the piping was glued and sewed at 8mm of the edge to use it as a guideline for the final sewing stage
So we have 8mm (thread guideline) + 2mm (final sewing) = 1cm which is exactly the spot where the needle should be sewing as the calculations showed above, staple the pieces to avoid fabric displacements and notch the corners so the fabric can sit nicely to make the sewing process easier, fantastic work man, keep it up
Thanks 😊 fantastic
Gracias. Profesor perfecto 👌 👍
Как всегда замечательно и познавательно. Спасибо! Здоровья и успехов мастер!
hello exellent work
Vc é o melhor! Nossa referência maior!
Dequemarca
.esla.maquina
nice video nice content congratulations
Com esa máquina y con ese prensa telas
Hasta un niño
awesome
Were you using the same needle for all of the sewing? What size was the orange thread? These videos very interesting and relaxing too! Thanks so much!
This time I used a 140 (european measure)=22(Singer or american measure) needle size. 92 size thread for the closing sewing and 138 orange thread size for the top stitching.
What type of tool are you clipping the material with????
Bravo
Ellerine sağlık usta
Grande professor,m
Me inspirado no seu trabalho e tento copiar alguma coisa.😉👏👏
Спасибо Мастер👍🤝
Nice work, what guides do you use especially the small one that follows into the piping seam?
There is a guide that is constantly pressing the sewing junction. There is a small compression springs (you can see in the rear) that is always pressing the guide to keep it down.th-cam.com/video/KelUBPZCQzg/w-d-xo.html
There are presser foots with guides in different sizes from the line of stitches to the center sewing junction.
www.amazon.com/CKPSMS-Brand-GL-1245-Spring-Side-5MM/dp/B07QHTHCBP
@@Cechaflo thanks, where can I buy such a guide?
@@patrickparisius4086 @patrick parisius You can order it from Amazon, Ebay, AliExpress, etc. Most of these items are for triple transport sewing machines. You have to order one according to your machine model.
These feet are called: Spring loaded guide presser foot . It can be for Juki, Pfaff, Consew, etc.
Excellent work, could I ask where did you purchase your guide presser foot? The one to the right of the main foot 5.10 in video.I have not seen these before. Any help would be greatly appreciated.
It is called suspended edge guide for ....Pfaff, Juki, Consew, Adler, etc.
You can get it on Amazon, Ebay, AliExpress, etc.
www.amazon.com/KUNPENG-KG-1245-suspending-guide-Pfaff/dp/B077MTSHBB
@@Cechaflo Thankyou for letting me know, keep up the good work.
Fiquei curioso a saber mais
Wow.
Comment. Appelle s'est coll bonsoir maître Dieu vous béni.
6:02 esa guía viene con la máquina o se compra por aparté
La guía no viene con la máquina. Son accesorios que se compran aparte y las hay para Pfaff, Adler, Juki, Consew, etc. Se puede comprar en Amazon, Ebay, AliExpress, etc.
www.ebay.com/itm/155000105439
www.amazon.com/Suspended-Industrial-Machine-Dnu-241-Dsc-244/dp/B07Z6LD81X
www.amazon.com/Suspended-Brother-Consew-Walking-Machine/dp/B07Z6JCSB1
For 1/2” foam! What size needle would you be using??
I am using a medium size needle 140 (european measure)=22 (Singer or american measure) Just one needle size for the whole process.
A 160=23 would be much better.
Why would a 160 needle be a better choice?
@@pilotnelson4507 Thicker needles are less prone to bending and causing skipped stitches. It is advisable when sewing/attaching thick foamed panels.
🔥🔥🔥🔥🔥🔥🔥🔥
Where do I get those pliers that snip the vinyl??? What are they called or did you custom make them??
I made it out of a pair of glass pliers.th-cam.com/video/ErA4USKrfN0/w-d-xo.html
These pliers are ready for sale on internet.
www.amazon.com/Universal-Pattern-Notcher-Making-Tailors/dp/B078T3SLXL www.amazon.com/QWORK-Stainless-Identify-Equipment-Animals/dp/B09MFSGPR9
What fabric is used under the foam? I normally use calico
Yes, calico fabric, muslin or thin fabric canvas.
Where can i get the cutter where you cut the red line mark?
Ity is a home made notcher.
th-cam.com/video/ErA4USKrfN0/w-d-xo.html
You could find similar designs online. They are called 'V notcher'.
www.ebay.com/itm/353865221077
how can we found or produce the tool which is cutting the marker points of leather???
It is called V notcher and can be bought on Amazon, Ebay, etc.
www.amazon.com/ZXUY-1-X-Pattern-Notcher/dp/B00134C4HO
vetmeddevices.com/product/ear-notcher-with-v-shaped-notch-7-25/
@@Cechaflo thank you very much, george from Greece!!!!!
Спасибо за видео. Какая модель швейной машинки?
Pfaff 1245-706
What’s the name and material you’re sewing??
I have used a regular upholstery automotive vinyl.
A polyester thread 138 size for top stitches.
What is the glue you are using in this video for the piping?
A regular upholstery yellow glue:th-cam.com/video/o2xeezdF8Ss/w-d-xo.html
@@Cechaflo thank you for the info
😊
que hilo se utilizo para este trabajo?
Hilo de poliester N° 92 (N° 8 en Mexico) para unir las piezas. Hilo N°138 (N° Zero en Mexico) para la sobrecostura decorativa.
Хороша робота!
What kind of machine is this? That guard is really handy.
Pfaff 1245-706/47 (old version)
What size cord for your piping?
A solid piping plastic cord 1/8"
Que tipo de hilo hay que usar.lo más grueso posible.
Para tapicería de carros generalmente se utiliza el hilo 92 (N° 8 en Mexico) para hacer las costuras que unen las piezas. También se utiliza esta medida de hilo para la sobrecostura.
Para darle mas vista (por encima) se utiliza el hilo 138 (N° zero en Mexico) para sobrecoser solamente. Las costuras de sobrecostura van desde 4 mm a 6 mm.
En el caso de muebles estas costuras se pueden hacer con hilos mas gruesos y puntadas de sobrecostura mas largas. Desde 6 mm a 12 mm de largo.
Отличная кропотливая работа, жаль только, что из такого материала...
It is an educational video that shows how a piping strip is attached then oversewn over a foamed panel. In other words, it is only a basic sample I share with my students who have purchased my courses and follow me on youtube.
@@Cechaflo хорошая работа, да
друг, не подскажешь, каким клеем он пользуется?
@@CoEnHe I used a traditional upholstery yellow glue(brushable):th-cam.com/video/o2xeezdF8Ss/w-d-xo.html
QUESTION: what are those pliers he uses? are they cutting or crimping? are they hog ring ? thanks!
Those are regular pliers that help to shape the welt.
These wide jaw locking pliers are much better to press the welt edges:
www.hahn-kolb.net/Todas-las-categorias/Wide-jaw-locking-pliers/5521CL04_TC_0603010421.cyid/5521.cgid/es/ES/EUR/
@@Cechaflo OK el clip negro lo tengo, Y la pinza que usa (a los 13:07) tiene un colmillito, es corta? o prensa temporalmente el material? Gracias!
@@luismagana8130 It is a personal pattern notcher I made out of a pair of pliers
th-cam.com/video/ErA4USKrfN0/w-d-xo.html
You could use instead:canvastraining.com/product/pattern-notcher-14-inch/
@@Cechaflo THANK YOU. I have a lot to learn. 😊
Видео должно называться "Как пришить кант на поролоновых панелях". К пенопласт ничего не пришъешь, он просто расколется и рассыпается.
Can i ask what machine you are using.New subscriber here.
It is an industrial, triple transport sewing machine (walking foot). Pfaff 1245-706 (old version) very similar to a Pfaff 545 H3.
Almost similar to an older version Pfaff 145
Understanding a triple transport sewing machine:
th-cam.com/video/U3HBXBDDKoo/w-d-xo.html
Thanks i am looking at a dorkoff 767 machine to do auto/marine seats only is it a good machine? it is local for sale here.@@Cechaflo
@@racervboat A Durkopp & Adler 767 (old version) sewing machine is a good, powerful one, provided it is in good condition. Check it out.
th-cam.com/video/8AT5qDjwMsY/w-d-xo.html th-cam.com/video/rlcDplc94o4/w-d-xo.htmlsi=hSiOO7qOaZ6Ivksd&t=718
The new version is the Durkopp&Adler 867
🥰🥰🥰🥰
Type of machine please
Pfaff 1245-706/47
🇹🇷🙋♂️👏👏👏👍❤️
🥀🥀🥀🥀🥀🥀🥀
🥀🥀🥀 Terzi 🥀🥀🥀
🥀🥀🥀 Üstat 🥀🥀🥀
🥀🥀🥀 Usta 🥀🥀🥀
🥀🥀🥀🥀🥀🥀🥀
Ése aprendió ayer
I don't know how long you take to do this job, but I will do it faster than you with a 1/4 inch piping foot with an old 1950 singer 111w walking foot sewing machine and it will come out the same way. Keep up the great work 👍
Главное-результат. Но вижу массу ненужных швов. Ну и отделочный шов, когда засовываете все изделие под машинку? Ведь можно взять лапку на другую сторону, и изделие будет слева, так легче. Извините за критику, но ваш метод сложен, вас смотрят и учатся.
🤔🤔🤔🤔😀😀😀😀👍👍👍👍👌👌👌👌👏👏👏👏
Sofa ok
I don't believe this video, because I know a little about putting back the seat to gather. And some things waa missing.