Nice Tutorial, as always. The issue I'm having is that I know what every slider or wheel does in PP but I don't know the "psychology" (if you will) behind the decisions what to change. For Example why did you not want any color in the sky, or why did you want to add a little bit of blue to those tin containers? And do you have any tips on how to learn it? Greetings
At the end of the day its going to be based on the look you're trying to go for many people just copy things and don't know why they do it but i think its important to know what kind of look you want and look into color combinations a lot of people go for that teal and orange look because those colors work really nice together so i would look into color theory to get a better understanding what colors do and you can convey what you're going for
@@cdups24but so many different looks can look “natural”, I think it’s best to ask yourself what is the emotion you want to evoke from the scene, much like when you’re lighting a scene.
try to learn something about color theory. studio binders have some great tutorial about it. so you learn a knowledge about colors and why they are so important for each scene or to try to tell stories.
I have seen a lot of people switch from premiere to Davinci and I see their videos now worse than before, not all are colorists... basically because they have a color program, I also think that colors look better in Adobe and I have used Davinci. Good job.
That's because they aren't used to it.i don't agree with withe colors looks better in adobe part but the above statement is true.they might need some time to figure out resolve.
Thank you for the insightful walkthrough. One question I did have is why you forego importing a conversion LUT for the S-log and start from ground zero. There seems to be a lot of conflicting information and opinions out there about whether or not you should do this and even where in the panel it should be applied if you do (Basic or Creative). Could you explain any insight you may have on these two issues?
When you used the 3 dots to desaturate the yellows in the HSL panels is that the standard way to make adjustments on any scale like that? Just add 3 or more dots and essentially drop the bottom out to desaturate and make a little mountain to saturate?
You should start adding an adjustmentlayer above your clip and import the right slog->rec709 LUT. Sorry for writing that but it looks like you just press every button and that’s it. Working with curves AND color wheels just complicate everything. You will not be able to copy those settings on your 2. Clip and will end up spending a lot of time because the tools are working against each other.. and without the right color space it will not look that good on every device
I appreciate your input dude but this is the workflow that has worked for me for the past 3-4 years. Is it perfect? Probably not but it's exactly how I colour grade all my work. I can copy, paste, create luts and base grades from this workflow too. I guess this is the beauty of creative processes, everyone is different right?
Such a helpful video - thanks for making this! Do you have any setting tips for using premier pro with Mac systems? I’m having an issue where I colour graded the video but when I export it, it just looks washed out. 😳
Hi, thanks for the video and can we bring our cameras to Egypt? I readed about it, if we bring they can take away from us at the airport, there are any risk?
Click on the Workspaces button on the top right hand side. It will look like a piece of paper...my team and I had to watch so many videos to find this...after clicking on that a drop down menu shows, then chose Color. You'll have a similar workspace shown in the video so you can follow along. Good luck!


you can autotrack masks by clicking on the arrow next to the mask options :)
exactly
Trying to get better at coloring :) Thank you for this!
this video literally didnt explain color grading at all.. he just showed "what he does"
Hence “walkthrough” in the title.
Walkthrough = what he does
shtoopid, go read the title
thats literally what a "walkthrough" is
Nice Tutorial, as always.
The issue I'm having is that I know what every slider or wheel does in PP but I don't know the "psychology" (if you will) behind the decisions what to change.
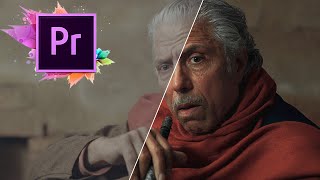
For Example why did you not want any color in the sky, or why did you want to add a little bit of blue to those tin containers?
And do you have any tips on how to learn it?
Greetings
At the end of the day its going to be based on the look you're trying to go for many people just copy things and don't know why they do it but i think its important to know what kind of look you want and look into color combinations a lot of people go for that teal and orange look because those colors work really nice together so i would look into color theory to get a better understanding what colors do and you can convey what you're going for
I think the key is to keep things looking natural.
@@cdups24but so many different looks can look “natural”, I think it’s best to ask yourself what is the emotion you want to evoke from the scene, much like when you’re lighting a scene.
try to learn something about color theory. studio binders have some great tutorial about it. so you learn a knowledge about colors and why they are so important for each scene or to try to tell stories.
@@cdups24wrong
Wow I really needed this I have an R5C and have been using the Canon lot to return it to 709. Really appreciate it
I have seen a lot of people switch from premiere to Davinci and I see their videos now worse than before, not all are colorists... basically because they have a color program, I also think that colors look better in Adobe and I have used Davinci. Good job.
That's because they aren't used to it.i don't agree with withe colors looks better in adobe part but the above statement is true.they might need some time to figure out resolve.
Just because people don’t know how to use it doesn’t mean the simpler program is better
@@brianc8157 Look, next year if the great Sam Kolder moves to Avid Media composer, 80% is behind....with that I think I say it all, I think.
Thank you for the insightful walkthrough. One question I did have is why you forego importing a conversion LUT for the S-log and start from ground zero. There seems to be a lot of conflicting information and opinions out there about whether or not you should do this and even where in the panel it should be applied if you do (Basic or Creative). Could you explain any insight you may have on these two issues?
All respect from Egypt🇪🇬
Thx mate .. pls make a video on overlays and how use them
When you used the 3 dots to desaturate the yellows in the HSL panels is that the standard way to make adjustments on any scale like that? Just add 3 or more dots and essentially drop the bottom out to desaturate and make a little mountain to saturate?
very good tut
Greetings from Egypt
❤
You should start adding an adjustmentlayer above your clip and import the right slog->rec709 LUT.
Sorry for writing that but it looks like you just press every button and that’s it. Working with curves AND color wheels just complicate everything. You will not be able to copy those settings on your 2. Clip and will end up spending a lot of time because the tools are working against each other.. and without the right color space it will not look that good on every device
I appreciate your input dude but this is the workflow that has worked for me for the past 3-4 years. Is it perfect? Probably not but it's exactly how I colour grade all my work. I can copy, paste, create luts and base grades from this workflow too. I guess this is the beauty of creative processes, everyone is different right?
Such a helpful video - thanks for making this! Do you have any setting tips for using premier pro with Mac systems? I’m having an issue where I colour graded the video but when I export it, it just looks washed out. 😳
Amazing video structure, I love learning from you 🙂
good tut
Hi, thanks for the video and can we bring our cameras to Egypt? I readed about it, if we bring they can take away from us at the airport, there are any risk?
excellent work
Thanls man! Subscribed :)
oh dea im love with ur voice.
Cary on
Bro how to edit sound like u plg tell me
This is cool but you never show the color grade in action.. you only show a still image basically
yaaayyyy
❤❤❤❤❤❤❤❤
maybe you should like you know tell how the fuck to get to these panels
Exactly!!
Click on the Workspaces button on the top right hand side. It will look like a piece of paper...my team and I had to watch so many videos to find this...after clicking on that a drop down menu shows, then chose Color. You'll have a similar workspace shown in the video so you can follow along. Good luck!
Give your life to Jesus.
Jesus beckons on you all
🇮🇳🇮🇳🇮🇳🇮🇳🇮🇳se kon kon hai
speak sor long
Bro how to edit sound like u plg tell me