Flip Top Bench Cart

ฝัง
- เผยแพร่เมื่อ 28 ก.ย. 2024
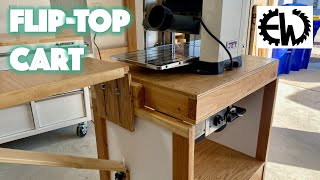
- I built a portable flip/top bench cart , it's fitted with a thicknesser & disc/belt sander with extra storage in the bottom drawer compartment.
99% of material used was 3/4 inch marine grade plyboard & held together with pocket hole screws , My first time using pocket hole jig/screws , I must admit I was very sceptical at first , but was pleasantly surprised with this product .


Just purchased my lumber and hardware for this. There are many videos for these carts but I found yours the most useful. Thanks for the video. Cheers!
Thank Gary , yes there a many of these carts in TH-cam, I simply added my own personal touch to mine , One thing I will say they are very top heavy ! invest in quality castor wheels , add tools in the Bottom drawer (counter the weight-top)
I agree !
What did you get?
I think it looks great, I love how you put your clamps on the cart so they are right there when you need them
Glad you like them! cheers!......I was away (holiday) for a while , limited internet...
Very nice instrument stand! It is a pleasure to watch the work of a wonderful master!
Thank you so much my friend ......🙏
Brilliant build...love those pockets
Thanks very much Mike , glad you liked it .
Very well done! I've watched other flip cart builds, I like your design. Thanks.
Thanks ,,,,, I'm glad you like it ,,,,, cheers mate .
I am looking forward to making this, because it looks great, and is in METRIC MEASUREMENTS!
Thanks so much for the video.
Thank you , I'm glad I can be of help , enjoy your building process , regards Wally .
fantastic build - thank you - love those written numbers
Thanks glad you liked it , cheers !
Thank You, for share this Projekt with us. Greetings from D/Berlin.
My pleasure ! I'm glad you enjoyed my project - Danke und einen schönen Tag .
Sorry for the English mistakes, I'm Brazilian and I'm using Google Translate.
I watched a lot of videos looking for a bench like this to make. Thank you very much for the video and the instructions.
I've already subscribed to the channel.
I'll look at other videos you published, congratulations on the project.
olá meu amigo, fico feliz que você tenha gostado do meu vídeo (banco flip top), obrigado por se inscrever no meu canal, aproveite para assistir mais vídeos meus.
Atenciosamente Wally.
@@metal1301 Thank you so much ! my attitude has always been if people take the time/effort to make a positive comment , then the least I can do is to reply back , have a great day , Regards Wally..
Well done Wally, best build on TH-cam!
Thank you so much Sir .... &. thanks for watching 🙏
Very well documented video. Nicely done.
Thanks very much. ,,,, this project was fun to build - especially knowing no sanding / varnish was required .
That wad the best one I found so far. Good job. Thanks. 😊
I'm glad you like it ! thanks for watching 🙏 .
Loved this build i have often thought about making one as i only have a very small shed but like you had i have my doubts, also liked the play on words with the fridge handle ( intended or otherwise ) 😅🤣😅🤣
Thanks again , there's a lot of functionality in this bench cart, it's space saving & allows me to store accessories in the below drawer & the fact I can move it anywhere in the garage with ease.
Nice build!!
Thanks Rubbernecker !
Great tutorial.
Thanks Mate .... much appreciated 🙏
Nice job! I think I found my next project. We're you able to construct this out of one 4 x 8 sheet of plywood?
You've got me there mate ,,,, to be honest I can't recall ,,, I know I used off cuts for the bottom drawer .
Thx anyway! 😊
Thank you, very helpful for me to build my own. I am subscribing!
Thanks for subscribing David .... let me know how you go (build)...cheers
Great Build. I'll be copying it thank you. FYI you need a new hacksaw blade. LOL
Thanks so much , glad you like it ,,, yup , the hacksaw blade has seen better days ... cheers .
Surprised you didn’t hit one of the 200 screws you used to laminate the flip top. 😂 nicely done!
Thanks, Wally. I've been watch fliptop cart vids for a month or so looking for a a simple and stable cart. I've seen many with the the same top, but the more simple carts looked like they'd rack fairly easily. Your cart is the most stable I've seen. I like that drawer, too. I've never seen one like it. I'm going to make the cart a little wider to stick my Makita mitre saw on it with the dewalt planer.
Thanks for the compliment , yeah the drawers make the unit much more stable , it's top heavy , so I've put extra weight (tools) in the drawers ,,,, my advice - buy top of the range Castor Wheels with rubber tread ! you'll thank me ! ,,,, your new project sounds exciting ! let me know how you go - cheers Wally...
Will do. I'm also adding the folding wings from your miter stand to my version. I use a whacked together sled on the planer so those are only for the mitre saw. It's going to be great. I tore down a large, 3x8-foot diy bench with a 2x4 laminated top and replaced it with a 5' "2x4 Basics" kit bench get back some room and add bench shelf space (you wouldn't believe how strong it is given its sturdiness). I put a dw745 on a rolling cart I built yesterday from John McGrath's channel and I'm moving the planer and mitre to (your) mobile cart to free up benchtop and storage space to have enough room to work in my small basement. It's taken two weeks to get to where I could even start the on saw bench, but it's been worth it. It's already like a new shop. Having enough room to breakdown sheet goods is priceless, and the easy bench tool access/use is heavenly. I'll be able to do all my work in the basement rather than going outside to chop 2x's and sheet goods.
LOLS, "how strong it is given its light weight and sturdiness"
Ahh Yess ,,, the idea of building a cart to support my Makita sliding mitre saw - complete with folding wings , was on my to-do-list also ,,,, working in a warm basement rather than out in the cold sounds good,,,@@screwyougoogleplusnoreally6508
Thanks
Thank you , I really appreciate it. 🙏
Great project, thanks for the video. Where can those casters be purchased?
Thanks so much mate ! ..... casters were purchased at my hardware/building supplies store Bunnings.com.au
Great build since you have been using it for a while is there anything you would change?
Thanks...I can't stress how important it is to attach quality castor wheels with rubber tyres ! as you can imagine it's top heavy .... I've placed more tools in the lower drawer to stabilise the unit,,,,that's why having a drawer is important...cheers !
@@wallytrinc9885 thanks have a great day
I LOVE IT!! That's a fantastic build, I need to make one for my shop. Thank you for sharing!
Thank you , I'm glad you like it , let us know how you go with your build , cheers ,,
Is your thicknessner (planer in the states) still on this cart? I want to build a flip cart for my planer (which I have yet to buy) but concerned about the weight. Its roughly 92lbs /41kg. Video is 10 months old. If your thicknesser has been sitting on it for 10 months, I'm curious if there's any sag or ill effects from the weight.
I'm in Melbourne, Aus , my thicknesser weighs approximately 90lbs + Ryobi sander 42lbs , with a combined weight = 132lbs , it's very top heavy ! to balance this I've added various tools ie power saw , electric hand planer etc in the lower drawer for balance , very important to add quality castor wheels ! .....10 months on , No Bow , No Sag , the 19mm Marine plywood is extremely efficient , hope this answers all your queries , ''cheers ''
Dude, I have a question.I see an error in the measurements visible at 6:45 23/32 seconds of the video.real measure:365+90+90=545 /2=272,5 Why do you measure 271.5?waiting for your reply.thanks.
In a Perfect World , one would use a table saw to cut (6) exact Panels @ 745mm X 545mm. What I tried to emphasise in my DIY , is by simply using a power/saw the everyday ''Punter'' can make a bench cart .
Reviewing my video @ 2:05 23/32 seconds in , the marine ply off/cut straight edge may not have been squarely positioned correctly (1mm ) ? ....combined with a not so sharp saw blade led to the measurement discrepancy.
Where you cleverly highlighted @ 6:45 23/32 seconds , I again measured the upper width (both panels) which measured a Bee's Dick over 543mm- thus giving me a 1/2 point of 271.5mm .
use the whole blade when you use the hex saw.
Ok will do .
Why use a hacksaw when you have an angle grinder?!?!? Placing your planer long ways, would give you more space for in/out feed table.
And using basic tools! Love it! You just earned a Sub
Thank you my good man , much appreciated. 🙏
yOU ARE THE "kING OF pOCKET hOLES" Gave me anxiety through the entire video. Why do you like those pocket hole screws??????
Easy to use - stronger than normal screws - can be hidden easily - & make construction easier , because one can screw things in from the side ....'' aLL hAiL the King ''
Excellent job. I would recommend the 2 following things: 1) you should face your tools opposite directions so when you flip the top, you never end up behind the tool. 2) you should use the retractable stepdown caster wheels so when you're using your cart it can sit level on the ground, and when you need to move it, you step down on the caster wheel and move it. This will also require you build the cart just slightly taller to account for the difference in with and without wheels.
Your analysis does have merit ! thanks for the feedback , regards Wally
Super nice. A long time ago Sears made one simular, but rotated 3 of the smaller table top tools, table saw, belt sander and router table , plus 2 others, I think.. I always wanted it, but now this might be a better one.
Thanks Ken , yeah there are many different versions of flip/tops ,,, making mine on a long work bench did cross my mind .
Dude, you did a great job giving your measurements.I congratulate you on this job.I hope your other work will be as perfect as this.have a nice day and good work.
Thanks so much for your nice compliment ....I always try to challenge myself with new projects ...thanks for watching ''cheers''
Well done! Where did you get the extension cord/"tidy"?
Thank Mate ! I purchased the extension chord/tidy at Bunnings.com.au
I just got my Dewalt planer this past weekend, so now I need a table for it, I’ve been watching videos on the subject for a couple of weeks now, I honestly have to give you credit for the best breakdown video, of step by step action to make this table. Excellent work. Now only to get you to go to IMPERIAL MEASUREMENTS, come join the dark side, leave the metric world behind!! ( you do kinda look like Obi-Wan)
Thanks so much ! that video contained well over 3hrs of video footage which took me an entire week to edit down to 23 minutes ! ................. Ahh yes come to the Dark Side did you say - where we have Cookies ! Mmmm who doesn't love Cookies !
Wally we don’t need to see every pocket hole drilled and every screw driven. Nice design but everything is too tedious they way present it. Try to edit more.
@@kennethspengler9934 Thanks for the feedback! my wife agrees!!!
@kennethspengler9934 , can you share your channel so we can see how it's supposed to be done?
Well, some of us might like "tedious "😊
I reckon I’ve seen a dozen of these on TH-cam now and I reckon your locking mechanism could be my favourite.
Cheers Mate ! glad you like it 👍
Terrific build! Thanks for posting!
Thank you Mr Lawrence , thanks for watching 🙏
Great build. Thanks!
I'm glad you like it 🙏 cheers
Love the Labeling Thank you 😊
Your welcome 👍
love your unique take on this project. Just a tip for next time, if you have a grinder already, you can get a cut off disk for it that will go do those metal cuts much easier. Like a hot knife through butter.
Thanks for the tip mate , great advise 👍
@@wallytrinc9885 one quick note of caution - have a GOOD hold of your grinder. When the cut is almost through sometimes the metal will pinch the disk and the grinder tries to run away. This can cause really bad injuries.
Job well done looks good, now I need one
Thanks very much Sir , glad you like it 🙏
great job!!
Thanks Philip , I'm glad you like it 🙏