I hope this can inspire you to experiment with new ideas in how to treat your line art. I left it out of the video because it's time-sensitive but for the next 30 days, channel members can also download the brushes, palette and the procreate file with the intact layer structure used in this project. If you're reading this comment a month from now just ignore this because it's gone and replaced by new downloads. Thank you for visiting my channel. Now go make some art 🐻🐻
I WANT TO SCREAM WITH JOY AND EXCITEMENT THIS JUST BLEW MY MIND!!!!!!!! I didn’t even know copying the canvas was a thing, I’ve wanted a feature like that for so long! AND THE TECHNIQUES!! THEY ARE _GENIUS!_ I am so excited to create and experiment with this! Thank you SO MUCH mikko!!!! :D 💖
Omg this is legit the craziest tip I’ve ever seen. You’re bleeding color into the line layer. I can’t believe I’ve never thought of this! Thank you mikko!
I would absolutely advise against this since it will also move and deform the position of those lines. If you want retain the position of lines but make them thinner you can select the lines make them into a layer mask->add a tiny Gaussian blur to it and then adjust the curves on that mask to be black and white again. This will eat the edges of each line evenly from both sides without moving the centre point of any lines. This can also be used in tandem with the colouring techniques outlined in this video.
Do you know how much time this will save me?! Please dude more videos like this. It actually makes drawing more encouraging for me when I learn more like this. Better ways to stay in the zone and not fumbling around
When I have a pencil drawing for an illustration the amount of lines tends to be pretty massive. Doing the second technique really helps in those situations because I can focus on the colours and the mood of the piece. Sometimes it can also be a way to communicate perspective by letting the background element outlines be affected by their surroundings and leaving the darker punchier lines to the foreground of your piece.
I just discovered your channel today and I'm like T_T IT'S SO GOOOOOOOOD! I love your intuitive approach to art and it really resonates with me. Thank you so much for sharing these videos
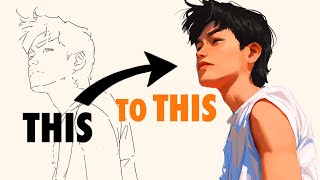
Great video Mikko! It is very helpful and insightful. I appreciate how you explained the choices you made in the color of your line art. I also really like this painting, I agree it is optimistic. I enjoy looking at it.
I like using these thick lines every now and then. It’s a complete opposite to the messyness of my pencil drawings but both are fun in their own ways. Birds 🐦 are always fun to draw in any style :)
The tip on separating scanned linework in Procreate is priceless. I was wrapping my head around for awhile how to do it, and had to use multiply mode instead.
Multiply mode is easy and fine to use if you want either dark or black lines but separating the lines with transparency gives a lot more options on what ti do with them.
@@angrymikko if I need to color the linework previously I would put colors on a separate layer and use “Darker color” for the linework layer. But it has lots of constraints
Kiitos!!! Oon ite alottanu värittämään mun töitä vasta nyt. Oon kattonu paljon videoita siihen liittyen ja sun on paras tähän mennessä! Helppo ymmärtää:D Sun piirrokset on tosi hyvän näkösii:)
Have fun! It's worth trying them all because different situations can demand different approaches. Clipping masks offer a lot of flexibility but alpha locked lines help when you can't add more layers.
Clipping mask is definitely more flexible option in most cases than just alpha locks, for example gaussian blurs look much smoother because the app has more information to blend and it doesn't result in ugly artefacts.
Ok, now I am turning the notification on for your channel! This was uploaded2 days ago and I am seeing it today!!! Fantastic tips for line art drawing!!!
Oh my goodness, this is so cool. This will definitely be used, thank you for sharing! I’m going to pretend I haven’t been redrawing my entire piece multiple times over… nope, not me. 😂
oh... my... GOD! MINDBLOWN! Omg this is amazing, I was struggling to find a way o colour my lines properly without feeling bleh and OMG YOU ARE A GENIUS! This changed my life, thank you 😍😍
Could you explain to me why the first method works better for coloring lines than just using select and fill canvas? Why does doing it that way seem to lower the quality of the lineart?
Me who has manually colored my lineart in the color of whatever I was drawing which sometimes took hours to make it look accurate.. holy hecking hell thank you so much
There’s not a full process version for every illustration. Right now there are new art assignment and feedback videos that I’ll make more of in this month but there will also be more full process videos when I have the time to make them.
Hi, can someone explain how the clipping mask step, of colouring line art, is different from the first method, of selecting line art from canvas, and colouring those areas?
You can try it in practice and see which works better for you. You can have multiple clipping masks but only one layer mask both bring different possibilities and limitations depending on what you want to do.
I’d love to help but based on the information in your comment I can only speculate. I would hazard a guess that you tried the above method but your paper wasn’t 100% white. This leads into the inverted process still leaving the mask somewhat grey instead of black. Any grey in your mask will show up on the canvas. This can be fixed by simply cranking the curves through adjustments when you have that mask selected. Locked pixels can’t break so what you might be seeing is those half opacity pixels acting as a low opacity surface for brush strokes.
Sorry I don’t quite understand what you’re asking here. The glow comes from the blend mode. If you just want the fade then just use a small gaussian blur on a normal blend mode layer.
This was fun & useful, thanks! Not sure if there's some tips for this but is there a way to select lineart from an already colored picture? Where the lines are not that sharp. I'm working on a new tarot deck, galaxifying the good old RWS deck so I only need the lineart from the cards. It takes way too much time so if anyone knows any kind of shortcuts, please let me know X;D
By RWS do you mean a Raider-Waite set? Maybe I’m wrong because I don’t know what the S stands for🤷🏻♂️ If its that deck though I remember that it’s been printed with a fairly old fashioned 4-plate setup meaning that the lines are easily the darkest areas in each image. In Photoshop they’d be easy to separate with “select by colour” (note: the ipad version of PS doesn’t have this feature yet nor anything else that would make it even remotely worth the subscription price). In any other app like procreate turning the illustration into greyscale might work because with curves you could cut out every other shade of grey before the values hit perfect black. (Basically by moving the top right node of curves to the left until you blow out every shade of grey) After that repeating the process shown in the beginning of the video should leave you with extracted lines.
@@angrymikko thank you! I don't have photoshop anymore but I'll try the procreate way. I did try to make it greyscale but didn't think about the curves (I'm not that knowledgeable in editing images), will give it a try. The scans are not the best but they are the only royalty free options for the deck so this is what it is. 😅 S stands for Pamela Coleman Smith, the illustrator. There's some effort to highlight her as part of the creation of the deck these days so some people say Smith-Waite instead of Rider Waite, in case you saw that somewhere.
I love this piece so much - but the "do birds have tails?!" killed me 🤣 Seriously though I wish this had been around when I did my most recent digital piece because I was really struggling with getting my lines to look good. I wound up keeping them black just because I gave up trying all the other suggestions that were out there. And the "coloring in" process was rough as well. Any chance of a "color in" tutorial? The method I used was making the line art into a reference layer, but this made big gaps in my colors so I had a ton of issues with any changes I made down the road, and some blending got rough. Would love your take!
Thank you. Usually in my art classes I teach brush stroke rhythm and direction and colours before blending. When you learn how to do those you’ll realise how little blending is actually necessary and how much opportunities those other elements can give you.
my lines were coloured perfectly ...but ...I ended up with white gaps from where I previously selected sections from the line art (or used line art as a reference) and dropped in a colour or painted. oh well...will keep trying🥴
I’m not exactly sure what happened based on that description but if I had to guess I’d say that probably the threshold of your colour drops was too low to affect the sub-pixels. The threshold can be increased by sliding the stylus to the right during the drop itself.
@@angrymikko Thanks🤩 yes, threshold was the issue. When selecting and then painting, I find that the threshold setting does not work as well to fill all the pixels. Threshold works better with dropping in the colour...but I prefer painting. I ended up just filling in the gaps manually and it ended up looking great🥳
Yes it does I just tried it on my iPad following the exact steps. Notice that the lineart copied and pasted is on a white layer in this video. If you’re pasting from a transparent layer with lines it will not work the same way.


I hope this can inspire you to experiment with new ideas in how to treat your line art. I left it out of the video because it's time-sensitive but for the next 30 days, channel members can also download the brushes, palette and the procreate file with the intact layer structure used in this project. If you're reading this comment a month from now just ignore this because it's gone and replaced by new downloads. Thank you for visiting my channel. Now go make some art 🐻🐻
Where are they?
I found it 1 year later
I WANT TO SCREAM WITH JOY AND EXCITEMENT THIS JUST BLEW MY MIND!!!!!!!! I didn’t even know copying the canvas was a thing, I’ve wanted a feature like that for so long! AND THE TECHNIQUES!! THEY ARE _GENIUS!_ I am so excited to create and experiment with this! Thank you SO MUCH mikko!!!! :D 💖
Omg this is legit the craziest tip I’ve ever seen. You’re bleeding color into the line layer. I can’t believe I’ve never thought of this! Thank you mikko!
holy crap this was exactly what I was looking for! Great tutorial
Glad I could help 🐻
I am just over 2 minutes in and am so thrilled at learning to do this! Can not wait to see what the rest of the video brings. THANK YOU!!
Liquify function to reduce outline "weight" could help too..
I would absolutely advise against this since it will also move and deform the position of those lines. If you want retain the position of lines but make them thinner you can select the lines make them into a layer mask->add a tiny Gaussian blur to it and then adjust the curves on that mask to be black and white again. This will eat the edges of each line evenly from both sides without moving the centre point of any lines. This can also be used in tandem with the colouring techniques outlined in this video.
Do you know how much time this will save me?! Please dude more videos like this. It actually makes drawing more encouraging for me when I learn more like this. Better ways to stay in the zone and not fumbling around
When I have a pencil drawing for an illustration the amount of lines tends to be pretty massive. Doing the second technique really helps in those situations because I can focus on the colours and the mood of the piece. Sometimes it can also be a way to communicate perspective by letting the background element outlines be affected by their surroundings and leaving the darker punchier lines to the foreground of your piece.
@@angrymikko thank you brother.
I just discovered your channel today and I'm like T_T IT'S SO GOOOOOOOOD! I love your intuitive approach to art and it really resonates with me. Thank you so much for sharing these videos
Thank you so much. I’ve always used black solid line art with my color and it always looked so weird to me. I love this
Brilliant. Excellent presentation, too.
Great video Mikko! It is very helpful and insightful. I appreciate how you explained the choices you made in the color of your line art. I also really like this painting, I agree it is optimistic. I enjoy looking at it.
I like using these thick lines every now and then. It’s a complete opposite to the messyness of my pencil drawings but both are fun in their own ways. Birds 🐦 are always fun to draw in any style :)
Changing my life right now, I was doing this sort of thing manually in Alpha Lock and it was so painful! THANK YOU!
The tip on separating scanned linework in Procreate is priceless. I was wrapping my head around for awhile how to do it, and had to use multiply mode instead.
Multiply mode is easy and fine to use if you want either dark or black lines but separating the lines with transparency gives a lot more options on what ti do with them.
@@angrymikko if I need to color the linework previously I would put colors on a separate layer and use “Darker color” for the linework layer. But it has lots of constraints
Can you not just add a layer above the lineart, select clipping mask, and fill in the canvas with the color you want, then merge them?
Floored by the gaussian blur trick! Like dayam. Thank you so much for sharing!!
My pleasure :)
Awesome job of explaining! Thank you.
Kiitos!!! Oon ite alottanu värittämään mun töitä vasta nyt. Oon kattonu paljon videoita siihen liittyen ja sun on paras tähän mennessä! Helppo ymmärtää:D Sun piirrokset on tosi hyvän näkösii:)
tried your lineart trick with something i finished awhile ago, looks a lot more interesting!
Thank you for this!!! Can’t wait to try these techniques and see which one works best for me. You’re the best Mikko!
Have fun! It's worth trying them all because different situations can demand different approaches. Clipping masks offer a lot of flexibility but alpha locked lines help when you can't add more layers.
Thanks 😊 I always just used a clipping mask to color my lines but I definitely gonna try your ideas 🙌🏻
Clipping mask is definitely more flexible option in most cases than just alpha locks, for example gaussian blurs look much smoother because the app has more information to blend and it doesn't result in ugly artefacts.
Thank you! 😅😅 thank you and you saved my life in the world of digital art
Ok, now I am turning the notification on for your channel! This was uploaded2 days ago and I am seeing it today!!! Fantastic tips for line art drawing!!!
Oh my goodness, this is so cool. This will definitely be used, thank you for sharing! I’m going to pretend I haven’t been redrawing my entire piece multiple times over… nope, not me. 😂
I'm going to pretend I didn't read that comment.
oh... my... GOD! MINDBLOWN! Omg this is amazing, I was struggling to find a way o colour my lines properly without feeling bleh and OMG YOU ARE A GENIUS! This changed my life, thank you 😍😍
Could you explain to me why the first method works better for coloring lines than just using select and fill canvas? Why does doing it that way seem to lower the quality of the lineart?
Thank you for this. ❤
Wow,You are Amazing,,Thank-you for Sharing your Talents
Can you please make a video going in depth into all of your brushes I’m the the painters brush set!
I recommend checking out this one because it’s relevant to most of the brushes I’ve made:
th-cam.com/video/DqM-ogkQtWo/w-d-xo.html
Very Cool Illustration method !!
"One day, you too can become a rainbow star!" -mikko 😍 Thank you! This video is exactly what I needed. The mask inversion technique is brilliant!
🌈s are forever 🐻
Subbed straightaway. Thank you for the way you teach.
Beautiful picture. And this just saved me a ton of time.
Me who has manually colored my lineart in the color of whatever I was drawing which sometimes took hours to make it look accurate.. holy hecking hell thank you so much
I'm a member but I'm finding it challenging to find the longer version of this video.... You are the best btw❤
There’s not a full process version for every illustration. Right now there are new art assignment and feedback videos that I’ll make more of in this month but there will also be more full process videos when I have the time to make them.
Bang… that was great tips. Thank you
Thankyou so much ✨👍🏼
My pleasure 🐻
Thank you, very much Mr. Nikki ❤️🇦🇪.
No problem (:
My jaw VISIBILY dropped i love figuring out this program
Thanks a ton for patiently explaining the lineart coloring 🥲🥹❤
This is great. It already looks good even without much practice, so you can‘t be discouraged. Practice just makes it even better!
I just saw instagram artists changing the color of their traditional linework and HAD to know how to do it
Hi, can someone explain how the clipping mask step, of colouring line art, is different from the first method, of selecting line art from canvas, and colouring those areas?
You can try it in practice and see which works better for you. You can have multiple clipping masks but only one layer mask both bring different possibilities and limitations depending on what you want to do.
Thanks a LOT! Any idea what to do if the background kind of becomes a gray layer and alpha lock did not work?
I’d love to help but based on the information in your comment I can only speculate.
I would hazard a guess that you tried the above method but your paper wasn’t 100% white. This leads into the inverted process still leaving the mask somewhat grey instead of black. Any grey in your mask will show up on the canvas. This can be fixed by simply cranking the curves through adjustments when you have that mask selected. Locked pixels can’t break so what you might be seeing is those half opacity pixels acting as a low opacity surface for brush strokes.
How do you get that colour hue ? Like glow fro the star or moon? I like that but just as a fade not as a glow
Sorry I don’t quite understand what you’re asking here. The glow comes from the blend mode. If you just want the fade then just use a small gaussian blur on a normal blend mode layer.
@@angrymikko I meant the shine from the moon that dims towards the background!
Thank you so much for this 🙏
Very good teacher. You have new sub!!!!! Thank you!
It adds an extra level of magic to the art work. I will be definitely be trying this out. Thank you.
you can just use the clipping group to color the line and then squeeze them
Not all heroes wear capes.....
Thanks for this❤️
This is insanely helpful. Thank you. New sub. :)
This was fun & useful, thanks!
Not sure if there's some tips for this but is there a way to select lineart from an already colored picture? Where the lines are not that sharp. I'm working on a new tarot deck, galaxifying the good old RWS deck so I only need the lineart from the cards. It takes way too much time so if anyone knows any kind of shortcuts, please let me know X;D
By RWS do you mean a Raider-Waite set? Maybe I’m wrong because I don’t know what the S stands for🤷🏻♂️ If its that deck though I remember that it’s been printed with a fairly old fashioned 4-plate setup meaning that the lines are easily the darkest areas in each image.
In Photoshop they’d be easy to separate with “select by colour” (note: the ipad version of PS doesn’t have this feature yet nor anything else that would make it even remotely worth the subscription price).
In any other app like procreate turning the illustration into greyscale might work because with curves you could cut out every other shade of grey before the values hit perfect black. (Basically by moving the top right node of curves to the left until you blow out every shade of grey)
After that repeating the process shown in the beginning of the video should leave you with extracted lines.
@@angrymikko thank you! I don't have photoshop anymore but I'll try the procreate way. I did try to make it greyscale but didn't think about the curves (I'm not that knowledgeable in editing images), will give it a try. The scans are not the best but they are the only royalty free options for the deck so this is what it is. 😅
S stands for Pamela Coleman Smith, the illustrator. There's some effort to highlight her as part of the creation of the deck these days so some people say Smith-Waite instead of Rider Waite, in case you saw that somewhere.
thank you
Thank you. This was very helpful! Beautiful result too by the way. I love the change in color based on the shadows and angles.
just alpha lock the line art and color it
you always bring amazing videos, techniques and art pieces! thank you!
very helpful, i can now no longer erase anything :)
Can somebody help me understand how this is useful? Being able to color the lines different? What layer is he using to fill in the bird with color?
All three methods are literally shown in this video. ☝️
I love this piece so much - but the "do birds have tails?!" killed me 🤣
Seriously though I wish this had been around when I did my most recent digital piece because I was really struggling with getting my lines to look good. I wound up keeping them black just because I gave up trying all the other suggestions that were out there. And the "coloring in" process was rough as well. Any chance of a "color in" tutorial? The method I used was making the line art into a reference layer, but this made big gaps in my colors so I had a ton of issues with any changes I made down the road, and some blending got rough. Would love your take!
Thank you.
Usually in my art classes I teach brush stroke rhythm and direction and colours before blending. When you learn how to do those you’ll realise how little blending is actually necessary and how much opportunities those other elements can give you.
I had this same issue with my lines as a reference and gaps
my lines were coloured perfectly ...but ...I ended up with white gaps from where I previously selected sections from the line art (or used line art as a reference) and dropped in a colour or painted. oh well...will keep trying🥴
I’m not exactly sure what happened based on that description but if I had to guess I’d say that probably the threshold of your colour drops was too low to affect the sub-pixels. The threshold can be increased by sliding the stylus to the right during the drop itself.
@@angrymikko Thanks🤩 yes, threshold was the issue. When selecting and then painting, I find that the threshold setting does not work as well to fill all the pixels. Threshold works better with dropping in the colour...but I prefer painting. I ended up just filling in the gaps manually and it ended up looking great🥳
the first one doesn’t seem to work anymore?
Yes it does I just tried it on my iPad following the exact steps. Notice that the lineart copied and pasted is on a white layer in this video. If you’re pasting from a transparent layer with lines it will not work the same way.
what is line art?😳
You and angryturtle 😅have to be the same
I’m too fast to be a turtle : )🏃♂️ 🐻
THANK YOU SO MUCH!!
No problem