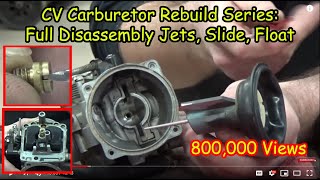
How to remove Main Needle Jet / Emulsion Tube from Mikuni BST36SS Carby Disassembly.

ฝัง
- เผยแพร่เมื่อ 5 ม.ค. 2016
- Easy removal of Main Jet / Emulsion Tube from Mikuni BST36SS Carby. NO DRILLING. No Special Tools.
This carburettor comes off a Suzuki GSX750 Katana 1989-1996. Will also work for most other carbies of the era from Mikuni.
An online service Manual can be found here
www.manualslib.com/products/Su...
I have a printed manual by Clymer which is indispensable. - แนวปฏิบัติและการใช้ชีวิต


Thanks for this video and the one on the float levels. On my Triumph triple version of these BST36 (not BST36ss) the emulsion tube pulls right out when you pull out the grey plastic slide guide. There is no need to tap it out. There's a flat on the emulsion tube that needs to line up with a flat in the carb body when you reinsert. I believe the O ring for the base of the grey slide guide is a 1.5mm cross section x 10mm ID x 13mm OD. I just ordered some Viton ones up.
Apparently the slide guides are prone to wear making the fit of the slide sloppy and eventually leading a worn emulsion tube. Instead of a round hole on the emulsion tube you will eventually see an egg shaped one. I did find the grey slide guides as well as the slides on a British parts site in case you run into this issue. New slide guide and new emulsion tube will fix it. If you don't replace the guide too you will end up quickly with a worn emulsion tube again. . .Cheers!
Thanks for this video. I had no idea how to remove the needle jet from my Mikuni carb but copied your method and got it out easily.
Thank you so much, I have a Mikuni Carburetor off of a 9HP Subaru motor and there was no slot to remove the carburetor main jet. I would have never thought about pushing it through into the main body of the carburetor. Thank you for this video!
Thanks for the video, another job done without breaking anything!!!!
Hahaha. True.
Half the shit I pull apart goes in the bin. lol
Cheers.
For Christ's sake, I have 3 of these damn things on my 1996 Triumph Adventurer and they are impossible to find videos or tutorials on. Thank you for your help.
Hey thanks a lot for the video. I just cleaned my carb and the little plastic spicer and the needle fell out of the diaphragma-thing and i didn know where it belonged :-) You saved the day !
Thanks heaps for the video, I was wondering how the heck I was going to get that out
Good vid, you don't need to screw into the venturi tube to push it through, just use a punch, screwdriver or any tool that sits down there and tap gently. Also helps to grease it slightly to put back in
"screwdriver or any tool that sits down there and tap gently." I'm glad you said "tap gently". I worked in a shop that would use tiny flat head screwdrivers and chew the crap out of the tubes. lol. Made it a bitch to get the screw back in......
Cheers.
i was under the understanding that the main jet controlled cruise speed which is wrong. My idle is perfect but 1/4 to 3/4 throttle is garbage and sputters out. I pulled the main jet and while it was clean and i could see thru it, i thought maybe it was the pilot jet. Pulled it out and it WAS clogged, cleaned it, put it back on and still the same issue.
Then to learn about this needle jet where the needle and the needle jet passage controls mid range throttle. Never got that far but one day i will take the carb back off and get that jet out and see if its dirty.
Great tutorial, thanks!
Thanks for the vid... I just pulled those carbs off my 1991 Katana.. Going threw them this week
You're Welcome.
Excellent tutorial. Thank's a lot!
Your welcome. Cheers
Thank you for the tip, worked like a charm
hola , muchas gracias por el video . una pregunta , Luego como lo vuelves a poner en su sitio , para no dañarlo?
Great to know! Just took the tube out of a 77 Suzuki PE 250 carb
I spent a whole half day on a PE 175 learning to ride. lol
That may be why I love Suzi's
Just found your video, liked and subscribed. I have a 1990 GSXR1100 that I am rebuilding. Found a lot of good replacement parts for the Mikuni carbs but I need a couple of the black tops. Any suggestion on where to look?
I've got a tm28-418 carb I'm about to do the same to, and for some reason I can't get mine to to work past idle without wanting to choke the engine out.
thank you.. this video help me a lot
Your welcome.....
Thanks a lot for share.
Thank you for this informative vid. Upon installing the new emulsion tube, it's just loose and can slide up&down..? or tap the set pin in further to hold it ,,both?
Edit: Nevermind ,i see how the spacer and main jet draw it down tight.
Glad you got it sorted.
I've never thought how loctite would go in unleaded fuel?
Might dissolve
This is 1 of the coolest videos I've seen. I've been wanting to replace emulsion tubes on my zx9r 1999 carbs.keihin. is it same procedure? The tubes are little 18mm long ones. 6.5mm wide
Should be.
Carbs are pretty much the same until you get into Flat Slides ...
Thanks for Comment.
Cheers from Sydney Australia
Well done man, you're the only one in the whole internet to show how to remove that plastic holder of the needle jet @04:17! It seems so easy when you do that, but I've been ruining my hands for hours to take out only 3 out of 4 of them...it looks like you can either pull it from the top like you did (very few grip surface) or try push it down from the air intake, but the room to maneuver is very limited...do you have any advice for me to remove the last one? I've been tackling issues at small throttle opening and I think that replacing that OR at the bottom can help me fix them while cleaning the carbs
Glad you found the Vid.👍
You could use the soft rubber handle of a screwdriver.
Go through the main body and lever the slide up. You could even wrap a cloth around it if you feel like it might mar anything.
Cheers
Thank you for replying! I had no screwdriver that could do the right angle from the air intake to slide it up...eventually I soaked everything in wd40 and pried using a thin flat head screwdriver from the top, in between the joint you can see when you look at the carbs from the venturi outlet.
I have these carbs my 1994 900 speed triple. It is leaking fuel into the air box, so I’m guessing it’s a worn float/needle valve. Do you have any ideas?
You can buy a small rebuild kit from eBay with a new needle valve, and all related o rings and a new pilot air screw. If I was to rebuild them do you think I’d need to re sync the carbs? I don’t have the tools to do so.
Great video by the way.
Yeah. Sounds like a stuck float or jambed inlet valve.
And only leaks when it's not running. You should be able to pull the spark plugs and see which plug is wet. (Running Rich) That will tell you which bowl to take off an play with. I haven't bought any rebuild kits on ebay (Australia) They are fairly exy.
OK but how do you get it back in aha? Thanks for the video
THANK YOU!! Saved my ass lol.
You're Welcome !
hey thanks mate
Thanks for the video!
Do you have a complete strip down video to share with us?
If not, hat are the most important passages to get clean?
Thanks!
I do, but only putting the emulsion tube back in, the inlet jet in the bowl and a few other bits . They are fairly straight forward to work on. I'll throw a compilation together. I would also clean all passages if you can.
Cheers
Thanks!
Am I seing this right that the intake mouthes are oval?guess there are no K+Ns available for these...
Yep. Slightly oval. Still should be able to get a round filter on it. ;)
Mate , I was removing the air screw and it became tight then a brass sleeve came out with the jet/adjuster (the one not in the bowl) it's damaged.. what to do?
Cheers mate
I take the jet out of the brass sleeve. Then put the sleeve in the freezer. Warm up the carburetor in the oven or with a heat gun. Then slide the frozen sleeve back into the hole it came from.
Should be an easy fix. 😉
@@MikMech great you are a legend
Gracias¡¡ Una pregunta te hago. Creo que se me fracturo el caño pequeño de color cobre que se ve por fuera del cuerpo del carburador. ¿ Para que sirve ese caño pequeño y externo que tiene el mikuni?. saludos
*Spanish*
Hi Enrique. Es una pipa de aire.
Simplemente deja entrar y salir el aire para que no haya presión ni vacío para interrumpir el suministro de combustible. Deberías poder arreglarlo con pegamento epoxi o buena cinta. simplemente verifique que el aire todavía pase por la tubería cuando esté arreglado.
Buena suerte.
*English*
_Question_
Thanks! A question I ask you. I think I fractured the small copper-colored pipe that can be seen outside the body of the carburetor. What is the purpose of that small and external spout that the mikuni has? regards
_Answer_
It's an Air Pipe.
It just lets air in and out so there is no pressure or vaccum to interupt the fuel supply. You should be able to fix it with epoxy glue or good tape. just check that air will still go through the pipe when it's fixed.
Good luck.
@@MikMech gracias¡¡¡¡¡
where can I get the Oring at the base of the white plastic?
This is probably an option.
I would test them in high octane fuel before using them.
www.ebay.com.au/itm/225Pcs-Rubber-O-Ring-Washer-Assortment-Set-Hydraulic-Plumbing-Gasket-Seal-Kit/113459997026?_trkparms=aid%3D555018%26algo%3DPL.SIM%26ao%3D1%26asc%3D57482%26meid%3D2771235b757d4a79baa0572b6ecfd7d4%26pid%3D100005%26rk%3D12%26rkt%3D12%26sd%3D332255645931%26itm%3D113459997026&_trksid=p2047675.c100005.m1851
Where does the small o ring go
The small 'O' Ring seals the slide carrier to the carby body.
Then you remove the slide carrier at 4:18 it's underneath.
"Cant buy em anymore" not exactly true, just rebuilt the Mikuni BST 36 Carbs on my bike, Thunderbird 900, this store provided all the components needed. store.moto-lab.com
These carbs are on a lot of Suzuki's and many other bikes. The o-rings and all the parts are available you just have to do some research. Ron Ayers and many other OEM part sites have every single part for sale.
why did you remove the emulsion tube. no reason whatsoever to do that. just make sure the main jet is clean and it will be fine. Also, the pilot jet is usually the main problem with these carbs. They are very difficult to remove since mine was plastic and just broke away when trying.
?
Removing the emulsion tube was the reason for the video. (Title)
When rebuilding Carbs it's good practice to do a thorough job. All parts went through an ultrasonic bath.