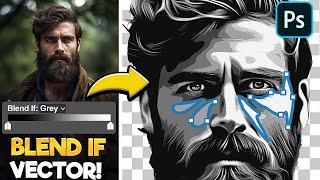
How to Make Vector Art Effect (REAL VECTOR) - Photoshop Tutorial

ฝัง
- เผยแพร่เมื่อ 9 พ.ค. 2024
- This is an updated version of our previous tutorial "How to Make Vector Art Effect in Photoshop (Without Pen Tool)". In this vector art Photoshop tutorial, you'll learn how to make a vector art effect in Photoshop using smart objects & some filters.
The final result is customizable and can be updated with a SINGLE CLICK!
No need to know how to draw vector art using the pen tool, just convert your photo to vector art using this method and vectorize the final result as mentioned in the tutorial.
Please Like the Video and Subscribe for more "Photo to Vector Art" tutorials.
➤TUTORIAL ASSETS
-Download: www.psfreebies.com/vector-art...
-Oil Paint Filter Troubleshooting: / oil-paint-filter-24686486
➤FINAL PROJECT FILE
Download: / 59890056 (Patreon Members only)
➤FOLLOW US
/ pixivu
/ pixivu
/ pixivu
TIMESTAMPS
0:00 Intro
0:25 1. Create The Vector Art Effect
3:59 2. Replace The Background
5:47 3. Update the Effect with a Single Click!
6:44 (OPTIONAL) Convert the Result to a Vactor
7:45 (OPTIONAL) Export the Vector from AI to PS
9:25 Outro
#PhotoshopTutorial #Photoshop #Pixivu


![ILLSLICK - Homies Feat. LILY [Official Music Video]](http://i.ytimg.com/vi/r6jGK7MumF0/mqdefault.jpg)


That's absolutely INCREDIBLE!
Thanks for sharing this.
This is fantastic! I've been doing something similar, but was missing a couple of steps that you have, which makes them look SO MUCH BETTER. And your tutorial was really easy to follow. Thanks!
thank you. Well laid out and explained.
These are the easiest tutorials to follow for everyone. Keep up the awesome work! I appreciate it 😊
cant agree more
This was SO useful for my art. THANK YOU!!!
why are you here??
Thanks for this best and very easy tutorial.
I don't even have Photoshop on my PC, but, I whatched the whole video, it's so well made.
this is one of the best tutorial on vector art... instantly subbed the channel.. this trick feels like a superpower for real man, Thanks a ton. :)
Absolutely incredible
thank god I found what i need. Thank you and keep it up!!!
Awesome Video, thank you!
very helpful tutorial! thanks a alot!
One of the best tutorial I ever seen very well explained 🤘🤘🤗
Thanks! 🥳
It blows my mind how you make it simple to such job
TYSM FOR THIS TUTORIAL
bro thanks for this awesome piece of art in such a easy way
Amazing, thank you!
Sir! It's really Amazing
Incredible!😄
This was awesome. Thank you.
Muchas gracias, ha sido muy fácil seguir tus indicaciones. Gracias por tener el traductor activado.
Omg this is really the best tutorial!!! 😭❤️
Amazing keep the good work
This is the 'Poster Cutout' finish that I particularly like.
so helpful, thank you
Really Awesome Work
Perfect tutorial as always
Glad you like it ❤️
Thank you very much!!!
Nice . . . i like the part on PS to AI it's really cool
Great Tutorial.......!
Awesome........!
Thank You Friend......!
Thanks Man, I love you
Thanks so much... I truly appreciate this so much...
The Best Photoshop Tutorial for make Vector Art!! Thank you very much.
that is not a vector
@@sandialpiando1809 yes, but it's can be adapt to vector easy i'm ok. :)
Thank you!
thank you pro ♥ you are very professional ♥ you,ve solved abig problem
Thank youuu!!
You r legend bro.❤
Thanks for this
good video brother. Thank you
the best the best the best 😍😍😍😍
it's so cool
Very helpful..
Awesome Video Brother
Awesome 🤩🤩🤩
One of the best tutorial ever
Thanks! 🙏
Thanks a Ton
I use this type of techniques to create a draft for the real vector i will make in illustrator adding my style 😉
Cool!
thank you!
You are Extraordinary!
Thanks mate 🙏
Thanks for this. Great tutorial. Just one hiccup - I don't know if it's to do with today's PS update, but when I click on the smart object thumbnail it opens up the original image as a .jpg. So if I add a mask it won't let me save without flattening it. This also means that I can't simply change the image.
perfect tutorial mate , this time i had problem on the removing background it sais: can't save this document back to its original file format. flatten layers and discard extra data as necessary then choose file > save again. i hope you can help me in that and thank you Pixi
wao its amazing
OMG tks u so muchhhhh
you are the best
This what I need
thanks a lot
thank you !!!1
Lovely
Hello, I have a question.
I do not have the updated version, so I have only 4 option to choose from "Paste" function (at 08:07). What should I select in this case?
thanks!!
Thank you
I was planning to give my gf a vector portrait. Guess this will do good enough!
what Photoshop version are you used, and your system requirements for smooth running of Photoshop?
very nice video
thank u! i have watched and saved almost all of your vector art videos - this one is different than the past ones, is it an alternative method or a better method than the previous where it is not needed to export to illustrator and then import back to photoshop? thank u so much.
Yes it gives a better result in most cases. You don't need to vectorize the final result, you can use the final effect as it is.
GREAT VIDEO THANKS! Does it necessary to trance the image in Ai? because the trace ruined my paint and my details in it.
All I need is to have a vectored title so it will stay vector in InDesign for a printed book. thank you
You are cool!!!
Nice video
grazie
WOW
What if you don’t have the updated version
What do you select?
Pixels?
Just subbed after watching a couple of vids. I like this method but as with many similar techniques, shine, shadows and highlights on the original photo creates those blotchy patches in the final result. What would be a way around that? I suspect trying to even out luminosity in PS and somehow selecting areas with different hues on the face and making them the same in AI...but I don't know how to do either. Any comments and suggestions would be great. Thank you!
-Try to correct the original image colors using Curves, Selective Color, Color Balance, Exposure...etc.
-Making a perfect selection and Isolating your object perfectly with the "Select & Mask" should wipe away this problem.
-Also making the image smaller or bigger inside the smart object will give you a different result.
-Using the "correct color" layer as mentioned in the tutorial should fix most of these blotchy spots.
Forgive me If I can't fully understand your question and if you need any further help please send me your PSD file with the problem on the email: zeater111@gmail.com
Thanks!
@@Pixivu Thank you very much. I will give that a try. I will try.
🔥🔥🔥
Nice🥰
Thanks :)
@1:27 Instead of going through the steps of creating and deleting the old image. Why not just hit Ctrl-A to select all and go to image and crop. That will give you the correct size image without going through the extra steps.
It can be done using Image>Crop (or Crop Tool) if your layer is not a smart object.
CTRL+A > CTRL+J> delete old layer = Rasterize> CTRL+A > Crop it. (Same steps I think).
Woww😲
Very enlightening and I learned some new things, I've been working in Photoshop for 20 years, but I want to improve my skill levels, You do move a bit too fast, I had to keep rewinding to see which tools your choosing and where your getting them from. I cannot get the the new image to convert to the one I did on this tutorial. very frustrating.
Hello Im very new to this and only use CC PS - I dont have illustrator. Can I do this without illustrator?
Hi, The oil paint is hidden on my Photoshop why? I'm using Updated Photoshop.
Thanks
You could also use "reduce colors" if you want a one click effect
Woo 🎉
What version of Photoshop are you using?
Is this the same thing as cartoonization?
Do you have a video like this but with illustrator?
Can you help out
How to use photoshop for making blur logos or pics (not human pics) to vectors.
Check this: th-cam.com/video/6iL3vSZFJxc/w-d-xo.html
hi, can u kindly do a tutorial using a cat and converting it to a vector effect? i can't seem to do it very well on animals. thank u for your kind consideration
Recent update broke this or I am missing something...It wont apply filters on a smart object, it just updates it in original state...and it wont allow to mask the smart object unless you flatten it, which is ok as I can do it in a main file but updating filters on another image is not working as it should
i got error that says: "could not complete the paste command because photoshop does not support illustrator clipboard content which contain non-native art, legacy text or freeform gradient object fix" when pasting the illustrator to photoshop, any fix for this?
i use AI 2024 and 2022 photoshop
Want a Photoshop latest version
Hello I followed the instructions but after I copy-pasted the file to photoshop, why can't I select the anchor points of each color layer when using the direct selection tool?
use the pentool on the anchor points instead
Hello dear i have latest version of Photoshop I don't have oil paint filter what I do please tell me
W mans
How can i separate the diferent colors layers?
❤❤❤❤❤
Ano pong gamit niyong app?
is this possible to make a car or truck into a vector? I want to vector my car but it seems like all the other ways are super frustrating
Yes, it works. Check this one too: th-cam.com/video/ZLctw7R1RiY/w-d-xo.html
Please can I get the link to download the shapes to be used?
Yes they are in the description right here: www.psfreebies.com/vector-art-effect-photoshop-tutorial/
6:52 при двойном нажатии по смарт обьекту он открывается в новом слое как обычный jpg файл и далее при нажатии ctrl+s выскакивает ошибка -When you double-click on a smart object, it opens in a new layer as a regular jpg file, and then when you press ctrl + s, an error pops up-Can't save this document back to its original file format. Flatten layers and discard extra data as necessary and choose File > Save again.
You did the first step of creating the smart object wrong. you'll need to repeat the process and follow the first step carefully. You can send me your PSD file here so that I can check it: zeater111@gmail.com
IF contrl A doesnt bring anything up what else am i suppose to use. Im using a 2016 mac book pro.
It is Command(⌘)+A in mac
What Pc tablet don't have oil paint