
ฝัง
- เผยแพร่เมื่อ 5 ก.พ. 2025
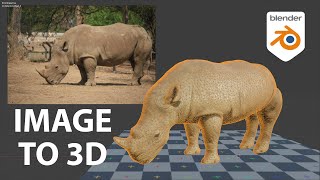
- Josh breaks down his workflow when creating 3D Environments from images and textures using Blender.
For the Full Tutorial and Breakdown with detailed step by step instructions and to help you improve your 3D skillset in Blender head to our Patreon below!
bit.ly/Moonboy...
----------------------------------------------------------------------------------------
►Follow us on IG: @moonboy_studios
► Josh's IG: @joshhoole
► Our Work: linktr.ee/moon...
----------------------------------------------------------------------------------------


0:29 wtf does *"press Ctrl+T and import your image"* mean? Ctrl+T where? What shortcut is it supposed to be? How does the image magically appear when you didn't even select it? EDIT : Found it. Ctrl+T no longer works in some setups. The equivalent manual actions in the "Shading" view are : 1) Add --> Texture --> Image Texture, 2) In the new node, use the "folder" icon to import the image, 3) connect the "color" output to the "surface" input of the Material Output node
wow just saved me here, thank you so much !
Settings>Addons>NodeWrangler.. does it work or not ?
thank u bro
You rock, absolutely! I was trying to make a visualizer for my single cover and I'm still a little noob on Blender, but I loved your tutorial and I might try to adapt for my cover concept. Thank you so much, baby boy! Wish you the best!
Sometimes beginners want to follow along, it took me 30 minutes to realize that a lot of the shortcuts were for add-ons and not Blender as is. Could be incredibly useful and a huge time-saver if somehow that is explained in the tutorial.
just loved your tuts... the perfect speed of explanation to the point not long and boring but short and sweet...
Appreciate that! Tried to keep it quick and interesting haha
how to use blender on core i3 , 4gb ram machine , please make a video on it😊🌸
If you're running into odd texture issues (if you've imported the image as a plane), especially with transparency, a handy solution is tweaking the material blend mode to "Opaque." The Images as Planes addon tends to lean towards "Alpha Blend" by default, so just change it to "Opaque" to hopefully solve the issue.
its insane how easy it is to follow along to this, i apreciate you tellings us all the keys we need to press an exactly how to do everything
what no way ive been struggling to add the image to my plane for hours
@@amado1199 Yo if you need any tips in blender im here im good at it could help ya
you think a new blender user can follow along with no problem????
It's frightening how cheap and nasty, yet truly effective approach is, especially sleazing the interior into the scene the way you did! Great video, man. Thank you!
Incredible! A true legend. I think it is one of the best tutorials I have ever seen in my life.
Wow, thanks! Hope it helped!!
Sir! This is the best Blender tut I ever seen recently!
Thanks for the support!
Amazing! You covered ALL the details missing from other videos.
Thanks for the good feedback!
THank you for this. Can't wait to give this a try. It looks super easy to follow and the results look awesome!
That is a truly a fantastic tutorial! Precise and clear explanations with a friendly approach! Wow! Great!
Glad it was helpful!
a great result, it reminded me of those images of abandoned places
Pure Gold!! Thanks for everything, my Good Sir. 🙏🏾
Cheers bro! Hopefully more gold in the near future!
how the heck did I never think of this... epic! thank you!
wow!! this is amazing ! im def trying that out
What a great tutorial my man! You are pretty underrated. By Any chance can you make a tutorial on how to model a tshirt in blender? Would highly appreciate it and would help a lot!!
this is really cool. u deserve more raise oml
keep inspiring
YOOO THAT'SS AMAZING!! INSTAA SUBBED
Appreciate it Andrew!
this was really so helpful sir. Your explaning method was so good 😍
glad you were able to take something away from the vid!
Stright to the point, nice.
No time to waste!
Wow...just wow...need to learn this in depth.
Thanks a lot
this was super great. im not trying to build a building but this was perfect enough for me.
HOLY COW... that is insane! Thank you for this awesome tutorial, kind sir, I appreciate ya'!
This was amazing. Thank you for sharing this.
This was on my Tiktok now on my YT homepage
We're everywhere! Hahah
😮 jeesh 👏🏽 I dont know Blender but im going to give this a try. Can you please remake this tutorial using Unreal Engine 5? 🙏🏽
People already forgot Ian Hubert exists i guess :(
Who?
Not at all, he did this exact technique ages ago, although he is REALLY fast.
Nothing bad with others showing the technique too i guess, I'm sure Ian wouldn't mind
Ian hubert is a legend
I got much more than i wanted to learn in 1 video, Thanks❤, subbed
Thanks for the sub! We're trying to be more consistent with our tutorials, etc so keep an eye out!
please keep doing blender tutorial ... thank you , i have just subscribed your channel becoues of blender , thank you again.
For sure we will aim to do Blender tutorials amongst film making and editing tutorials also!
This 2D to 3D blender tutorial is incredible I need to try these techniques later
I always struggled with 3d modelling backrounds for 2d animation, now I know that I only need my textures and some simple edits to make a decent background lol
Great video
Thanks for sharing your workflow! :)
thank you
🔥🔥🔥🔥 thanks Bro
No worries thanks for tuning in 🙏💯
awesome usefull technick
Glad you liked it!
Your so Awesome 😂😂😂😊😊 I truly like the way you do
The most disturbing thing about this channel is I thought this was moonboy; the dubstep artist still killer tutorial now subbed to both lol.
appreciate the sub still!
Yeeeaah very easy 😮
Thanks bud
This is wild. You just saved more time creating it from scratch LMAO.
Haha hope it helped!
0:27 what panel is that? I.e. how do you "add a material texture"? I can't find the "Materials" tab in Blender 4. Has it been changed? EDIT: Found it, it's the Shading view.
did u find out ?
When i press CRTL R. nothing happens in edit mode. i wish you explained what to click better
Your post processing changes the game. What did you do!!!???
About interior... or you can use Parallax Image using KIT-OPS Addon Free :)
Amazing.
Protip: enable the images as planes add-on to skip the first few steps
this is good!
Subscribed
Appreciate that!
How many studios use blender?
Is this method possible for a .png of clothing? Would love to see a similar workflow to bind clothing to a character. I’m thinking 2d reference image, make it 3d in blender, edit as needed, and attach to a video game character
Good video but even on full HD your zoom shots are blurry for some reason
🙃 Thanks!
Make a tutorial for Adobe After effect....
amazing
Cool. Make a tutorial on megascan bro,?
Is this really projection mapping?
How did you make the statue?
I've been struggling to find resources for a specific idea i have
Can you do texture based collison? Like, can I have it so every frame it does some sort of perception check to see if you're touching the colored portion of a texture, if so apply collision?
I want to make a very stylised mobile game and thus optimization is important, so if i could have it so the textures can have transparent portions of the texture you can pass through it would be ideal
I'm also curious if 2d billboards can be warped with perspective?
Do you know hw to do this in Cinema 4D? well the texture stretching part? I cant find the setting in Cinema 4D to keep image from moving when I move an edge
Every time I used the knife tool it would add random edges and vertices that It won't let me dissolve. Any advice?
how can i import it to unreal engine?
Hey mate, I make Props and Scenes in Blender 3D and this is awesome, but I would like to know your render settings. I am using HDRI, some tweaks, lighting, and 4k-8k textures and still I can't get it to look like that. It would help me a lot if you could help me with this.
Hi, how can I do this with 360 images? tnks
This'll definitely help me out a lot. Just one question: I'd like tu use this method with an artowork for Scooby-Doo from Scooby-Do! Mystery Incorporated. Can it work with that?
Tip: If control T isn't working for you enable the Node Wrangle add on in preferences.
How long did it take you to make this and what was the render time?
When i click CTLR+R i cant put lines where i want..
Same,
good one but this pic has no perspective! is there a way to make a 3d model out of a 2d perspective image ?!
Hello friend tahnks for share your videos.. Please help me ... I need render with overscan.. do you nknow any methor for this?.. thanks friend
what pluging did you use for trees so they were animated?
bro cooked a whole scene in just 3mins
speed run ting
can't i just import images as planes?
Does anyone know the correct face attributes setting in cinema 4D
What are the minimum requirements for me to do a similar project?
More video
please give us slow n step by step tutorial, thx b4
nicee
Cheers!
Can Counter Strike maps be made this way?
fiiiiiiiiiiiiiire thx
شكرًا جزيلًا
♥️
ty ty!
ok now teach us how to do this with these new AI generated QR codes, that would be sick!
🔥🔥🤙🏾🤙🏾🔥🔥
cheers!
How tf did I just find this channel?
The universe works in mysterious ways
You talk too fast but this seems like a good guide for people already familiar with Blender. I will check this out again later.
Alright, now I just need to export a USD file and bring it into it unreal
great guide! ty ( tip 4noobs, like me. put in 0.75 speed)
It’s look easy and when I start to do it everything goes wrong 😅
kinda clickbaity with the title, but I figure "How to turn flat images of buildings into 3D" wouldn't ring as much.
It is great for what it does to images of buildings tho
there isn't even a free trial?
"super easy"
heh heh, rrrrright
srly tho, good tutorial
can you please slow down.....it is a lot of info...thank you
😘
Ayo
Very complicated 😢
Great, now tell us how to do it _IN A DIFFERENT ANGLE_
Was not able to follow it since you went so quick
Video is 3mins but it will take 3 hours😂