If you want a antique effect on the pictures. Take some modge podge and put on a plate. Add a couple drops of brown paint to it. Just to give it a little color. When you apply this to the topic of your photos it will give that aged look.
@@OurUpcycledLife It might also look great if the edges of the photo were gently sanded to look more blended with the wood for an even more aged look :)
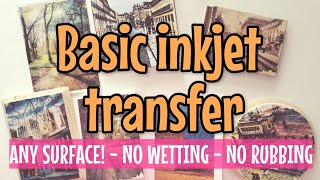
Like you, I thought this was going to be photo transfer with a miracle way to do it with an inkjet printer. But if you are looking for photo transfer, I have two videos on my channel......one showing transfering to tiles, and one showing transfering to wood.
I agree with you! This is a decoupage tutorial with instructions on how to prevent the inkjet printer ink from smearing. It is NOT a “photo transfer” tutorial. Nevertheless, the suggestions on how to decoupage inkjet printer images with no bleeding of colors are awesome!
My late husband and I used to go camping for years. I loved this video. I have lots of pics of us. I am going to try this. Fingers Crossed! Thank you Deidra
My grandmother used to do this in the 70's with, I believe, greeting cards on wood. I'm going to have to ask maybe an older cousin who may remember what she used to do, but it was exactly the same idea. Plus I think she may have used some kind of ribbon around the edges of the wood or plack. This brought back fond memories of my grandmother! Thanks! 💗
I remember that technique from summer camp. Do thin coats of mp on the image do one direction. Dry through then other direction for 3 coats. Then after dry wet the image and rub off the card back. Then put decoupage on desired surface and apply image. Then decoupage the top.
Back in the depression my Grandmother said they used real tea bags to stain paper to give it an aged look. To make ordinary paper turn brown. Similar to what we use as regular tags and decorate. Tags you use for gifts. I wish she was around to ask more details like what they used as embellishments.
I have watched this video mutliple times. Ever since i subscribed to you I started using mod podge techniques on my projects. Thanks to you I am enjoying my mod podge projects hehe
I used to decoupage beautiful, evocative magazine photos on wood back in the 70's...SO now that I make inked copies of beautiful images all the time, I'm SO happy to see how to keep them from smearing! New subscriber BC you have such clear instructions....
I printed pictures on white tissue paper., How would I cure them so that the ink does not run... And can I bake pics for my inkjet in a toast oven.. I love watching your videos..
Thank you so much for this video. I was always whining about not having a laser printer because I couldn't do cute little mod podge crafts with my inkjet images. I just finished a darling project I've been wanting to do. Your hack worked great. I am so happy I found you Thank You
My school is doing an adventure theme this year and you just did a public service by saving me a fortune on decorative items so I can buy more instructional materials!!!! Thank you!
I’ve wanted to decoupage some beautiful inkjet printer images I have stored in a folder, but didn’t know how to do it without making a mess from colors bleeding all over the place! Thanks to your tutorial, I know exactly what to do now and I can use my pictures for so many projects! You are always so helpful! Thank you ever so much! ❤️❤️❤️!
New subscriber here. I've watched 3 of your videos now and love them. I like that they are thorough but short enough to get through quickly. Thanks for sharing your knowledge.
Thanks for watching ❤️ thanks for the compliment 🌸 I haven’t been making videos very long so still learning lots and comments like your make me feel I am really helping out☀️
Just wanted to let you know that I used your technique in this video using my inkjet printer . I used hairspray and it turned out great. I linked this video in the description box on my video . Thanks for sharing 👍
Thank you for this video...it was SO helpful! I never knew that you could get the wrinkles out with a warm iron! It worked perfectly! I did try one example using the hairspray method and didn't notice any difference after ironing. (11:21)
Absolutely awesome video! I have been wanting to learn how to do this for a very long time and didn't know where to turn. So thank you so much for making the video and making it look so easy! ❤️
I think this is a brilliant idea. Not sure why all the comments saying "this isn't photo transfer" because that's literally what you did... You TRANSFERRED a photo! (Unless I'm missing something?) But anyway, you have a new subscriber here! 😊 Thank you for the information. Great videos!
This is decoupage which is a very nice way to do this...I like it.... but it is not photo transfer. I have 2 videos on my channel for photo transfer.....one for tiles and one for wood......if you're looking for ways to do that.
Good video - simple, effective communication of method. Well done. This of course is NOT photo transfer, it is decoupage which is simply sticking paper onto something else. Nonetheless the video was well done.
I'm so glad I found your channel 😊 I have been watching a few of your videos and I love all you share with us 😊. I can't wait to try this and other things from your videos. Thanks for sharing this video
I love your work and alternative methods. I find Some crafting materials very expensive for what they are, but when you do a little research you can find cheaper ways of creating the same affects. You make things look very easy and straight to the point. Thank you very much for sharing your videos.
Thank you again!! I made a few signs for the kitchen that came out great, of course it helps to give it an antique look to hide any blemishes on it. I wanted to down load a couple photos to show you, but it doesn’t allow me. I put a little brown acrylic paint on a piece of card stock and lightly brushed a down stroke over the photo a few times with a dry brush. Sue V
I thought this was gonna be a new inkjet TRANSFER technique! However you were sticking paper onto wood (decoupage), which I know how to do! The oven process is new to me. A well-made tutorial video though. TY
Just found your videos and so happy I did. Thank you for the tips on using an ink jet printer. Now my options aren't limited because I don't have a laser.
@@OurUpcycledLife thank you for your reply, I love creating greeting cards, also photo albums none sew not as good as professional quality but all the same I enjoy. Thank you again.
Fantastic tutorial sunshine. Looks like I'll soon be looking into getting an ink jet printer. LOL 😎 My brain is now spinning with ideas for personalized gifts for friends and family. Such a fun project. I'll certainly check out your camper upgrade journey. Loved this video. 🌞
This is great! Thanks. And btw I used to live in upstate NY and we would go to Ontario all the time. It's absolutely beautiful and the people are very nice.
Hi. Thanks so much for this tutorial. I have an ink jet printer and this worked perfectly. I did put too much modge podge on top of my photo and it bubble and wrinkled but I was actually able to lay down some parchment paper on top of it and iron on low for a few seconds and everything straightened out. Thanks again.
Thank you so much! I’ve been wanting to make my own decoupage paper, but the ink always runs, and knowing about the oven step is definitely a game changing tip, I’m going to try it out today. I’ve been thinking on using a matte art sealant, didn’t know that hairspray could work too, so I’ll keep that in mind when I run out of my sealant. Again, thanks a lot!
We just bought a Casita travel trailer and I was looking for a way to decorate it with family photos. This idea will work beautifully using thin wood pieces and hanging them from the carpeting that on our walls with curtain hooks. The wall carpeting is used to provide installation as well as noise dampening. Thank you for sharing this, you have resolved a baffling problem for me! New subbie!
Thank you so much for this tutorial...Newbie to modge podge I have saved a bunch of scraped wood so I'm going to make some signs with it...at least try my hand at it ...👍👍🤞🤞🤞😁😁😁
I can't seem to find images on that site you included for vintage artwork? I tried various search options, but nothing but text. Any helpful suggestions would be appreciated. Many thanks for the tutorials!
Hi, I watched another one of your videos that showed you putting the mod podge on the top of the photo. Which way works best? Top or bottom? And why two different ways? I'm new to this so I'm just learning. I think your just putting the image on the block as opposed to transferring the image by rubbing?
Question : when using a laser printer graphic (for rub off method) does ink need to be wet or can graphic be printed days earlier than transfer to wood, mp, dry 24 hrs. Rub off projects TYIA
New subscriber to your channel--Thank you so much for this video!! I heard you mention that you were using your "homemade chalk paint" in the beginning so of course I had to look through your other videos to see if you had a video for it, and... YAY! you have that video as well! I can't wait to put these awesome videos to good use! Thanks again! 😊
I spray the hairspray after it is already on the wood I print them out and wait one day before I use the print Decoupage only the back side onto the wood, with a credit card. Keeping the top side dry. Let dry Sand edges Then hairspray to set. Not sure if I explained that clearly lol But I almost never have a problem when I do it this way Use 20lb cheap copy paper.
Yes you sure can if you wpaint with chalk paint first. I have a tutorial on how i paint glass if interested. : th-cam.com/video/i8ETTafLTrA/w-d-xo.html
I love this! What size were your blocks please I know you do not did a sander for this project but I am wondering what type you use to sand and clean up old and new pieces of wood Thank you so much for all the great videos Your ideas are amazing!


Subscribe to my email list for more crafting and DIY content! eepurl.com/hLQBjf
Your title says using an inkjet printer, but your link shows laser jet???
What is the name of the finisher you use to make the photo looks complete?
If you want a antique effect on the pictures. Take some modge podge and put on a plate. Add a couple drops of brown paint to it. Just to give it a little color. When you apply this to the topic of your photos it will give that aged look.
Great tip! yes that works great
@@OurUpcycledLife It might also look great if the edges of the photo were gently sanded to look more blended with the wood for an even more aged look :)
You can also print out your images using the antiqua setting on your PC to give it the sepia look.
@@vanessaeden8174 thank you for this tip. I adore the sepia look and now I’ll be able to print my own photos using this technique! Much appreciated.
Is it 200 degrees F or Celsius
Great video, none of that unnecessary talking throughout the video. Simple explanation with visual! Perfect!
Glad you enjoyed! Thanks for watching
This is a great method of decoupage. Thank you! It is not transfer or photo transfer, though, as the video title infers.
Like you, I thought this was going to be photo transfer with a miracle way to do it with an inkjet printer. But if you are looking for photo transfer, I have two videos on my channel......one showing transfering to tiles, and one showing transfering to wood.
I’m not sure if you watched the same video I just watched because she just did 2 photos and 1 graphic. I thought it was brilliant.
I agree with you! This is a decoupage tutorial with instructions on how to prevent the inkjet printer ink from smearing. It is NOT a “photo transfer” tutorial. Nevertheless, the suggestions on how to decoupage inkjet printer images with no bleeding of colors are awesome!
@@Bohemian-Nilda Yes this is a great technique for those that are wanting to decoupage (and not transfer) and don't want to wait for the ink to dry.
@@janiethecraftprincess but using Laser printer
My late husband and I used to go camping for years. I loved this video. I have lots of pics of us. I am going to try this. Fingers Crossed! Thank you Deidra
Thanks for watching Carolyn glad you enjoyed have fun crafting
You are the best instructor! Makes me like TH-cam again.
Wow, thanks! That is a big compliment!! Glad you enjoyed
My grandmother used to do this in the 70's with, I believe, greeting cards on wood. I'm going to have to ask maybe an older cousin who may remember what she used to do, but it was exactly the same idea. Plus I think she may have used some kind of ribbon around the edges of the wood or plack. This brought back fond memories of my grandmother! Thanks! 💗
Thanks for watching Belynda! I remember my grandmother using this method also
I remember that technique from summer camp. Do thin coats of mp on the image do one direction. Dry through then other direction for 3 coats. Then after dry wet the image and rub off the card back. Then put decoupage on desired surface and apply image. Then decoupage the top.
Back in the depression my Grandmother said they used real tea bags to stain paper to give it an aged look. To make ordinary paper turn brown. Similar to what we use as regular tags and decorate. Tags you use for gifts. I wish she was around to ask more details like what they used as embellishments.
I have watched this video mutliple times. Ever since i subscribed to you I started using mod podge techniques on my projects. Thanks to you I am enjoying my mod podge projects hehe
That is awesome!
I used to decoupage beautiful, evocative magazine photos on wood back in the 70's...SO now that I make inked copies of beautiful images all the time, I'm SO happy to see how to keep them from smearing! New subscriber BC you have such clear instructions....
Wonderful! Glad to have you follow along Rebecca
I printed pictures on white tissue paper., How would I cure them so that the ink does not run... And can I bake pics for my inkjet in a toast oven.. I love watching your videos..
Thank you so much for this video. I was always whining about not having a laser printer because I couldn't do cute little mod podge crafts with my inkjet images. I just finished a darling project I've been wanting to do. Your hack worked great. I am so happy I found you Thank You
You are very welcome
I know nothing about this field,was watching out of interest,and here I learnt how to make my own shelf sitter. Thank you so much ❤️
Happy to help
Did NOT know that oven trick. Excellent.
Works great! Thanks for watching
Funny…I do my crafts in my popup camper! I love your channel. We live in the forest and I really like the things you make.
So glad you’re enjoying Sherry thanks for watching
My school is doing an adventure theme this year and you just did a public service by saving me a fortune on decorative items so I can buy more instructional materials!!!! Thank you!
Glad this video was helpful! Thanks for watching
I’ve wanted to decoupage some beautiful inkjet printer images I have stored in a folder, but didn’t know how to do it without making a mess from colors bleeding all over the place! Thanks to your tutorial, I know exactly what to do now and I can use my pictures for so many projects! You are always so helpful! Thank you ever so much! ❤️❤️❤️!
Glad to help out! Happy to have you following along
New subscriber here. I've watched 3 of your videos now and love them. I like that they are thorough but short enough to get through quickly. Thanks for sharing your knowledge.
Thanks for watching ❤️ thanks for the compliment 🌸 I haven’t been making videos very long so still learning lots and comments like your make me feel I am really helping out☀️
Thank you so much. This video is a great help & very easy to understand. You made it simple & short without all the unnecessary talking. 🤗🤗💖
Thanks so much for watching. Glad you enjoyed.
Thanks so much for sharing this! I am one of the people that has an ink jet printer. This is SO helpful. 💕
Thanks for watching ❤️ so much you can do with a ink jet printer
@@OurUpcycledLife I now know that, because of you 😊
Exactly the information I was looking for with no nonsense. Thank you!
Thanks for watching ❤️ glad to help out
Just wanted to let you know that I used your technique in this video using my inkjet printer . I used hairspray and it turned out great. I linked this video in the description box on my video . Thanks for sharing 👍
Thanks for watching ❤️ glad it worked for you! Perfect solution to not having to buy a laser jet. Thanks for the tag I appreciate it 🌸
Thank you for this video...it was SO helpful! I never knew that you could get the wrinkles out with a warm iron! It worked perfectly! I did try one example using the hairspray method and didn't notice any difference after ironing. (11:21)
That's perfect! Glad it was helpful
Thank you for sharing your techniques on TH-cam! Hope all is well.
You are so welcome!
Absolutely awesome video! I have been wanting to learn how to do this for a very long time and didn't know where to turn. So thank you so much for making the video and making it look so easy! ❤️
Glad to help out! thanks for watching
I think this is a brilliant idea. Not sure why all the comments saying "this isn't photo transfer" because that's literally what you did... You TRANSFERRED a photo! (Unless I'm missing something?) But anyway, you have a new subscriber here! 😊 Thank you for the information. Great videos!
Thanks for watching! Glad to help out and love new crafting friends ❤️🌸
This is decoupage which is a very nice way to do this...I like it.... but it is not photo transfer. I have 2 videos on my channel for photo transfer.....one for tiles and one for wood......if you're looking for ways to do that.
Great job young lady! You answered my query as to whether the inkjet would smear
Glad to help out ! ☀️ thanks for watching
Good video - simple, effective communication of method. Well done. This of course is NOT photo transfer, it is decoupage which is simply sticking paper onto something else. Nonetheless the video was well done.
Your studio is super cute!
everything was thrifted or free!! I love working in it! Thanks for watching Allison
I love what you did with upcycling …( is it a frame from a mirror, or maybe a headboard of some sort ?) that peg board tool hanger is phenomenal!!!!!
Thanks for watching! 🌸 isn’t the peg board fabulous
I’m trying all of your Mod Podge Techniques Deidre I think you’re awesome
Thats awesome!! Thanks for watching Eleanor
Glad the PVA works just as well because I’m asthmatic and the hair spray would be awful for me. What great tips, thanks.
Thanks for watching!
I want to put an image on a faux leather journal. Will this method work for that?
It will work best on a chalk painted surface. Thanks for watching Theresa
I'm so glad I found your channel 😊 I have been watching a few of your videos and I love all you share with us 😊. I can't wait to try this and other things from your videos. Thanks for sharing this video
Thanks for watching Jan glad you are enjoying!
I love your work and alternative methods. I find Some crafting materials very expensive for what they are, but when you do a little research you can find cheaper ways of creating the same affects. You make things look very easy and straight to the point. Thank you very much for sharing your videos.
Glad you are enjoying!! Thanks for watching
Thank you again!!
I made a few signs for the kitchen that came out great, of course it helps to give it an antique look to hide any blemishes on it. I wanted to down load a couple photos to show you, but it doesn’t allow me. I put a little brown acrylic paint on a piece of card stock and lightly brushed a down stroke over the photo a few times with a dry brush. Sue V
I thought this was gonna be a new inkjet TRANSFER technique! However you were sticking paper onto wood (decoupage), which I know how to do! The oven process is new to me. A well-made tutorial video though. TY
Thanks for watching!
Just found your videos and so happy I did. Thank you for the tips on using an ink jet printer. Now my options aren't limited because I don't have a laser.
Yes, if you’re really careful you can get the inkjet printer to work well thanks for watching. Glad you enjoyed.
Totally awesome!!! Can't wait to try this!! THANK YOU SO MUCH (from Canada)
Glad this video was helpful! Thanks for watching Maggie
Thank you for the side by side comparison!
Thanks for watching ❤️ hope it helped you out
Thank you for sharing your Amazing ideas
You are so welcome! Thanks for watching!
Quick question when put the pics in oven do you keep oven door slightly open are closed for the whole ten minutes
You can shut the door but just keep a real eye on it! Thanks for watching
Thank you so much inhave a question I need to put pictures on a tumblers do you need to add epoxy bc I don't want to be abel to feel the photo
Thanks for watching ❤️ I have never worked with epoxy so I’m unsure..
I did a similar thing many years ago with a Christmas card I liked using Mod Podge. Thanks for your instructions & tips!
Glad to help out! Thanks for watching Bonnie
Thanks so much for this video. Love how you show and explain your steps so quickly and thoroughly.
So glad you’re enjoying my videos thanks for watching
Wow! I've always wanted to try this & your video makes it looks easy enough for me to try it. THANKS!!
All are easy techniques! Give them a try ❤️
Omg! Your tutorial was absolutely amazing, thank you again for sharing this wonderful talent you have, I must try this technique myself. Many thanks 😊
You are so welcome! So glad you enjoyed Michael!
@@OurUpcycledLife thank you for your reply, I love creating greeting cards, also photo albums none sew not as good as professional quality but all the same I enjoy. Thank you again.
Fantastic tutorial sunshine. Looks like I'll soon be looking into getting an ink jet printer. LOL 😎
My brain is now spinning with ideas for personalized gifts for friends and family. Such a fun project.
I'll certainly check out your camper upgrade journey. Loved this video. 🌞
Thanks!! Have a great day
Your inkjet method works!!!! Thank you!!!
Glad it helped! Thanks for watching Barbara
You are a darling. You just gave me an answer to all my problems of smearing etc
Love all your diys you are so inspirational Thankyou
Realy enjoyed the video I'm new to mod podge new subscriber too x
Thanks for watching ❤️ glad you enjoyed and love new crafting friends 🌸 glad to have you following along
Exactly what I was looking for, thank you!
So glad to help. Thanks for watching 🌸
Thank you for this content. I love your wall color!
Thank you!
Fantastic I’ve been wanting to learn how to transfer inkjet pictures. I love your videos I just watch one after the other 🇦🇺🇦🇺💕💕
Thanks for watching 🌸 love new crafting friends. Glad to have you follow along
This is great! Thanks. And btw I used to live in upstate NY and we would go to Ontario all the time. It's absolutely beautiful and the people are very nice.
Thanks for watching! Its beautiful here right now the leaves are just starting to change :)
I love your technique for photo transfer. Best one I've seen! I will be doing tgis! Thank you for sharing 😊
Thanks for watching ❤️ glad it was helpful 🌿
Hi. Thanks so much for this tutorial. I have an ink jet printer and this worked perfectly. I did put too much modge podge on top of my photo and it bubble and wrinkled but I was actually able to lay down some parchment paper on top of it and iron on low for a few seconds and everything straightened out. Thanks again.
Glad it was helpful. Thanks so much for watching.
This is really interesting and makes sense. I’m also trying to figure out how to do things people say I cant. I use hair spray in unusual ways too!
Have you tried to use hari spray to crackle paint? It works fantastic! th-cam.com/video/SrDEKJeco_A/w-d-xo.html
Thank you so much! I’ve been wanting to make my own decoupage paper, but the ink always runs, and knowing about the oven step is definitely a game changing tip, I’m going to try it out today. I’ve been thinking on using a matte art sealant, didn’t know that hairspray could work too, so I’ll keep that in mind when I run out of my sealant. Again, thanks a lot!
Thanks for watching ❤️
We just bought a Casita travel trailer and I was looking for a way to decorate it with family photos. This idea will work beautifully using thin wood pieces and hanging them from the carpeting that on our walls with curtain hooks. The wall carpeting is used to provide installation as well as noise dampening. Thank you for sharing this, you have resolved a baffling problem for me! New subbie!
That's a great idea! Thanks for following along! Hope you find lots of great content
I want to make a plaque that will be outside. Any recommendations on best sealant for outdoor use?
If you were going to put something outside I would seal it with an outdoor poly acrylic sealer thanks for watching
The aged paper looks like an interesting project.
Wow! Really enjoyed this presentation. Super informative but also a way to use all those 2 X 4 ends ... Cheers
Thanks for watching ❤️ never burn scarp wood always seem to use it up 😄
Thank you for the hairspray and oven tip. Can you use these methods to do the wet and rub transfer method?
Thanks for watching! Here is a tutorial that will help you out with that method th-cam.com/video/F17WmucEwqM/w-d-xo.html
@@OurUpcycledLife thank you
One last question can I use the hairspray or put into the oven before I apply the modpodge onto picture?
What a project! Can’t wait to try it
Thanks for watching glad you enjoyed Jan
Thank you so much for this tutorial...Newbie to modge podge I have saved a bunch of scraped wood so I'm going to make some signs with it...at least try my hand at it ...👍👍🤞🤞🤞😁😁😁
Have fun creating thanks for watching
Do you have to bake the pictures if they were printed days ago?
It will probably be ok not to put in oven but I would give it a spray of hair spray. Thanks for watching Jessica
I can't seem to find images on that site you included for vintage artwork? I tried various search options, but nothing but text. Any helpful suggestions would be appreciated. Many thanks for the tutorials!
They look so good. Thanks for sharing
Thanks for watching Rhonda glad you enjoyed and it was helpful
I love this idea, thank you!!!
My ink smeared with the matte mod podge. I will have to try the hairspray.
So, so fun!!! This is an excellent tutorial!!!
Glad this video was helpful! Thanks for watching Shirley
Thank you so much for posting this!
Thanks for watching Valerie
Thank you thank you thank you for this tutorial!!!
Thanks for watching glad you enjoyed Alice
Great video it opens a whole new world ,printing my own pictures to decopague ! Thank you so much ❤️👍😍
Thanks for watching Helga! Yes it sure does
Can’t wait to get to printing!!!!!
Awesome info! Love from NB!
Glad it was helpful!
Hi, I watched another one of your videos that showed you putting the mod podge on the top of the photo. Which way works best? Top or bottom? And why two different ways? I'm new to this so I'm just learning. I think your just putting the image on the block as opposed to transferring the image by rubbing?
It’s just 2 different techniques
Question : when using a laser printer graphic (for rub off method) does ink need to be wet or can graphic be printed days earlier than transfer to wood, mp, dry 24 hrs. Rub off projects TYIA
I find it works best to use right away but it will also still be ok after a few days. Thanks for watching Gale
I like the iron tip.
thanks for watching!
Thank you for this very informative video.
Glad it was helpful thanks for watching Susan
Thank you. This is doable. I’m wondering if you could use the iron for a transfer?
New subscriber to your channel--Thank you so much for this video!! I heard you mention that you were using your "homemade chalk paint" in the beginning so of course I had to look through your other videos to see if you had a video for it, and... YAY! you have that video as well! I can't wait to put these awesome videos to good use! Thanks again! 😊
Thanks for subbing Angela! Glad to have you following along
Can you use this same method if want to put on glass or a mirror? Or do I have to use a different method?
You can use this method but make sure that you paint it with chalk paint first
How do you get a crisp colorful print on regular computer paper? Mine always seems less than great.
That could just be your type of printer
I spray the hairspray after it is already on the wood
I print them out and wait one day before I use the print
Decoupage only the back side onto the wood, with a credit card. Keeping the top side dry.
Let dry
Sand edges
Then hairspray to set.
Not sure if I explained that clearly lol
But I almost never have a problem when I do it this way
Use 20lb cheap copy paper.
Thanks for watching ♥️ great tips
I'm so happy you found a way to make things using an ink jet printer. Could you use a brayer to press image on to get wrinkles & bubbles out?
Yes you sure can
Going to try this. Thank you
Thanks for watching glad you enjoyed
Hi, is varathane the same as mini wax acrylic sealer? Thank you
Yes, it is
is the 200 degrees in Fahrenheit? Just checking, I'm in Australia, so I'm assuming that its 90/95º c?
Yes it is Fahrenheit. Thanks for watching Rachael !
Great job you explain so well..
Glad it was helpful! Thanks for watching Donna
Thanks for the tutorial, just what I was looking for🎉🥰🥰🥰🥰🥰🥰
Thanks for watching 🌸 glad to help out
Thanks for this tutorial.
Thanks for watching glad it was helpful Patty
Love love love your method
Thank you Mary! 😊
Is this what is also called decoupage? I thought this was a transfer of a picture or motif on fabric. Do you have any video for the same?
How to PRINT on your own FABRIC / EASY DIY PROJECT
th-cam.com/video/okMcwgS8FiE/w-d-xo.html
This was an awesome video, you stated hair spray can polycrylic protective spray be used instead?
Thank you,
I have not tried it so I’m not sure . Thanks for watching 🍁
If I want to do reverse image transfer do i do this to my inkjet print?
Yes you can
Can you use this technique to transfer onto canvas as well? Or will this only work for wood?
Yes you can
Can you use this method for ceramic coasters?
Yes you sure can if you wpaint with chalk paint first. I have a tutorial on how i paint glass if interested. : th-cam.com/video/i8ETTafLTrA/w-d-xo.html
I loved your video. Do you think that this technique would work on ceramic tiles?
It will if painted with chalk paint first
Thanks for sharing, I think this looks doable.
Thanks for watching Kay!
I love this! What size were your blocks please I know you do not did a sander for this project but I am wondering what type you use to sand and clean up old and new pieces of wood Thank you so much for all the great videos Your ideas are amazing!
amzn.to/42X2536