Flip Cart, Part Two. FREE PLANS | How To

ฝัง
- เผยแพร่เมื่อ 13 ต.ค. 2023
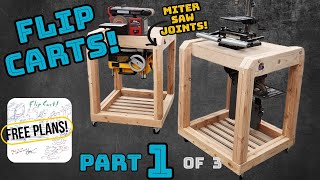
- FINALLY the project has come full circle. After sitting in the background for months, I have finally completed my flip cart, or "flip top cart" as some may call it. These carts can be wheeled around your shop to available outlets, and stored out of the way if your wife still has that fairytail of parking in the garage. Instead of lifting them ontop of your workbench, or getting onto the ground to use your tools each time, spend the $80 per cart and build these bad boys. Featuring several endlap joints and a tenon joint, all cut using the miter saw (and one that requires a router).
I am breaking this video up into three separate parts:
PART ONE: is the bottom construction. the bracing, the legs and the caster wheels. it also includes the most important step: finding the correct measurement for you!
PART TWO: is the upper construction. the 2x6 top bracing and how to build the flipping section of the cart.
PART THREE: ohhh baby, part three is when we customize these carts even further by adding a sandpaper organizer, cord management and the drawers in the space between the tools. Im sure to have a few more ideas by the time I get to that step. lets not forget, the carts took me several months :P
Thank you ALL for the support, all I ask is for you to simply click the like button if you are going to download these plans.
Free DOWNLOADABLE PLANS can be found here:
freeimage.host/i/Jbv2bhG
Pinterest Plans Link:
pin.it/3XDfiEqXK
Materials List: Per Cart
(8) 2"x4"x8'
(2) 2"x6"x8'
(1) 1-1/2"x 36" Dowel Rod
(1) 3/4"x4'x8' Double-Sided Plywood
(1) Scratching Awl
(2) 3" Caster Wheels - swivel
(2) 3" Caster Wheels - fixed
Happy building! - แนวปฏิบัติและการใช้ชีวิต


![[HIGHLIGHT] หมีLIVEปะ? | EP.171 เห็นแต่ในจอ วันนี้มาต้องขอคารวะ](http://i.ytimg.com/vi/gPWLxa0e_Z8/mqdefault.jpg)


Instead of a solid dowel, I used a piece of pipe as the pivot. I mounted a small power strip inside the spinney platform and ran the cord out of the pipe. All of the power tool cords go inside, and then there's one single plug outside for everything.
This blew my mind! Great idea buddy! Good thing I didnt glue my dowels ;)
That is so smart! 🎉
Would you be willing to send me a picture or two of this so I can include it in Part 3? Thanks!
WhosTheVossWoodworking@gmail.com
Very good idea.
Love your approach to woodworking. A person doesn’t need all the mega dollar tools. Keep up the good work and creativity.
Thanks buddy! My little shop has everything I need. Except maybe a oscillating sander, dust collection system, more clamps, a lathe, CNC machine. But those are just "wants" lol. The dreammmmmmm
The cart with the planer mounted sideways works out good as you could add attaching in/out feed tables to the cart.
Dang scotty! Im lovin that thought!
@@WhosTheVoss I got some other new ideas also. We should chat sometime!
Now I'm seeing more of the ingenuity of your joinery. I do love it. Re-thinking my flip cart design now.
Thanks :) they are pretty sweet carts! Glad you liked the video buddy
LOL!
Your sanding at 7:50 cracked me up!
🤣🤣 gotta get comfortable buddy ;) lol
The handle can come off. I take mine off all the time. Use the tool that's on top of the planer. I think it is a star shape. I like your design, I'm going to model my own cart with some elements of yours. Thanks for the design ideas.
I have it rotated so the top spins around without additional steps, i do love the easily accessible tool they have on the top :) glad you enjoyed the cart! Good luck with your cart!!
looking good. I just found your channel. I'm looking forward to future videos.
Welcome aboard! Glad you enjoyed the video :)
Some great tips in this one. Measure at the bottom, making the washers the way you did from ply “sweet!” . Only thing I’d do different is use dowel in stead of the Awl. Just being a tight ass 😂
Thanks buddy, i thought about a dowel but ended up with the awl, probably going to switch over to a screw driver so its easier to push in ;)
@@WhosTheVoss totally get why you used a screwdriver. It would make life easier for sure
Nicely done.
Thanks David!
glad I found your channel. So glad someone is making more realistic videos, Thanks
Fist pump. You hate the videos where the thumbnail is a guy holding a board and says "$300 with one board" and you have to watch 4 minutes to learn what they are building? Meee too, but I made a spoof video of that exact thing for next week ;) lololol
Hey, its all learning my friend. Lookin' good so far!
Definitely a learning project :P thanks for the confidence boost! ;)
Great job
Thanks buddy!!
You should make a video on how to download the plans. Everyone I click on is empty. I must be doing something wrong.
Nice carts!!
Might try it on a different device, plans download on all three of my devices, not sure if its a browser setting or why it wont let you download them. Sorry buddy, A video is a good idea though! :)
this is really great stuff man. Keep it up!
quick question though: what did you use to clear out the holes around the 24 minute mark? The hole saw is just going to cut a circle right?
Thanks Chris! So the hole saw at the 24 minute mark removes the outer 2x6 chunk. Since there are two 2x6 pieces I use the hole saw until it removes only the first board. And it leaves you with a perfectly centered spot to finish drilling out for the stop :)
@@WhosTheVoss oh of course! I lost sight of the fact that it was two boards. Duh. Thank you!
Nice work. When is part 3 coming?
Part 3 is in production (finally), it will post on the 3rd if I get plenty of shop time orrrrr on the 10th for sure :)
Whats a snipey spot? Lol cool video man I subscribed
Its the small area of wood where the round router bit doesnt remove the material to be a clean and square corner. Its a planer term, might have used it incorrectly :P but you can use a chisel and remove that little bit :)
@WhosTheVoss you are such a tease! I watched part one and two but I don't see part 3 yet...tsk, tsk sir...lol...
🤣 this video just got popular, ill have to get started in making those drawers finally! Lol
You can hang peg board on the sides...set them on the inside edge that will give you the thickness of the 2x4 worth of space to hang things. You can also run 1x2 boards there with drilled holes for bits and blades...just a suggestion
Can you please make a simple rolling shop cart for clamps? Shelf on the bottom to hold glue/tape and maybe outfeed rollers on top so you line it up with table saw or maybe make it height adjustable...new challenge for you! I've been playing with designs in my head but I have to focus on building my workshop outside plus storage...I don't have anywhere proper to work yet
👍💯👍💯
Thanks!!!! :)
How do you intend to prevent the drawers from sliding out as you spin the top?
It's explained at the end of part three :)
9:11
👍
28:57
👍
I can’t find part 3
th-cam.com/video/6klvUhufMnQ/w-d-xo.htmlsi=1MR82DKFaeAf3XWI
here she is buddy :)
Where are the plans? I do appreciate the doodles when i click the link but also leaves alot to be desired. I know they are free but from what i can tell you seem a bit smarter than just some doodles. i would be willing to bet that you have more detailed plans that im just totally missing somewhere. I do enjoy your uploads! Please help
These are one of the first plans I ever made. Might consider giving them a face lift :P