Change a U-Joint with a Hammer

ฝัง
- เผยแพร่เมื่อ 28 ก.ค. 2024
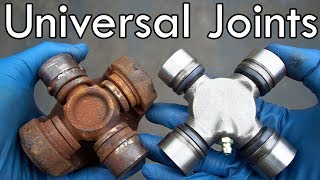
- In this video I will show you how to change a U-Joint with a hammer... As opposed to with a press. This way you can change your universal joint out on the trail after it breaks! Some say it's easier to fix it with a hammer anyway, what do you think?
Need To buy Parts? Get them cheaper Here: www.bleepinjeep.com/discounts
Website: www.bleepinjeep.com
FaceBook: / bleepinjeep
Offroad Parks: bleepinjeep.com/offroad-parks
Tee Store: bleepinjeep.com/store
Donate: bleepinjeep.com/donate
Coupon Codes: bleepinjeep.com/discounts
Disclaimer - This product is meant for entertainment purposes only. Your mileage may vary. Do not try this at home. Void where prohibited. Some assembly required. For off-road use only. Slippery when wet. Batteries not included. Do not use while operating a motor vehicle, heavy equipment, cherokee, wrangler, or any jeep vehicle. May be too intense for some viewers and children under 30 years of age. Please remain seated until the ride has come to a complete stop. Studies have shown viewing these videos causes increased cancer risks in laboratory test people. I am not a professional, I have no training, I'm not even particularly good at horse whispering. Don't believe everything that you know. Please keep your hands in the vehicle at all times. Do not tap on glass. Do not eat anything that has been on the floor for more than 3 days. Keep your hands to yourself. Not to be taken internally. Reproduction strictly prohibited. Driver does not carry cash. Objects in jeep mirrors may be farther than they appear. - ยานยนต์และพาหนะ


![เบิ้ล ปทุมราช - อ้ายกินดอง น้องลาบงัว ft. สแน็ก อัจฉรีย์ [OFFICIAL MV]](http://i.ytimg.com/vi/-OK--KaSPcI/mqdefault.jpg)


Might be worth noting that if you're doing it at home as opposed to on the trail, keep the new UJ in the freezer right up until you start to fit it. Will make it so much easier to press back in.
+alan hutchinson Wow that's a great tip! Glad I read thru the comments.
So on the trail store u-joint in your cooler.
Very nice, one of those I really should have thought of that like 100 years ago sort of thing, thank you very much, great tip!!
alan hutchinson , will be doing exactly that from now on I’m sure, amazing tip for sure, getting ready to do several u joints , many thanks!
Hi Matt. Something you ought to know. You play a very important role to have us Jeep enthusiasts "checked out" on all maintenence procedures. Ill fess up on something here that might qualify me to rate you as tops in what you do in these videos. Im an A&P (Airframe and Powerplant licenced aircraft mechanic) for 28 years. All are nuts and bolts but every system has its way of doing things. Its called getting "checked out" on a procedure. I purchased my first Jeep Cherokee 1989 and I see your videos to help me get things done on my unit. Your explanation is comprehensive and to the point. I thank you for all.
Thanks for watching! glad to have you as a subscriber!
Guess what? I had posted on your channel that my jeep cherokee, had a fuel pump that was humming real loud. Well, yesterday I let it run for 15 minutes parked and no sound. Then this morning I went to the corner and in about 2 minutes it started humming. At the place I went I decided to let it run parked and again in 15 minutes it didnt hum. Then when I put it in drive I let it coast and no sound. Then when i made a turn into a street on the drainage slight channel tha joined the streets it started again. So just to make sure I sopped, shut it off and started it again, no sound, coasted in drive, no sound, accelerated, and it came back. So it means that while the pump is feeding its ok but when the fuel moves and I suppose that when temporarily not submerged completely, it sarts humming again. What do you think?
Oh and thanks Matt for your great videos.
@@edelgado1
Bad fuel pump?
The best gem was to go further in with one cap so you don't loose the bearings on the other side... Great vid.
After the clips are in I always give each side of the yoke ,the ears.a good solid rap with the hammer. It centers the joint. Great vid I've been doing them with a hammer for 30 years.
Matthew Richardson I second that, rapping them always makes them work more smoothly right away
One of the clearest, most concise, to the point how-to's I've ever watched. Very well done. Thanks
What a great video!! My F350 was vibrating too bad while on highway, had to pull over and get a tow....u joints were shot, this video really helped me understand what had to be done. This guy is an incredible presenter! Thanks!!!!
You video was so simple and straight to the point very helpful other people make theirs so long....
Thanks!
Agreed, no B.S. just to the point, thank you.
Mika Nuñez I
Great video dude.
You made sure to point out the critical factors... don't loose the needle bearings, don't damage the cap housing with the BFH and so on.
Straight, concise and to the point.
Thanks a bunch.
I've changed my share of these (in the truckstop parking lot) and in my garage.
Good to see a video like this.
You remind me of Mr. Rogers but a mechanic version😂
You are the best Jeep mechanic ever man!!! You take something complicated and make it so understandable that even a grade school kid could do it. When I have the money I will be donating every time I what one of your videos. That's if you have a way to donate. Thanks for everything!!!
Always remember to mark the slip yoke and slip stub shaft before removing the slip yoke. It's balanced a certain way. The yokes have to in (phase) aka in line with each other.
Man you don't know how much I have learned from your videos!!! Thank you so much, I have definitely subscribed. Started watching awhile back when I needed to know how to replace my ball joints in my '93 xj. Love your videos and they have answered every problem I've had so far! Thanks again- Mark
Hey Mark, Thanks for the awesome compliment man! Glad you are watching and I hope I can make some more helpful videos in the future.
Your channel is more helpful on my Jeep than any manual or mechanic. Thanks guys keep the vids coming
Hey man I just found your page. I'm 16 and currently restoring a 1974 CJ5 and I love your vids. Tutorials and humor are top notch. Love it! :)
I am grateful for your video. I have swapped u joints in the past using a huge vise, but your method with the hammer worked out better for me.
I have just bought a Goldwing trike. The MOT test result said the UJ was failing so I was dreading doing it. After seeing your clear video I now look forward to trying it! Plus it just so happens the grease gun I inherited that I have never used before will finally see some action!
use that grease gun on all your cars... most people dont realize there are grease fittings on many vehicles!
Greatly appreciate these kind of videos, this will definitely help me figure out what tools to bring and how to do it trail side!
iv watched some of your other videos in the past like 2010 and I must say your work and acting skills have improved greatly
Major props on the video. Very very well done. I came for a refresher cuz I haven’t done one in several years and this was excellent. Even for someone who has never done one before
I just used this video to do both front wheel u joints on my 2000xj . First time it was tricky but second one went easier. Thanks Bleepin! And ill say you MUST swing the bfh hard, love taps won't get it done. And hard surface is crucial. But most certainly works!
Thanks for the video! You're videos are really helpful and make sense the way you explain things.
I always put extra grease in each cap before I start installation, I find the grease helps hold the needle bearings in place while installing the caps in the yoke or shaft.
also the general rule is to install the joint so the zerk is pointed towards the drive shaft and not the companion flange on the axle or transmission because it generally allows more room to get a grease gun in to grease it later on.
Thank you. I appreciate you taking the time to show us dummies how to change the U-joint. I have watched several videos and yours was very helpful.
Having only had front wheel drive cars myself, I've never had to deal with this. It really shows how simple the service would be - I'm slightly more inclined to go 4wd or rwd now. Thanks for sharing!
ur the man.. great step by step instructions. thanks bro... ( Ryan from Boston)
You definitely deserve lots of subscribers. You make me want to buy more jeeps and fill up my back yard with Cherokees!! Thanks man!
Great to witness. Im on a small island in Philippines and tired of poor workmanship on my car due to ignorance and lack of proper tools. At least now i know to make sure its done right. Gotta keep my old rig running👍☹️
Thanks
I've spent the last 2 days looking for a video that actually shows the removal of the u-joint. usually they just explain it and don't film it and its really f&$%ing annoying very informative! thanks!
No problem, thanks for subbing!
Best example I have seen and the most practical
Finally got around to doing the u joints on my 98 today. I really appreciate you taking the time to do these videos.
84forshow its pretty easy once you get the hang of it.
I sucessfully changed 2 u-joints on my Dakota because of this video. Thank you so much for posting, you saved me a bunch of cash!
+Matthew Millar sure, thanks for watching!
Just what I was looking for to tackle my '79 Chevy. Great video!
I use side cutters to remove and install the clips. They have a good bite on clip. If they haven't ever been off in awhile I use a punch to work the clips out. Love your Channel. Lots of good Info shared.
Thanks for the quick and efficient tutorial. Helped me and made the removal and install a breeze!
outstanding. Just changed my rear. Couldn't pull the end off, probably need to grease that.. my first time ever changing a ujoint, and this method worked flawlessly.
I like these repairs without a garage and all the tools. alot of us do not have a nice garage to work out of and work in the driveway. Good vid mate
I actually just changed my u-joints today using the backside of a pickle fork (believe it or not, I don't have a hammer at the moment) a K-bar and long nose pliers! Thank you so much for the video, incredibly helpful!
My tools are low budget and low tech, but this video is straight forward and I am able to use what I have available with this simple method. Thanks!
I just had to do this on my 4x4 van, after walking two miles to catch a train to the next town that had the joint, and two mile walk to the parts store from the train station lol. A large C-clamp can be useful for pressing caps in. Also, joints with the grease fitting where shown in your video can cause a weak spot in the joint. If you have no choice but to use this type, install the joint so that the drive load is compressing the grease fitting hole, not pulling it open. Cheers 🍻
Just changed mine tonight. Worked slick!
Used this video and exact technique on my 97 ZJ front DS. Worked like a charm. After I got one cap out I used the old caps instead of the sockets to hammer on because I messed up the socket a little, you really have to hammer on those things to get em out! This was on a double cardan joint, a little different but I thank you for the video good sir. Subbed.
dope vid. So many spaz's out there today, you are nice and calm the whole time. Made it look easy
Great instructional. Thanks! Used it on another 4x4 and it worked perfectly.
Easy simple and straight to the point. Cool video 👍🏼
Thanks, I love to fix things on my Jeep myself. Gonna check this out ASAP!
Holy crap the ending had my sides hurting I was laughing so hard! Thank you for the information and entertainment. This is why I'm subscribed lol
sure, thanks for watching!
Great video and information.... Ripped the u-joint in half off the front of my rear shaft (at the T case)... I dont have a press available... Giving this a shot right now... thanks again
Great video bro. Just did this very project with 2 of the u-joints on my Silverado.
Thanks for putting this video out there. It worked great for me.
Good video! Learned A LOT as I've got to change ALL the u-joints on the 2003 TJ I drive as they are still factory joints.
Thanks for this video!
Thanks for this video man, I don't own a jeep but you helped me diagnose the problem on my car and showed me how to do this easily.
You made this look so easy! I need to look at the u-joints on my FJ80. Maybe I can get'r done this weekend and actually start its long due maintenance!
great videos! simple, straight forward and informative.
Thanks for the refresher course, mine are a little bit tighter but it will be done.
Lol your ending videos are so funny! I know I will probably never do this myself but I'm just getting educated by watching your videos. Thanks alot!
Glad you like them!
Hey, thanks for the vids. you are my go to guy when working on my XJ.
Just found your page and so very happy that I did!!!
sure, thanks for watching
Nice work, we do the same thing appreciate your videos.
thanks for the tips
Very easy and simple, That is what many want to hear, Fast simple , specially old people, we dont have that much energy. 👍
respect! you have common sense, a good voice and explained it all!!!
Great video man, really helped me out, subscribing now!
Love your videos...gonna change mine. thanks for help
Thanks! next time my waterpump needs replacing I certainly will, in the meantime you could watch my power steering pump vid... it will get you half way there!
Thank you so much for making these videos. You are an amazing explainer and talented presenter. Also, you know a thing or two about Jeeps.
Great to know and well done. Thank you for sharing.
Good video, subbed, nice and straight to it , great job!!
Thanks for the helpful video Matt.
Matt, does it matter if I get the driveshaft reinstalled 180 from the way I took it off? I don't mean fore and aft end of the shaft, I mean the u bolts on the front joint or aft joint.
Great video used this a bunch of times in the woods with a lot of different kinds of vehicles. And also in the junk yard.
Evan Bellizia awesome, thanks for watching!
compatible? a xj dana 35, a xj dana 44, a xj chrysler 8.25. any others will need to be modified unless i missed one.
Thank you for this video - it really helped me out - I also used a 6-inch C-Clamp to seat the new bearings, improvising a 'press'. I'll be adding this clamp to my off-road box. :)
Good stuff. New to Jeeps and looking to learn how to maintain/repair when needed.
We have a creaking u joint coming from the drivers front wheel on our 2001 Wrangler. I guess it's time to replace it. This video really helps!
HEY BLEEPIN JEEP! I LEARN ALOT ON UR HOW TO VIDEOS TANKS ALOT ... DUDE ... ☺ ☺ ☺
Thank you for this video!!!
I broke my vice trying to press the u-joint out. Used the hammer and a socket and it popped right out !!!!
which one, front or rear?
Hey Matt, I got a 1998 jeep cherokee xj 4x4 i never have changed the UJoints on my jeep, this is going to be my first time doing it, your videos are going to help me alot, thank you for the videos, if i have any problems i will watch your videos, THANKS LEROY
Thanks for watching Leroy!
These youtube videos always make things look so much easier. lol. I have a vice and the joint doesnt wanna move
great job as always Matt!😎👊
yes, the u-joints and yokes are different. Even with a press though it is easy to bend the axleshaft ears... If it is a stock axleshaft they can be very stubborn sometimes.
I dig your speech cadence. It's perfect for instructional videos. Thanks a bunch.
Awesome video!!! Thanks it helped a bunch.
thanks man lot of help watched 5 videos before yours just explaining symptoms not actually showing or describing how to do it
Great video! I will be using your method in the near future! Thanks!
This worked well! I rested the driveshaft on some rocks in my backyard. Then I tapped the caps out with a 3/4 socket and a sledge. The rear driveshaft is a little trickier in that once I had tapped the u joint all the way down, it still wouldn't come out. So I tapped the cross member the other direction forcing the other cap out the opposite end. Then I was able to remove them both after the joint fell out. Also, make sure the auto parts store gets the part right because the front U joint is bigger than the rear U joint and it wont fit back there.
excellent video you are the bleepin jeep man !!
Thanks for all the info Matt.
You rock.
I followed all the steps and got the new u joint installed. But i can't get the driveshaft end back on, how would i go about doing that?
Thanks for the video. Very helpful.
Another excellent video with good camera work
This is a very educational video. Thank you very much .you've really have helped me !
Eunice Chalmers sure thanks for watching and subbing!
no sweat, if you have a vise I have a video on that as well.
I'd like to but I installed my SYE long ago and dont have a need for one right now. Sometime in the near future I plan to buy a stock cherokee and slowly build it up so I can get more vids out there for you guys... Not sure how I'm going to afford that, Maybe I should put out a tip jar;)
Excellent video. Thank you!
Time for my 99 xj to get new u-joints. Any suggestions for brands? Love your channel by the way, probably one of the main reasons my jeep is still running.
Thanks , back to the garage 👍jeep