Making a Mold of a 3D Printed Part- Carbon Fiber Air Box Lid Project part 3

ฝัง
- เผยแพร่เมื่อ 5 ส.ค. 2022
- Mold release wax: amzn.to/3BJZqjx
PVA: amzn.to/3p1pZJg
Mini spray gun: amzn.to/3JPVUGt
Modeling clay: amzn.to/3QoVOHD
This is part 3 of our Carbon Fiber Airbox Lid Project. Other parts listed below.
Part 1- 3D scanning: • Carbon Fiber Air Box L...
Part 2- CAD and 3D printing: • Carbon Fiber Airbox Li...
Part 3 is this one.
Part 4 coming soon
To purchase parts or contact us: ajhartmanaero.com/
Facebook: / ajhartmanaero
Instagram: @ajhartmanaero
Recorded on GoPro 7 Black: amzn.to/2YW7B5N
Edited with Pinnacle Studio: amzn.to/30NWm11


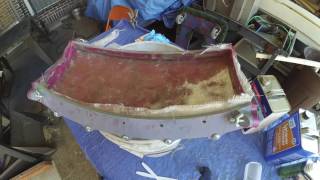


One of the bits edited out from the final cut but probably should have left was why I made the mold with epoxy and carbon. I have so much epoxy on hand, where as if I bought enough poly resin, I'd have to buy more than enough (nothing worse than running out before finishing the project) the leftover would spoil before I make another mold most likely. This makes the epoxy, in my case, effectively cheaper than poly. The small strips or patches of carbon are just off cuts from other parts that would either go in the trash or sit around forever. So I can look at the carbon as basically "free". So I'm in a weird boat where an epoxy mold is cheaper for me than a polyester mold for a mold this size. Now a larger mold, it would lean back toward poly and fiberglass being cheaper.
Yep I'm in that same boat AJ. Have epoxy and carbon on hand. I understand completely
Ha! The video wasnt five seconds in and I saw the gray surface coat and was like "He's making molds with epoxy now?".... Which isnt a bad thing. Much less shrinkage and in this case that makes a huge difference. Good call!
Just got a 3D printer, very happy to come across this video!
J'adore ton travail sur la pièce....super
I have been battling to make a mould, and this video really put some prospective on the process. Thanks for making this video 👍
Glad to see the OG TFR shirts still showing up in a lot of your videos and good to see you’re still going strong. Love the channel!
Haha yeah I have 2 or 3 of them from a long time ago when Tom and Tony would come around my shop in NJ.
Hi ,Peter from South Africa,your cutting table is it glass
top job
So I know this is a year old and you probably learn this by now but I saw you sanded the hot glue.
If you put isopropyl alcohol on hot glue, it immediately releases. It just no longer sticks to whatever it's on.
So you can perfectly take off the hot glue I just spreading some IPA on it and rubbing it with a rag or whatever and then grab the edge of the hot glue and pull up or in this case push off all your little glue tacks.
So you can use hot glue on what will be final surfaces and then take it off perfectly.
I’ll give that a shot. Thanks.
What 3D printer are you using these days? I've got a Kobra 2 Max, and printing these larger parts has been super helpful with its massive print volume. AND HELLA FAST!
I just mad large fg mold from large pla 3d print (12 elements adding to over one meter). PLA is not suitable due to huge CET (expansion) and low heat deflection. Gelcoat and barier/coupling don`t generate much heat but these new no shrink tooling resin needs to be applied at at least four layers 450g. It need a little heat from exothermic reaction to activate non shrinking additives and cur properly (than it change color). My pla model expanded so much it warped mold, despite gelcoat and coupling coat was cured and stiff. Barley saved it. Perhaps PETG will be enough due to higher heat deflection, but still CET is high, so don`t go crazy with size and put veil layer for stability.
This video series got me to buy a POP2.
Nice. I have 2 more videos coming out soon that utilize it again. I love that thing.
Since you have a 3D model already, you might consider also printing the mold flange. Just something I've been pondering lately. 'twould save a little time.
Glad to see you keep having new content. Keep it up, AJ.
Jim
If I was 100% sure my model was perfect, and also had a printer large enough, then yeah.
@@ajhartmanaero , I meant as a secondary piece. Wasn’t suggesting the whole part as one.
@@rocktman117 Oh got ya. Probably would have been more time consuming as well as the texture would have not been ideal even if only the flange. The plexi took no more than an hour to get on.
Another method you could do is get an old wood burner and melt the pieces of the print together in 1 piece, and if needed, use scrap pieces of filament as filler to fill in gaps. *EDIT* But be careful it is easy to melt through whatever you are trying to melt together so test on something first to get the hang of it
Hay man you haven't be coming up in my deed any more so went to look for you and I almost had to tipe in your whole name to get you to pop up so I don't normally do this but I turn on the bell.. I'm making a roof for a new edge mustang right now. Do you spray jell coat in you mold before you lay the part up to get a better finish?
Kinda up to you but pre or post clear both work. And weird that I’m not popping up but thanks for hitting the bell. Funny enough my next video will be a Timelapse of me doing our E46 roof.
Nice :) I did comment last time it would be better to make a mould out of Fusion 360. Use CA glue instead of hotglue. But overall nice experience and could be improved :) Also check Voron Design and maybe build the biggest printer for ABS. With ABS printed parts sometimes you don't even have to go with CF. :)
You gotta work with what you got.
Hey just confused, why do you clay the edges? Wouldn't that result in the edges getting/splaying outwards instead of straight down? Just confused, thanks!
What nozzle and pressure do you spray the duratec primer with?
Also, do you thin it before spraying?
Thanks :-)
Check their data sheet since it varies.
What kind of Gelcoat do you use that allows you to apply it so thick without wrinkling (alligatoring)?
epoxy gel coat
Why a CF mould over a fiberglass ? isn't it more expensive? Keep it up, all the best. 👌 love the channel and the workshop in particular.
I had to cut out a ton of recorded stuff or else the video would have been 45 min long and one of the cuts was explaining why I did epoxy and carbon. The carbon for the most part was just “scraps” that would get tossed in the trash anyway. I buy epoxy in such bulk to make parts and have it on hand, as opposed to having to buy more than enough polyester then let the rest spoil since I don’t know when my next mold will be. So I’m in a weird boat where aside from the epoxy gel coat, I can make the mold cheaper than fiberglass.
@@ajhartmanaero Thanks 🤟
Do you save your plug for making a new mold or do you can it? How many parts can you make out of a mold?
If it’s small and doesn’t break I’ll keep it. If a mold is made and prepped properly you should get over 100 pulls from it.
What tooling gelcoat do you use? Do you have compatibility issues if you use a poly based gelcoat with epoxy resin?
I would not mix poly with epoxy unless stated by the manufacturer.
Hmmm, I did not know you could make molds from carbon fiber for carbon fiber parts. I always thought carbon fiber layup needed fiberglass molds. Is there any reason why most molds are made of fiber glass?
Cost
Can I ask what gelcoat that is AJ?
Just an epoxy surface coat. I got it from smooth on.
Can you share a link for the epoxy that you use as gel coat? please sir.
Why didn't you take the J clip off, put the blue top part where it should be, mark a new hole on the lower tab, drill it and put the J clip back, pushed right up so all the holes line up?
Cause this will be a production piece. Gotta make it as install friendly as possible for other people down the road.
@@ajhartmanaero Ah, okay, I understand. Hopefully all the holes and J clips are in the wrong place like yours then. Love your channel btw, really informative. 👍
@@Russ1367 I wouldn't say the J clip was in the wrong spot. Thats the OEM part and the clip sits center on the OEM hole. I didn't leave enough space in my CAD model so just adjusted my part to the OEM.
@@ajhartmanaero slot in part instead of hole.
@@stevemethia5080 these aren’t huge concerns but a hole is easier to drill in finishing steps which is a very small time saver, and a round hole looks nicer when every other hole is a circle. Literally added maybe 5 min to modify my plug as opposed to asking every potential future customer to modify their oem airbox cause I cheaper out on the plug making steps.
Where is part 2?
Just before part 3, and right after part 1.
@@ajhartmanaero I found it, however it's not in the composite playlist just FYI.
I really don't get why you didn't printed your part(s) thick enough instead of so thin and then spend hours to make it thicker with carbon !
I explained it in the video. If I printed it to thick, I would not have been able to test fit it. Then I’d be molding something I wasn’t sure would even fit.
@@ajhartmanaero Yes makes sens