CNC Machine + Epoxy Resin - CNC Resin Inlays To Step Up Your Sign Making Or Resin Art Game

ฝัง
- เผยแพร่เมื่อ 22 ก.ย. 2021
- A CNC machine is perhaps one of the most powerful tools you can have in your shop, even a hobbyist grade machine can empower home woodworkers, makers and resin artists to really step up their game. In this video we look at utilizing the shop CNC along with epoxy resin to create unique resin inlay (resin filled) signs.
If you are a sign maker looking for an edge, or a resin artist unfamiliar with CNC technologies, this video is a must watch.
Recommended Product Links & Resources
*********************************************************
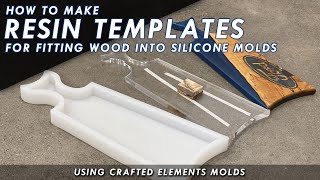
Molds: Crafted Elements - craftedelements.com
Router Templates: Crafted Elements - craftedelements.com/collectio...
Router Sled: Crafted Elements - craftedelements.com/routersled
------------------------------------------------------------------------------------------------
Epoxy Resin: @TotalBoat - craftedelements.com/a/totalboat
Makerpoxy (For Pours Under 1/2") - craftedelements.com/a/totalbo...
Thickset (For Pours Under 1.25") - craftedelements.com/a/totalbo...
Thickset Fathom (For Pours Up To 3" & River Tables) - craftedelements.com/a/totalbo...
------------------------------------------------------------------------------------------------
Pigments: Black Diamond - craftedelements.com/a/blackdi...
------------------------------------------------------------------------------------------------
Mold Release Option 1: MG Chemicals 8329 - craftedelements.com/a/mg8329
Mold Release Option 2: Mann Ease Release 200 - craftedelements.com/a/mann200
Bark Removal Knife: Beavercraft Draw Knife - craftedelements.com/a/drawknife
1/4" Flush Trim Bit: Amana 46297 - craftedelements.com/a/amana46297
1/4" Plunge Template Bit: Amana 47224-S - craftedelements.com/a/amana47...
3/8" Plunge Template Bit: Amana 45475-S - craftedelements.com/a/amana45...
1/2" Plunge Template Bit: Amana 45460-S - craftedelements.com/a/amana45...
2.5" Slab Flattening Bit: Spe Tool 2.5" - craftedelements.com/a/spetool...
------------------------------------------------------------------------------------------------ - แนวปฏิบัติและการใช้ชีวิต


![LISA - ROCKSTAR (Official Music Video) REACTION [SHE'S BACK!]](http://i.ytimg.com/vi/QBxE30vavMQ/mqdefault.jpg)


Great video!! Been doing CNC for well over a decade...about to do my first pour!! A comment on the clear finish - you may have done this and we just didn't see it...you need to put a clear coat on the back of the board as well...all sides need to have same number of coats to eliminate moisture effecting the wood.
Most definitely! Yes, I did do a layer of clear on the back to seal it.
Great job! The colors in the humming bird really turned out great the way you mixed them.
Thank you! Cheers!
Thanks for your tutorial. Great help for those who want to do inlay.
Glad it was helpful!
I wish I had the space for one. Great work!👍🏼🍻
Very cool......I will give this a try.
Thanks. Best of luck in your project!
Omg u hade me in hysterics 🤣...talking bout ur mother dearest! Sum a ur sarcasm just got me! Some videos I've seen remind me of Bueler Bueler guy but so far I'm digging it keep up the schooling videos, trust they seriously helped me!!! Thank u!
Haha! I say this job is part entrepreneur, part marketer, part circus performer.
Those are beautiful. You did such a nice job on them, they really look great. Thats a great idea to use the machine to even everything out, let it do all the work lol.
I'll be getting into CNCing very soon and it's these little projects that I'm really looking forward to doing. It seems that carves using resin have endless possibilities.
Thanks for making this video and showing us how its done!! 👍👍
Thanks for the positive feedback
@@CraftedElements You're very welcome. 🙂
Good video. The beautiful thing about wood and resin is that the combination makes beautiful pieces. My colleague Shane Peters and I put out information on actually using multi layers of epoxy pours that are various colors to end up with some pretty impressive results. I have a series of videos on how to go about the process and Shane has several videos with cutting boards he has created. I am pretty sure you already follow Shane.
Very cool! Will check that out.
Thank you for this great video. I was wondering what rpm do you run with the spoilboard bit?
Rob. We just use the pre-defined settings in Vectric, that are associated with that tool. I couldn't tell you off hand what they are.
I bet alot of people have no idea how much work goes into something like that to make
Its quite true!
Good video. One question though, what would have gone wrong if the cuts were only 2-3 mm deep?. I was thinking of saving on resin without any visual difference?
If you were going to run it through the planer to level it, it would likely take off at least 3mm and you would loose your design.
I think the depth of your cut is too mush, do you know if the epoxy sticks to wood if the depth is around 5/64"?
Great content here, thanks! Quick question- What determines your depth of cut o\in the wood? I just purchased a Shapeoko CNC and I'm starting to do the resin inlay to elevate my projects. Right now, I'm focusing on increasing efficiency. At a glance, it seems it would be more efficient to do a smaller cut, such as .125-.250" cut depth, resulting in a shorter cut time and less resin? Does this make sense or am I missing something? I appreciate any insight!!
I get your question. Ideally you want to do at least 0.25" if you dont plan on planing down the item after. The problem with pigmented resin is that it really only looks good when its not too thin. If its too thin, you can see through it and the wood color shows through. If you do a small inlay, then run it through your planer (or level the board with your cnc) it takes more material off and the results may not be ideal.
Nice video! I am curious, could you apply a stain to the board after the Epoxy has been sanded smooth, and then spray on a finish. I want to crave a Compass Rose into maple for a small Table!
Yes you definitely could, you just want to try and avoid staining over epoxy. Despite looking impermeable, the microholes in its surface can hold stain. So you just need to be careful around the epoxied areas.
Fantastic
Does the planer sometimes chip the resin?
Rarely, its more likely to chip the wood in my experience. You just have to make sure its set well, and not "Soft" so to speak.
Shouldn't both boards come off the planer or CNC fully flat? You can see multiple areas in the sign where the epoxy hasnt been hit with either the planer blades or the flattening bit and is leaving them sunken in/glossy compared to matte like the epoxy that has been flattened.
This is why I always flood the epoxy so it goes over the wood or else you are left with low spots like the bottom E in the last few shots.
Yes you are correct, however I didn't want to keep flattening the piece and loose some shallow elements (like part of the bird). Nor did I want to flood coat with epoxy, I wanted to use a UV safe exterior grade polyurethane.
Here's a tip to figure out how much resin to mix. Fill all the areas with rice. Collect the rice in a measuring cup and add maybe 10% more. Then mix that amount of resin.
Thats a solid idea! Thanks for sharing.
Need to seal laser burn area or watch it for very long time like a hour or more the burn area bubbles from air in wood released as epoxy soaks in
OK!
One minute in and I'm seasick
Does it work on marble ?
There are CNC machines that are designed to cut marble. They usually involve a water stream to keep the bit and stone cool.
@@CraftedElements my question is does same inlay technic work on marble or not
@@bharat.h.rajpurohit Epoxy will adhere to unpolished marble, so i would say yes for sure.
Although I thought was good length; Cut this down to 10 mins and I say u would get much more views
If that wood wasn't sealed first, that water-based finish WILL raise the grain. I speak from first-hand experience.
Makes sense! Thank you for the input.