
ฝัง
- เผยแพร่เมื่อ 10 ก.พ. 2025
- #photoshopmalayalam #GraphicDesignMalayalam
കൂടുതൽ വിഡിയോകൾക്കായി സബ്സ്ക്രൈബ് ചെയ്യുക.
📺📺For more videos Plz. Subscribe 📺📺
/ rathzcraft
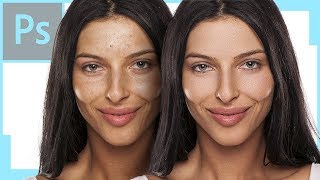
In this video I show you how to retouch the skin like a retouch professional. The tool you will learn here is Frequency Separation in Photoshop.
Learn how to retouch skin professionally in Photoshop without making it look fake or blurry. In this Photoshop tutorial, you will learn how to reduce wrinkles and blemishes, airbrush & smooth skin naturally, dodge and burn, and more using all non-destructive editing techniques. Once you learn this, you can make everything from natural skin improvements to glamorous airbrushed skin used in advertising.
Getting Started with Frequency Separation
To get your image set up for frequency separation you will have to make 2 copies of your background layer. If you are not starting from the beginning, add a Stamp Visible layer over all layers by typing CTRL+ALT+OPTN+E. One of these copies will be for your low frequency (skin) and one will be for your high frequency (texture).
First apply a Gaussian Blur to the lower (low frequency) layer. Choose a radius that blurs out the skin texture, but don't go too far as to make the face unrecognizable.
Next choose your high frequency layer and go to Image, Apply Image. Here you will want to se the Layer: to the low frequency layer. For blending choose Subtract and for Scale:2, Offset:128. These will be your settings every time, no need to change them.
Now you should have one layer with a blur (low frequency) and a layer above it that looks mostly gray (high frequency). Select the high frequency layer and change the blending mode to "Linear Light".
Your image should now look identical to the image before you started the process.
Correcting Underlying Color
To correct the underlying color (skin) choose an area with the lasso tool. I suggest feathering the selection to make it look more realistic. Use Q for Quick Mask as a quick way to see what your selection looks like. After you have made your selection choose the low frequency (blurred) layer and apply a Gaussian Blur in the selection. Choose a radius high enough to blend the tones together.
Repeat this process over different areas of the portrait to smooth the skin tones. Because the texture is on a different layer, it should stay in tact during this entire process.
Correcting Texture
If you need to correct texture, we recommend waiting until after you do the tone. Select the high frequency layer and choose the Clone Stamp Tool. In the Clone Stamp Tool settings be sure to hit Sample: Current Layer. This will make sure you are just using the texture and not sampling anything else. Then on your high frequency layer sample good skin texture using ALT and then paint over "bad" skin texture. This will work very well for stray hairs, acne, wrinkles and other small blemishes.
#MalayalamPhotoshopTutorial
#malayalamtutorials
#graphicdesignmalayalam
#PhotoshopMalayalam
#Keralagraphicdesigners
#Keralamultimedia
#GraphicDesignMalayalam
#GraphicDesign
#GraphicDesignCareer
#malayalamvlog
#adobetutorials


![โกดำ - วสันต์17 x ไม้เมือง [Official Music]](http://i.ytimg.com/vi/OUg2L4Sx1TY/mqdefault.jpg)
