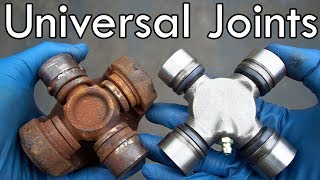
Propshaft Repair - How to Replace a Universal Joint

ฝัง
- เผยแพร่เมื่อ 4 ก.ย. 2024
- A full detailed tutorial on how to repair a propshaft by replacing the Universal Joint (Also known as a Hooke joint).
This method of repair and replacing the universal joint is the same whatever the vehicle.This particular propshaft is from a Land Rover Defender.
For this job you will need:
A mallet or "soft" hammer
Circlip pliers
mandrels or a couple of sockets
A vice
Oh, and a new Universal Joint.
If you like what you see please hit the like button, and if you would like to see more subscribe to Educational Mechanics here: www.youtube.co...
Visit our website for a larger collection at: edumech.co.uk


THE best video on YT for universal joint replacement. THANK YOU SIR.
Made this look a lot easier than it actually is! My dad has specialised in reconditioning propshafts and axles all his life and I've never seen him do one this easily, when they come in rusted up and knackered they are a lot more difficult and require special tools that he has made over the years, a 40 ton press is essential most of the time too! A brand new joint and a brand new shaft on a tutorial video is very misleading.
I'm very fussy about clean and neat work to be done where you never find in workshops excellent work keep it up thanks bye
This is a great video, I hardly knew how one of these worked until it was flogged to bits on my 4x4. Now have rebuilt my own for $50.Have just subscribed! Thankyou very much.
Great video, very clear and yes, I was doing this job the wrong way on my Vito propshaft. Only thing I would say is make quite sure the needle bearings are held in place by grease. They might come like that but if not add a bit. On a Vito W639 rwd propshaft the ujs are staked in rather than circlipped. To me this seems incredible meanness on the part of the designers and the ujs are not supposed to be serviceable. It's usually the second joint from the front that goes and they do, even from new. I pressed out the uj, fitted a new one and re-staked the joint using a piece of tool steel ground for the purpose. My Vito is a taxi on 357k miles and I've done it a few times, £20 vs £1000+ for a new propshaft
Very good, just taking your time so there's no stuff ups, thanks mate
Very good video, helped me a lot but be warned removing the old UJ cups may not be quite as easy as in this video. If pressing them out as in the video doesn't work or the are super tight and you can't get enough purchase on it with a vice sensible use of a hammer and lots of penetrating fluid I.e. WD40 will help. Just be sure to try and keep everything as square and lined up as you can. Also use reference marks so everything goes back identically as original. In particular shaft to flanges
Oh well done Sir ✊🏻👏🏻
Clear, concise, witty and simply could not be any better . Thank you for your efforts. Still baffled how you work out which axis to fit grease nipple .
Also, do prop shafts have to be balanced ?
Excellent video Thank you for sharing your knowledge
important stuff, thanks for posting
An excellent video, thank you
Thanks from India
you're welcome abhisekh singh 🙂
Awesome step by step video, just what I needed, thanks! 👍
Great, Thanks.
I had a lucky escape today. Nasty vibration 50mph....then 30. Checked the rear prop and surprise surprise it's on its last legs. Def 90.
Hi
Please I would like ask you if you had an experience about the reasons for the front propshaft if has problem then lead to vabiration for speed up 110 Km? My car discovary 2 year 2000
Thanks a lot
Thanks for video 👍
I found grinding the universal in halves was easier and no stress was put on the housing, I’ve heard they can be distorted and miss aligned. After the centre’s are removed, punch in the caps.
Excellent how to do it video.
Gosh, thanks! This helped a lot. Definitely subscribing
Very helpful, thanks alot 👍
nice tutorial it helps a lot
That is a flange yoke on the opposite end yes?
Hvala , Danke , Gracie ----- Croatia
Thanks
Thank you so much is very helpful video
Nice job!!!
Is it wise to mark the flange and the shaft to ensure that they go back on in the same position, avoiding any possibility of vibrations?
Probably more important for a centre joint on a two piece prop?
thanks for the video
Please make a video on how to install a 4x4 propeller shaft correctly. Slide joint n U joint is confusing
very good 19/20
Thanks is very nice video
Plus killiar videos
thank's my frind
What size vice is that. The one I have does not open wide enough to receive the shaft and the sockets.
I think that was a Record 6" bench vice we used for this one.
Thanks.
Good
Is the front propshaft do vabiration after 110 Km speed?
Because I just replace front shift before 10 months ago and now I have vabiration when speed is up 110 Km.
My car is discovary 2 year 2000.
Please any one has idea or recommendation for this situation please advise me.
Thanks all😊
do you have a video with inner clips u-joints replacement ?
so if prop shaft is removed it becomes two wheel drive?
Yes, but only if you lock the centre diff. Also, you'd need to take it easy and drive carefully and the handling characteristics would be quite different. It's an option better than being stranded.
Tnq
1:00 Oo-er-missus!
Firmly grip that shaft!😂
Anyone can easily do a NEW prop! try doing the same on a old rusted together one!!!
Exactly!
No universal joint that actually required replacement Ever came out of the vehicle that clean. No snap ring ever came out of any universal joint that required replacement that easy either. BAD EDUCATIONAL. Every snap ring should be loosened & have it's "seal broken" first. This is shown in EVERY OTHER UNI JOINT TUTORIAL EVER, but not here.
Thanks for the video