Auto cut off 12 volt battery charger circuit

ฝัง
- เผยแพร่เมื่อ 8 ก.ย. 2024
- #battery_charger
#12volt_charger
#power_supply
#automatic_charger
#new_electronic_projects
12 volt auto cut off battery charger
12 volt automatic battery charger
12v battery charger circuit with auto cut off
Auto cut off 12v battery charger
automatic 12v battery charger
how to make 12 volt battery charger
12v battery full charge indicator
12 volt battery level indicator
Top Electronic Projects [New]
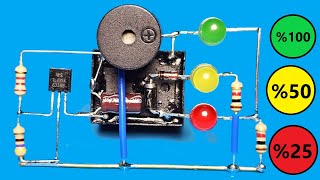
In this video i have made 12v auto cut off battery charger circuit without relay instead i have used current (shunt regulator 431) that shuts off current at output when crossing 13.4 volts,
Thus protect and prevent battery from over charging.
You can increase or decrease cut off by changing 1.5k resistor.
👉Download Circuit Diagram link
drive.google.c...
👉Join Group: / 819126578700997
👉Follow Page: / creativetechvids
PART LIST
1) Irfz44n Mosfet
2) TL431 Shunt Regulator
3) Red & Green LEDs
4) 56K, 2.2K, 1.5K, 1K & 330R Resistors
5) 1n5408 Diode or SR306 Schottky Diode
Music Credits
Music: Another time
Musician: LiQWYD


![Megan Thee Stallion - Neva Play (feat. RM) [Official Video]](http://i.ytimg.com/vi/TpYTyAaTRts/mqdefault.jpg)
![[UNCUT] The Loyal Pin ปิ่นภักดิ์ EP.6 (1/4)](http://i.ytimg.com/vi/m05kZ2GDKXg/mqdefault.jpg)


![12v battery level indicator circuit [NEW]](/img/n.gif)
I love your site because you include a schematic where a lot of them don't so it takes time to draw it out. Thanks
Thanks for appreciating
Pode fala português po favor eu não tradutor
@@eliomacruzdossantos7861 what is this means? Which language is this?
@@CreativeTechos cbslhdamdyjglcfjjwuerdvjzff
Eu adoro seu site porque você inclui um esquema onde muitos deles não, então leva tempo para desenhá-lo. Obrigado
matur nuwun tutoriale,bermanfaat banget mugo2 entuk pahala seng akeh
Mantap... Trimakasih ilmunya... Salam dari Indonesia... i love you so much....
Thanks for watching my friend 🙂
wow super 👌 very very nice project 👌 but..this project use 13007 ..mosfect sir ..
Thanks for watching 😀
Very very good and simple explain very good
Thanks for watching my friend 🙂
very very good video . well done . thanks for all . i will save it to remake it later . in shaa Allah
Thanks for appreciating 😊
Excelente proyecto te felicito 👌.muchas gracias por compartir tus conocimientos y ayudarnos
Thanks for appreciating 🙂
The world's best teacher thanks
Good tiching karte hai 👌👍👌👌👌👍👌
😊
I like this circuit.its perfect
Need another circuit diagram for 28 volt auto charger
Thanks
I'll try to upload ASAP
CONGRATULATIONS FROM BARCELONA SPAIN
Thanks for watching my friend 🙂
Been a long time since i played around with eletronic ccts but after watching some of your video's im getting back into it. Like your explanations and the video content Thanks. Have Subscribed and thumbs up.
Graeme in Australia.
Terima kasih sangat bermanfaat
very good creation. it is better if you mention required parts before start soldering
Thankyou for your suggestion, also i have included part List in video description.
The circuit is really good thank you sir
Thanks 😊
I think it's a correct structure, the technical creation, I also congratulate you in every respect! Have a nice day and for everyone also in strength, health and peace!
👍🍀🇭🇺☝️🌞
Thanks for appreciating, Thanks for watching my friend 🙂
@@CreativeTechos
have a nice day! Good luck!
👍🍀🇭🇺🌞☝️
👍
@@CreativeTechos
🎄👍🍀🇭🇺🌞☝️🎁
I am having 12V 5ah battery. Need to know input current for 14V supply with your circuit. Your circuit is good.
I like your site because you include a schematic where I have time draw it out. Thanks
Thanks
Very useful project, thanks for sharing
You are welcome, Thanks for watching 👍
Muito bacana o seu projeto. Vou tentar fazer
Thanks for watching my friend 🙂
Your art is wonderful
Thank you for watching 😀
The Best Job and Explaination 👌👍
Thankyou 🥰
Watching and sending support thanks for sharing
Thankyou so much 🥰
Useful circuit. Thanks for a lot.
Thanks for watching my friend 🙂
Bro im glad i found ur channel. Im a mechanical engineer. Recently started a project (24v 250w car for kids)fully functional jeep . I have no much knowledge in electronics where im being very unprofessional... Can u please guide me😐😐☹️
Yes sure I'll help you if i can, whatsapp +91 9596386458
Please u make a similar this type of BMS circuit for 12Volt lithium ion battery...please u make a BMS circuit..at home.by using transistor,diode,resistor and some components..which I can easily find in market. OK...and upload a video..on it.plz..plz..plz...plz..plz...plz....Humble request from u..thanks very much...
Dr. Deepak..
Love from India...
sir, i like your videos,simple yet effective and mostly, lucrative one, most of all, "IN ENGLISH"!!!, that everyone could understand easily,universal language. also,the SCHEMATIC,sir, can we use this with car batteries.keep up sir,thanx
Yes you can use, also i recommend you to ise heatsink on mosfet, and thanks for appreciating
Falo português brasileiro.e o Google disponibiliza.a tradução.
Excelente saludos desde colombia 🇨🇴
Thanks for watching my friend 🙂
Sir very nice explain tks
Thankyou
thank you sir❤❤❤❤
Good
Thanks for watching my friend 🙂
5:15 Nabíjecí napětí na Pb článek je 2,4 V. To znamená na celý akumulátor s šesti články musí být U=14,4V.
Yes absolutely you need 14.4v Max output voltage. You can check new improved version of this circuit with precise & adjustable cutoff. Video link th-cam.com/video/nvlOeDHkwK0/w-d-xo.html
Very good one
Thank-you
Two problems here,
1/ The output voltage is determined by the input voltage. If you want to accurately control a battery, you need an accurately controlled supply. This because the output is derived from the voltage divider that is the 1K5 resistor and the 330Ohm resistor
This might be OK for a Lead Acid battery but NOT for a Lithium Ion battery
2/ All the current going into the battery must go through the big MOSFET. As shown and without any heatsinking, it stands a very real chance of getting insanely hot - and what happens then is anyone's guess.
Thus, Do Not Use this circuit for Li-Ion batteries
It is actually not for lithium batteries as already mentioned for lead acid batteries in thumbnail, Here is another upgraded versions of these controllers
th-cam.com/video/fq3pdoB_Sbo/w-d-xo.html
th-cam.com/video/nvlOeDHkwK0/w-d-xo.html
Please what other methods do I use to build a 12v lithium lon battery charger?
Good job....
I will try this....
Thank-you
Good presentation. Very clear thank you
Thanks for appreciating
Thks for you video sir. how to auto cut for 24 and up vdc
Thanks for watching 🙂, For 24v the concept will be the same but Resistor value will be near to double, also preset should be used to set cutoff at precise voltage. I'll soon upload 24v version but in the meanwhile this video may help you.
th-cam.com/video/nvlOeDHkwK0/w-d-xo.html
Your 3D circuit board is cool
Thanks for watching, BTW which one lab bench power supply?
verry usefull content have a great day
Thankyou so much 🙂
tanks sir
You're most welcome 👍
Mạch điện rất thú vị đơn giản và hiệu quả mạch sạc acquy
Thanks bro,,,,Can i use this circuit for charging nickel cadmium battery
How many volts is that battery?
12v,,,,full charged IS 14v
Thanks
My pleasure, Thanks for watching my friend 🙂
cam on anh chia de so do
My pleasure 😊
Thanks for this video
My pleasure 😊
Simple and excellent
Thank-you, check out my new uploaded video.
Nice auto cat off 12v led acid battery thanks
You're most welcome ☺️
Thank,s
My pleasure, Thanks for watching 🙂
Thank you sir
How to make a battery cut off system without relay for 4.7 volt battery.
Please help me
I will also upload that video too, Thanks for watching my friend 🙂
Amazingly simple setup!!! Please would you tell me which resistor should I tweak to set the TL431 to 28 volt or 30 volt cut off? To charge a 26 volt battery.
Thank you!!
Simply change 330 resistor with 10k variable resistor and set cutoff point.
(If you want cutoff when voltage reaches 28v, you need to connect 28v at output and slowly rotating variable resistor till green led glows.
@@CreativeTechos Thank you!!!! You're so skilled and such a good person as well!
Thankyou so much for appreciating
This project is very good!
Thanks 😊, New latest video of same improved project is uploaded, wich has more precise cutoff with feedback from battery to reference pin. Watch that out on my channel, The video has black pcb in thumbnail. Thanks 😊
Thank you, very useful, nice and clear presentation
Thankyou very much 🥰
Gracias
My pleasure 🙂
Very good circuit !
Knowledge class
Wow great. , make more vedios then please explain it how it works and the function this is nice video. .
Nicely explained. and easy to see the lay out.
Glad you liked it!
I like your site
Thanks 😊
Simple and good!Nice
To day I am subscribe your channell. Nice circuit
Thankyou so much!
Very nice! It is worth watching and learn.
very good project
Thank-you so much
Excellent
Thanks for watching my friend 🙂
Very good And Nice Work Bhrother....Ⓜ
Thanks for watching 🙂
Very nice sir
Thankyou
Very Nice 👌
Thank-you
That was very nice
Thanks 😊
oke simple and powerfull circuit
I like the simplicity of this setup, would doing the math on the resistors would make it work for 9.6 lead acid battery charger ?
You can simply use a 10K variable resistor instead of 330R Resistor and use variable power supply to calibrate the cutoff on your desired voltage.
This is helpful thanks
You're most welcome 😁
Very nice my bro 🎉
will any mosfet work or does it really have to be this exact mosfet? Thanks and great video!
Any n channel mosfet will work, but use more than 10A mosfet
@@CreativeTechos Thank you very much.
Most welcome
Hi friend thanks for the informative. What adjustments would be needed if I want to charge a 6v battery?
Change 330R Resistor with 10k preset, connect preset middle pin with Tl431 pin 1 and bottom right pin to ground, and calibrate it to 6v cutoff threshold using variable power supply.
@@CreativeTechos thank you so much for your quick response and valuable information
My pleasure, Thanks for watching 🙂
Nice to meet you my friend, your work is amazing, I like your work, keep it up
✔✔✔✔✔✔✔✔✔✔✔✔✔✔✔✔✔✔✔✔✔✔✔✔✔✔✔✔✔✔✔✔✔✔✔✔✔✔✔✔✔✔✔✔✔✔✔✔✔✔.......
Thankyou
Very good work
Thankyou
@@CreativeTechos same to you
Useful project,thak you❤
Thank you! Cheers!
Thank you
You're most welcome 👍
great video, thanks
You're most welcome
Excellent work, please. I want to make a 48-volt battery control circuit. When it reaches 45 volts, it will be disconnected. Thank you. I follow you from Egypt
48v is not used most, but i can modify it for you and send schematic where you would like to receive, let me know in reply.
Whatsapp me +919596386458
When you change the 1.5k and 330 Ohm resistor. They give the reference voltage to TL 431. When you increase the 330 Ohm the output voltage is also increasing. However, I'm not sure of the design max voltage of some components (e.g. elco).
@@CreativeTechos please i nedd also 48v and 36v please
Please wait I'll soon upload adjustable that you can use for any battery
Nice Video
Thanks for watching my friend 🙂
can you make a video of how to make 12v battery with 120Ah by using sets of 3.7v batteries.
& how to charge those batteries.
we want to use those for our home solar system.
thanks appreciates much!
👍🏻👍🏻👍🏻👍🏻👍🏻
why are you want to make it of 3.7v batteries? There are special batteries for solar systems and you can buy it.
Wow! Amazing bro
Thank-you
great work what would need changed to make this work with 6 volt battery???
There need some modifications, I'll soon upload for 6v, stay updated 👍
TRES BON TRAVAIL
Lovely 💐
Thanks for watching my friend 🙂
Hi CT...what is the best amperage for the power supply of the battery charger for this project?....i have two pieces of 12v 7 Ah ups battery...the ups is not working anymore and i want to use the two batteries...thanks for the video.
The charging voltage should be max 14.4v @ 2A and cutoff threshold 14.5v
Check out this circuit for precise charging
th-cam.com/video/nvlOeDHkwK0/w-d-xo.html
Tnx Bro 🇧🇩
You're most welcome
Very good ⚡👍
Thanks
Excuse me what other substitute for the irfz44n l have left. Thanks
You can use any Mosfet as Mosfet handles higher draw current, so use any Mosfet but be careful about pin configuration of mosfet and connect accordingly in diagram
how about input sir how many volts...and the watts of resistor...thank you sir and good bless..
14-14.5v, all resistors 1/4w, also you can check out the new version circuit uploaded with black pcb in video thumbnail, it can be adjusted precisely and with feedback.
Best project. But your connection not monitor battery voltage ..
It better to connect reference pin through resistor to battery side, to cutoff at exact calibrated voltage.
Excellent video , but how can i adapt this circuit to use a Bi-Coloured (red & green) led?
Very good teaching. Can you please tell me if this charging circuit is good for 12v x 100 amp battery?
Only change high Ampere MOSFET in this circuit
@@arunr1093 which is it ,12 volt,35 ah bettery can work properly 🙏🙏 please tell y
Hii there, yes you can use this circuit for 12v 100ah battery. And set voltage to 14.4v and current Full.
Why are you increasing input voltage to test it? Shouldn't input voltage be constant (around 14v)?
Also, why you connected a diode on the output? Even if bettery will full charge, the circuit wouldn't get the voltage of bettery due to unidirectional property of diode.
Actually this circuit works on drop voltage by connecting battery and when voltage touches 14v it cuts off, I used variable power supply for demonstration,
th-cam.com/video/nvlOeDHkwK0/w-d-xo.html
You can check out this upgraded version that works with voltage feedback form battery and cutoff at precise cutoff set voltage.
I enjoy your your youtubes!!!I am looking for a auto cut off circuit voor a 12v battery: cut off at 9....10 v. please advise!
If you need for 12v battery then why you want cut off at 9-10v?
@@CreativeTechos it is a lithium battery.....discharge must be limited! Regards, Jan
Then it needs over discharge protection circuit
Hello sir, i am Bangladeshi
Thanks for watching 🙂
possible 60/95/110 AH battery charge AutoCut?
Nice
Thanks 😊
thenk you for my xpirins😊
Thanks for watching 🙂
Great, thanks !
You're most welcome ☺️
Thanks...
Can it work 12 volt,35 ah bettery...
Please tell me 🙏🙏🙏
Yes use 3A diode and two mosfets in parallel.
Perfect
Check out this video, with best protection, adjustable cutoff, and feedback from battery for precise cutoff.
th-cam.com/video/nvlOeDHkwK0/w-d-xo.html