Custom Swinging Hitch for Bike Rack

ฝัง
- เผยแพร่เมื่อ 10 มี.ค. 2017
- ** Check out our new and improved version, it's WAY better! • Custom Bumper with Swi... **
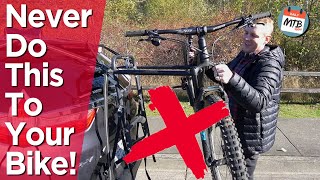
We built a custom swinging hitch for our bike rack so that we could load motos in the back of our van. We get a lot of questions about our bike rack and swinging hitch so we figured we'd do a little video explaining more about it.
We came up with the idea because we wanted to be able to get into the back of our van to access our motos without removing the bike rack. It's a custom swinging hitch receiver that can take any 2" bike rack. We based the design off of the van's original hitch receiver and had it custom welded with a swinging arm. It handles a heavy rack plus four bikes no problem and we leave it open almost every night so we can climb the ladder to our rooftop tent.
Subscribe and follow along with all of our adventures!


Nice. One of the best videos explaining how it's made and bolted on. Straight to the point and no unnecessary music and beating around the bush. Appreciate the time and effort.👍👍👍
Great video, I especially like the added support to the bumper very well thought out.
Thanx for the effort pulling it apart mate, very informative.
The best ever.
Congratulations
Good stuff man!
Check out our new and improved version, it's WAY better! th-cam.com/video/a21ikiRroiI/w-d-xo.html
Nice! I need to make something similar for my van too.
Muchas gracias ... es el mejor que he visto dentro de todos los diseños que hay ... estoy haciendo uno igual para mis bicicletas ... apenas lo termine les mando una foto ... GRACIAS
+edgardo de la sotta suerte!
Thanks for going through the effort of completely removing and disassembling the rack to show all the design features. Great ideas incorporated into it! A question for you- do you use nylock hardware or Loctite on any of it? If not, do you have any issues of it loosening up? Thanks again for sharing- great vid!
Nope, no Loctite or anything and haven't had any issues. I do occasionally (every couple months) check to make sure everything is tight, but so far nothing has been...
in one of the camera angles it looks like on of the frame screws down there is missing a nut!
Thanks for taking it apart to show us. Do you find that building this thing sacrificed too much on the actual hitch receiver? What if you need to haul one day? Would you have build this again through the actual hitch receiver? And have turn buckles on both corners to keep it from rattling.
Great design and thanks so much for taking it off so we could get a good look at how it was built. About how much did the materials and welding labor cost for just for the swinging assembly?
+EL34XYZ glad you enjoyed it. We paid $500 for the swinging hitch receiver for the metal and labor.
I don't know if it will fit but I'd insert that receiver pin from the top. If the clip wears through, breaks or whatever the way you insert it, it will fall out! Disaster!
Sent from seths bike hacks lol
Welcome!
@0.53 chemtrail!