
ฝัง
- เผยแพร่เมื่อ 8 มิ.ย. 2024
- #mechanicalkeyboard #macropad #build
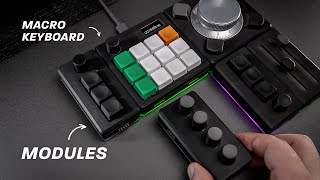
this 3by2 mechanical macropad supports mx or choc switches with my 3d printed hotswap plates with the goal to build a prototype faster and have no soldering required.
read the article here blog.heaper.de/e/w3by2
UPDATE: the firmware is now in my git repository so you all receive updates: github.com/JanLunge/vial-qmk
and the 3d print files are in a separate repo as well
github.com/JanLunge/keyboards
also join the discord server if you are interested:
/ discord
Twitch: / janlunge
Materials:
Diodes 1N4148 - www.amazon.de/gp/product/B012...
github.com/JanLunge/keyboards...
0:00 Intro
0:55 Materials
1:28 Case Design
3:00 Hotswapsocket
3:55 Wiring
5:15 ProMicro Pinout
5:41 Firmware
6:57 Review - วิทยาศาสตร์และเทคโนโลยี


This is incredible! I’ve been soldering since I was 4 years old. So, when I hear people say they want to make a keyboard without soldering, I shut down. I would have never thought this was possible. This gives me something to share with those people. Great work!
Wait till he hears about hotswap
But still I agree with you
well you can easily make a keyboard without soldering, as long as you have a hotswap pcb, but making one from scratch is quite the challenge
the challenge is finding components with leads appropriate for wire wrapping. and wrapping wire... and a wrapping tool. but if you manage all three its doable. soldering is really no big deal when your get appropriate tools. if youve just got a wood burning iron and windex for flux, things can get goofy
@@homelessrobot only the wire wrapping tool is scarce. But it is also completely "improvise-able".
3D printed hotswap sockets. This guy is a genius. Thank you!
Wonderful engineering, and the interlude with the cat was magic.
This is brilliant. It seems so simple now that I've seen it, I can't believe this isn't the normal way. I guess that's the sign of a truly elegant solution!
Thank you for such a clear tutorial!! I'm getting into mechanical keyboards and it really helped me understand the basics 🙏🏻
Awesome project and great video documentation. I watched your other keyboard videos as well and find the style of video presentation very pleasant to watch. Long story short: Keep up the good work.
Hey Jan - just wanna say that I love your videos and this will make a great weekend project!
This is the first time I have seen this type of socket and I see a lot of potential for this type of socket, and I look forward to seeing what you can do with it
such a high quality channel and video! thanks! I can’t wait to start building my own keebs!
Congrats mate! Excellent video, keep up with the good work
Very nice job, I have a 4 x 4 doing. Thanks a lot for your work.
I am going to build a dactyl like this. Genious, Jan!
man, this is what I was thinking about before getting 3d printer! awesome job!
I would also glue gun connections to board and maybe other places.
Extremely creative, bravo dude.
Great video! The idea and the execution is superb. I'm also prototyping a split keyboard with my 3D printer. I'm looking for a breadboard like base were I can attach switches and the diodes but this is even faster to test.
Thanks! Keep it up
Been thinking the same. Bread or Perf boards that allow for "prototyping" changes and fine tuning/ tweaking / changing
Did you end up taking any steps in this direction? Prototyping a split? I was thinking in similar direction but dont have a 3D printer. So was thinking of Cardboard based prototyping.
@@AX-fx7ng I'm doing the same, but I don't really know what I'm doing. I got some hot swap sockets and mounted them onto some cardboard, although the switches are on the same side as the electronics so it's a bit messy
@@samuelwaller4924 Can you share what that looks like? Maybe we can DM via reddit or something? I might also try to do similar.
this is a really cool idea! i may hve to try making one myself
This look wonderful!
Amazing design!
this is insane dude
very interesting and nice video quality!
Nice video quite interesting to watch
Love it, dude! I’ve been wanting to build one with rotary encoders on it to use in Lightroom. Any chance you could make a video for that?
I would still use the pushfit sockets, but solder any other Connections. There is nothing thats more annoying than an loose Connection. I think this works Just fine for Testing but if it is in use very often, it definitly should be soldered .
I build a similar thing,but i use custom code for my one (i use an old keypad from an door with numbers on it.) And i mapped the keys to F13 - F24. Also i use some pots on analog Inputs to control the Sound on my pc.
it's 2023 and I didn't know that there were 3d printable hot-swap sockets 😲
a Version of this sockets for gatearon switches would be amazing and appreciated. really cool idea!
Newer versions in my other videos are using gateron switches but i replaced the clips with a more open designs if you like to solder and used wire wrapping when not soldering
Very good content
Hi! I'm a person who's currently dipping their toes into DIY keyboards. As of now, the opportunity to solder for me are far and few between for me so I have had to resort to wire wrapping and assorted friction fitting methods for a majority wiring for my exploits. You tensioning the holes on the pro micro and circuit in general with a solid core wire blew my mind. Although I probably won't adapt it (as what I'm trying to do is supposed to be more permeant instead of having the ability to quickly to take apart for prototyping), very cool! Keep up the good work!
When you say "assorted friction fitting methods" - which ways are these? I am super new too :)
Hi it is great idea
I love it and I love to build a keyboard with socket
Is there is any to note or requirement for hotswap socket to work with other design
Stumbled across your 60% build through your post on reddit. My youngest wanted a keyboard of her own to pretend and fidget with (not actually use as a keyboard). Using your macropad shell and a mix of random switches for her. Bottom wouldn't stay on unfortunately, so I'm just adding a dab of silicone to get it to stick (just what I had kicking around). If I end up making one to be functional, then I'd consider modifying your design to allow for screwing the bottom on. I was also surprised that your macropad wasn't on your Github. Both projects really cool though. Thanks!
thanks a lot, yes im still moving all the things over from the blog to github the macropad is now also on there im currently exploring magnetic bottom plate mounting but its still in its early days
@@JanLunge Magnetic Bottom plate mounting - Curious as I am thinking for it as well (Magnetic, Velcro ..etc) - Any updates on that? Did not see anything in your videos yet?
My w100 is using a magnetic bottom plate but that board was a bit big to have it mounted with magnets, could have used a few more.
@@JanLunge Interesting. Is this build visible online? Does that plate then adhere the switches to it using Magnetic force?
Or are you using the magnetic only to shut it from bottom?
Yes its the full size keyboard video
th-cam.com/video/aBdC5xZZPSY/w-d-xo.html only the bottom plate is clicked in with magnets the switches are still using the usual method
Wow, great content, it's something that I was very very specially looking for as I don't want to buy a lot of parts for my first build.
Awesome. I tried that too. Sometimes the button movements while pressing can cause the wiring contacts to come loose, therefore the functions can't be triggered. Just a thought.
yes I can totally see that happening but my macropads stayed without much issue the same even with a lot of use, but I'm working on more reliable versions like with the 60% build I did. Its just really nice to use for prototyping and when you are happy with the result you can even solder these together for more rigidity
Thanks a lot !
Juste received my switches, coming back to find the link and print this badboy
Hi Jan, as always it's a great video. Thanks for sharing your knowledge. Which software do you use to design the case and its components?
Thanks, im currenlty using fusion 360
I was kinda scare of hand wiring a Cardboard Prototype design - but now I am thinking this might be fun to try with 6 keys and then expand more.
"Cardboard Prototype design" - that's ingenious.
I would really like to see a keyboard that is cheaper than the Stream Deck to come out with LCD screen keys.
I love how you don’t need to Route a custom PCB
damn I guess I need to buy a cat to feel like a real software engineer
btw, what are those black shelves/drawers behind you? Thanks.
Hi, I was wondering if I can add an analog joystick and use a teensy board. Is that possible?
Hi Jan, I am looking for a USB-C QMK 4 button PCB, any ideas where I can find one?
Hey thanks for the wonderful content, it's really interesting. You should consider hosting your blog somewhere else - it's extremely slow to access. Peace :)
That’s a pretty cool idea! How reliable is it on the long run?
I would say 80% are keeping up without any maintenance but 20% need to be adjusted after some time and use (like a few weeks) but 10% make a lot of trouble and might need to be replaced with a new printed socket as they break constantly (every few days because print tolerances) after switching out the faulty ones they work for years on normal desk use (not travel tested)
I’m gonna build one, just trying to find the wire you used, seems impossible to find where I am hahahah. Thanks, great clip, will come back and update on how it went (may take a few weeks at least due to hard time getting the wire)
i can imagine any wire with a similar diameter would work even slight difference should be fine but the stiffness is really important for the handwiring part. I guess 24-gauge is equivalent to what i use www.amazon.com/dp/B00LHOJLT4
@@JanLunge followed pretty much everything the the video, flashed my pro micro, doesn't work, I hit the keys, nothing happens.
@@majinkeyboards ok 3 step debug plan: 1. check if the firmware and microcontroller is fine by connecting any of the column pins with any of the row pins if keys get pressed this thing is fine continue , 2. connect a the wire behind the diode(the side that connects to the switch ) of one of the hotswap plates with the bent wire piece on the other side if this doesn't work the connection between the row and column wires to the hotswap plate is unreliable (try bending the wire so the wires actually touch) if it worked continue 3. the connection between hotswap plate and switch is not working or the switch is broken. this is how I check errors on my builds but it seems to be a microcontroller issue if none of the keys work.
@@JanLunge thanks so much, I will try now. I will also try reinstalling QMK and check if I missed any steps in that.
solved after debugging. You were right. Wires were not contacting. Thank you sir
Could this be made to a 4x6 layout if I just added the extra row and columns and ofc edited the case?
yes definitely, it might make sense to add some more wire management as you would use pins from the other side of the microcontroller as well
What diodes did you use for this build? I'm not very familiar with this stuff so I don't know what to use.
These are the 1N4148 Diodes - www.amazon.de/gp/product/B012ACSC1O
yo, it's like brackets!
It's unlikely those connections will last very long. It's certainly fine for prototyping, but for longer lasting connections you will have to solder.
The alternative is to use what's called wire wrapping. While that's certainly old school it also happens to be extremely robust (in certain cases more robust than soldering) and allows for manual (error) correction.
I actually just did a video about a keyboard build with wire wrapping, though through unrelated issues the build got more complex. Also so far i would say this wiring method has a 10% error rate long term most if the switches will function correctly even after a year but on some tweaking is required to fix them again
@@JanLunge I have a lot of catching up to do on your videos, literally just found your channel 😁
Wow, that's cool. Is it also possible to configure the controller with QMK Configurator?
no for that i would require you to use the exact pins i used and also send my version as a pullrequest into qmk and get that merged before it would work which i have not planned yet. in my opinion that workflow is too slow and also in prototyping things change.
But if you want this just for it to be easier to change the keymap im currenlty porting the board with vial support so you can change the keys on the fly with the nice gui tool they provide
no the qmk configurator will not work, but im working on a version with vial support so you would only need to flash it once and can then change the keymap with the gui application
Awesome! Is it possible to add a rotary encoder for volume?
You might like this build i did of the same wiring with an added rotary encoder
th-cam.com/video/OCwuDV3WIkM/w-d-xo.html
Wow this is amazing but I feel like my 3D printer just won't be able to print those miniature details properly! I have an Ender 3 Pro
The cat gave me a good laugh.
Btw. do you speak german?
Yeah she is really interested in everything when i start filming and yes I'm from germany
@@JanLunge Na dann, wohin des Wegs?
Thanks for the fantastic videos, Jan. I was trying to compile the default keymap and was getting an error as a result of the "key count" variable in info.json. I deleted that variable and it compiled fine. I'm yet to finish the build but I wanted to know what was going on with this error, can you shed any light?
Qmk is changed this to not be required as they now count the assigned switches in the matrix, now it is not optional anymore but got completely removed. But as far as I tested the firmware would still get compiled even with this error being shown in the comandline
@@JanLunge Great, thanks for the information! Yes, the file was still compiled the error messages just concerned me. Thanks again for your great work.
With such a limited key amount, is it really necessary to have diodes? Obviously you shrink the required pins needed for function, but if your device is never intended to exceed the pin count, could you just do each one independently?
Yes you can set it up without diodes, with each key to a data pin and then to ground. Just like to do it like this so people can understand how bigger keyboards get built and use this firmware as a starting point as well.
@@JanLunge Cheers, I appreciate the response!
I feel so sad that I found this vid too late.
Ideas without soldering/pcb was so attractive. I've got no experience at both of them.
Do you think it's possilbe to build (split)keyboard with the same way?
One worrying is that problems may occur due to complexity when the wire is too many.
Yes you could build a full keyboard or a split keyboard this way I'm currently working on an updated version of the hotswap sockets to make them more relieable when wired together. and I just finished a 60% keyboard build without any soldering or pcb.
It was a lot of effort to make it work but it is more reliable than I initially thought.
@@JanLunge Thank you for your reply. It's very expected. I was preparing this build for a while and two questions left.
1. Is there any possibility of signal problem due to contact error from no soldering?
2. In this vid you did not use diode, which means there is no 'ghost' effect prevention. Can I attach diodes here too?
Please give me a lesson.
1. yes if the wire is not attached firmly there will be double pressen but incresing the tension on the wire worked for me every time
2. i did use diodes they are inside the hotswap socket, same for the new build i did you can look at the pictures of that already on the discord
@@JanLunge I'm really sorry I thought it was the resistor whole time. I checked the project on discord and it was awesome. I can finally build my custom keyboard even if I don't know anything about soldering/pcb . Thanks for the courage!!
Is it possible to use a combination of buttons pushes at the same time? I mean simultaneously. Thanks
Yes by default its i think 4 or 5 keys but you can enable n-keyrollover but haven’t tested that
I mean this a great idea, however I cannot stop hearing the anger of a thousand electronics professors shouting in anger. Mainly because I had them yell at us for poor soldering connections
есть и др модель - квадратная. правда она больше 14мм в сокет не влезет, только после установки свитча можно установить.
What kind of wire is used there? not sure what to search for to order the unshielded wire online
It’s silver plated copper wire usually used for jewelry. You can also look for copper wire which would be easier to solder if you want that later on
Hi i have a question, Is there a Rasphberry Pi Pico version for this?
You can get my sneak peek version here github.com/wlard/keyboards/tree/main/w3by2%20-%20pico it's not done yet but should be useable
Is the microcontroller connection also done without soldering?
Yes its just using tension to keep it in place
Ahhh .. my Eyes!
Is there any picture of the second version of your sockets? I printed the second ver of your hotswap sockets but I'm not sure how to avoid shortcircuits.
Thank you!
Yes my w60 is built with those
th-cam.com/video/L04CBJteuHE/w-d-xo.html
@@JanLunge Thank you! And what AWG wires are you using? I tried 22AWG but it seems that I need 24 or 26. I broke some pins from my switches with 22AWG.
Yes something like 24-26 awg should work better then, I used 24 i think but we have different units here. Also the copper wire I used was quite soft and sometimes I pre bent a tiny dent in it with tweezers to make it go in smoother.
@@JanLunge Got it, thanks for the help!
Is your cat hotswappable or soldered 🤔
Could you, in theory, just direct attach instead of making it rows and columns? so, F5 - B3? I am wanting to do a 6 switch macro-pad that's a lemon that's programmed for QMK/VIA, but a lot of this is over my head.
yes that also works and is called DIRECT_PINS then each switch is connected to a pin and ground
@@JanLunge thanks for your input!
I know nothing about electronics. Why is a diode needed?
I really need to buy a 3d printer...so many project ideas are dying in my head cause i dont have one.
Hey man, where is the stl file that secures the wires? they are not included in the github.
Thank you!
Thanks for pointing that out, added the v1 of the sockets to github now github.com/wlard/keyboards/tree/main/hotswap_socket/v1
@@JanLunge Thanks for the response! Do you advice me to use V1 (which has securing clips) or V2 which hasn't? Does V2 even need securing clip?
I continued to use a wire wrapping method for the next builds as when printing a lot of the small clips it can get really complicated. For the 3by2 it will be fine but any bigger build would benefit from not using the clips
How hard is to add here a battery and turn it into a Bluetooth macropad?
Swap the microcontroller to a nice!nano and use ZMK
where did you find the choc keycaps?
I 3D printed them myself, github.com/wlard/keyboards/blob/main/keycaps/choc%20-%20wKeycap.stl
@@JanLunge thanks!
What different would i have to do to add a knob to it?
I have built the same one with an encoder here th-cam.com/video/OCwuDV3WIkM/w-d-xo.html maybe that helps. Basically you just need a hole for the encoder to fit in, i have files provided for that build
@@JanLunge hey... thankyou so much..great work
what kind of diodes did you use. Do you or anyone else here in the comments have a link?
Diodes are the zener diodes 1N4148 - www.amazon.de/gp/product/B012ACSC1O
@@JanLunge 1N4148 is not a Zener diode! It's general purpose, small signal, switching diode.
Would it be possible to make a split keyboard like that ?
definetly but im still working on making them more relieable and attach to the frame so you dont pull out the hotswap plate when you want to swap a switch. so there is some optimization to do but you could use these for a full split keyboard build already
@@JanLunge how about same assembly procedure but extend the hotswap plates so they touch the plate/case then super glue it in place? Would that work?
yes i hope that exactly that will work i started prototyping a 60% keyboard last week for a proof of concept and am updating my progress on that on my discord as well as streaming the build on twitch if you want to see some things before im done with the video
is it 3 or 5 pin switch?
Works with both i designed the socket for 5pin and 3pin fits just without the plastic pins then
this is realy cooul but ... did you ever heard about soldering?
Keyboard jesus
are these 1N4148 diodes
yes that is correct from what i heard other diodes work as well but these are the ones i tried
Where stl for hotswapsocket please
Here github.com/JanLunge/keyboards/tree/main/hotswap_socket/v1
Any specs on the diodes?
Literally was digging through the comments looking for the same thing, these tutorials are awesome but I wish they just had that little bit extra technical documentation.
Also, the video where he added the rotary encoder also shows an updated hot swap design, I’m gonna see if I can get a better view of the diodes there and see if I can figure out what it is
I used Diodes ( 1N4148 ) from amazon www.amazon.de/gp/product/B012ACSC1O, though from what I have read about this topic others work fine as well its mostly about the footprint and the rated power and our pro micro pins are quite low on that, I will check to link them in the video description
@@JanLunge wow, thank you for the swift reply!
4:57 5:26
6 buttons only is waste of controller :) any chance on morphing it into full 3d printed ( split maybe) keyboard ?
es prehistorico tu metodo
Yo diría artesanal. Más accesible para gente sin experiencia soldando o diseñando circuitos. Es perfecto para crear prototipos. Hasta un niño puede hacerlo👌
is it ironic that it feels like soldering would actually make this easier?
e
I mean, hou you don’t have soldering tool but HAVE A 3D printer?!
I got everything needed for soldering. But when i need to swap the case when prototyping it is easier tho swap the wiring to the new case without resoldering. Current plan is that the hotswap sockets can be soldered for a permanent connection but the switches will still be hotswap
@@JanLunge aahaha I was joking. I rly can understand your intentions :).
anw for next vid can you find way to make pcb become hot swap in cheapest way possible?
@@fenkum Look into Holtite or millmax sockets, you can get them in packs of 10 for cheap here in AU
1st
idk but i think when someone can afford to buy a 3d printer he/she can afford to buy soldering station XD
did your parents scared you with a soldering iron
No soldering is for kids. No soldering means no reliability at all. Soldering is not so hard and it's not expensive, just buy 4$ soldering iron and a roll of cheap solder..
The point is to have fast "changeability" for prototyping - Not solders that make things permanent/ static.