People in the comment section being very critical. They missed the whole point. This is an extremely cheap way to get some really expensive looking beams. Other people would pay a contractor thousands of dollars for this. You guys probably paid about $200 and some elbow grease. Great job!!😊
Looks great. If you have crawl space access you might be able to get a couple really solid anchor points either in joists or build an anchor point between joists with a board or two and a couple long bolts. I'm planning on doing this and I do have crawl space that allows me to get right behind the ceiling so I'm concocting some mount points up there but I like the L shaped mounts above the bed you guys used.
A helpful tip, if your going to put your beams together using a box end fit it may look better from the floor if you put a slight reveal on the side boards. That means if you have your two side of the beam hand down past the bottom board say 3/8 of an inch much like they do on cabinets
Great concept, but I have to say, you could have located the joists (ceiling "studs") and at least purposefully anchored the ceiling attachment boards - those beams still weigh a lot and simply hoping that the drywall screws will support them is not a good bet...but it looks good.
@@AmandaFallonHomes He's essentially correct, but that depends on ceiling joists being perpendicular to desired direction of the beams. If not, you MIGHT get lucky and have a beam fall under a joist just by chance. If not,, you could locate each joist (studfinder) and see if there's a spacing for the beams that will work visually, and allow at least a bit of each (or most) backer board(s) to be situated below a joist.
Nice video thanks for sharing. I would like to share my own tweaks that I would add to it that I think simplify things a little. Instead of screws on the finished beam use nails. Common board is light to begin with and using 18 gauge will be suffcient nailing every 16" or so and wont be visible, especially using a stain. For supports use 1x2 on both sides and chaulk lines to keep the inside consistent to bottom of inside dimension of beam nailing criss cross and add some PL adhesive to give it extra strength. This elminates trying to find studs altogether. If hanging it by yourself which is possible use a ledger board from floor to under beam and prop up on one side working your way down nailing along the way. Hope this helps you DIYers.
@@AmandaFallonHomes you’re welcome! I followed. Just curious, how well did the brackets hold up? Or would you recommend something more secure. I’m about to build some faux beams like the ones in your video but for them to be equally spaced I could either install a few of them the way you did, or add additional framing.
@@dusttinfinn6583 hi Dustin! That’s awesome!! If you screw that first ceiling board into joists you definitely won’t need the brackets. We didn’t check whether we were screwing into joists or not so we added the brackets just onto the beams over the bed area to be safe (though still probably unnecessary in my unprofessional opinion). Our beams have held up amazing! Definitely tag me in your pics on IG when you start your project! Can’t wait to see!
@@garrettmcdowell8902 I use Wood Blocks inside , at spacing of 24" to hold all the joints tight. I am extremely careful when cutting the 45 degree edges. As a result, there is almost no need to fill the joints. I use a Marine Epoxy to glue the length of the Joints . Many Clamps help. . The Beams are Painted , not stained. That , to me, is more pleasing than stained wood above the head. Best Wishes Garrett .
@@dylancarmack3643 When I explain the mitered edge to clients, they go woth that and the extra cost. When it's finished, they are glad they went with that feature. Huge difference. J MO
If you cut your exposed beam material at 45 degrees glue and nail them then sand and putty the corners then stain you will get a much more realistic look, it will look like one solid beam.
Yes definitely a better and more realistic look to miter all edges for those who care to take the time 👍🏼 Follow along with my home projects on Instagram @AmandaFallonHomes ☺️
Thanks for the video. I must add a few things; just IMOs. 1- Keep the vertical plates on the inside of the horizontal ones 2- Pre-treat wood before staining 3- When screwing up the 'base' boards, try to screw 'most' into the joists; for strength
You can use rough cut cedar (very lightweight) on the three boards for the box beam. and use a nailgun to put them together Small holes in the wood Very easy to hide
I liked that you were keep saying "beam", and then you wrote "not beam". Lol Very nice job guys. 👏 I'm about to go ahead and do the same in my hallway ceiling. The problem is that is tooooooo long 🤦♀️
So glad you enjoyed it! I’m so excited for you!! Would love to see pics when you get your beams up! Follow along with my home projects on Instagram @AmandaFallonHomes ☺️
Hi and thanks for watching! Wanted screws for better security since I didn’t want to use wood glue and decided it looked a little more seamless having the joint at the bottom rather than the side for this method. Follow along for more home projects on IG instagram.com/amandafallonhomes?igshid=OGQ5ZDc2ODk2ZA== ☺️
Would be interested in knowing cost for material, although today lumber is through the roof. I was just looking at faux beams and was kind of shocked at the price, with one 13’ “beam” costing anywhere from a few hundred to nearly a thousand bucks.
Thanks so much for watching. At the time, $200 for lumber, maybe $15 for stain, and $15 for screws. Tools already owned. 👍🏼 Would cost a little more today with all things considered.
Thank you! My walls are Toasted White by Glidden in flat sheen. My accent walls are Oxford White by Benjamin Moore (also flat). Follow along on IG @AmandaFallonHomes =)
Hi there! A box is preferable; otherwise you would see 4 boards stacked together from side view. Hope that helps! Great! Follow along with my home projects on Instagram @AmandaFallonHomes ☺️
@@AmandaFallonHomes wasn’t a criticism, just a suggestion. Room looks great. I’m going to put some faux beams up in my house when I stop being lazy 😂 I’ll check the insta in the mean time
lol my husband just laughed out loud at this. My concept, my design, my measurements, my marks, my cuts, my sanding, my custom stain mix, my staining, and my husband will be the first to tell you he just helped me hold the boards and screw in the screws. I’m glad you stumbled upon my tutorial and I hope it is helpful to you. Would love to see your tutorial when it’s ready.
Why show the side seams. Run your wood through your table saw with a 45 on the edges. Glue screw and the round the edges a little with some sand paper. If you want something seamless. I also have a chain I whip my boards with. Gives a great distressed look.
@@AmandaFallonHomes OK, I started following you on facebook keep in touch for future business ventures. Here in Tucson, AZ we have alot of custom homes and it is a booming business.
Hi there! I’ve seen others install very shallow beams with 8’ ceilings and it looks great. If you want chunky beams like these I would say 9’+. Thanks for watching! Come follow along on IG @AmandaFallonHomes 😊
How high are your ceilings? Did it make your ceilings feel lower? We have 9ft ceilings and I'm afraid it might give us the feel that the ceilings are lower. I know they work good for 10ft and taller ceilings. 🤔
Our ceilings are 96” tall, and the recessed tray portion is 6” higher. You would definitely be fine with 10 ft. ceilings! Does not make ours look lower, actually makes it feel more grand. If you are worried you could use shallower side boards (use 1x4s instead of 1x6s). For a better look At the beams check out my Instagram @AmandaFallonHomes ☺️
If you can be sure that your screws are hitting the ceiling joists you shouldn’t have any problem with the beams falling. Thank you so much for watching! Follow along on IG @AmandaFallonHomes ☺️
All Stores Please Lower the cost of all Military and Local for all Brands of High Beam Ceiling Products and Accessories and Production Cost Now That's too much $$' The Whole thing Now 🙏🙏🙏
Looks good. However far from a professional job when it comes to how it was put together, how to attach beams to joists or use anchors and most importantly you don't want to just drive screws into the ceiling without knowing what's above. Looks good but certainly not the way to do it.
Thanks for watching! LOL It also drives me crazy when people mispronounce the word “faux”. In this case I was actually saying “Box” Beams. Come follow along on IG @AmandaFallonHomes 😊
All that work and you didn’t miter the joints of the bottom of sides of the beam. What a waste and who would “not know” if you are attaching that to the ceiling joist. I hope you did or someone will have a bad day at some point in the future when that falls on their head
THINK before you speak. Was it true? helpful? Inspiring? Necessary? or Kind? Your comment violates the think before you speak rule. Not nice at all. You could have kept it smh.
@@clenox9500 Criticizing someone with no carpentry skill is not evil. Showing someone how to do something with bad method is evil. I said Sorry. But I am not sorry that someone is putting up content that is PISS POOR.
@@paulinesmith9723 Saving someone from using such poor carpentry methods was my thought. I did think before I spoke. This creator should have done some research before putting up such a bad example of finish carpentry. If someone did that level of carpentry in my home I would be very disappointed. If she was paid to do that work in your home you would feel the same way.
Hope you have climate control. Because jamming those beans in like that without room for expansion is a recipe for disaster when that wood expands due to humidity variations


I just hit the like button before watching the video, it's the least we can do for someone taking the time and work involved sharing it's ideas.
How kind of you, thank you!
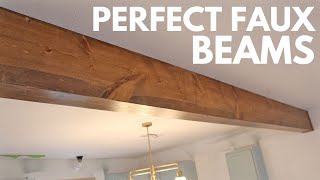
The beams with the inset of the roof looks super good
Thank you so much :-) come follow along on Instagram! @amandafallonhomes
People in the comment section being very critical. They missed the whole point. This is an extremely cheap way to get some really expensive looking beams. Other people would pay a contractor thousands of dollars for this. You guys probably paid about $200 and some elbow grease. Great job!!😊
Thank you Richard! You’re spot on! ☺️ Follow along on IG for more home content @AmandaFallonHomes 🏡
Looks great. If you have crawl space access you might be able to get a couple really solid anchor points either in joists or build an anchor point between joists with a board or two and a couple long bolts. I'm planning on doing this and I do have crawl space that allows me to get right behind the ceiling so I'm concocting some mount points up there but I like the L shaped mounts above the bed you guys used.
Thank you so much! That’s a great tip :) Definitely want to see your beams when you get them done! @AmandaFallonHomes
So many negative comments. Looks good. To each their own.
A helpful tip, if your going to put your beams together using a box end fit it may look better from the floor if you put a slight reveal on the side boards. That means if you have your two side of the beam hand down past the bottom board say 3/8 of an inch much like they do on cabinets
This is a great tip! I like the look of that too. Thanks for sharing! Come follow along on IG @AmandaFallonHomes 😊
Nah if you want a true beam look you gotta 45 the corners with a table saw glue screw and then round em off a bit. No seams.
So cool
Thank you so much!! Follow along on IG @AmandaFallonHomes 😊
Great concept, but I have to say, you could have located the joists (ceiling "studs") and at least purposefully anchored the ceiling attachment boards - those beams still weigh a lot and simply hoping that the drywall screws will support them is not a good bet...but it looks good.
This is a great tip, I would do this if I had it to do over again!
Doesn’t care, house sold to unsuspecting buyer.
@@AmandaFallonHomes He's essentially correct, but that depends on ceiling joists being perpendicular to desired direction of the beams. If not, you MIGHT get lucky and have a beam fall under a joist just by chance. If not,, you could locate each joist (studfinder) and see if there's a spacing for the beams that will work visually, and allow at least a bit of each (or most) backer board(s) to be situated below a joist.
I’m sure that guy putting them up found them. She just forgot to add that into the video.
@@lordvizier4379 you clearly can't read. She states "great ti, id do that if I re did them
Nice video thanks for sharing. I would like to share my own tweaks that I would add to it that I think simplify things a little. Instead of screws on the finished beam use nails. Common board is light to begin with and using 18 gauge will be suffcient nailing every 16" or so and wont be visible, especially using a stain. For supports use 1x2 on both sides and chaulk lines to keep the inside consistent to bottom of inside dimension of beam nailing criss cross and add some PL adhesive to give it extra strength. This elminates trying to find studs altogether. If hanging it by yourself which is possible use a ledger board from floor to under beam and prop up on one side working your way down nailing along the way. Hope this helps you DIYers.
Hi there and thanks for watching! Those are great tips! Come follow along on IG @AmandaFallonHomes 😊
I'm here for the intro beat 😊.. 🔥🔥🔥🔥.. The beams too 😊
🤣 Love it. Thank you so much for watching! Follow along on IG @AmandaFallonHomes ☺️
Looks great! I think I would have found the ceiling joists in the attic to secure them but the brackets looks like they’ll work.
Thanks so much! If I were to do faux beams again I would definitely do that 👍🏼 Follow along with my home projects on Instagram @AmandaFallonHomes ☺️
@@AmandaFallonHomes you’re welcome! I followed. Just curious, how well did the brackets hold up? Or would you recommend something more secure. I’m about to build some faux beams like the ones in your video but for them to be equally spaced I could either install a few of them the way you did, or add additional framing.
@@dusttinfinn6583 hi Dustin! That’s awesome!! If you screw that first ceiling board into joists you definitely won’t need the brackets. We didn’t check whether we were screwing into joists or not so we added the brackets just onto the beams over the bed area to be safe (though still probably unnecessary in my unprofessional opinion). Our beams have held up amazing! Definitely tag me in your pics on IG when you start your project! Can’t wait to see!
Looks Great. I always Miter (45) The Edges of the Vertical and Horizontal .No Butt Joints. JMO
What do you do to secure the joints, and do you wood fill your edges? I’d much rather mitre than butt up.
@@garrettmcdowell8902 I use Wood Blocks inside , at spacing of 24" to hold all the joints tight. I am extremely careful when cutting the 45 degree edges. As a result, there is almost no need to fill the joints. I use a Marine Epoxy to glue the length of the Joints . Many Clamps help. . The Beams are Painted , not stained. That , to me, is more pleasing than stained wood above the head. Best Wishes Garrett .
Thanks for watching! Yes, agreed, mitering will always look best if one cares to take that step. Come follow along on IG @AmandaFallonHomes 😊
So you do it correctly instead of half assed? 👍
@@dylancarmack3643 When I explain the mitered edge to clients, they go woth that and the extra cost. When it's finished, they are glad they went with that feature. Huge difference. J MO
If you cut your exposed beam material at 45 degrees glue and nail them then sand and putty the corners then stain you will get a much more realistic look, it will look like one solid beam.
Yes definitely a better and more realistic look to miter all edges for those who care to take the time 👍🏼 Follow along with my home projects on Instagram @AmandaFallonHomes ☺️
Thanks for the video. I must add a few things; just IMOs.
1- Keep the vertical plates on the inside of the horizontal ones
2- Pre-treat wood before staining
3- When screwing up the 'base' boards, try to screw 'most' into the joists; for strength
Can I screw in a concrete ceiling?
Looks nice, only using drywall screws and not looking for joists is kind of terrifying though..
Beautiful😍 if only I could do this to a rental and take it with me once I move again. 😂
So true!! 🤣
Excellent. Thank you. Only problem I am trying to figure out is who is going to hold the other end while I install it.
Thanks for watching Johnny! Yes definitely a two-person job! Follow along on IG @AmandaFallonHomes =)
Looks good! Not criticizing but just giving you a tip! 45 degree cut the wood to make it look seamless
Thanks so much! I definitely agree! Follow along on IG for more home projects: instagram.com/amandafallonhomes?igshid=OGQ5ZDc2ODk2ZA== ☺️
You can use rough cut cedar (very lightweight) on the three boards for the box beam. and use a nailgun to put them together Small holes in the wood Very easy to hide
You should miter or rabbet the edges for a more realistic look. Also, if you use 2x material for your joist cleat you’d have more to bite into.
Yes this is a great tip!
I liked that you were keep saying "beam", and then you wrote "not beam". Lol
Very nice job guys. 👏
I'm about to go ahead and do the same in my hallway ceiling. The problem is that is tooooooo long 🤦♀️
So glad you enjoyed it! I’m so excited for you!! Would love to see pics when you get your beams up! Follow along with my home projects on Instagram @AmandaFallonHomes ☺️
Brad nails would be harder to see. If you put the side boards on the inside, it will look like one solid piece! Looks great though!
Hi and thanks for watching! Wanted screws for better security since I didn’t want to use wood glue and decided it looked a little more seamless having the joint at the bottom rather than the side for this method. Follow along for more home projects on IG instagram.com/amandafallonhomes?igshid=OGQ5ZDc2ODk2ZA== ☺️
Nice work
Thanks so much! Follow along with my home projects on Instagram @AmandaFallonHomes ☺️
OMG this is gorgeous, you did a great job and explained everything with details and everything, thank you
Thank you so much!! ☺️
Would be interested in knowing cost for material, although today lumber is through the roof. I was just looking at faux beams and was kind of shocked at the price, with one 13’ “beam” costing anywhere from a few hundred to nearly a thousand bucks.
Thanks so much for watching. At the time, $200 for lumber, maybe $15 for stain, and $15 for screws. Tools already owned. 👍🏼 Would cost a little more today with all things considered.
@@AmandaFallonHomes - Thank you,, appreciate the response.
You’re so welcome! Thank you for watching! Follow along on IG @AmandaFallonHomes ☺️
What type of wood did you use it looks amazing
Thanks for watching! I used common hoard (pine). Follow along with my home projects on Instagram @AmandaFallonHomes ☺️
Nice work 👍
Thank you so much for watching! Follow along on IG @AmandaFallonHomes ☺️
Looks awesome!! I’m not seeing what type of wood you used or your stain mix. Can you please send that to me?
Thanks Lindsay! We used common board/pine. Exact wood is in the description as well as stain :)
love the paint color of walls! could ypu tell me brand & color name?
Thank you! My walls are Toasted White by Glidden in flat sheen. My accent walls are Oxford White by Benjamin Moore (also flat). Follow along on IG @AmandaFallonHomes =)
Why didn’t you just stack 4 boards on top of each other. Why make a complex box?
Hi there! A box is preferable; otherwise you would see 4 boards stacked together from side view. Hope that helps! Great! Follow along with my home projects on Instagram @AmandaFallonHomes ☺️
Looks really good, but you should have mitred the joins. Nicer finish.
Thanks for watching! Yes, agreed, mitering will always look best if one cares to take that step. Come follow along on IG @AmandaFallonHomes 😊
@@AmandaFallonHomes wasn’t a criticism, just a suggestion.
Room looks great.
I’m going to put some faux beams up in my house when I stop being lazy 😂
I’ll check the insta in the mean time
Great idea! We are working on adding one in our bedroom. Thanks
Awesome Johnny! I bet it will looks great. Adds so much character!
Check the video by DIY Dalia. She did a fantastic faux beam at her rental using cardboard boxes.
Beautiful! Great idea
Thank you Cherie! Follow along on IG @AmandaFallonHomes ☺️
'what we do...' ah.. who is we. THE MAN IS DOING EVERYTHING, SWEETIE
lol my husband just laughed out loud at this. My concept, my design, my measurements, my marks, my cuts, my sanding, my custom stain mix, my staining, and my husband will be the first to tell you he just helped me hold the boards and screw in the screws. I’m glad you stumbled upon my tutorial and I hope it is helpful to you. Would love to see your tutorial when it’s ready.
Why show the side seams. Run your wood through your table saw with a 45 on the edges. Glue screw and the round the edges a little with some sand paper. If you want something seamless. I also have a chain I whip my boards with. Gives a great distressed look.
GENIUS!!!
Thanks for watching! Follow along on IG @AmandaFallonHomes ☺️
Helpful video thank you! How deep is your tray ceiling ? And how tall is your ceiling from the top of the tray to the floor?
Would you be willing to tell me how much this cost? I want to do this through out my whole house
Beautiful Upgrade!!!
Thank you so much! ☺️
Excellent!
Thanks so much Justin! Follow along on IG @AmandaFallonHomes =)
Your amazing! Liked, shared and subscribed.
Thank you Marcos! Follow along on IG @AmandaFallonHomes =)
@@AmandaFallonHomes do you have a facebook account?
@@marcos22571 Yes sure do! Facebook.com/AmandaFallonHomes
@@AmandaFallonHomes OK, I started following you on facebook keep in touch for future business ventures. Here in Tucson, AZ we have alot of custom homes and it is a booming business.
This is a great idea👍🏼. Thanks for posting
Thanks so much! ☺️
Love this, it is stunning! thanks for sharing👍💕
Thank you so much!!
@@AmandaFallonHomes hi sis, umm my mom keeps making these comments, but i do appreciate your work lol
Really nice. Do you screw to the concrete ceiling?
Ok Amanda all done with cuts and stains on my wood.. What kind of screws did you use size please...thank you
Awesome! Tag me in your pics on Instagram @amandafallonhomes so I can see! I used trim head screws :)
Got it Gracias.. Will Do..👍
How tall should a should a ceiling be for proper look?
Hi there! I’ve seen others install very shallow beams with 8’ ceilings and it looks great. If you want chunky beams like these I would say 9’+. Thanks for watching! Come follow along on IG @AmandaFallonHomes 😊
If you use construction adhesive and screws for backing, it will never budge.
Yes! 👍🏼 Thank you so much for watching! Follow along on IG @AmandaFallonHomes ☺️
Good job
Thank you!
Thanks alote 😊
Amazing, do you prep termites or anything that could damage it
Thank you so much. No, just wood conditioner and stain on the pine :)
Amazing... What wood did you use...???
Thank you so much! It is pine :)
Looks great. Now just pray that an earthquake never hits your area and no one will die in there sleep!
Why not miter the edges? You can totally tell how they’re put together.
Love your rehab/flip show?
How much did you pay for the wood?
Awesome!!
thank you so much! :)
How high are your ceilings? Did it make your ceilings feel lower? We have 9ft ceilings and I'm afraid it might give us the feel that the ceilings are lower. I know they work good for 10ft and taller ceilings. 🤔
Our ceilings are 96” tall, and the recessed tray portion is 6” higher. You would definitely be fine with 10 ft. ceilings! Does not make ours look lower, actually makes it feel more grand. If you are worried you could use shallower side boards (use 1x4s instead of 1x6s). For a better look At the beams check out my Instagram @AmandaFallonHomes ☺️
I want to do it but I’m scared one will fall on my head
If you can be sure that your screws are hitting the ceiling joists you shouldn’t have any problem with the beams falling. Thank you so much for watching! Follow along on IG @AmandaFallonHomes ☺️
You said that the types of body uses in the description however I don’t see it could you please post it?
Hi there! We used common board/pine.
All Stores Please Lower the cost of all Military and Local for all Brands of High Beam Ceiling Products and Accessories and Production Cost Now That's too much $$' The Whole thing Now 🙏🙏🙏
How much do you think you spent on the project. We are thinking of doing same thing soon
Hello! $200 for lumber, maybe $15 for stain, and $15 for screws. Tools already owned 👍🏼 Thanks for watching!
Don't use drywall screws use those spring clip bolts tighten them down they never gonna fall
Love you!
🤗 thank you for watching!
No ceiling fan! How do you people sleep at night 😂. The beams look good tho 👍
LOL! Thanks so much!!
Its hard to film and record at the same time?
Yes! It’s hard to record and appear in the video at the same time. Thanks for watching!
What size of the board you use for the ceiling ....Thanks
Hi Klomar! Thanks for watching. Check the description box for all products used 👍🏼
What weight Dumbbells are those on the floor? 😜
💪🏼 💪🏼
Looks pretty but beams above your sleeping area is bad Feng shui.
Thanks for watching! Come follow along on IG @AmandaFallonHomes 😊
🤣 also is you pull faces in the wind your face will stick
Old wives tail
why is your video 480p?
What if my room is more than 10 feet wide
Create two beams to span the length of your room. Butt them up together. You will have a seam but it shouldn’t be too noticeable!
You can find boards larger than 10 ft.
What are the dimensions of the room?
Intro music blew out my eardrums. 😢
Should have mitered the joints
Yes, mitering always looks best if you care to take that step. Thank you so much for watching! Follow along on IG @AmandaFallonHomes ☺️
Looks complicated!
Thanks for watching! No, it's not too bad! You can do it. Think of it like a box! Follow along on IG @AmandaFallonHomes =)
4:00 lol or just measure
Looks good. However far from a professional job when it comes to how it was put together, how to attach beams to joists or use anchors and most importantly you don't want to just drive screws into the ceiling without knowing what's above. Looks good but certainly not the way to do it.
Pretty sure faux is pronounced "Fo" not "Fox"
@@Concordeagle of course. I’m saying “box beams”. They are a box construction.
How much did you spend on this project??
Hello! $200 for lumber, maybe $15 for stain, and $15 for screws. Tools already owned 👍🏼
It's pronounced "fow" not "fox". Nice tutorial!
Thanks for watching! LOL It also drives me crazy when people mispronounce the word “faux”. In this case I was actually saying “Box” Beams. Come follow along on IG @AmandaFallonHomes 😊
All that work and you didn’t miter the joints of the bottom of sides of the beam. What a waste and who would “not know” if you are attaching that to the ceiling joist. I hope you did or someone will have a bad day at some point in the future when that falls on their head
Wow your construction method is not great. Sorry.
Rude for no reason AT ALL. What was the point?
THINK before you speak. Was it true? helpful? Inspiring? Necessary? or Kind? Your comment violates the think before you speak rule. Not nice at all. You could have kept it smh.
@@clenox9500 Criticizing someone with no carpentry skill is not evil. Showing someone how to do something with bad method is evil. I said Sorry. But I am not sorry that someone is putting up content that is PISS POOR.
@@paulinesmith9723 Saving someone from using such poor carpentry methods was my thought. I did think before I spoke. This creator should have done some research before putting up such a bad example of finish carpentry. If someone did that level of carpentry in my home I would be very disappointed. If she was paid to do that work in your home you would feel the same way.
She says we but I think she means he
Hope you have climate control. Because jamming those beans in like that without room for expansion is a recipe for disaster when that wood expands due to humidity variations
Looks horrible. Looks like boards nailed together to make a really long box. Doesn't look like a beam at all.
It doesn't look that good