Thanks for making the video. I have the same valve and need to do some maintenance on mine this week before pool season starts. Forgot to get the Permatex. Need to put that on my list.
water was leaking below the lid, replaced the gasket . It doesn't leak as bad but now I have a leak on the top below the handle where the white o ring goes, I put in a new white o ring too.
Thank you for the plain, common sense language and demo unlike most videos on here. Is that a variable speed pump? We bought one to replace our old pump last year but haven’t installed yet.
I would recommend installing the variable speed pump ASAP. it is much friendlier on your wallet!!! My pump has been variable speed for the last 7 years.
How in the world were you able to get the old gasket out??? What should have been a simple fix is turning into a nightmare. I have only been able to remove pieces of the old gasket by brute force and still have the outside ring portion to remove. Help!
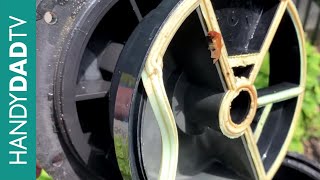
The way I got my gasket removed is to use a utility knife to cut down both sides of the old gasket groove first. Then with a long narrow screwdriver with the business end sharpened like a chisel, work it under the gasket, essentially cutting it away from the bottom of the groove. Use the utility knife to make an incision so that you can access the underside of the old gasket. Use a rocking motion to cut the old gasket away. Any residual gasket material may then be removed with the same sharpened screwdriver. This procedure still took me SIX HOURS on my hands and knees. Persistence is the key.
DON'T put oil where the knob dial seats. Oil is a dirt magnet. Wind carry dust and sooner that later it will act like sand paper. Your problem will even become worse. RV window track lubricant would be appropriate.
MrMurrstir he took time out of his day to make the video for people and put in all the necessary information. Then he took the time to upload the video for people to learn from. Now you want him to take more time out of his day to answer a question that is already in the video?
I just took off my gasket. Not a good idea to put adhesive on entire gasket. That is why the manufacturer only recommends to apply adhesive to corners. May be good now but you will pay for it next time...it's going to be real bitch to remove.remove.
The type two adhesive would only be slightly more difficult to remove when applying to the entire gasket, but would significantly reduce the chances of gasket separation.
I'll take your word for it. But I just took off the previous one, which was the original, and it was very difficult...took a while. Thanks for feedback.
what you failed to mention is that it takes 4 f*ing hours to remove the old gasket from the base because it’s glued in!! just buy a completely new valve assembly and you’ll save money. hayward devices are 💩


Thanks for not including useless music in your video!! Here to get tips on doing stuff, not for a dance party😊
The stuff that annoys me are not included in my own videos
Thank you for making a video! I use TH-cam a lot for around the house and I appreciate when people make videos to help others
No problem 😊
Thanks for making the video. I have the same valve and need to do some maintenance on mine this week before pool season starts. Forgot to get the Permatex. Need to put that on my list.
It makes a big difference.
Thanks for video!!! My valve can now be turned by little kid!! Huge difference! $25 fix
Glad it helped
nice instructional video for my same multiport valve by Hayward
Glad it helped
Great instructions and your correct on adhesive to all spider gasket bottom surface for best results. Years back I did not do it and it did not last.
Glad it helped
water was leaking below the lid, replaced the gasket . It doesn't leak as bad but now I have a leak on the top below the handle where the white o ring goes, I put in a new white o ring too.
Very informative. I have the same exact unit. Waiting for my gasket to arrive by amazon and will pop it in using the methods you outlined. Thanks!
The gasket repair makes a big difference.
Thank you from North Texas! I hope I get to find the parts , after this winter storm we had
all available online. Good luck to you.
Thanks for the video Sir. You just saved me $475. It was quoted by Pinch a Penny. God Bless you and your Family!!
Glad to hear it!
Great video! I may have the exact same problem. Do you happen to know the part number of the o-ring for this model?
Thank you. You made my mind up. Just ordered the gasket kit. Thank you
You're welcome.
Best diy on TH-cam
Thanks,.!
Do you drain the filter or shut off external valves to prevent pool or hot-tub water from coming back up into housing once you 'pop the top'?
I drain the filter, then the water level is lower than the housing.
Great video clear and CONCISE !!!
Thanks
You're welcome.
Thank you for the plain, common sense language and demo unlike most videos on here. Is that a variable speed pump? We bought one to replace our old pump last year but haven’t installed yet.
I would recommend installing the variable speed pump ASAP. it is much friendlier on your wallet!!! My pump has been variable speed for the last 7 years.
How in the world were you able to get the old gasket out??? What should have been a simple fix is turning into a nightmare. I have only been able to remove pieces of the old gasket by brute force and still have the outside ring portion to remove. Help!
I'm in the same boat... Argh!
The way I got my gasket removed is to use a utility knife to cut down both sides of the old gasket groove first. Then with a long narrow screwdriver with the business end sharpened like a chisel, work it under the gasket, essentially cutting it away from the bottom of the groove. Use the utility knife to make an incision so that you can access the underside of the old gasket. Use a rocking motion to cut the old gasket away. Any residual gasket material may then be removed with the same sharpened screwdriver. This procedure still took me SIX HOURS on my hands and knees. Persistence is the key.
How do i take out the pressure?
Great video and attention to detail.
Thank you.
DON'T put oil where the knob dial seats.
Oil is a dirt magnet. Wind carry dust and sooner that later it will act like sand paper. Your problem will even become worse. RV window track lubricant would be appropriate.
I use dry lube in a can it works great .
Mine was leaking only on Backwash in which I cannot believe because when I took it apart there was only half of a gasket. 😳
What type glue did ya use
Which glue are you referring to? The one I specifically mentioned in the video?
@@retrotechandelectronics Why can't you just answer the question instead of being a smart ass?
He says "RTV"
MrMurrstir he took time out of his day to make the video for people and put in all the necessary information. Then he took the time to upload the video for people to learn from. Now you want him to take more time out of his day to answer a question that is already in the video?
@@retrotechandelectronicsthought you said you changed from glue to permatex gasket former? Did I get that wrong?
I just took off my gasket. Not a good idea to put adhesive on entire gasket. That is why the manufacturer only recommends to apply adhesive to corners. May be good now but you will pay for it next time...it's going to be real bitch to remove.remove.
The type two adhesive would only be slightly more difficult to remove when applying to the entire gasket, but would significantly reduce the chances of gasket separation.
I'll take your word for it. But I just took off the previous one, which was the original, and it was very difficult...took a while. Thanks for feedback.
Could this be the reason my filter blows de back into the pool?
No, thats due to holes in the internal elements.
I checked and replaced grids. Manifold is not cracked either. Who knows.
Yes. Mine failed so that backwashing went back into the pool.
Thanks for the video, very helpful!
what you failed to mention is that it takes 4 f*ing hours to remove the old gasket from the base because it’s glued in!! just buy a completely new valve assembly and you’ll save money. hayward devices are 💩
After an hour of struggling to remove the old gasket, I am thinking of ordering a complete new assembly.
laughs dude .. at 7:53 its still leaking... hahahah .. but it was a very informative video .. thanks
uuuhm ok.