Photoshop Ai Masking Trick! IMPOSSIBLE Selections Made Easy

ฝัง
- เผยแพร่เมื่อ 22 พ.ค. 2024
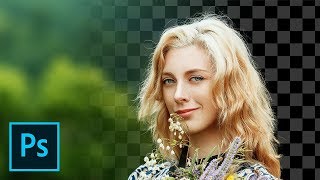
- ►Download AI Skin Fix Action (free):photoshopdesire.com/ai-skin-f... In this tutorial, I'll show you how to cut out subjects from backgrounds using Photoshop AI. Extracting subjects from busy backgrounds, especially with difficult hair, can be challenging. Traditional methods like select and mask often result in rough edges and halo effects when placing the subject against different backgrounds.
To simplify the process, enable the contextual taskbar in Photoshop AI. Select "Remove Background" from the taskbar to automatically mask the subject and remove the background. Create a Solid Color adjustment layer using a 50% grey color. Place the Color Fill layer beneath Layer 0 and zoom in to inspect the masked edges.
To fix rough edges and missing hair parts, enable quick mask mode. Double-click on quick mask to open its options dialog and select "Selected Areas." Make Layer 0 active, enter quick mask mode, and use a soft-edge brush to paint on the areas that need fixing. Switch to the black color to make selections. Turn off Quick Mask and click on Generative Fill to fill the selected areas.
Inspect the three generative fill options and choose the one that closely resembles the original hair. Repeat this process for other areas, always using quick mask mode and Generative Fill.
Once all the fixes are done, there is a drawback to consider. When changing the background color, the AI-generated content will have a grey background instead of transparency. That's why we added a 50% grey background at the beginning of the tutorial. You can easily remove it using select and mask, avoiding halo and fringing issues associated with black or white backgrounds.
Group the layers and create a visible stamp copy. Go to the Select menu, choose "Select and Mask," refine the hair, and set the output to "new layer with layer mask."
To change the background color or save the image as a transparent .png file, hide the group and make the desired adjustments.
That's it! By utilizing Photoshop Beta's Generative Fill, you can effectively mask out subjects from challenging backgrounds and enhance your photo editing. Remember to subscribe for more Photoshop tips and tricks. Like, share, and comment if you found this helpful. Take care and happy editing!
►SUBSCRIBE: goo.gl/d31fld
►Join this channel to get access to perks:
/ @psdesireyt
►Download Free: photoshopdesire.com
Follow US - LET'S BE FRIENDS!
------------------------------------------
►Official Website: www.photoshopdesire.com
►FACEBOOK : / photoshopdesire
►GOOGLE+ : plus.google.com/+photoshopdes...
►Twitter : / psdesire
►Instagram: / photoshopdesire
#photoshop #cutoutsubject #photoshopai - แนวปฏิบัติและการใช้ชีวิต


![[UNCUT] ฝันรักห้วงนิทรา | EP.3 (1/4)](http://i.ytimg.com/vi/zVXAFD1OLZg/mqdefault.jpg)


Beyond brilliant!! What a time saver! The results are excellent! Thank you!
I just discovered your channel and have become an immediate fan! This technique is as fantastic as your tutorial explaining it! It is the most accurate one I've seen thus far, and it's not just for hair.
The G.O.A.T! !!! The best ever! God bless you Good Young men!!!!
This is AMAZING. You just saved me HOURS of my life. THANK YOU!
This is just brilliant use of the AI. Thanks for the great video ❤
Glad it was helpful!
Brilliant!
Gracias! Al segundo intento funcionó.
Your pace is excellent. I am grateful for your clear explanations, thank you!
Many thanks!
Excellent, excellent tutorial!
Note: Generative fill is only available in PS Beta for the moment. But a good usage of it !
Excellent
This video is great, Thank you! ❤ Please make a video that separates white background (like foggy sky) with white hair.Good luck.❤
Your tutorials are the best, thank-you you have helped me enormously
Happy to hear that!
Excellent tutorial. Hacking Ai. Good work. Keep it up
Great tutorial, please keep up the good work. many thanx
Thanks, will do!
Genius!
Great job. Very useful thanks.
Thanks for watching!
what version yours photoshop??? mine is 2015 and dont have this stuffs
Hi, one question so far... the gen fill is grayed out and it says I must change the image mode to RGB, Lab or CMYK, and grayscale is not supported at this time. I have the latest version of Adobe, so I don't understand this part. Also, after I removed bg and then clicked on quick mask, the quick mask icon shows up in the masked Layer 0. That does not happen in your explanation. Can you please explain more? I don't see it in your printed tutorial. Thanks
When I select the hair with red, after pressing quick mask button, at me entire photo is selected. Beside that, due to your very strong accent, often I just do not understaand clearly what are you saying. Maybe it's possible to write on the screen what you say.
Thanks for this. Will you be making action for that?
Yes, soon. But it little complicated.
Brother without long in or crack ai Photoshop no coming?
Same question for me😢
Puedes compartir la imagen por favor? Gracias
download image from here www.patreon.com/posts/photoshop-ai-86382629
@@psdesireYT gracias
Not much quick or easy about this.