How to Use 5 Volt Relay Modules with Arduino and ESP8266

ฝัง
- เผยแพร่เมื่อ 22 ม.ค. 2019
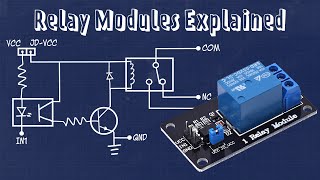
- Taking a look at an opto isolated relay module and examining how it works:
-what does the control circuit look like?
-what is the rating on the relays, what voltages are required to use it?
-how can we use it with a PCF8574 gpio expander to use up to 8 relays per expander from the I2C bus if we don't have enough pins?
-can we run it at both 5V and 3.3V for modules that only support 3.3V? (both direct control and through the PCF8574)
-how simple is it to use a PCF8574 Arduino library to control the relays and read in buttons with the gpio expander?
-gotcha: making sure the relay module is properly configured for isolation if that is a desired use case. Just having opto isolators on board isn't all that's required
8 channel relay module Amazon affiliate link:
Amazon.com: amzn.to/2ldR8LB
Amazon.ca: amzn.to/2ldSEgL
Sketch and Schematic:
github.com/GadgetReboot/Ardui...
Datasheets:
www.ti.com/lit/ds/symlink/pcf8...
www.espressif.com/sites/defau...
Fritzing part for 4 relay module:
timgolisch.wordpress.com/2015...
Support the channel by using these affiliate links to check out Banggood's sale on Tools & Electronics this month (2021 4.07 - 4.18) :
Banggood hot brand tools bit.ly/3dSyO2l
Electronic Brand Sale bit.ly/2PHpeau
Creality 7th Anniversary Sale bit.ly/3d0fLUi
Note: If you make a purchase through my affiliate links, I will earn a small commission which helps the channel but doesn’t cost you anything extra.
Support me on Patreon: / gadgetreboot
#ElectronicsCreators - วิทยาศาสตร์และเทคโนโลยี


Just found your channel. Enjoying the vids very much. Thanks for you ongoing efforts.
Interesting experiment. A bit advanced for my level, but I managed to learn a couple of new helpful things. And congratulations on reaching 1000 subs. From what I've seen on other "young" channels, as you continue posting quality videos, this number can grow pretty fast in the upcoming year.
Thanks! The video was a bit of a struggle more than I thought it would be as well on my end so I think it’s time to try something a little simpler. Maybe I’ll get that temperature humidity sensor going soon.
@@GadgetReboot Great ! Looking forward to see it.
Cool experiment.
And congratulations on making 1K subscribers.
Next goal, 100k play button. Maybe I better set some more realistic expectations first. I have to place a lot more eBay orders between now and then.
@@GadgetReboot I hate to encourage, but maybe you should conciser a commercial? Big Clive says it's needed and it's the only reason FranLab doesn't have more because she doesn't. Supposedly TH-cam doesn't suggest you to non-subs if you don't.
I really don't know how that works, but everyone else comments about it on their channel.
Monetization , yes now that I reached 1000 subscribers I have been automatically put in the queue to have the channel reviewed to be monetized so it estimates currently it might take up to one month so then there will be ads. I’ve noticed a lot more subscriber growth in the past two months so I’m not sure how that started taking off but hopefully it keeps going.
@@GadgetRebootIve tried to plug you on the comments of other channels, but I dont know how many people read that.
Good luck, and please keep at it - your videos are great.
@@GadgetReboot In my experience, you should take that 1 month estimate with a few grains of salt... They can take far longer for random (and unexplained) reasons.
I subscribed at the same time he said "Woa I got a new subcriber". That timing was freaky ;)
This is what I needed today Sir, thank you! I subscribed and hit the bell.
Glad I could help!
@@GadgetReboot sir, does 250 VAC and 10 amps mean that a single relay can handle load upto 2500 watts ?
Thank you. I have a 2-relay version of that that I want to use with an ESP8266. I'm measuring battery capacity and want to be able to turn off the load before the cells get over-discharged.
Another good one ;-)
Good day sir. I have a question, with nodemcu and 2 pcf8574 connected, is it possible to control 8 relays by 8 push buttons independently?
Nice work! A question for you. I'm total beginner when it comes to "C" type of coding. I'm and automation contractor so a few years ago I thought it would be a good idea to at least start learning how to code in C. I figured I would try and automate a terrarium. I bought an arduino, MCP23008 (I2c 8 Channel relay board), I2c humidity/temp sensors, I2c water level sensors and a 2.8" lcd touchscreen. I'm slowly getting graphics drawn on the touch screen. I chose all I2c devices because the touchscreen is a shield and the sda and scl is all my remaining pins. Is my design poor? Will I eventually get to a point where my hardware won't work? Why didn't you buy the relay board in a I2c version?
It sounds like I2C would be sufficient for all of that because they are all slow communicating devices. If you have 5 or 10 sensors on the same bus including relays that only need to be read or activated in the macroscopic timeframe, everything should be able to run adequately and getting the most out of the available limited resources is always good design practice as long as it’s implemented within the normal constraints for example if there’s a maximum number of devices allowed on a bus or a certain maximum cable length for signal integrity.
If you had something else on the I2C bus that needed more frequent access like trying to generate an output waveform with a DAC, that’s where limitations might be exploited and it would’ve been better to use SPI or even just 8 bit parallel data to get things running smoothly.
I chose the discrete relay board for no particular reason but mostly I had in mind that I might want to try building some sort of PLC device and that’s why I got eight relays to start instead of a board with 1, 2 or 4. Although I am waiting for a shipment of a smaller relay board with 2 on it. It’s a little more practical when I just want to control one thing.
So I2C would’ve been probably more efficient and perfectly suitable to control eight relays but I was imagining some sort of big circuit with all kinds of separate logic gates or transistors turning them on rather than having a tighter package.
Useful video 👍
good video.
I am asking for help the expander gives high state 5v but when I connect the diode, the voltage drops on 2v what to do?
Are you using one of these relay boards or is it your own component project with an LED connecting to the expander separately? Two things immediately would come to mind.
If you connect an LED directly from the expander without a resistor, the LED will regulate the voltage around its own forward voltage so a red LED might be around 2 V. But if you have an LED and a resistor on the output, it should not drag it down.
Also, the expander is intended to really only drive an output low rather than an output hghi, so whatever is connected to the expander output should ultimately go to VCC.
For example an LED and resistor up to VCC and then to the expander output so the expander can connect it to ground. If you try the other scenario where you have an LED and resistor connected to ground and then you have it on the expander and intend to drive it high to turn it on, that’s more current than the expander can do so that would also drag the voltage down and not work.
The expander just has weak internal pull-ups with no high output drive capability, just a sink current drive capability.
@@GadgetReboot oh wow
thank you very much for the explanation I dealt with it maybe a little funny but I used a transistor that drives just an Expander
Is it usual design for the relays to power on when set to low? I have some devices that are powered with this module and I have to put the circuits on NC to function properly, but that leaves the devices on for a few seconds before the Arduino can give power to the module and if the microcontroller is turned off, which is problematic. Any tips?
I don't know if it's a standard outside of these modules to have active low control on industrial setups or if it's arbitrary, but if the action needs to be changed so that the relay is engaged when there is no Arduino controlling it (so there is a low already on the control input and then Arduino can come online and set it high to turn it back off if it wants or keep it low if that's desired), then maybe a simple transistor NPN switch can be added to the relay control input like this first NPN circuit: learn.sparkfun.com/tutorials/transistors/applications-i-switches
The LED and 100 ohm resistor going to 5v are basically what's already on the relay board so the transistor collector just goes to the relay control input directly, the emitter goes straight to ground as shown, then the base 1K with the control label is where Arduino would connect. Now add another pull up resistor from that 1K "control" side to the same 5V that's powering the relay, maybe between 1K and 10K, so there will be both an arduino output and a resistor to 5V going to the transistor Control.
Now if there is no Arduino controlling the transistor, the pull up resistor turns on the transistor and brings the relay control pin to ground as soon as possible when power is applied and the Arduino can over-ride it later.
@@GadgetReboot Everything seems to be acting in reverse to how your module is working even though its the same one, when I power the module all the lights blink up by default and I have to connect electrical devices in normally closed for them to not run by default.
Subbed for the knowledge, keep it up!
@@mariusnorheim1697 I wonder if there's different designs of the module that work with the backwards logic. I have 3 or 4 different ones that all operate the same. But the other solution is maybe one of those hex inverter logic chips like 74HC4049
assets.nexperia.com/documents/data-sheet/74HC4049.pdf
So putting an inverter in line with each relay control input, then the inverter input goes to an Arduino control output, and also a pull up resistor to 5V so that it forces the relay into the opposite mode on power up with the resistors and inverters, and Arduino can then take over later.
I have this module and despite connecting it correctly, I can "get" only 0,08mA from each pin to drive relay. That is far too less I wante and relay needs 5mA. This module cannot sink/source such amount of current, right ? What would you recommend to "give my relay" 40mA in total ? I activate my relays with high (3/5v).
The current at the control input for the relay isn’t the same current that the relay is actually getting on its coil, the input is just driving the optocoupler LED so you should measure the current powering the relay coils
Most demonstrations of solenoids I see here on TH-cam (as driven by an
Arduino) show only a pulse, not a sustained press or activation of the
solenoid. These are my questions: Can you send power to a solenoid for a sustained period, or does it have to be a pulse? I have a project in mind that will involve hooking up about 30 solenoids and they have to be able to pull for a few seconds at a time, in some cases.
It's to play a saxophone. I want to remove the keys from a saxophone and have little solenoids, one for each open tone-hole on the saxophone, and control them from an Arduino.
I'm a bit concerned about the smallest solenoids I can find being strong enough to operate the closing of the pad. I could design them to be light with light spring tension, but the solenoid would have to be strong enough to hold the key closed under spring tension and any combination of them at any time should be able to be controlled for any sustained amount of time. Will this be noisy? What is the smallest number and size relays that will do the trick? Can I supply enough power with a reasonably sized rechargeable battery? Everything needs to be fixed to the bell and body tube of the saxophone. Also, can the relays be modified to not make any sound?
It depends on the solenoid. The solenoid I just replaced on my dishwasher is engaged for many minutes at a time. If you want no noise, you may want to use transistors. There are solid state relays but I believe they are typically AC only.
Thank
With the relays being turned on when the signal goes low is there any chance of the relays turning on when the arduino is not powered up and active.
With the opto-coupler driving the relay, the LED in it needs to be powered to turn on the relay, so if there's no power on the Arduino controller outputting a definite high or low, the LED is off and relay is off. Then when arduino is powered up, initially its outputs are floating (still nothing driving the LED), and software should properly configure the lines to avoid unintended power-on
Go go gadget!!!
That video took a long time to make including some re-filming here and there and lots of editing. I think it’s time for a mail bag next.
@@GadgetReboot - you did a great job regardless. Congratulations, you are about to hit 1k!
edit: Congratulations on 1K - I was going by the subscriber counter in the video!
Thanks!
The counter actually hit 1000 during the yet to be released mailbag coming soon.
#MYYTC for the win!
I told you your counter would put you over 1,000
Maybe if I build more counters I will grow faster
What I do find very confusing is the GND pin being in the row of inputs instead of on the "relay power jumper" side. Because, once the jumper is removed, has no connection to the input side... And doesn't need to because that would break the isolation an thus making the opto useless.
I think it’s awkwardly laid out as well and misleading. It’s also misleading that the jumper can go in two positions and if you put it in the isolated position instead of totally removing it you would be shorting VCC to ground. It should just be a two pin jumper on its own to bridge the +power and another two pins for the isolated relay VCC and ground.
Hi Sir please helping i2c program Sir please
My brain hurts
In real-world, solenoid relay's power build-up and release (thousands of watt) will be causing it to restart your arduino..