Wow thats amazing, i like Texturelabs tutorial and recently buy Affinity Photo to switch to it in the future, this tutorial very helpful to me to transfer Photoshop workflow to Affinity Photo, need more of it so i can only use Affinity software for all design works
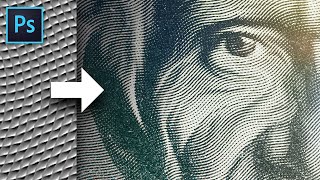
I'm trying to find the same or similar 'Displacement images' that you use in this tutorial, which are shown around minute 5:43. can you tell me… is there a site where I can get them or do you have a download for them. Thank you for any help given.
I think i just did a google (image) search on wavey displacement map and used a random one. For example: www.filterforge.com/filters/7063-bump.html I'll check my archive if i can find the source file used and share this image in the description. Here is a list of links which might be useful www.sketchuptextureclub.com texturehaven.com cc0textures.com www.cgbookcase.com texturelib.com www.wildtextures.com www.sharetextures.com freepbr.com www.textures.com downloadtexture.com texturify.com www.textureking.com free-3dtextureshd.com
Seriously it’s time to have a engraving filter built into this program already. There just so many missing filters not available to make it easier to work faster. Anyhow a great tutorial nonetheless
Many thanks for sharing this amazing technique, especially because you do it for Affinity Photo. I am looking for your technique to solve "Why PNG Files Opens With Background in Photoshop" in Affinity Photo version.
Thank you. If you have a PNG with a background means that the PNG file you downloaded is not transparent :) You probably will need to select the content and remove the background. Let me know if you want a tutorial how to make it transparent.
@@Graphicalfinity Many thanks for sharing the video about it. It is a transparent image like what is shown on Photoshop discussion with the title "Why PNG Files Opens With Background in Photoshop and How To Solve It!" But it is a Photoshop version, and not the Affinity Photo version. Again thanks so much for sharing the Affinity Photo version about this topic.
When I copied the equation formula it displayed in red when pasted into the box and when I applied it nothing happened. To work around this I pasted it into notepad first and then recopied that and pasted it into the x parameter which works.
Nice one ! There was also a Spoongraphics video for this effect, with a slightly different approach, if i remember correctly. By the way, the Displace filter is currently broken in Affinity Photo and not 100% doing what its supposed to do. The developers know about this. No idea when it will be fixed. Perhaps as an alternative, one could use Liquify or a GMIC filter, like Deformations -> Random.


Thank you so much indeed...! Most concise and overall precise...!
Thank you!
Most advanced Affinity techniques on YT. A pleasure to learn from you.
Wow, thanks!
Wow thats amazing, i like Texturelabs tutorial and recently buy Affinity Photo to switch to it in the future, this tutorial very helpful to me to transfer Photoshop workflow to Affinity Photo, need more of it so i can only use Affinity software for all design works
You're very welcome! If you have any suggestion for videos, please don't hesitate to share them.
This is by far the best tutorial that I've found on how to achieve this effect. Thanks!
Wow, thanks!
I'm trying to find the same or similar 'Displacement images' that you use in this tutorial, which are shown around minute 5:43. can you tell me… is there a site where I can get them or do you have a download for them. Thank you for any help given.
I think i just did a google (image) search on wavey displacement map and used a random one. For example: www.filterforge.com/filters/7063-bump.html
I'll check my archive if i can find the source file used and share this image in the description.
Here is a list of links which might be useful
www.sketchuptextureclub.com
texturehaven.com
cc0textures.com
www.cgbookcase.com
texturelib.com
www.wildtextures.com
www.sharetextures.com
freepbr.com
www.textures.com
downloadtexture.com
texturify.com
www.textureking.com
free-3dtextureshd.com
@@Graphicalfinity Much'O thanks for this and everything you do.👏
I always learn something new. Thanks so much.
You are so welcome!
Thanks for sharing. Great workflow!
Many thanks!
Whaouuu !!! ... Excellent ! ... Thank's
Thank you too!
great video and workflow, I just got affinity and trying to learn to replace photoshop $$$$. thank you so much
Welcome to the -$$$$ club :) Thank you.
Very good tutorial. Thx for the formula.
You're welcome! Thank you too.
Great video again! Thank you so much.
My pleasure!
Many thanks!
You're welcome!
Excellent especially the on purpose boo boo before rasterizing the pattern, this will stick with me :)
Great to hear! Thank you.
Very good, thank you
Thank you too!
Amazing❤️
Seriously it’s time to have a engraving filter built into this program already. There just so many missing filters not available to make it easier to work faster. Anyhow a great tutorial nonetheless
Totally agree.. Affinity is missing a lot of filters and it would be easy for them to add them i guess, as the basis is there already. Thank you!
Many thanks for sharing this amazing technique, especially because you do it for Affinity Photo. I am looking for your technique to solve "Why PNG Files Opens With Background in Photoshop" in Affinity Photo version.
Thank you. If you have a PNG with a background means that the PNG file you downloaded is not transparent :) You probably will need to select the content and remove the background. Let me know if you want a tutorial how to make it transparent.
@@Graphicalfinity Many thanks for sharing the video about it. It is a transparent image like what is shown on Photoshop discussion with the title "Why PNG Files Opens With Background in Photoshop and How To Solve It!" But it is a Photoshop version, and not the Affinity Photo version. Again thanks so much for sharing the Affinity Photo version about this topic.
Amazing.
Thank you!
When I copied the equation formula it displayed in red when pasted into the box and when I applied it nothing happened. To work around this I pasted it into notepad first and then recopied that and pasted it into the x parameter which works.
Thank you for sharing!
Nice one ! There was also a Spoongraphics video for this effect, with a slightly different approach, if i remember correctly.
By the way, the Displace filter is currently broken in Affinity Photo and not 100% doing what its supposed to do. The developers know about this. No idea when it will be fixed.
Perhaps as an alternative, one could use Liquify or a GMIC filter, like Deformations -> Random.
Cool, thanks! Indeed the Displacement is behaving very weird :)
@@Graphicalfinity I tried to link to the thread where i made the bug report, but YT doesnt let me :(
@@Espermaschine :) No worries..